- Install Windows on your older Mac using Boot Camp
- What you need
- Before you begin
- Perform the installation
- Step 1: Check for software updates
- Step 2: Prepare your Mac for Windows
- Step 3: Install Windows
- Step 4: Install Boot Camp on Windows
- Установка Windows 10 на Mac (на старые iMac, Macbook, Mac mini).
- 9 комментариев к “Установка Windows 10 на Mac (на старые iMac, Macbook, Mac mini).”
- How to install Windows on Mac
- How can I install Windows 10 on iMac using Boot Camp?
- How do I install Windows 10 on iMac using VirtualBox?
- Frequently Asked Questions
- Can you install windows on a mac?
- How to install windows 7 on mac?
- What os x utility allows you to install and run windows on a mac computer?
- Как можно тремя способами установить Windows на Mac
- Подготовка и установка Bootcamp
- Установка Windows через Bootcamp с помощью флешки
- Установка Windows на Mac и iMac через Parallels Desktop
- Устанавливаем Windows с помощью VirtualBox
- Видео по теме
Install Windows on your older Mac using Boot Camp
You can use Boot Camp Assistant to install Windows 10 on your Intel-based Mac.
You need an external USB drive to install Windows on older Mac computers. To find out whether you have a Mac that requires an external USB drive, see the “Learn more” section in the Apple Support article Install Windows 10 on your Mac with Boot Camp Assistant. If your Mac is a newer model that doesn’t require a USB drive, follow the instructions in Install Windows on your newer Mac using Boot Camp instead.
What you need
The keyboard and mouse or trackpad that came with your Mac. (If they aren’t available, use a USB keyboard and mouse.)
A blank 16 GB or larger external USB 2 flash drive, formatted as MS-DOS (FAT).
To format an external USB drive as MS-DOS (FAT), use Disk Utility, located in /Applications/Utilities. In Disk Utility, choose View > Show All Devices, select the USB drive in the sidebar, then click Erase in the toolbar. In the dialog, enter a name for the drive, choose MS-DOS (FAT) from the Format pop-up menu, choose Master Boot Record from the Scheme pop-up menu, then click Erase.
A full-installation, 64-bit version of Windows 10 on a disk image (ISO file) or other installation media.
Sufficient free storage space on your startup drive. For information about the amount of free space needed, see the Apple Support Article Install Windows 10 on your Mac with Boot Camp Assistant.
Before you begin
Before you install Windows, make sure you back up important files.
You can use Time Machine or any other method to back up your files. For information about backing up files, see Back up your files with Time Machine and Ways to back up or protect your files.
Perform the installation
Do the following steps in order.
Step 1: Check for software updates
Before you install Windows, install all macOS updates.
On your Mac, log in as an administrator, quit all open apps, then log out any other users.
Choose Apple menu  > System Preferences, click Software Update, then install all available updates.
If your Mac restarts after installing an update, open Software Update again to install any additional updates.
Step 2: Prepare your Mac for Windows
Boot Camp Assistant prepares your Mac by creating a new partition for Windows named BOOTCAMP and downloading the Boot Camp support software.
Important: If you’re using a Mac notebook computer, connect it to a power source before continuing.
Connect an external USB drive or insert a flash drive into the USB port on your Mac; keep it connected or inserted while you install Windows and the Windows support software.
On your Mac, open Boot Camp Assistant  , located in /Applications/Utilities.
At the introduction screen, click Continue.
The system is checked for total available disk space. Older Time Machine snapshots and cached iCloud files are removed to make space for Boot Camp. This process may take a long time to complete (you can click the Stop button to skip this process).
At the Select Tasks step, select all the tasks, then click Continue.
At the Create Bootable USB Drive for Windows Installation step, choose the Windows ISO image and the USB drive, then click Continue.
The Windows files are copied to the USB drive. This process may take a long time to complete (you can click the Stop button to interrupt this process).
At the Create a Partition for Windows step, specify a partition size by dragging the divider between the macOS and Windows partitions. If you have multiple internal hard drives, you can select a different hard drive from the one running macOS and create a single partition on that drive to use solely for Windows.
Important: You can’t resize the partition later.
When this step is complete, the Windows installer starts.
Step 3: Install Windows
In the Windows installer, follow the onscreen instructions.
When you’re asked where to install Windows, select the BOOTCAMP partition (you may need to scroll through the list of partitions to see it), then click Next.
WARNING: Do not create or delete a partition, or select any other partition. Doing so may delete the entire contents of your macOS partition.
Continue following the onscreen instructions to finish installing Windows.
After you install the Windows software, your Mac automatically restarts using Windows.
Follow the onscreen instructions to set up Windows.
Step 4: Install Boot Camp on Windows
After installing Windows, Boot Camp drivers that support your Mac hardware start installing.
Note: If the support software doesn’t install automatically, you need to install it manually. For instructions, see the Apple Support article If the Boot Camp installer doesn’t open after using Boot Camp Assistant.
In the Boot Camp installer in Windows, follow the onscreen instructions.
Important: Do not click the Cancel button in any of the installer dialogs.
If a message appears that says the software you’re installing has not passed Windows Logo testing, click Continue Anyway.
You don’t need to respond to installer dialogs that appear only briefly during installation, but if a dialog asks you to install device software, click Install.
If nothing appears to be happening, there may be a hidden window that you must respond to. Look behind open windows.
When the installation is complete, click Finish, then click Yes to restart your Mac.
After your Mac restarts, follow the instructions for any other installers that appear.
Установка Windows 10 на Mac (на старые iMac, Macbook, Mac mini).
Все подробности можно увидеть в видео!
Возможно видео будет полезно тем кто ищет информацию по темам:
- Windows 10 на старых моделях Mac – Как установить Windows 10 на ваш Mac
- Почему не ставится Windows на MacBook
- Проблемы при установке Windows на MAC
9 комментариев к “Установка Windows 10 на Mac (на старые iMac, Macbook, Mac mini).”
4:29 (время видео) – загрузка с искусственно созданного раздела с любой версией виндовс не идёт. Само содержимое на этом разделе находится, но диск НЕ загружаемый. iMac (27-inch, Late 2013), Версия системы: macOS 10.13.4 (17E199). Пробовал этот метод уже давно и на iMac (21,5-inch, Late 2009) и ничего путного не получилось. И там стоял внутренний винт SSD(250ГБ) и вторым внутренним винт на 2ТБ. Ни на SSD, ни на второй винда не вставала.
Кому нужна виндовс 10х 64 переделаная под установку под на мак про 1.1-2.1 пишите mic.ivanov2017@gmail.c…
мне нужна винда на мак про 1.1 с которой можно загрузится на систему мак независимо от начальной загрузки.Посколько видеокарта не родная и при загрузке черный экран вместо выбора с чего грузится.
Вот образ виндовс 10 64бит мной переделаный под загрузчик ефи 32 на старых mac pro1.1 imac mac ссылка на скачивания разорвана —– убираем пробелы и скачиваем https—–://pinapfile.—–com/download/54d8424eefefd809ef0f4c9d62a88e77.—–html
У кого нибудь при установке на iMac 27 Late 2011 возникала ошибка IGDKMD64.SYS ?Если да, поделитесь способом исправить. Поставил вин 10 на доп ссд, через флешку.
How to install Windows on Mac

- There are two ways how can install windows on external hard drive SSD/HDD for Mac, you can use Boot Camp or you can use a virtual machine . If you decide to use Boot Camp you can create a separate partition just for Windows 10, and you can boot your iMac directly into Windows 10.
- Using Boot Camp also has some benefits such as improved performance because it uses the full hardware power of your iMac .
- Do you want to be up to date with the latest news and tips about Windows 10? Then go straight to our Windows 10 category.
- It’s never late to learn some new things about everything connected to your software and devices. Our Tech Tutorials Hub is the perfect place to start that.

Windows 10 is here as a free upgrade for many PC users, but what if you’re a Mac user? If you are Mac user and you want to run Windows 10 on iMac, today we’re going to show you two ways how can you do that.  There are two ways how can you run Windows 10 on iMac, you can use Boot Camp or you can use a virtual machine. If you decide to use Boot Camp you can create separate partition just for Windows 10, and you can boot your iMac directly into Windows 10.
Using Boot Camp also has some benefits such as improved performance because it uses the full hardware power of your iMac.
Before we start, you should know that most Macs from late 2012 can run Windows 10, but make sure that your computer is on the list here. Our previous guide was referring to the preview version of Windows 10 and not the final one.
How can I install Windows 10 on iMac using Boot Camp?
Firstly you need to download the 64-bit version of Windows 10 Disc Image from here. Next, you’ll need a 16GB or more USB flash drive to add Windows 10 installer to it. Great thing is that Boot Camp is now updated and it supports Windows 10 on 64-bit iMacs, but make sure that you check for all available updates.
Also, make sure that you have at least 30GB of free space on your hard drive.
If you have Windows 10 ISO downloaded open the Boot Camp Assistant and check Create a Windows 10 install disk, and Install Windows 10. Connect your USB drive and select Windows 10 .iso file.
Now Boot Camp will transfer Windows 10 install to your USB along with some of its drivers. This process might take some time, so you’ll need to be patient.
This is crucial, you need to partition your hard drive since one partition will be used to run Windows 10, while others will run Mac OS. Like we said earlier 30GB or more should be enough for Windows 10. When you have this completed you can click Install and Windows 10 installation will start.
During the installation process, your Windows might restart a few times, and you might have to wait on We’re getting our apps ready screen for 10 on more minutes.
After all of this is finished your computer will reboot into Windows 10, but if it doesn’t you can hold Option / Alt key and choose which operating system you want to run Mac OS or Windows 10. Enter your product key and select Windows Boot Camp partition to install Windows on.
Follow the installation and you should boot into Windows 10 when you’re finished.
In the end, you need to locate Boot Camp drivers that are on your USB stick and install them.
How do I install Windows 10 on iMac using VirtualBox?
Another way of installing Windows 10 on your iMac is by using virtual machine. There are all sorts of solutions available, but we’ll show you how to install it using a freeware tool called VirtualBox.
Before we start make sure that you have downloaded VirtualBox and Windows 10 ISO.
- Press the New button in the VirtualBox toolbar and name your virtual machine, for example, Windows 10, and in the Type field select Microsoft Windows. Then click Continue.
- As you may know, virtual machine software runs with your OS, so it needs to borrow some of your computer’s resources.
- Select the amount of memory that you want to assign to the virtual machine, for example, 2GB or more, and then click Continue.
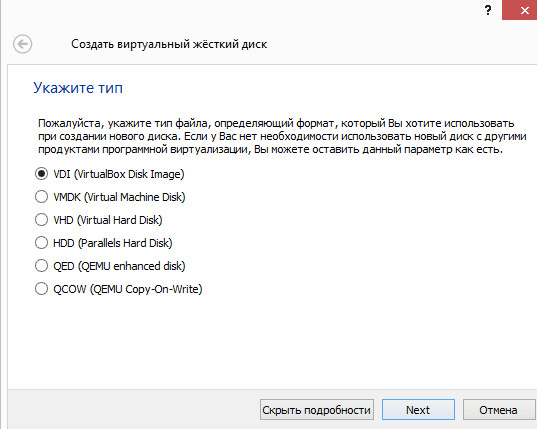
- Now, you’ll be asked to assign hard drive space to your virtual machine. The recommended amount of hard drive space is usually enough. Choose Create a virtual hard disk now and click Create. You’ll be asked what kind of drive you want to create, and VDI is usually the best option.
- Next screen will ask you if you wish to dynamically assign memory when needed or do you wish to assign all of it right away. Usually the better option is to choose Dynamically allocated.
- You have now created your virtual machine. Now just press Start to start it.
- Next find your Windows 10 ISO file.
- Follow the instructions and complete the installation.
That’s all, now you know how to install Windows 10 on iMac with both Boot Camp and using Virtual Box.
Frequently Asked Questions
Can you install windows on a mac?
Yes, you can, and the best tool you can do that with is Boot Camp. You can also use a virtual machine like VirtualBox.
How to install windows 7 on mac?
Open Finder and go to Applications > Utilities and double click on Boot Camp Assistant. Next, set the partition size for Windows. After you create the partition, you will see the BOOTCAMP icon on your desktop. Next, insert your Windows 7 DVD and click on Start installation. When you are prompted, select the Bootcamp partition to install Windows.
What os x utility allows you to install and run windows on a mac computer?
The best way to running Windows on a Mac is by using the Boot Camp tool. However, you will not be able to run both systems at the same time. You will have to switch from one to another. If you want to run both of them at the same time you will have to use virtualization software like VirtualBox.
Как можно тремя способами установить Windows на Mac
Компьютеры всем известной компании Apple весьма многофункциональны и имеют широкий выбор специально разработанного программного обеспечения. Но иногда бывает, что пользователь Mac или iMac желает установить уже столь привычную для себя операционную систему Windows. Иногда OS Windows может понадобиться для установки некоторых программ, чтобы можно было играть в любимые игры, а подходящей альтернативы под Мак нет.
Установить OS возможно самостоятельно. Сделать это можно несколькими методами, например, через утилиту или с помощью флешки. Рассмотрим на примере приложений, от компании Apple, которые называются Bootcamp, Parallels Desktop и Virtual Box.
Подготовка и установка Bootcamp
Данный вариант позволяет произвести установку дополнительной OS на Mac и iMac в отдельно созданный раздел на жёстком диске. Выбрать в какую систему загрузиться можно во время включения. Плюс этой утилиты в том, что установив через неё программу, для Windows будут доступны все ресурсы вашего ПК, это позволит использовать производительность Мак по максимуму. Компьютер с лёгкостью будет тянуть самые современные игры, и выполнять сложные задачи.
Перед установкой дополнительной OS, учитывайте то, что она займёт на жёстком диске много места. Убедитесь, что на нём есть нужные гигабайты. В среднем может понадобиться около 30 Gb.
Перед тем как начать установку операционной системы на iMac или Mac, проверьте и подготовьте программу Boot camp. Для начала убедитесь, что на ней установлены все обновления от Apple. Для этого нужно сделать следующие действия:
- Программа Bootcamp имеет страницу поддержки. Перейдите на неё, чтобы выяснить присутствуют ли обновления.

- Приложение можно обновить самостоятельно, зайдя в меню Apple и открыв раздел «Обновление ПО» (Software Update).
- После того, как все будет готово, обязательно создайте резервную копию данных.

Во время запуска утилиты у вас будет возможность выбрать место, на котором будет установлена OS Windows. Перед началом запуска софта следует закрыть все открытые приложения и программы.
После того, как утилита и флешки для копирования информации готовы, можно приступать к первым действиям:
- Для установки Windows 7 зайдите в меню своего Мак, откройте пункт «Программы» и через него перейдите по следующим подпунктам: «Служебные программы» и «Ассистент Boot camp». Жмите кнопку Продолжить .
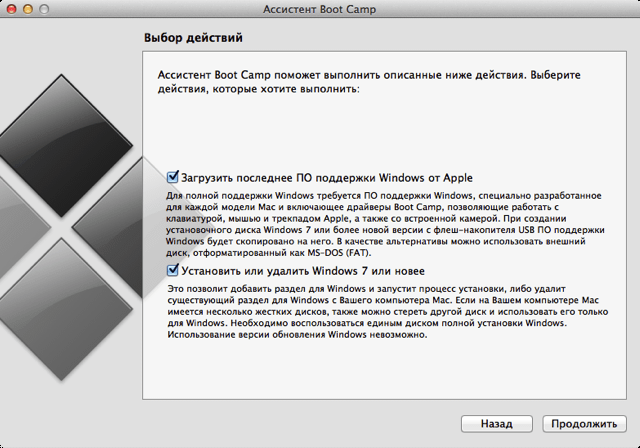
- В следующем окне поставьте галочки напротив пунктов «Загрузить последнее ПО» и «Установить Windows».
- Дальше, в открывшемся окне программа предложит сделать копию ПО поддержки Виндовс на DVD, CD или сохранить ПО на внешний диск. Поставьте галочку напротив подходящего вам действия.
- После окончания загрузки драйверов на флешку определитесь с объёмом жёсткого диска, который выделите для Windows. Для нормальной работы программы выберите хотя бы 20 Гб.

После копирования всех файлов iMac автоматически начнёт перезагрузку. Далее, для отображения менеджера загрузки нажмите и удерживайте клавишу Alt . На Мак откроется меню диска, обозначьте раздел с названием операционной системы. После этого последует запуск OS и настройка параметров.

Для установки Windows 8 нужно действовать точно так же. Только в окне «Выбор действий» следует установить галочки напротив пунктов «Загрузить последнее ПО» и «Создать диск для установки Windows 7 или новое».
Установка Windows на Мак, а точнее, настройка программы, начинается с выбора языка. Сразу выбирайте правильный язык, иначе придётся совершать все действия заново. Выбрав в этом окне все параметры, жмите кнопку Далее , которая находится в нижнем правом углу.
Для установки операционной системы Windows на Мак внимательно следуйте всем указанным инструкциям. Во время процесса не перезагружайте и не выключайте компьютер. Прерывать процедуру каким-либо образом нельзя.
После того как iMac второй раз перезагрузится, можно начинать установку нужных драйверов. Для этого загрузите их обратно из флешки, установите и запустите программу инсталляции.
Установка Windows через Bootcamp с помощью флешки
Установку можно проводить как при помощи диска с операционной системой, так и через USB-накопитель. Чтобы загрузить программу с флешки на Мак, нужно сначала её скачать. Если речь идёт о Windows 8, то версия этой системы должна быть в формате iso.
Этот вариант установки на Mac и iMac, от предыдущего особо ничем не отличается. Перед началом действий следует так же проверить bootcamp на обновления и сохранить все необходимые данные. Следующая инструкция поможет выполнить задачу:
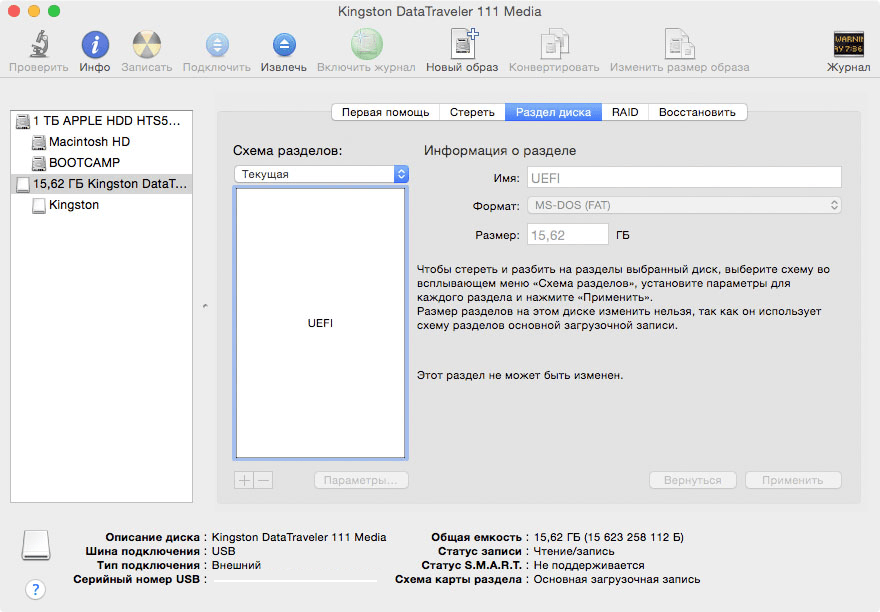
- Вставьте флеш-накопитель в USB разъем. Откройте программу «Дисковая Утилита».
- Кликните в левой части на флешку и в соседней таблице вместо «Текущая» выберите «Раздел 1».
- Установите формат MS-DOS (FAT) и кликните кнопку Параметры… .
- В появившемся меню выберите «Основная загрузочная запись» и подтвердите действие, нажав кнопки ОК и Применить .
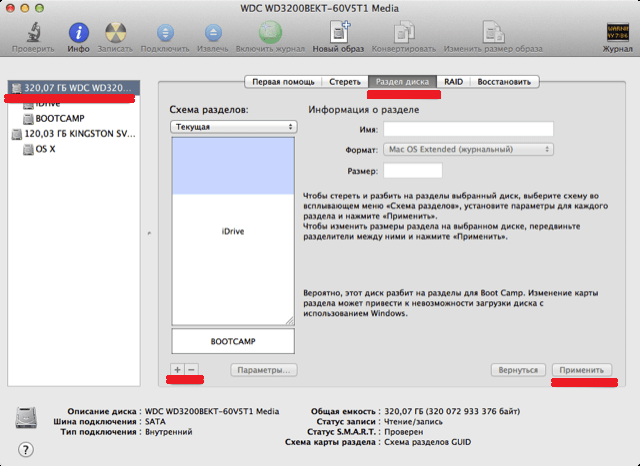
- Далее, жмите «Раздел диска» и освобождаем на нём место для дополнительной операционной системы.
- Запустите вкладку «Ассистент Boot Camp».
- Поставив галочки напротив предлагаемых действий, нажимаем Продолжить .
- Копируем данные с системы Мак. Появившийся треугольник жёлтого цвета означает, что система запрашивает пароль на новую операционную систему — введите его.
- После того как выберите диск для установки, система сама перезагрузится. В это время удерживайте клавишу Alt для появления окна параметров новой операционной системы. После установки настроек, новая программа готова к использованию.
Но бывает, что когда установочным носителем является флешка, утилита требует вставить диск с программой и отказывается продолжать действия загрузки софта на iMac. В этом случае можно скачать драйвер Daemon Tools Lite iMac. С его помощью монтируем iso-образ Windows, он послужит виртуальным приводом и тогда Bootcamp без проблем завершит процесс установки нашей OS.
Установка Windows на Mac и iMac через Parallels Desktop
Кроме Boot Camp существует ещё несколько вариантов установки дополнительной операционной системы. Например, можно воспользоваться программой Parallels Desktop, которая является виртуальной машиной по установке Windows. Вы сможете запускать программы Windows без перезагрузки ПК.
 Выполнить установку можно следуя инструкции ниже:
- Для создания новой виртуальной машины запустите программу Parallels Desktop и откройте меню File, далее нажимаем New….
- Всплывёт окошко, в нём кликаем на ярлык Install Windows or another OS from DVD or image file, и продолжаем наши действия.
- Далее, следует указать источник инсталляции. Это можно сделать вручную, перетащив нужную иконку в определённое место или дождавшись, когда Parallels Desktop сделает это автоматически.
- После нажимаем Продолжить и вводим ключ операционной системы Windows.
- В следующей таблице, появившейся на экране вашего Мак, укажите галочкой как использовать операционную систему.
- Определите название и месторасположение виртуальной машины. Если нужно, то произведите сразу все необходимые вам настройки.
- Когда вы нажмёте кнопку Продолжить , автоматически начнётся процесс инсталляции OS. По завершении перезагрузите систему.

Особенность Parallels Desktop — высокая производительность программы. Скачать бесплатную ознакомительную версию, либо купить программу Parallels Desktop вы можете по ссылке ниже:
Устанавливаем Windows с помощью VirtualBox
VirtualBox — одна из популярных программ виртуализации. С её помощью на вашем ПК будут с лёгкостью работать сразу две операционные системы. Установить дополнительную ОС через VirtualBox довольно просто.
Для начала введите в систему поиска запрос VirtualBox, зайдите на официальный сайт и скачайте программу. По завершению установки кликните по значку программы и выберите пункт «Создать». После этого можно приступать к установке Windows.
- В открывшейся таблице укажите, какую операционку хотите добавить.
- Далее, установите с помощью ползунка размер предоставляемой оперативной памяти, лучше не меньше 1024 Mb. Если памяти имеется больше чем 2000 Mb, то можно поделить её на две равные части.
- В следующем окне пометьте галочкой «Создать новый виртуальный жёсткий диск».
- Теперь программа попросит указать тип файла, который будет определять формат, используемый для создания нового диска. В указанном списке выберите первый тип «VDI (VirtualBox Disc Image)».
- Выбираем «Фиксированный виртуальный диск» и ползунком определяем его объём.
- Далее, в меню слева появится значок добавленной системы. Нажимаем Запустить и ждём открытия окна «Параметры настроек Windows». После завершения всех настроек новая операционка готова к использованию.


Иногда бывает, что после установки дополнительной операционной системы, на iMac появляются проблемы со звуком или воспроизведением видео. Для решения этой проблемы нужно установить на Мак все драйвера, которые предварительно были сохранены на дополнительный накопитель информации (диск или флешку).
После всех проведённых действий установка Windows на Mac полностью окончена. Перезапустите программу и всё обязательно заработает.


