- Windows Setup: Installing using the MBR or GPT partition style
- Why should I convert my drive?
- Reformatting the drive using a different partition style
- Make sure Windows Setup boots to the correct firmware mode
- How to Install Windows 10 on GPT Partition in 2021
- Can I Install Windows 10 on GPT Partition?
- Part 1. Prepare GPT Disk for Windows Installation
- #1. Confirm Computer Supports UEFI Boot Mode
- #2. Prepare GPT Disk for Windows 10 Installation
- Part 2. How to Install Windows 10 on GPT Partition
- Part 3. How to Protect Your GPT Partition Data (Extra Tips)
- Conclusion
- People Also Ask
Windows Setup: Installing using the MBR or GPT partition style
When installing Windows on UEFI-based PCs using Windows Setup, your hard drive partition style must be set up to support either UEFI mode or legacy BIOS-compatibility mode.
For example, if you receive the error message: “Windows cannot be installed to this disk. The selected disk is not of the GPT partition style”, it’s because your PC is booted in UEFI mode, but your hard drive is not configured for UEFI mode. You’ve got a few options:
Reboot the PC in legacy BIOS-compatibility mode. This option lets you keep the existing partition style. For more info, see Boot to UEFI Mode or Legacy BIOS mode.
Configure your drive for UEFI by using the GPT partition style. This option lets you use the PC’s UEFI firmware features.
You can preserve your data and convert the drive using the MBR2GPT tool. You can also choose to reformat the drive using the instructions below. Reformatting will erase all the data on the drive.
Why should I convert my drive?
Many PCs now include the ability to use the UEFI version of BIOS, which can speed up boot and shutdown times and can provide additional security advantages. To boot your PC in UEFI mode, you’ll need to use a drive formatted using the GPT drive format.
Many PCs are ready to use UEFI, but include a compatibility support module (CSM) that is set up to use the legacy version of BIOS. This version of BIOS was developed in the 1970s and provides compatibility to a variety of older equipment and network configurations, and requires a drive that uses the MBR drive format.
However, the basic MBR drive format does not support drives over 4TB. It’s also difficult to set up more than four partitions. The GPT drive format lets you set up drives that are larger than 4 terabytes (TB), and lets you easily set up as many partitions as you need.
Reformatting the drive using a different partition style
To wipe and convert the drive by using Windows Setup
Turn off the PC, and put in the Windows installation DVD or USB key.
Boot the PC to the DVD or USB key in UEFI mode. For more info, see Boot to UEFI Mode or Legacy BIOS mode.
When choosing an installation type, select Custom.
On the Where do you want to install Windows? screen, select each of the partitions on the drive, and select Delete. The drive will show a single area of unallocated space.
Select the unallocated space and click Next. Windows detects that the PC was booted into UEFI mode, and reformats the drive using the GPT drive format, and begins the installation.
To manually wipe a drive and convert it to GPT:
Turn off the PC, and put in the Windows installation DVD or USB key.
Boot the PC to the DVD or USB key in UEFI mode. For more info, see Boot to UEFI Mode or Legacy BIOS mode.
From inside Windows Setup, press Shift+F10 to open a command prompt window.
Open the diskpart tool:
Identify the drive to reformat:
Select the drive, and reformat it:
Close the command prompt window.
Continue the Windows Setup installation.
When choosing an installation type, select Custom. The drive will appear as a single area of unallocated space.
Select the unallocated space and click Next. Windows begins the installation.
Make sure Windows Setup boots to the correct firmware mode
To automate this process, you’ll need to run Windows Setup through Windows PE, and use a script to detect which mode you’re in before installing Windows. For more info, see WinPE: Boot in UEFI or legacy BIOS mode.
How to Install Windows 10 on GPT Partition in 2021
Quick Guide to Install Windows 10 on GPT:
- 1. Connect a Windows 10 USB to your PC and boot the PC.В
- 2. Boot the system into the BIOS (for example, using F2 or the Delete key)
- 3. Locate the Boot Options Menu.
- 4. Set Launch CSM to Enabled.
- 5. Set Boot Device Control to UEFI Only.
- 6. Set Boot from Storage Devices to UEFI driver first.
- 7. Save your changes and restart the system.
- 8. Reboot the system and install Windows 10 on GPT.
- More details.
Are you looking for an efficient way to install Windows 10 on GPT disk without any issues? Check out the quick navigation, and follow tutorials below in each part, you’ll successfully install Windows 10 on GPT partition on your own:
| Workable Solutions | Step-by-step Troubleshooting |
|---|---|
| Part 1. Prepare GPT Disk for Windows Installation | Confirm computer supports UEFI boot mode > Prepare GPT disk ready for Windows 10 installation. Full steps |
| Part 2. Install Windows 10 on GPT Disk | |
| Part 3. Protect GPT Partition Data | Create a regular backup of vital data > Execute operation carefully > Clean up virus. Full steps |
Can I Install Windows 10 on GPT Partition?
Don’t worry if you are having the following problems while trying to install Windows 10 on a GPT disk:
Case 1 — Your computerВ reports that it can’t install Windows 10 on GPT partition with the error message «Windows cannot be installed on this disk. The selected disk is of the GPT partition style».
Case 2- «I have upgraded from Windows 8.1 to Windows 10, and now I wish to do a clean install. Then I burnt Windows 10 to a disk. When I was trying to do it, I get a problem with an error message ‘Windows cannot be installed on this disk. The selected disk is of the GPT partition style.’ Is there any way to fix the issue and install Windows 10 on GPT partition with success?»В
The reason why you get this error is that your PC is booted in UEFI mode, but your hard drive is not configured for UEFI mode. On the following, we’ll cover the complete process for you to follow and install Windows 10 on GPT disk without losing any data. No error message like «Windows cannot be installed» error will be prompted.
Let’s get started to install Windows 10 on your computer now.
Part 1. Prepare GPT Disk for Windows Installation
Applies to: Prepare GPT disk for Windows 10 installation.
To obtain a successful Windows 10 installation process, here are two things that you need to get them done in advance:
#1. Confirm Computer Supports UEFI Boot Mode
Note that if the motherboard of your computer doesn’t support UEFI, it only supports BIOS. It won’t allow you to install Windows 10 on a GPT partition.
Therefore, you should first check out and confirm if your computer supports UEFI boot mode:
- Boot the PC and press the key (Esc, F2, F8, F12, Del, or another key) to enter the firmware or boot menu.
- On the boot menu, check if the computer supports UEFI boot mode.В
If the motherboard only supports Legacy BIOS boot mode, we are sorry that you have to stop here. As your computer doesn’t support UEFI boot mode, you can’t install Windows 10 on GPT disk which requires UEFI boot mode.В
If you see the UEFI boot option in BIOS as shown below, exit BIOS. And you can continue with the following steps.В
#2. Prepare GPT Disk for Windows 10 Installation
It’s vitally important that you make the target disk ready before installing Windows 10 to a GPT partition. Here are the tips that you can follow to make the disk ready:
As the way to set a disk ready varies, we suggest you follow the right way to configure your disk based on your own needs.
# For a New Disk — Initialize to GPT
1. Install the new disk to your computer. You may refer toВ How to Install a New HDD/SSDВ for help.В
2. Configure and initialize your disk to GPT
If you are an experienced user, you can directly open Disk Management and initialize the disk to GPT.
If you have 0 experience in disk management, we suggest you download reliable partition manager software — EaseUS Partition Master and follow the steps here to initialize your new disk to GPT:
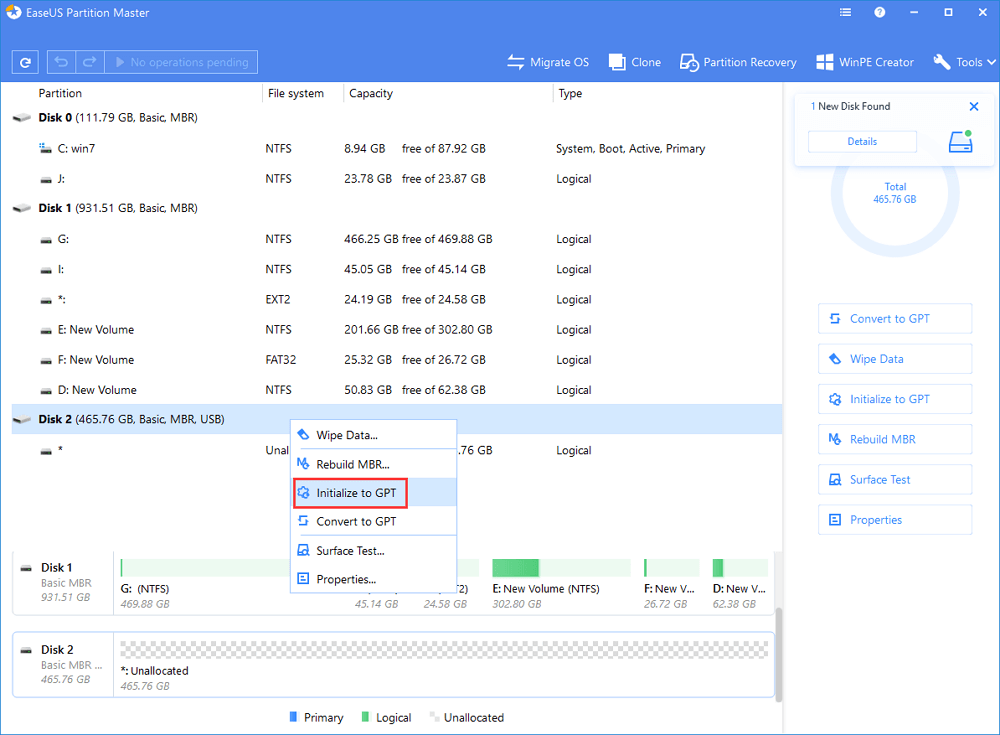
Step 1. Open EaseUS Partition Master. Connect the hard drive or SSD to PC.
Right-click the target HDD or SSD and select «Initialize to MBR» or «Initialize to GPT» accordingly.
Fig 1. Initialize to MBR:
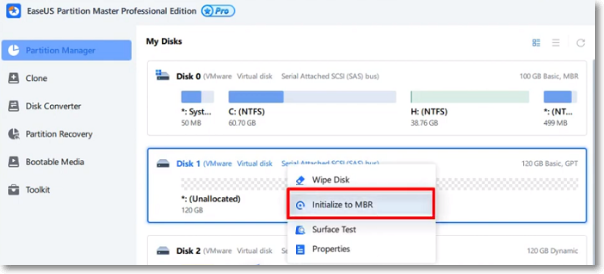
Fig 2. Initialize to GPT:
Step 2.В A pending operation of initializing disk to MBR or GPT disk will be added. Execute the operation and click «Apply».

# For an Old Disk — Convert Disk to GPT, Backup Data
1. Convert Disk to GPT
If your disk is with the MBR partition style, you need to convert it to GPT disk. And EaseUS Partition Master canВ directly convert MBR disk to GPT disk without data loss.
Step 1. Download and launch EaseUS Partition Master on your Windows computer.
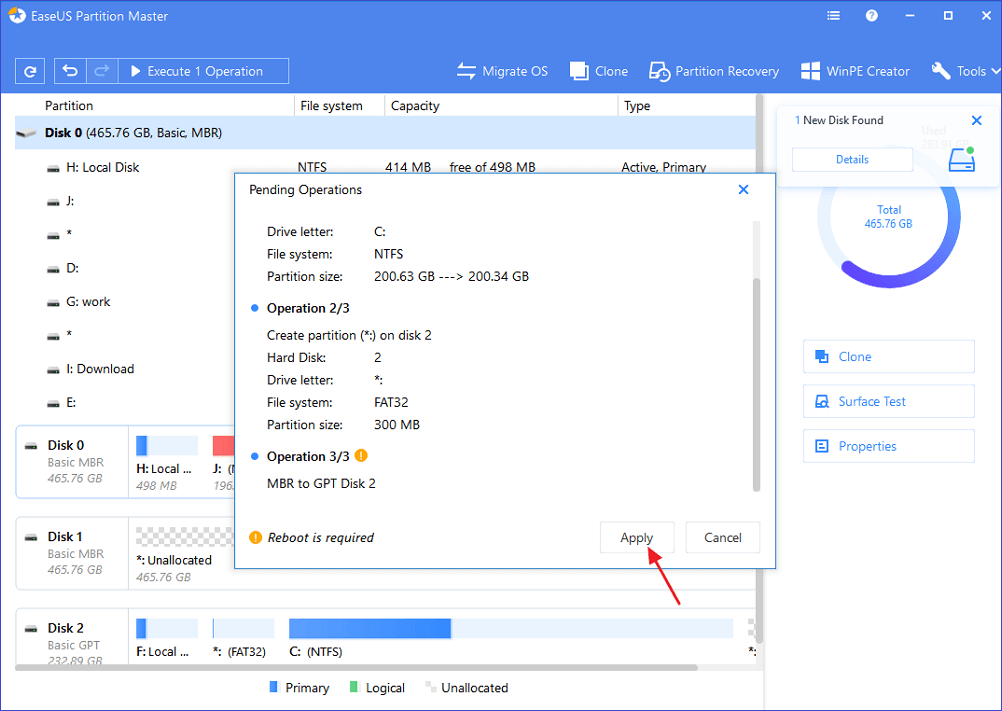
Step 2. Right-click the MBR disk that you want to convert and choose «Convert to GPT».
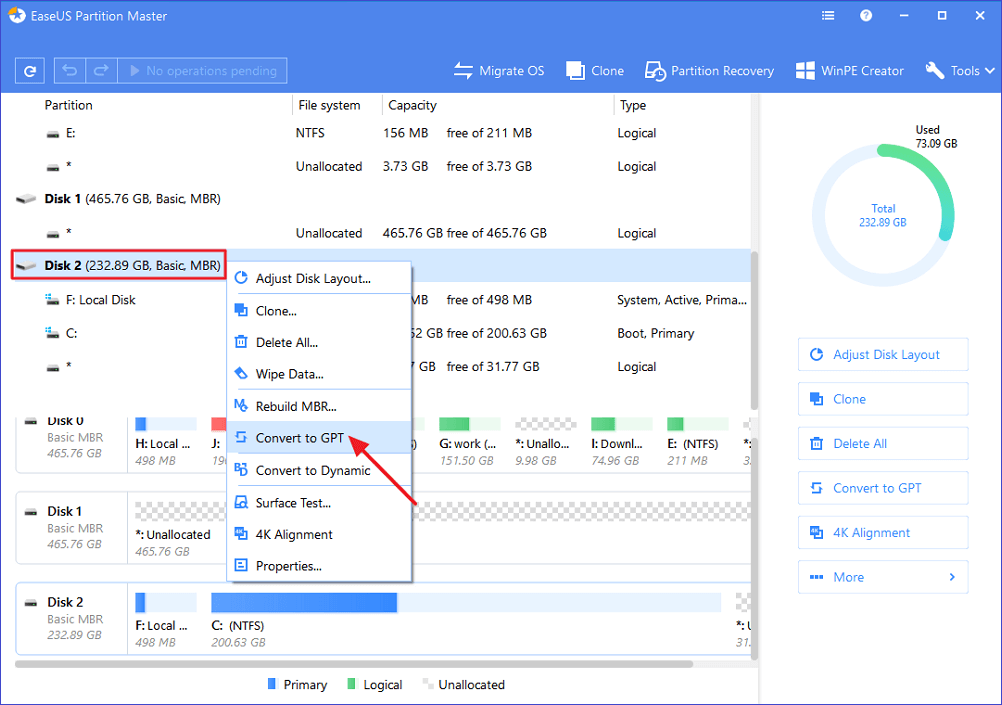
Step 3. After that, find and click the «Execute 1 Operation» button on the toolbar and choose «Apply» to start the conversion.
2. Backup Vital Data
If you have vital data saved on the old drive, we suggest you back up the data to another disk or an external hard drive first.
3. Format GPT Partition
It’s suggested that you format the used target GPT partition (with at least 20GB capacity) in advance so as to install Windows 10 on it.В
If you don’t format the GPT partition, all files on the partition will be reserved, which will take huge space on your system C drive. It’s obviously not a smart choice.
After that, you can now move to Part 2 on this page and start installing Windows 10 on the GPT disk.В
Part 2. How to Install Windows 10 on GPT Partition
Applies to: Guide you install Windows 10 on GPT disk partition.
Things could be easierВ if you already have Windows 7 or 8.1 installed, you can directlyВ upgrade to Windows 10.
But if you are looking for a to installing or reinstall a fresh version of Windows 10 on a GPT partition, you are in the right place. Follow the steps below to learn howВ to install Windows 10 on a GPT partition:
Step 1.В Create a Windows 10 installation media on an empty USB (min 8GB).
Step 2. Connect the Windows 10 installation USB to your PC and boot the system into BIOS.В
Restart PC and press the Esc, F2, F8, F12, Del, or another keyВ to enter the BIOS boot menu.
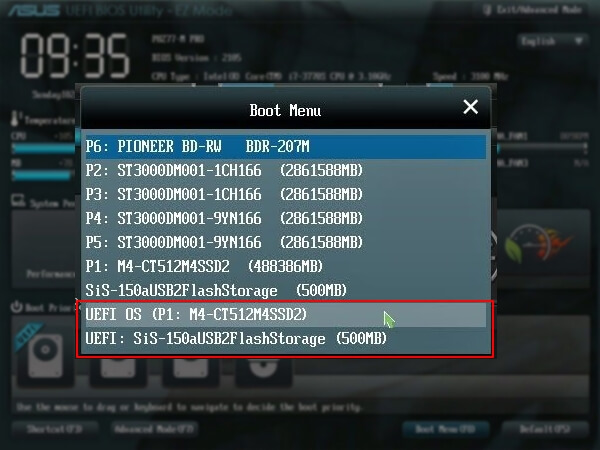
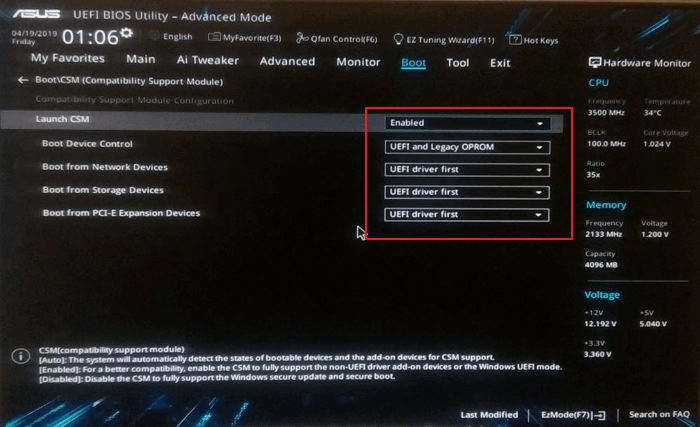
Step 3.В Locate the boot options menu and enable the UEFI mode.
- Set Launch CSM to Enabled. If CSM is set to Disabled, you can skip to Step 4 below
- Set Boot Device Control to UEFI Only
- Set Boot from Storage Devices to UEFI driver first
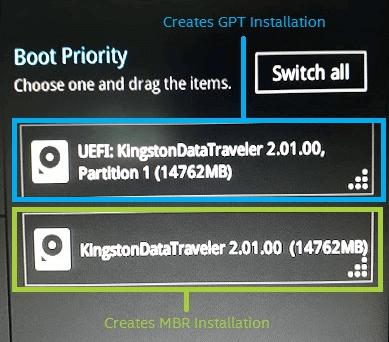
Step 4.В Set the USB UEFI OS Boot option is at the top of the Boot Priority List.
Step 5. Save your changes and restart the system toВ start installing Windows 10 on the GPT disk.
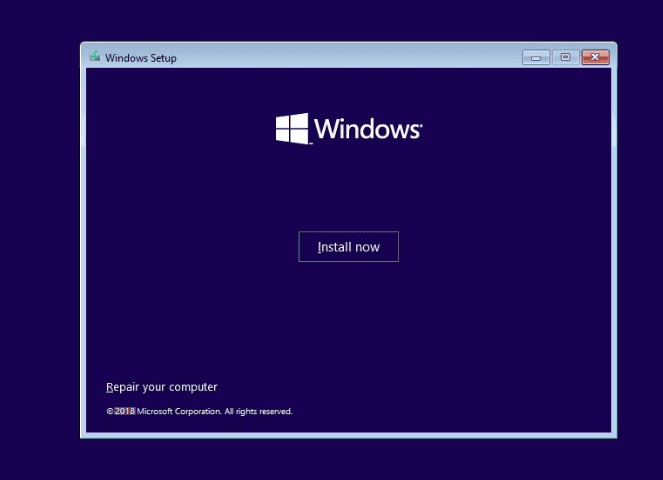
1. Choose which media to use — USB flash drive.
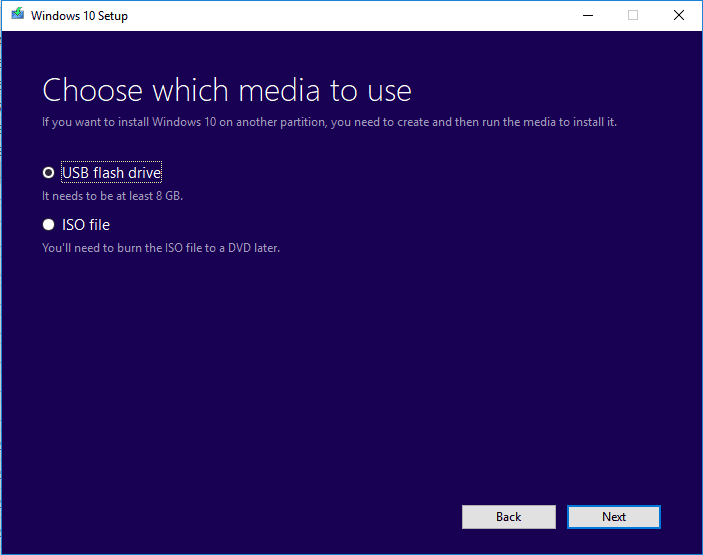
2. Click «Install Now», then set the language and other preferences.
3. Skip entering a product key and select «Install Windows only».
Select to install Windows 10 to the GPT partition, wait for the process to complete.
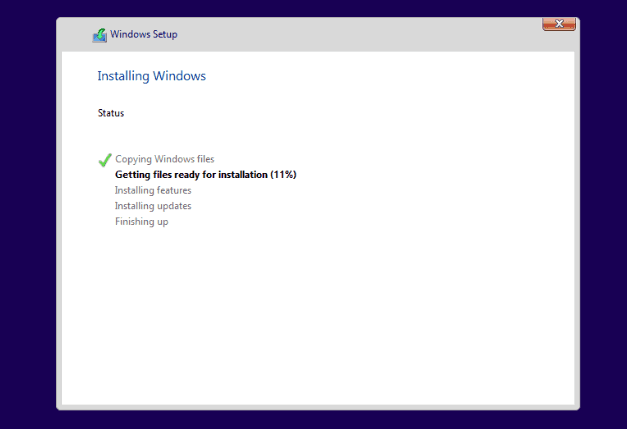
4.В Your computer may restart several times during this process. And the installation may take several minutes, about half an hour or more, just wait patiently.
Step 6.В When you complete the installation, reboot the PC and enter BIOS.
Set the computer to boot from the new GPT disk with Windows 10. Save the changes and restart the PC.
Step 7.В Confirm that Windows 10 is installed on a GPT partition.
After Windows 10 finally boots up, you can now check up if Windows 10 is installed on your GPT disk partition by following tips here:
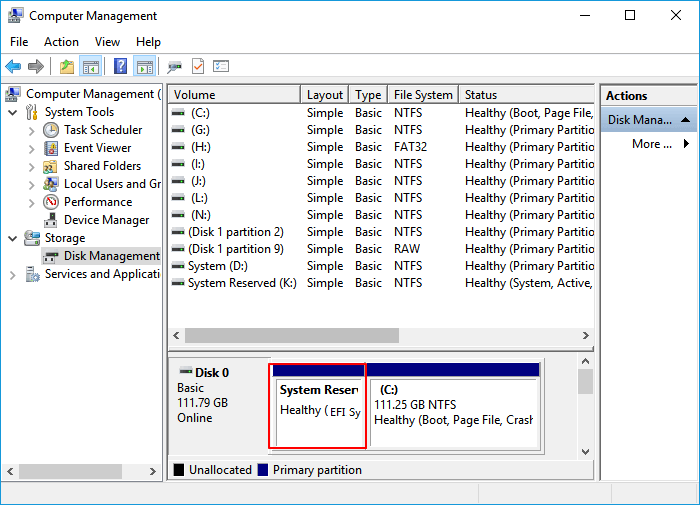
- Boot into Windows > Open «Disk Management».
- You see three partitions including the EFI System Partition.
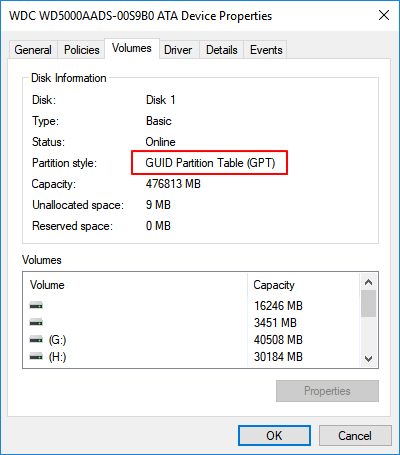
- Right-click the disk > select «Properties > «Volumes». Here you can confirm the Partition style:
Step 7.В Activate Windows 10 with Product Key
After the Windows installed, you’ll be asked to activate it with your product key.В
Go to Settings > Update & Security > Activation > Enter a product key to enjoy full features of Windows 10 on your PCпјљ

After this, you can enjoy all the full features in Windows 10 on your computer. It will make your life and work easy and enjoyable.
Part 3. How to Protect Your GPT Partition Data (Extra Tips)
If you have data on your GPT partition, this part would do you a great favor. Here’s a list of tips that you can follow to protect your data efficiently:
If you often make changes to your disk data, it’s important that you create a regular backup of vital data on your GPT disk partition.В
To ease your burden, you can try free back up software — EaseUS Todo Backup Free to create a full back up your data every day by creating an automatic backup plan.
- 2. Delete files, format drive partitions, wipe a disk with awareness
It’s essential that you should always be careful with operations that will remove data and files on your computer. For example, you need to make sure that you don’t delete wrong files, format a false storage device, or wipe a wrong hard drive or partition.
- 3. Run antivirus software to clean up virus, malware regularly
As we know that viruses or malware infection may cause unexpected data loss issues on your storage devices, like GPT disk partition. We suggest you always install reliable antivirus software to scan and clean up your computer and devices regularly.В
Conclusion
On this page, we included the whole process to guide you to install Windows 10 on a GPT disk partition. To complete the whole process, you need to execute the following operations:
- #1. Prepare GPT DiskВ
- #2. Download Windows 10 ISO and Create Windows Installation Media to USB
- #3. Configure PC Boot Mode to UEFI, and Boot from USB
- #4. Start and Finish Installing Windows 10 on the GPT Disk Partition
- #5. Reboot PC and Set Windows to Boot from New GPT PartitionВ
- #6. Activate Windows 10
During the process, If you are faced with «The selected disk is the GPT partition style» error, you can refer to Part 1В to convert the disk to GPT with the help of reliable partition manager software and continue installing Windows 10.
By the way, to avoid data loss, it is also of great importance to create a regular backup of your GPT partition data.
People Also Ask
If you have more questions about Windows installation, check out the questions and answers as listed below:
1. Can you install Windows 10 on GPT?
Normally, as long as your computer motherboard and bootloader support UEFI boot mode, you can directly install Windows 10 on GPT.В
If the setup program says that you cannot install Windows 10 on the disk because the disk is in GPT format, it is because you have UEFI disabled. The solution is to enter BIOS (by pressing a key during startup, either F1 or F10-F12 depending on your computer model), find the option to enable UEFI.
Then you can continue installing Windows 10 on the GPT disk.
2. Should I install Windows 10 on MBR or GPT?
To use MBR to GPT to install Windows 10 is highly depended on your disk capacity and the motherboard on your computer:
- 2TB or smaller Disk: Use it as MBR to install Windows 10.
- Disk larger than 2TB: Use it as GPT to install Windows 10.
- BIOS only supports Legacy boot mode: Install Windows 10 on MBR.
- BIOS supports UEFI boot mode, and disk is larger than 2TB: Install Windows 10 on GPT.
Also read:В MBR VS GPT
3. How many partitions are created when you install Windows 10 on a GPTdisk?
- On a brand new GPT: Windows will automatically generate two partitions on your disk — a boot partition, and a system C drive partition.
- On a used GPT disk: Windows will be installed on a selected partition. No further partitions will be generated.
If you want to manually create more partitions, you can manage GPT partitions on your own. In short, GPT disk support to create up to 128 partitions.


