- Install Windows from a USB Flash Drive
- What you need
- Step 1 — Format the drive and set the primary partition as active
- Step 2 — Copy Windows Setup to the USB flash drive
- Step 3 — Install Windows to the new PC
- If your Windows image is larger than 4GB
- Как установить Windows 10 с помощью USB-устройства с поддержкой UEFI
- Как создать загрузочный диск Windows 10 с помощью Media Creation Tool
- Как создать загрузочный диск Windows 10 с помощью Rufus
- How to install Windows via BIOS: settings, step-by-step guide, tips
- Basic Input-Output System. (BIOS)
- BIOS settings
- Management information.
- Booting the device with BIOS
- Loading Windows through a USB flash drive
- Tips and tricks
- Easy Windows installation process
- Difference in installation processes
- Operating system hard disk partitions.
- Analysis of the hard disk during installation.
- Retention of personal information.
Install Windows from a USB Flash Drive
Here’s how to create a bootable Windows installation USB drive starting with a Windows .iso file or a Windows Setup DVD.
If you’re looking for an easy way to create a bootable USB Windows installation drive, use the media creation tool.
What you need
- Windows 10 install .iso or DVD
- USB flash drive with at least 5GB free space. This drive will be formatted, so make sure it doesn’t have any important files on it.
- Technician PC — Windows PC that you’ll use to format the USB flash drive
- Destination PC — A PC that you’ll install Windows on
Step 1 — Format the drive and set the primary partition as active
Connect the USB flash drive to your technician PC.
Open Disk Management: Right-click on Start and choose Disk Management.
Format the partition: Right-click the USB drive partition and choose Format. Select the FAT32 file system to be able to boot either BIOS-based or UEFI-based PCs.
Set the partition as active: Right-click the USB drive partition and click Mark Partition as Active.
If Mark Partition as Active isn’t available, you can instead use diskpart to select the partition and mark it active.
Step 2 — Copy Windows Setup to the USB flash drive
Use File Explorer to copy and paste the entire contents of the Windows product DVD or ISO to the USB flash drive.
Optional: add an unattend file to automate the installation process. For more information, see Automate Windows Setup.
Step 3 — Install Windows to the new PC
Connect the USB flash drive to a new PC.
Turn on the PC and press the key that opens the boot-device selection menu for the computer, such as the Esc/F10/F12 keys. Select the option that boots the PC from the USB flash drive.
Windows Setup starts. Follow the instructions to install Windows.
Remove the USB flash drive.
If your Windows image is larger than 4GB
Windows USB install drives are formatted as FAT32, which has a 4GB filesize limit. If your image is larger than the filesize limit:
Copy everything except the Windows image file (sources\install.wim) to the USB drive (either drag and drop, or use this command, where D: is the mounted ISO and E: is the USB flash drive.)
Split the Windows image file into smaller files, and put the smaller files onto the USB drive:
Как установить Windows 10 с помощью USB-устройства с поддержкой UEFI
Если вы планирует выполнить чистую установку Windows 10, то для запуска процесса установки вам понадобится загрузочное USB-устройство флеш-памяти. Тем не менее, если ваш компьютер является достаточно современным, то велика вероятность, что на нем используется Unified Extensible Firmware Interface (UEFI) вместо традиционного BIOS. В этом случае вам нужно убедиться, что загрузочный носитель также поддерживает соответствующий интерфейс прошивки, в противном случае вы не сможете запустить процесс установки.
К счастью, для компьютеров UEFI доступно несколько способов создания загрузочного носителя. Например, вы можете использовать утилиту Media Creation Tool от Microsoft, которая позволяет упростить копирование установочных файлов Windows 10 на съемный диск и поддерживает как классический BIOS, так и UEFI. В качестве альтернативы вы можете воспользоваться сторонним инструментом Rufus, который может создавать загрузочные флешки специально для устройств с UEFI.
В данном руководстве приведем шаги по созданию загрузочного USB-устройства флеш-памяти с поддержкой UEFI, используя Media Creation Tool и Rufus.
Как создать загрузочный диск Windows 10 с помощью Media Creation Tool
Если вы планируете обновить или выполнить чистую установку Windows 10 на ПК с UEFI, Вы можете воспользоваться Media Creation Tool для создания совместимого загрузочного носителя. Просто подключите USB-накопитель объемом не менее 8 ГБ к вашему компьютеру и проделайте следующие шаги:
Скачайте последнюю версию инструмента Media Creation Tool:
- Дважды кликните по файлу MediaCreationToolxxxx.exe, чтобы запустить утилиту.
- Нажмите кнопку “Принять”, чтобы согласиться с условиями лицензионного соглашения Microsoft.
- Выберите опцию Создать Установочный носитель (USB-устройство флеш-памяти, DVD-диск или ISO-файл) для другого компьютера.
- Нажмите кнопку “Далее”.
- Выберите язык, архитектуру процессора и выпуск Windows 10, если значения по умолчанию не соответствуют вашим предпочтениям.
Совет. в разделе Архитектура вы можете заметить опцию “Оба”, которая предназначена для создания универсального загрузочного носителя для 32- и 64-разрядных процессоров.
- Нажмите кнопку “Далее”.
- Выберите опцию USB-устройство флеш-памяти.
- Нажмите кнопку “Далее”.
- Выберите съемный носитель, который вы хотите использовать в списке (если вы не видите свой накопитель, нажмите кнопку “Обновить список дисков”).
- Нажмите кнопку “Далее”.
После выполнения данных шагов, мастер создания носителей приступит к загрузке установочных файлов Windows 10 и создаст загрузочное USB-устройство для компьютера с UEFI или BIOS.
Как создать загрузочный диск Windows 10 с помощью Rufus
Использование Media Creation Tool — рекомендуемый метод создания загрузочного USB-устройства флеш-памяти. Тем не менее, если по какой-то причине данный вариант для вас не сработал, вы можете загрузить ISO-образ Windows 10 из другого источника и воспользоваться инструментом Rufus для создания установочного носителя с поддержкой UEFI. Просто подключите USB-накопитель объемом не менее 4 ГБ к вашему компьютеру и проделайте следующие шаги:
Скачайте последнюю версию программу Rufus.
- Дважды кликните по файлу Rufus-x.x.exe, чтобы запустить утилиту.
- В разделе Устройство выберите USB-накопитель емкостью не менее 8 ГБ.
- В разделе Метод загрузки нажмите кнопку “ВЫБРАТЬ”.
- Перейдите в папку с ISO-образом Windows 10.
- Выберите файл образа.
- Нажмите кнопку “Открыть”.
- В разделе Схема раздела выберите опцию GPT.
- В разделе Целевая система выберите опцию UEFI (non CSM).
- В разделе Новая метка тома выберите содержательное название для диска, например windows10-20h2.
- В разделе Файловая система укажите значение NTFS.
- В разделе Размер кластера оставьте значения по умолчанию.
- Нажмите кнопку Показать расширенные параметры форматирования и убедитесь, что метки “Быстрое форматирование” и “Создать расширенную метку и значок устройства” отмечены.
- Нажмите кнопку “СТАРТ”.
- Нажмите кнопку “ОК”, чтобы подтвердить, что USB-устройство флеш-памяти будет очищено.
После выполнения данных шагов, инструмент Rufus создаст загрузочный носитель Windows 10 с поддержкой UEFI.
После создания загрузочного USB-носителя с поддержкой UEFI, вы можете приступить к обновлению системы или выполнению чистой установки Windows 10.
How to install Windows via BIOS: settings, step-by-step guide, tips

How to install Windows via BIOS? Competent setting and precise actions will help you complete it quickly and efficiently. The updated version can be downloaded from CD-ROM, DVD-ROM or USB stick.
Basic Input-Output System. (BIOS)

BIOS is the basis of the motherboard, it is the I / O base (hereinafter I / O) located on the “motherboard”. The existence of the BIOS guarantees the ability to tune and correct the computer.
The I / O system for each PC depends on the “motherboard”.
BIOS settings
You can determine the BIOS settings for a specific motherboard by looking at them in the motherboard passport.
Important! Incorrect BIOS parameters can damage the computer or reduce the power indicator.
Management information.
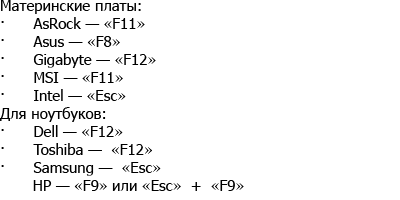
How to install Windows via BIOS, boot from DVD, USB, HDD depends on several Boot Menu keys:
Booting the device with BIOS
You need to get into the BIOS: restart the PC and enter “Setup” – the software that is responsible for the initial boot of the computer.
During the reboot, carefully monitor the inscriptions on the monitor screen, you must not skip the line that appears below with the following text:
Press ____ to enter SETUP.
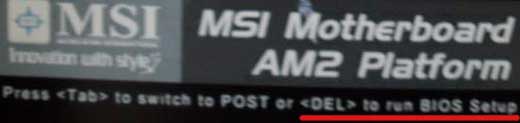
The program prompts you how to get into the BIOS, you must press the key that is written on the screen, it can be:
F1, F2, F3, F10, Del, Esc – they differ on different computers, depending on the BIOS version.
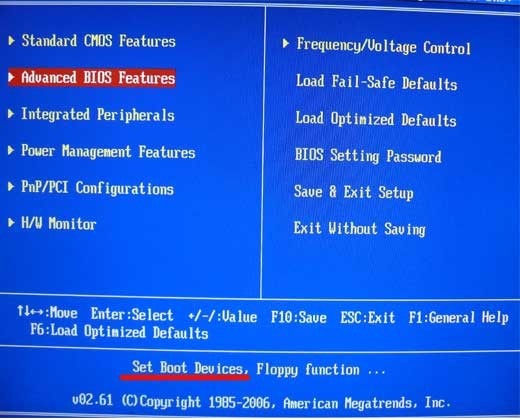
Hold down the key until the system redirects to the Basic Input-Output System. A list of tabs will appear on the screen, you need to select the one that says about booting devices – “Boot devices” or “Advanced BIOS Features”.
If you did not succeed in completing the prescribed actions the first time, do not despair, you must repeat all the actions a couple of times.
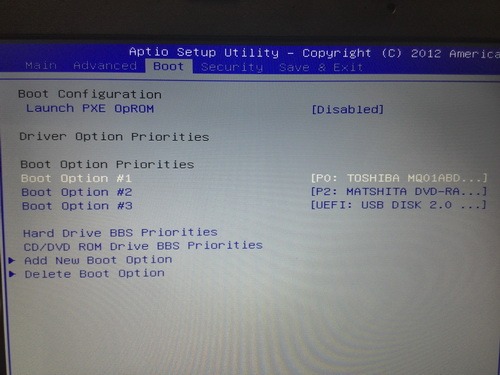
We select a tab, in order to enter, you need to press the “ENTER” button. After that, in the drop-down list, find the “Boot Sequence” tab and check the correctness of the selection with the information that will appear on the right on the monitor screen. It should be said that the selected tab is responsible for the boot priority of devices.
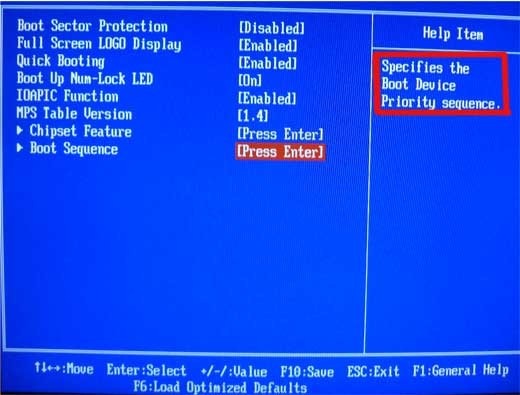
After the boot tab is defined, controlling the input keys, you need to set the priority so that the first in the list is “CD-ROM” or that boot device.
With the help of which the whole process will be carried out. To do this, select “First Boot Device” in the list and after that the hard drive came.
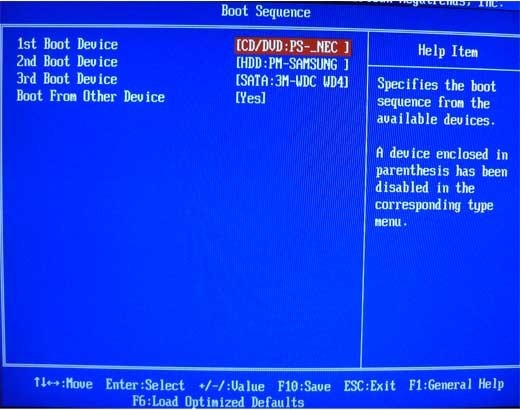
You need to confirm the correctness of your choice and press the “OK” button.
Thus, all BIOS settings for booting and reinstalling Windows are ready. This was all done so that the next time the PC is rebooted, the OS itself redirects the Windows boot from the previously selected drive.
In order to start the download, you must restart your computer.
Loading Windows through a USB flash drive
To install Windows via the Basic Input-Output System from a USB flash drive, in fact, the whole procedure is similar to the one described above, but you need to select Secure Boot from the list of proposed tabs in the I / O BIOS system or select the appropriate menu item in the OS with a simple version of “overlay” versions.
The process of installing Windows from a USB flash drive does not start and a black screen is shown on the monitor:
- UEFI mode enabled;
- The flash drive is formatted in NTFS;
- BIOS I / O supports only NTFS partitions, UEFI – FAT 32.
With a new version of the system to boot from a USB flash drive, it asks for permission to automatic mode. It is best to refuse such an offer, otherwise the OS may be installed on the wrong partition or delete some of your personal files.
Before installing BIOS settings, you must select using “+” or “-” and click on the “Boot” tab.
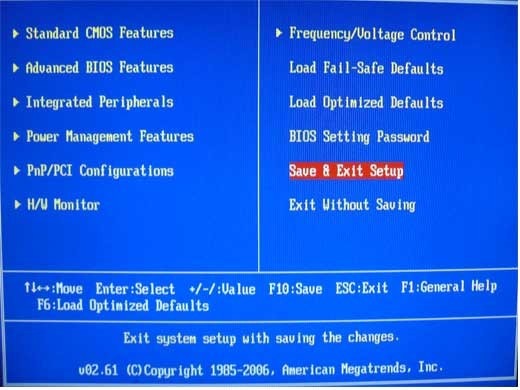
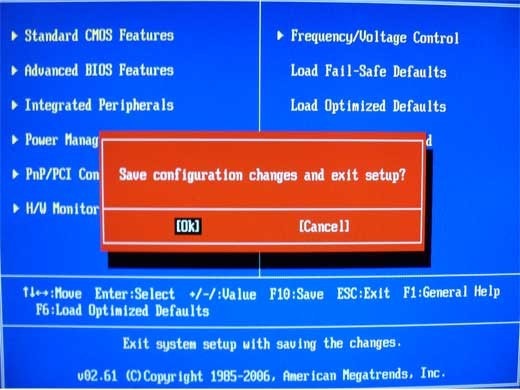
When choosing settings, you must save them. To do this, you need to press the “F10” – “Save and exit” key. You can also perform this action by pressing the “->” – “Exit Saving Changes” key, i.e. “Exit and save changes.”
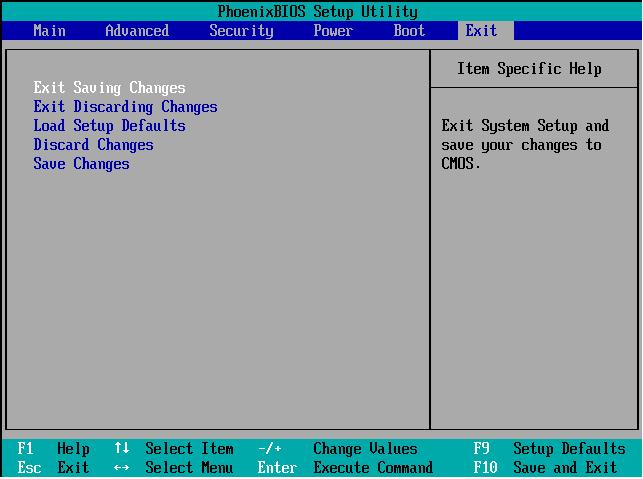
After the approved and selected option and device boot priority, you need to select the F10 option, and then restart the computer.
Tips and tricks

For novice users who need to reinstall Windows through BIOS, experts have developed some tips for a competent and fast flow of the process.
For a well-tuned BIOS system, you should pay special attention to these recommendations:
- PC requirements (subject to Windows 7):
- Memory – at least 1 GB;
- Processor – at least 1 Hz;
- Video card – minimum DirectX 9.
- Time to work in BIOS.
How long does the process of setting up and configuring a new version of Windows take? It all depends on the technical parameters of the PC:
- Speed ”Clock Speed”;
- The number of cores “Cores”;
- The trunk frequency is “800/1066/1333/1600 MHz”.
On average, it will take one hour to install Windows via BIOS.
Easy Windows installation process
A clean installation is a manual startup of the system disk during computer startup. After that, start, press any button, after the message “Press any key” appears on the tap.
The BIOS indicates the location of the new OS, for example, on a CD / DVD or on a hard disk, so that the old version is not used at all, or has been deleted. The clean version is used for any OS: Unix, DOS, Windows XP, as well as Linux, Windows 8 and Windows 7.
Simple is rarely used and is not recommended. This is due to the fact that the new version is launched from a CD / DVD disc already installed by the old OS. So a simple installation is more like the “overlay” process, since the new version is overlaid on the old version.
Difference in installation processes
Easy installation of Windows:
- Computer startup;
- BIOS;
- Operating system;
- BIOS;
- Installation.
Clean install:
- Computer startup;
- BIOS;
- Installation.
- Clean install.
Operating system hard disk partitions.
Often during a clean install, all partitions are formatted and old versions and files are removed. If you need to reinstall a system with several partitioned disks where important files are stored, you can leave the information unchanged.
It is not necessary to format the D drive, however, the C drive containing the old Windows files will be formatted.
Analysis of the hard disk during installation.
Before starting the installation of Windows (with a non-working OS, crashes and glitches), you need to try to use the last chance to restore and clean from malware.
In case of clearly expressed problems with the operation of the PC, it is necessary, first of all, to check the state of the hard disk, analyze the work of the segments, otherwise, even during the installation of the system, the formatting process may freeze or work unstably.
Retention of personal information.
Personal data and information is a very important component that cannot always be restored in case of deletion or damage, therefore, before reinstalling anything, you need to take care of their safety.
To save information and personal data when reinstalling Windows, you need to copy and transfer all the necessary files to a portable medium (disk, USB flash drive, etc.). It is also very important to save passwords, for this it is recommended to use the Backup program or do it the old-fashioned way, manually.
By exactly following the rules and tips, you can understand how to install Windows via BIOS on a computer, even for a person without special skills and experience, in such situations.
The main requirement for correct installation is the accuracy of the step-by-step guide suggested in the article above. Detailed photos accompanying the installation steps will help you navigate the I / O BIOS system.


