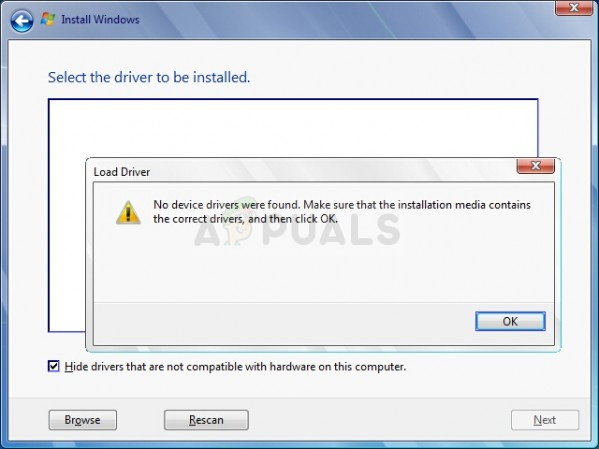
- Fix: No Device Drivers Were Found
- Solution 1: Switch to a USB 2.0 Port
- Solution 2: Set the Partition to Active
- Solution 3: Create a New Disc
- Solution 4: Enable the xHCI hand-off Option in BIOS
- Solution 5: Change Everything to Legacy and Set the Boot Device to Your DVD or USB
- Fix: A media driver is missing when installing Windows 10
- How can I fix A media driver your computer is missing in Windows 10?
- 1: Make sure you meet the Windows 10 requirements
- 2: Try switching the USB hub midway
- 3: Try different USB stick and use USB 2.0 port exclusively
- Run a System Scan to discover potential errors
- 4: Set USB option to Auto and disable Legacy USB if available
- 5: Try using Rufus instead of the Media Creation Tool or DVD
Fix: No Device Drivers Were Found
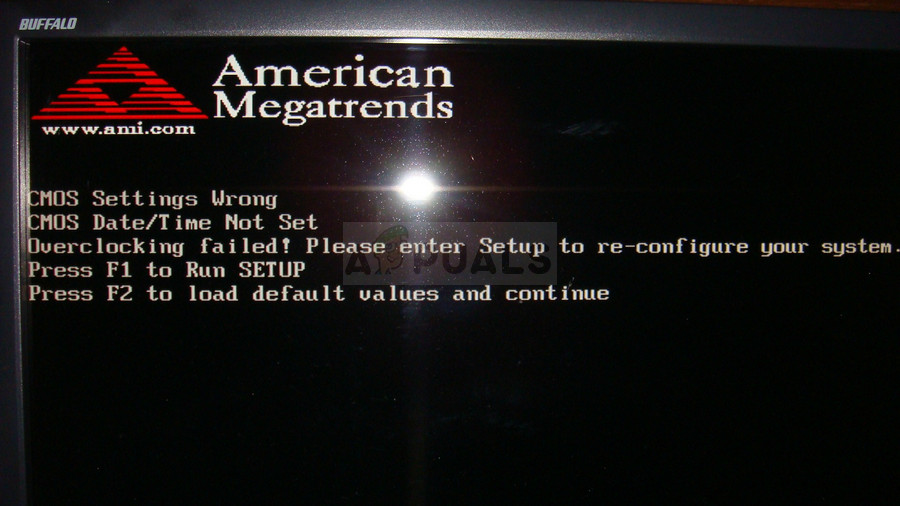
This error is quite specific as it occurs when users are either trying to reinstall their current operating system or when they are installing a new one using a DVD or USB installation storage device. The message indicates that the drivers on the installation media are either missing or corrupt but we will show that this is not always the case.
There are quite a few different solutions to this problem so make sure you try out all of them and we are certain that one of them will be successful. Good luck!
Solution 1: Switch to a USB 2.0 Port
If you have plugged the USB installation media from where you want to install the new operating system into a 3.0 USB on your computer, try disconnecting it and connecting to a 2.0 port. This is a weird fix but it has helped numerous users and this is definitely the easiest thing for you to check and take care off. Proceed with other solutions if this one doesn’t work out.
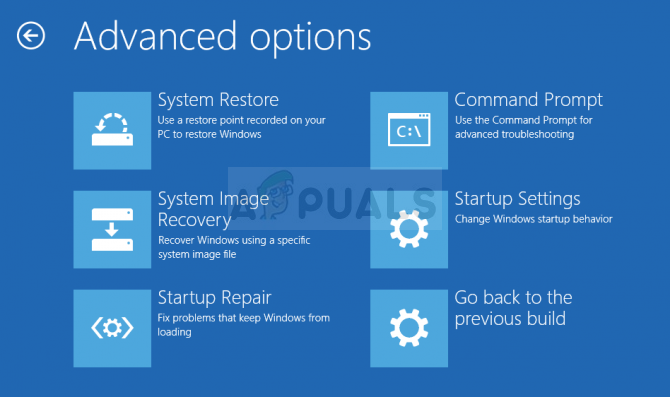
Solution 2: Set the Partition to Active
Setting the partition where you want to install Windows to as Active has also helped in countless cases where users were on the verge of giving up. This needs to be performed via Recovery tools which appear as an option before choosing to install Windows.
- Insert the installation media storage device you own and start your computer. The following steps are different from one operating system to another so follow them accordingly:
- WINDOWS XP, VISTA, 7: Windows Setup should open prompting you to enter the preferred language along with time and date. Enter them correctly and choose the Repair your computer option at the bottom of the screen. Keep the initial radio button as your choice when prompted with Use recovery tools or Restore your computer and click on the Next option. Choose Command Prompt when prompted with the Choose a recovery tool selection.
- WINDOWS 8, 8.1, 10: You will see a Choose your keyboard layout window so choose the one you want to use. The Choose an option screen will appear so click on Troubleshoot >> Advanced Options >> Command Prompt.
- Once Command Prompt opens successfully, type in the following commands and make sure you click the Enter key after you type in each one:
- Note that the X stands for the name of the disk in command “select disk X” and the X in command “select partition X” where you intend to install Windows to. After this, only one command remains:
- Now you can quit and restart your computer in order to apply the changes and to initiate the installing process with your new operating system.
Solution 3: Create a New Disc
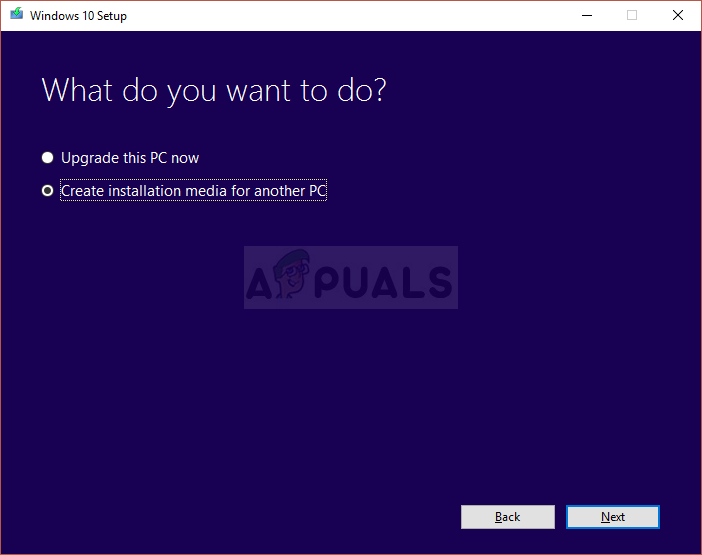
If the reason for this error is simply the fact that the drivers weren’t burned successfully or if the disc or the USB device endured some damage in the meantime, there is no other choice than to try and burn another copy of the operating system. The important thing is that you keep your serial key as it can be used only once. Here are the complete instructions on creating a Windows 10 installation DVD or USB:
- Download the Media Creation Tool from Microsoft’s official website. Open the downloaded file called MediaCreationTool.exe in order to open the installation file and initiate the process. Tap Accept to agree on terms set by Microsoft.
- Select the Create installation media (USB flash drive, DVD, or ISO file) for another PC from the initial window.
- The language, architecture, and edition of the bootable drive will be chosen based on your computer’s settings, but you should uncheck the Use the recommended options for this PC in order to select the correct settings for the PC which is encountering the error (if you are creating this on a different PC).
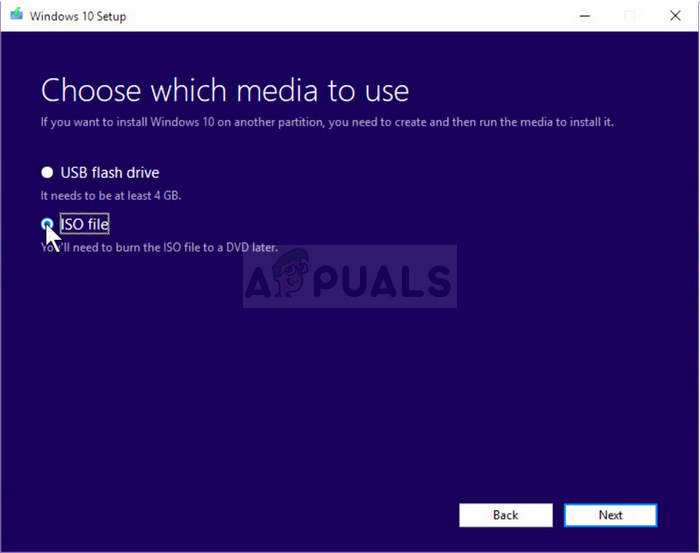
- Click Next and click on the USB drive or DVD option when prompted to choose between USB or DVD, depending on which device you want to use to store this image on.
- Click Next and choose the drive from the list which will show the storage devices connected to your computer.
- Click Next and the Media Creation Tool will proceed to download the files necessary to install create the installation device.
- Try installing your Windows 10 operating system using this drive and check to see if the same error appears.
Solution 4: Enable the xHCI hand-off Option in BIOS
This option is quite debatable and there are quite a few representations of what exactly does it to. However, the most accepted answer is that, when Disabled, it lets BIOS manage USB devices and ports and, when Enabled, it lets the operating system manage this. There are plenty of people who claim that enabling this option fixed their problem immediately. This is also recommended for new operating systems such as Windows 10 or Windows 8.
- Turn off your computer by going to the Start Menu >> Power Button >> Shut down.
- Turn your PC on again and try to enter BIOS settings by pressing the BIOS key as the system is about to start. The BIOS key is typically displayed on the boot screen, saying “Press ___ to enter Setup.” There are other keys as well. Common BIOS keys are F1, F2, Del, Esc and F10. Note that you will have to be quick about this as the message disappears pretty fast.
- The setting which you need to turn off is usually located under the Advanced tab which may be called different depending on the manufacturer. The setting is called BIOS xHCI Hand-Off or BIOS EHCI Hand-OFF and it’s usually right there under USB Configuration in the Advanced tab.
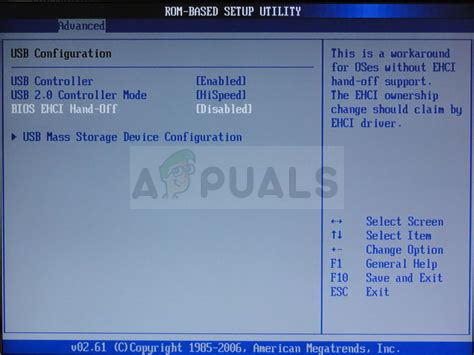
- Once you locate the correct settings, set it to Enabled. Navigate to the Exit section and choose to Exit Saving Changes. This will proceed with the computer’s boot. Make sure you try to run the installation again.
- Don’t forget to change the settings back to their original state after you have finished with the process and installed Windows 10 successfully on your computer.
Solution 5: Change Everything to Legacy and Set the Boot Device to Your DVD or USB
Setting certain settings to support Legacy has proven to be successful in many cases and sometimes your computer tries to boot from your HDD first ignoring the inserted Windows installation media which results in poor readings of the device. That is why you will need to assess the set of steps below in order to solve the problem.
- Navigate to BIOS by following the steps 1 and 2 from the solution above.
- Use the right arrow key to select the Security menu, use the down arrow key to select Secure Boot Configuration, and press the Enter key.
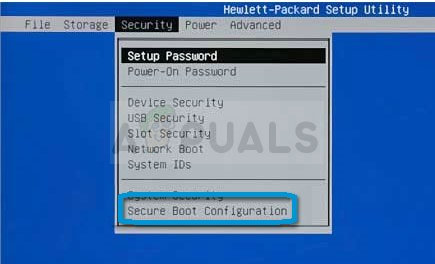
- Before you can use this option, a warning appears. Press F10 to continue to the Secure Boot Configuration menu.
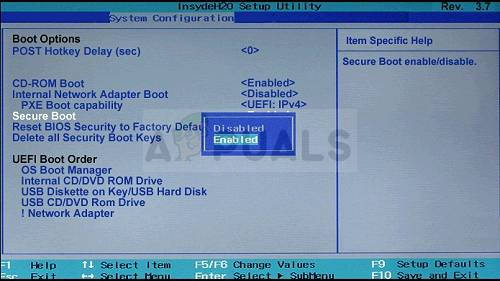
- Use the down arrow key to select Secure Boot and use the right arrow key to modify the setting to Disable.
- Use the down arrow key to select Legacy Support, and then use the right arrow key to modify the setting to Enable. Press F10 in order to accept the changes.
- Use the left arrow key to select the File menu, use the down arrow key to select Save Changes and Exit, then press Enter to select Yes.
- The Computer Setup Utility closes and the computer restarts. When the computer has restarted, use the power button to turn the computer off.
If you are not certain how to boot from installation media, you need to know just which option to select when the boot menu opens. It will ask you from which device you want to boot your computer. Follow the instructions below to boot from your storage device easily.
- Turn the computer on. As soon as the computer starts, a message appears indicating that the boot mode has changed.
- Type the four-digit code shown in the message, and then press Enter to confirm the change.
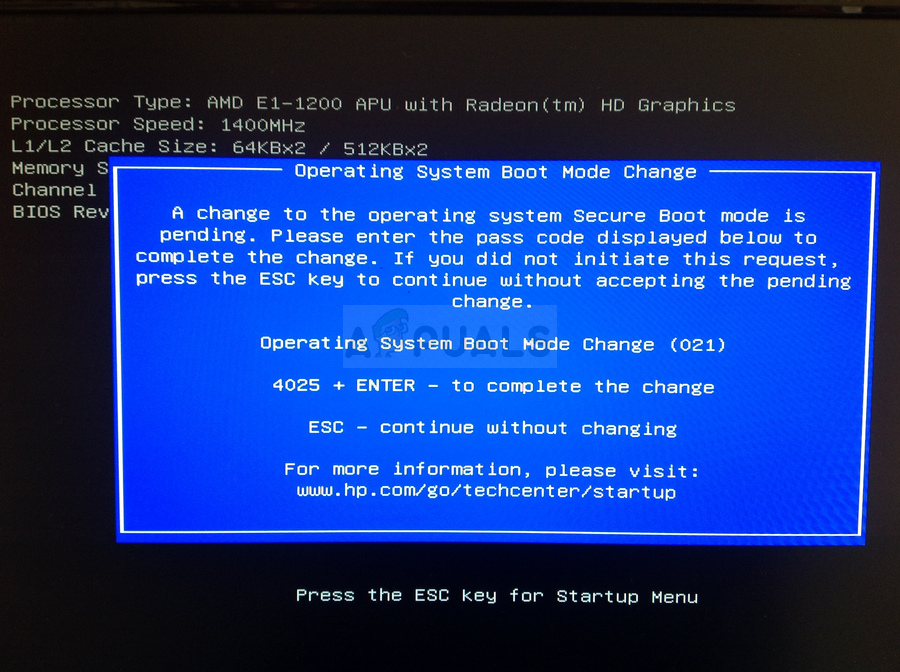
- Press the power button to turn off the computer, wait a few seconds, then turn on the computer and immediately press the Escape key repeatedly, about once every second, until the Startup menu opens. Press F9 to open the Boot Menu.
- Use the down arrow key to select your hard disk from the boot menu and make sure you choose it by clicking the Enter key. Restart your computer and check to see if the problem is solved.
Fix: A media driver is missing when installing Windows 10

- Before we move to deal with any steps, we suggest you check the system requirements for Windows 10.
- Not every compatible USB flash stick (6 GB of storage space) will load the installation files . In case you have an alternative USB flash drive , try re-creating the setup and try installing Windows 10 again.
- For any issues regarding external USB drives, you will certainly find a solution in our dedicated category.
- The Windows 10 errors hub is full of expert articles and complete guides on how to fix Windows 10 errors. You can use it as your main information reference on this topic.
- Download DriverFix now for free (secured download)
- Launch the program and press the Scan icon
- Wait for the scan to finish and start installing the needed drivers
- DriverFix has been successfuly downloaded by 0 readers this month.
As time pass, installing Windows became a walk in the park.
Anyone remembering Windows XP and the lengthy installation process closely followed by the demoralizing driver’s lookup? Those are, luckily, the things of the past.
The USB installation media boots fine, however, the installation fails due to a missing USB hub driver.
We provided some solutions which should help you overcome this problem. Check them out below.
How can I fix A media driver your computer is missing in Windows 10?
1: Make sure you meet the Windows 10 requirements
First things first. Before we move to deal with the steps, we suggest you check the system requirements for Windows 10.
Besides applying this to a standard system configuration, we also recommend updating your BIOS (if updates are available) before you move to a clean installation of Windows 10.
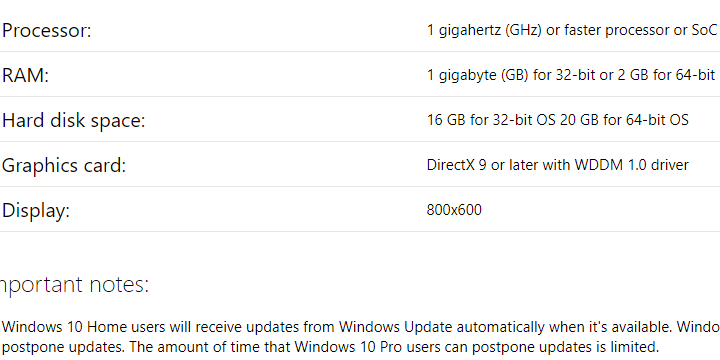
Here are the minimum system requirements you’ll need to meet in order to run Windows 10:
- CPU: 1 gigahertz (GHz) or faster processor or SoC
- RAM: 1 gigabyte (GB) for 32-bit or 2 GB for 64-bit
- HDD space: 16 GB for 32-bit OS 20 GB for 64-bit OS
- GPU: DirectX 9 or later with WDDM 1.0 driver
- Display: 800×600

Of course, in order to achieve a seamless workflow, it’s better to have at least 2 GB of RAM (3 for the 64-bit version) and much better processing power.
2: Try switching the USB hub midway
This isn’t a new problem. Not by a long stretch. A lot of users experienced the error while clean installing Windows 7 and 8, as well.
Now, it seems that the certain user provided the solution for the Windows 7 installation issue, which can, hopefully, apply to Windows 8 or, in this case, Windows 10.
Namely, he/she was able to go past the error screen with a nifty workaround. Here’s how to do it yourself:
- Create the USB installation drive with Media Creation Tool or Rufus.
- Boot from the drive and wait for the installation files to load.
- Choose your preferences and click Install now.
- When the error occurs, click Cancel, unplug the USB and plug it into a different USB port.
- Click Install now again and everything should work just fine.
This should work but we must stress that this mostly applies to users who already installed Windows 10 on a given machine before.
3: Try different USB stick and use USB 2.0 port exclusively
For some peculiar reason, not every compatible USB flash stick (6 GB of storage space) will load the installation files.
Run a System Scan to discover potential errors


In case you have an alternative USB flash drive, try re-creating the setup and try installing Windows 10 again. You can use either Media Creation Tool or any third-party application to do so.
Furthermore, if you’ve never installed Windows 10 before on the given PC, chances are that the BIOS won’t load the installation setup if you use a USB 3.0 port.
So, make sure to stick exclusively with the USB 2.0 ports while installing Windows 10. You’ll easily recognize the USB 3.0 port by the blue stripe inside.
4: Set USB option to Auto and disable Legacy USB if available
Disabling/enabling some of the options available in BIOS helped some users circumvent the error.
Firstly, if you’re installing a 64-bit version of Windows 10, we recommend disabling Legacy USB and Legacy BIOS in the BIOS (UEFI) settings.
Also, make sure to enable the AHCI prior to plugging in the flash installation drive.
Some contemporary configurations allow users to enable USB option to USB 3.0 solely. We suggest setting it to Auto. If you have the option like that in your BIOS/UEFI menu, of course.
5: Try using Rufus instead of the Media Creation Tool or DVD
Finally, if you’re unable to get through with it, starting from a scratch with the Rufus might be your way out.
Even though the Microsoft-provided Media Creation Tool usually works just fine, we suggest to try out the alternative.
Also, if you depleted options when it comes to installing Windows 10 from the USB flash, just give a DVD a try.
You can download the ISO file and burn it to DVD by using nothing else but the Windows resources. The main condition is that you have a DVD-ROM at your disposal.
Another viable solution is to upgrade to Windows 10 from Windows 7/8.1 with the Media Creation tool through the system and perform a clean reinstallation later on.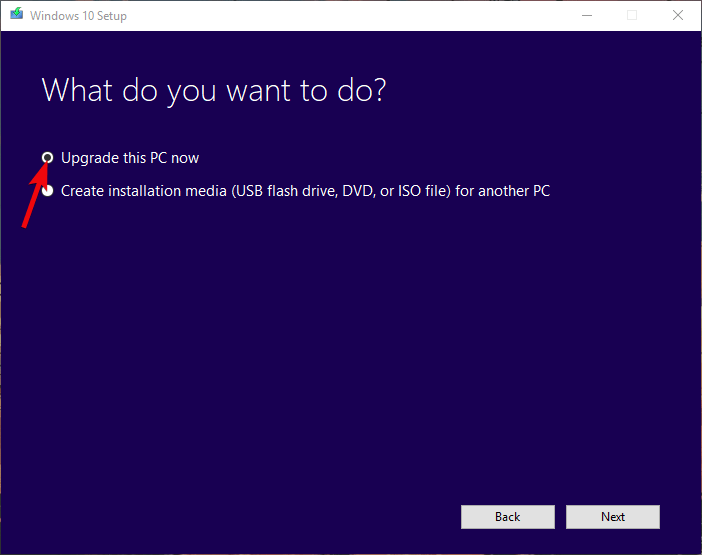
That should do it. In case you have an alternative solution or questions regarding the enlisted ones, make sure to tell us in the comments section below.


