- 3 Ways to Fix Windows Won’t Install on SSD or HDD
- Windows unable to install on SSD
- Situation 1. SSD not recognized by BIOS
- Situation 2. SSD not recognized by Windows 10/8/7 Setup
- Situation 3. Windows cannot be installed to this disk
- What to do if you can’t install Windows 10 on SSD [QUICK FIX]
- What can I do if I can’t install Windows 10 on SSD?
- 1. Preliminary fixes
- 2. Convert disk to GPT
- 3. Download Windows 10 Media creation tool
- 4. Update BIOS
- 5. Set up GPT
- Installing windows 10 on SSD
- Replies (9)
3 Ways to Fix Windows Won’t Install on SSD or HDD
There are 3 situations where Windows 10/8/7 won’t install on SSD. Learn the step by step guide to make it right.

By AOMEI  / Last Updated February 13, 2020
Windows unable to install on SSD
Installing Windows 10/8/7 on a solid state drive (SSD) will surely make your computer faster. However, it would be frustrating if Windows won’t install on SSD. This article covers 3 situations and provides a corresponding solution so you can fix this effectively.
Situation 1. SSD not recognized by BIOS
Usually, an SSD will be automatically detected in BIOS when you attach it. However, if your SSD is not showing in BIOS, you should check the things belowпј›
1. Check the SSD cable connection. You can simply switch another SATA cable. You can also connect it to an external USB adapter to see if it is a problem of damaged BIOS connection.
2. Check if SATA port is enabled. In some cases, the port is turned OFF in System Setup (BIOS). When you connect a new SSD drive to the system, you may need to manually turn it on before you can see the drive in BIOS.
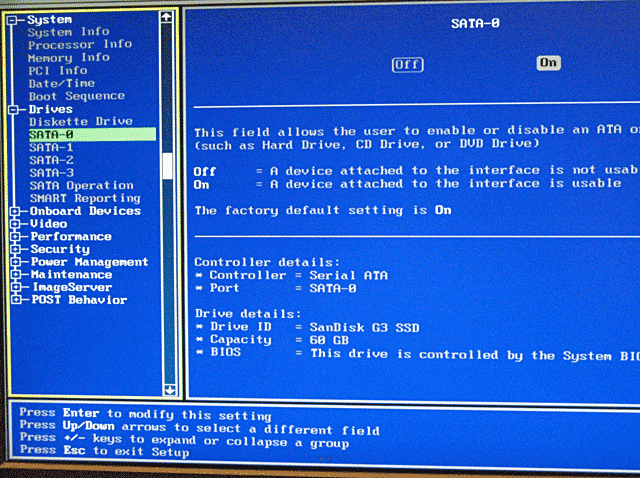
3. Connect the drive to another working computer to see if the SSD is damaged.
Situation 2. SSD not recognized by Windows 10/8/7 Setup
If it is detected in BIOS, then you can refer to the following steps to make it right:
If it is detected in BIOS, then you can refer to the following steps to make it right:
1. Boot into BIOS, and set SATA to AHCI Mode. For installing Windows8/10 cannot install on SSD, enable Secure Boot if it is available.
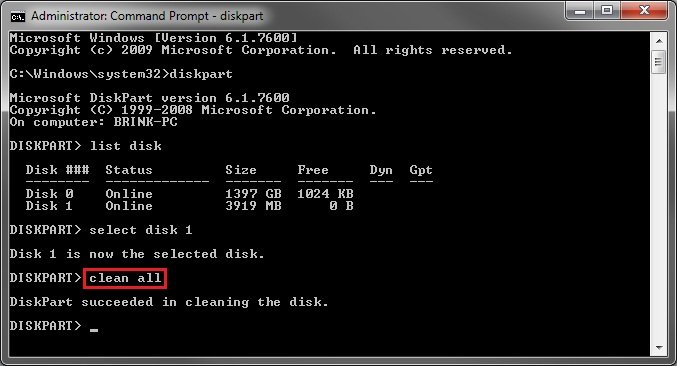
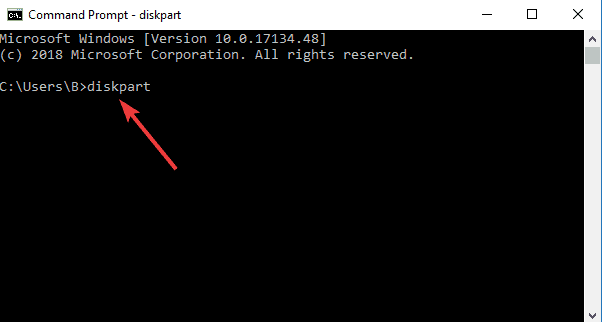
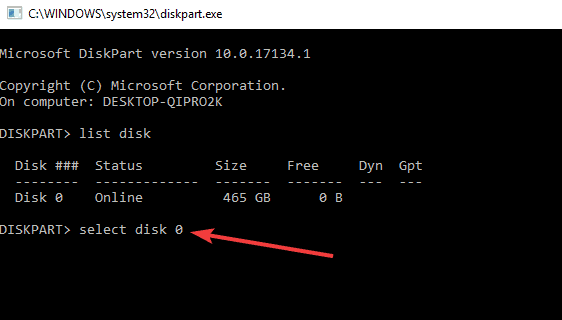
2. If your SSD still is not showing at Windows Setup, press SHIFT+F10 to open a Command Prompt window.
3. Type “diskpart”
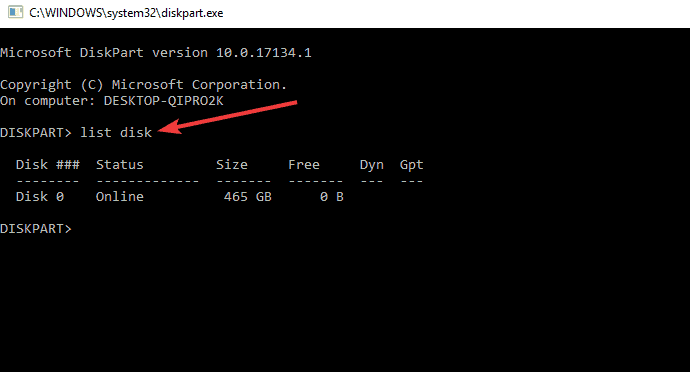
4. Type “list disk” to display all the disks connected to your computer.
5. Type “select disk [disk number]” For example, type “select disk 0” if you have insert one drive in your system
6. Make sure the selected disk has no valuable data. Type “clean all” and press Enter to wipe out all data from the SSD.
7. When the process is complete, type “exit” to close this windows and go back to Windows Setup screen.
After that, you should see the SSD drive appear at Windows Setup. If you think this disk clean process may reduce its lifespan, you can perform a Secure Erase for SSD.
Situation 3. Windows cannot be installed to this disk
If Windows sees the SSD drive, but you can’t install Windows on SSD GPT with an error “Windows cannot be installed to this disk. The selected disk is of the GPT partition style”, you can fix this through changing BIOS settings or converting disk to MBR partition style.
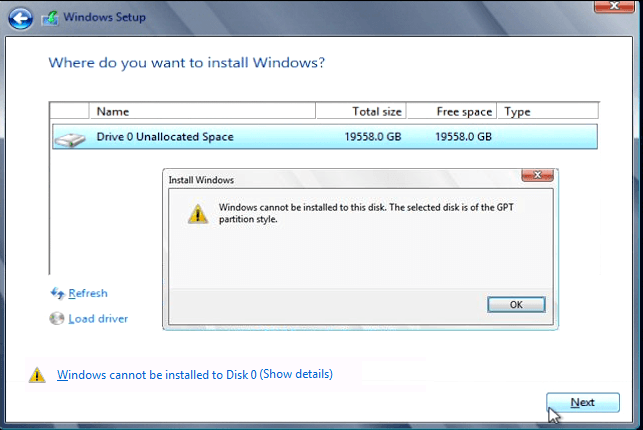
If your computer supports UEFI boot, you can go to BIOS settings and enable UEFI mode. If you only see Legacy boot mode, you can convert the SSD to MBR disk referring to the following.
1. Press Shift+F10 to bring out a command prompt.
2. Type the following:
diskpart
list disk
select disk [disk number]
clean
convert mbr
3. Wait for the process to complete. Till then, go back to Windows installation screen, and then you should be able to install Windows.
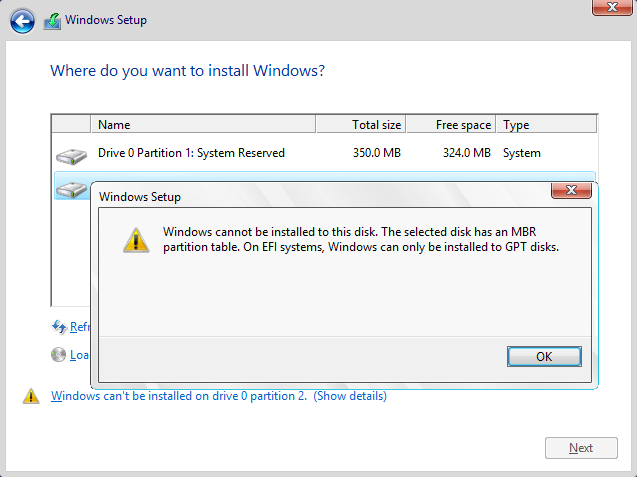
If the error message you received is “Windows cannot be installed to this disk. The selected disk has an MBR partition table. On EFI systems, Windows can only be installed to GPT disks”, you can disable UEFI mode and enable Legacy mode, or you can convert SSD to GPT disk.
As mentioned, using diskpart.exe to convert disk to MBR/GPT will completely wipe out everything on the disk. If you do not want the SSD to be erased, there is third party software AOMEI Partition Assistant Standard that allows you to convert disk to MBR/GPT without data loss/removing partitions.
You can download the free version on a working computer and connect your SSD to it as a second drive. To convert drive to GPT/MBR with AOMEI Partition Assistant:
1. Open this software.
2. Right click on the SSD and select Convert to GPT. If your SSD is MBR, select Convert to MBR.
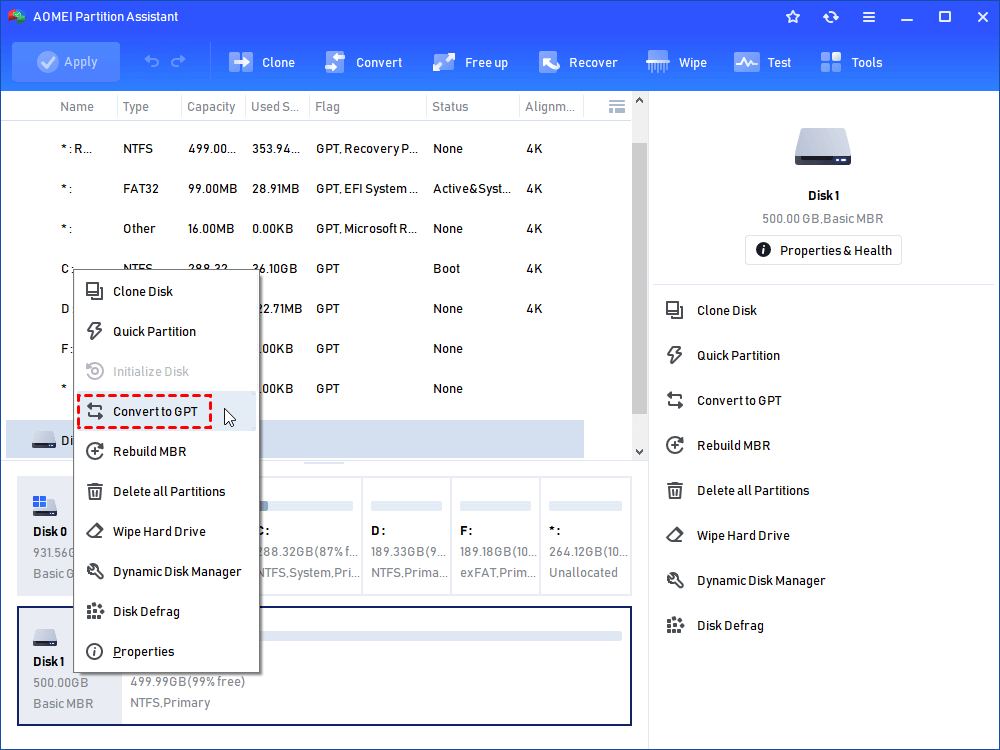
3. Confirm the task and click “Apply” to apply this change.

PS.: You need to uprade AOMEI Partition Assistant to Professional version if you need to convert system disk between MBR and GPT.
This software also allows you to create a bootable media so you can use it on a computer that has no Windows system installed yet. If you want to clone hard drive to SSD instead of fresh install, this software can be of use too. In conclusion, you don’t need to panic when Windows will not install on SSD. You can just follow these steps to fix it based on your own situation.
What to do if you can’t install Windows 10 on SSD [QUICK FIX]

- Usually, the error message that appears on the screen is Windows cannot be installed onto this disk. This computer’s hardware may not support booting to this disk. Ensure the disk’s controller is enabled in the computers BIOS menu. We fixed this problem in the article below.
- In you’re into fast transfer and low maintenance you’re a SSD fan. Read our article about the best deals on external SSD drives.
- There are no shortages in Windows installation errors so take a look at the Windows Installer errors we covered until now.
- If you experienced any other Windows 10 errors we’ve got you covered. Check out our Windows 10 errors hub.
If you connected a new SSD on your computer, but you can’t use it to install Windows 10, continue reading this guide to learn how you can fix this problem.
Usually, the error message that appears on the screen is this:
Windows cannot be installed onto this disk. This computer’s hardware may not support booting to this disk. Ensure the disk’s controller is enabled in the computers BIOS menu.
There’s a reason why people prefer to install their Windows 10 operating system on SSD – it makes the computer run much faster.
However, if you can’t install Windows 10 on SSD storage, there are solutions that can help get you be able to do it so you can enjoy faster processing speeds and run time on your machine.
What can I do if I can’t install Windows 10 on SSD?
1. Preliminary fixes
- One solution you can start with when you can’t install Windows 10 on SSD is to perform a clean install to a partition of the right size on an HDD, and clone that to the SSD. The only thing you’ll need to check is the number of free blocks before the partition.
- Make sure that the SSD is attached correctly, with all cables plugged in properly.
- Make sure you have the latest BIOS version on the laptop.
- It shouldn’t matter which slot SSD is in, but if your machine says it should be in a particular spot, like primary bay then that’s where it should be.
- Windows works best with UEFI. Unfortunately, there are machines where it got corrupted. It might be a repair job if update won’t fix things.
- Make sure that SATA Operation mode is on AHCI.
2. Convert disk to GPT
When you can’t install Windows 10 on SSD, convert the disk to GPT disk or turn off UEFI boot mode and enable legacy boot mode instead. To do this:
- Boot into BIOS, and set SATA to AHCI Mode.
- Enable Secure Boot if it is available.
- If your SSD still is not showing at Windows Setup, type CMD in the search bar, and click Command Prompt
- Type diskpart
- Type list disk to display all the disks
- Type select disk [disk number] for exampe select disk 0
- Make sure the selected disk has no valuable data.
- Type clean all and press Enter to wipe out the SSD.
- Type exit to close this windows and go back to Windows Setup screen.
Accessing BIOS seems too big of a task? Let us make things easier for you with the help of this amazing guide!
3. Download Windows 10 Media creation tool
Check the media, as this step is crucial because some Windows media can get corrupt and fail to use the SSD. To do this:
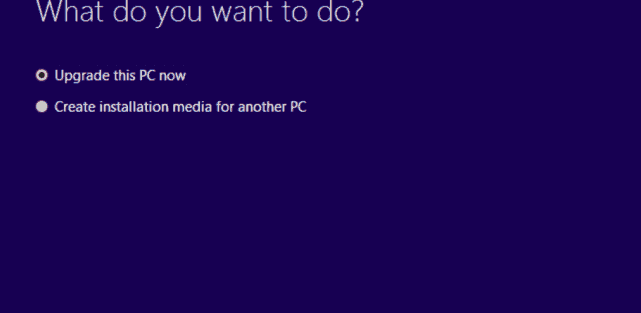
- On a working computer, go to the Microsoft software download website
- Download media creation tool and run it
- Select Create installation media for another PC

- Choose a language, edition and architecture (32 or 64-bit)
- Follow the steps to create installation media then click Finish
- Connect the installation media you created to the computer that isn’t working and turn it on
- On the initial set up screen, enter language and other preferences and click Next
- If you don’t see set up screen, your computer may not be set up to boot from drive so check how to change your computer’s boot order (from manufacturer’s website) and try again
- Select Repair your computer
- On Choose an option screen, click Troubleshoot
- Select Advanced options
- Select System Restore
- Select Reset this PC to reinstall Windows 10
If you want to create a bootable USB drive with Windows 10 on it, follow the simple steps in this article and do it with ease.
4. Update BIOS
You can update your computer’s BIOS to version A16 by downloading the BIOS Update Executable file for Windows. Once you find the file from your computer manufacturer’s site, do the following:
- Click Download File to download the file.
- When the File Download window appears, click Save to save the file to your hard drive.
- Run the BIOS update utility from Windows environment
- Browse to where you downloaded the file and double-click the new file.
- Windows System will auto restart and update BIOS while system startup screen.
- After BIOS update is finished, the system will automatically reboot to effect changes.
Note: Do not turn off your computer or disconnect from your power source while updating the BIOS or you may harm your computer.
Do not carry out other tasks on the computer until the BIOS update has completed. Back up your data files to external media before updating the BIOS.
If you don’t know how to backup your data on Windows 10, this step-by-step guide will help you do it in no time.
Also, if you want some backup software that will automatically do it for you, check out this list with our best picks.
If your SSD isn’t recognized by the BIOS when you attach it, check for these things:
- Check the SSD cable connection or switch another SATA cable. You can also connect it to an external USB adapter.
- Check if SATA port is enabled as sometimes the port is turned OFF in System Setup (BIOS). You may need to manually turn it on before you can see the drive in BIOS.
- Connect the drive to another working computer to see if the SSD is damaged.
5. Set up GPT
If Windows 10 sees your SSD drive but you can’t install Windows 10 on SSD, you’ll get the error ‘Windows cannot be installed to this disk.
The selected disk is of the GPT partition style.’ This can be fixed by changing BIOS settings or converting the disk to MBR partition style. To do this:
- Go to BIOS settings and enable UEFI mode. If you only see Legacy boot mode, convert the SSD to MBR disk
- Press Shift+F10 to bring out a command prompt.
- Type Diskpart
- Type List disk
- Type Select disk [disk number]
- Type Clean Convert MBR
- Wait for the process to complete.
- Go back to Windows installation screen, and install Windows 10 on your SSD.

Were you able to install Windows 10 on SSD after using any of these fixes? Let us know your experience by leaving a comment in the section below.
Also, leave there any other questions you may have and we’ll be sure to check them out.
Installing windows 10 on SSD
I recently decided to purchase an SSD to install Windows on. Unfortunately I am unable to install Windows on the SSD as every time I select the drive on the installer I get this error «Windows cannot be installed to this disk. This computer’s hardware may not support booting to this disk. Ensure the disk’s controller is enabled in the computer’s bios menu»
I’ve looked at lots of other posts of people having this issue but am still not able to resolve the issue.
Motherboard: Gigabyte Z370P D3
SSD: Crucial MX500 250GB SSD
Replies (9)
BIOS is up to date and controller is NOT in legacy mode?
You may need the Windows 10 Pre-Install driver:
1 person found this reply helpful
Was this reply helpful?
Sorry this didn’t help.
Great! Thanks for your feedback.
How satisfied are you with this reply?
Thanks for your feedback, it helps us improve the site.
How satisfied are you with this reply?
Thanks for your feedback.
Hi James, connect the SSD to the same SATA port the original drive was connected to and disconnect any other drives on your system
Insert the Bootable Installation Media, then go into your BIOS and make the following changes:
1. Set SATA MODE to AHCI
2. Disable Secure Boot
3. Enable Legacy Boot
4. If Available enable CSM
5. If Required enable USB Boot
6. Move the device with the bootable disc to the top of the boot order
7. Save BIOS changes, restart your System and it should boot from the Installation Media
Power to the Developer!
MSI GV72 — 17.3″, i7-8750H (Hex Core), 32GB DDR4, 4GB GeForce GTX 1050 Ti, 256GB NVMe M2, 2TB HDD
1 person found this reply helpful
Was this reply helpful?
Sorry this didn’t help.
Great! Thanks for your feedback.
How satisfied are you with this reply?
Thanks for your feedback, it helps us improve the site.
How satisfied are you with this reply?
Thanks for your feedback.
I did all of that and then it told me it won’t work as the SSD is of the MBR type. So i booted Windows from my hard drive and changed the SSD to the GPT type as that’s what it asked for. When i got back into the installer it then told me it won’t work as the SSD is of the GPT type.
This is the crap I’ve been trying to deal with and it has turned into an endless loop.
Was this reply helpful?
Sorry this didn’t help.
Great! Thanks for your feedback.
How satisfied are you with this reply?
Thanks for your feedback, it helps us improve the site.
How satisfied are you with this reply?
Thanks for your feedback.
I can tell you fro m personal experience is that installing a Crucial drive (1tb inmy case is a super simple process but you difinitely need to read their docs and may need they image copy utility (from Acronis in my case). The problem sounds like a UEFI/Mbr issue.
In my case, I just bought cheap external case for the SSD and did an image copy. Uninstalled the old drive and then insttalled the copied drive. Worked like a charm in a few minutes without any problems. (My feedback on Crucial support is also very high)


