- Remote Server Administration Tools (RSAT) for Windows
- Introduction
- Download locations for RSAT
- RSAT for Windows 10 platform and tools support matrix
- RSAT for Windows 10, version 1809 or later versions
- Управление сервером Server Core Manage a Server Core server
- Управление ядром сервера с помощью центра администрирования Windows Managing Server Core with Windows Admin Center
- Удаленное управление ядром сервера с помощью диспетчер сервера Managing Server Core remotely with Server Manager
- Управление с помощью консоли управления (MMC) Managing with Microsoft Management Console
- Разрешение подключений оснасток MMC в брандмауэре Windows To configure Windows Firewall to allow MMC snap-in(s) to connect
- Управление с помощью службы удаленных рабочих столов Managing with Remote Desktop Services
- Локальное Добавление оборудования и Управление драйверами Add hardware and manage drivers locally
Remote Server Administration Tools (RSAT) for Windows
RSAT enables IT administrators to remotely manage roles and features in Windows Server from a computer that is running Windows 10 and Windows 7 Service Pack 1.
Original product version: В Windows 10, version 1909, Windows 10, version 1903, Windows 10, version 1809, Windows 7 Service Pack 1, Windows Server 2019, Windows Server 2012 R2
Original KB number: В 2693643
Introduction
You can’t install RSAT on computers that are running Home or Standard editions of Windows. You can install RSAT only on Professional or Enterprise editions of the Windows client operating system. Unless the download page specifically states that RSAT applies to a beta, preview, or other prerelease version of Windows, you must be running a full (RTM) release of the Windows operating system to install and use RSAT. Some users have found ways of manually cracking or hacking the RSAT MSU to install RSAT on unsupported releases or editions of Windows. This behavior is a violation of the Windows end-user license agreement.
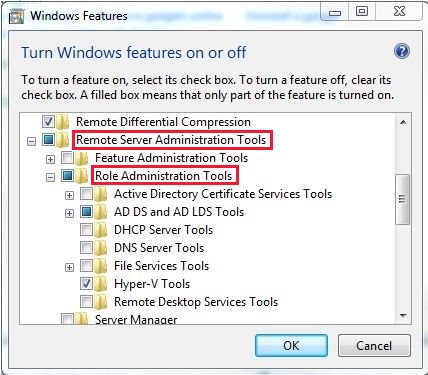
Installing RSAT is similar to installing Adminpak.msi in Windows 2000-based or Windows XP-based client computers. However, there’s one major difference: in Windows 7, the tools aren’t automatically available after you download and install RSAT. Enable the tools that you want to use by using Control Panel. To enable the tools, click Start, click Control Panel, click Programs and Features, and then click Turn Windows features on or off.
In the RSAT releases for Windows 10, tools are again all enabled by default. You can open Turn Windows features on or off to disable tools that you don’t want to use for Windows 7.

For RSAT in Windows 7, you must enable the tools for the roles and features that you want to manage after you run the downloaded installation package.
You can’t do the following changes for RSAT in Windows 8 or later versions.
If you have to install management tools in Windows Server 2012 R2 for specific roles or features that are running on remote servers, you don’t have to install additional software. Start the Add Roles and Features Wizard in Windows Server 2012 R2 and later versions. Then, on the Select Features page, expand Remote Server Administration Tools, and then select the tools that you want to install. Complete the wizard to install your management tools.

Download locations for RSAT
RSAT for Windows 10 platform and tools support matrix
| Remote Server Administration Tools Technology | Description | Manages technology in Windows Server 2012 R2 | Manages technology in Windows Server 2016 Technical Preview and Windows Server 2012 R2 |
|---|---|---|---|
| Active Directory Certificate Services (AD CS) tools | AD CS tools include the Certification Authority, Certificate Templates, Enterprise PKI, and Online Responder Management snap-ins. | в€љ | в€љ |
| Active Directory Domain Services (AD DS) tools and Active Directory Lightweight Directory Services (AD LDS) tools | AD DS and AD LDS tools include the following tools: |
— Active Directory Administrative Center
— Active Directory Domains and Trusts
— Active Directory Sites and Services
— Active Directory Users and Computers
— ADSI Edit
— Active Directory module for Windows PowerShell
— Tools such as
- DCPromo.exe
- LDP.exe
- NetDom.exe
- NTDSUtil.exe
- RepAdmin.exe
- DCDiag.exe
- DSACLs.exe
- DSAdd.exe
- DSDBUtil.exe
- DSMgmt.exe
- DSMod.exe
- DSMove.exe
- DSQuery.exe
- DSRm.exe
- GPFixup.exe
- KSetup.exe
- NlTest.exe
- NSLookup.exe
- W32tm.exe
— Connection Manager Administration Kit console
— Remote Access provider for Windows PowerShell
— Web Application Proxy
GUI tools support Windows Server 2016 Technical Preview and Windows Server 2012 R2. Only PowerShell tools work in Windows Server 2012.
— Share and Storage Management tools
— Distributed File System tools
- The DFS Management snap-in
- The Dfsradmin.exe , Dfsrdiag.exe , Dfscmd.exe , Dfsdiag.exe , and Dfsutil.exe command-line tools
- PowerShell modules for DFSN and DFSR
— File Server Resource Manager tools
- The File Server Resource Manager snap-in
- The Dirquota.exe , Filescrn.exe , and Storrept.exe command-line tools.
— Services for NFS Administration tools
— iSCSI management cmdlets for Windows PowerShell
— Work Folders Management tools
The Share and Storage Management snap-in is deprecated after the release of Windows Server 2016. Storage Replica is new in Windows Server 2016 Technical Preview, and won’t work in Windows Server 2012 R2.
Group Policy has some new features in Windows Server 2016 Technical Preview that aren’t available on older operating systems.
IPAM tools in Remote Server Administration Tools for Windows 10 can’t be used to manage IPAM running in Windows Server 2012 R2.
IPAM tools in Remote Server Administration Tools for Windows 10 can’t be used to manage IPAM running in Windows Server 2012 R2.
— Remote Desktop snap-ins
— RD Gateway Manager
— tsgateway.msc
— RD Licensing Manager
— licmgr.exe
— RD Licensing Diagnoser
— lsdiag.msc
Use Server Manager to administer all other RDS role services except RD Gateway and RD Licensing.
Remote management with Server Manager is available in Windows Server 2016 Technical Preview, Windows Server 2012 R2, and Windows Server 2012.
WSRM has been deprecated in Windows Server 2012 R2. Tools for managing WSRM aren’t available in RSAT for Windows 8.1 and later releases of RSAT.
RSAT for Windows 10, version 1809 or later versions
You can’t use the Turn Windows features on and off dialog from the Control Panel
Installing the RSAT Tools for Windows 10 version 1809 and later version is slightly different from earlier versions. RSAT is now part of the Operating System an can be installed via Optional Features.
To enable the tools, click Start, click Settings, click Apps, and then click Optional features, after that click on the panel Add a feature and enter Remote in the search bar.
Управление сервером Server Core Manage a Server Core server
Область применения: Windows Server 2019, Windows Server 2016 и Windows Server (половина ежегодного канала) Applies to: Windows Server 2019, Windows Server 2016, and Windows Server (Semi-Annual Channel)
Управлять сервером Server Core можно следующими способами. You can manage a Server Core server in the following ways:
- Использование центра администрирования Windows Using Windows Admin Center
- Использование средства удаленного администрирования сервера , работающего в Windows 10 Using Remote Server Administration Tools running on Windows 10
- Локально и удаленно при помощи Windows PowerShell Locally and remotely using Windows PowerShell
- Удаленное использование Диспетчер сервера Remotely using Server Manager
- Удаленное использование оснастки MMC Remotely using an MMC snap-in
- Удаленно с службы удаленных рабочих столов Remotely with Remote Desktop Services
Можно также добавить аппаратное обеспечение и управлять драйверами локально, при условии, что это выполняется из командной строки. You can also add hardware and manage drivers locally, as long as you do that from the command line.
Существуют некоторые важные ограничения и советы, которые следует учитывать при работе с Server Core. There are some important limitations and tips to keep in mind when you work with Server Core:
- Если вы закроете все окна командной строки и хотите открыть новое окно командной строки, это можно сделать в диспетчере задач. If you close all command prompt windows and want to open a new Command Prompt window, you can do that from the Task Manager. Нажмите клавиши CTRL + Alt + Delete, выберите запустить диспетчер задач, щелкните Дополнительные сведения > файл > выполнить, а затем введите cmd.exe. Press CTRL+ALT+DELETE, click Start Task Manager, click More Details > File > Run, and then type cmd.exe. (Введите Powershell.exe , чтобы открыть окна команд PowerShell.) Кроме того, можно выйти и снова войти в систему. (Type Powershell.exe to open a PowerShell command windows.) Alternatively, you can sign out and then sign back in.
- Команды или служебные программы, которые пытаются запустить проводник, работать не будут. Any command or tool that attempts to start Windows Explorer will not work. Например, запуск . For example, running start . из командной строки работать не будет. from a command prompt won’t work.
- В Server Core отсутствует поддержка HTML-отрисовки или HTML-справки. There is no support for HTML rendering or HTML help in Server Core.
- Server Core поддерживает установщик Windows в тихом режиме, чтобы можно было устанавливать средства и служебные программы из установщик Windows файлов. Server Core supports Windows Installer in quiet mode so that you can install tools and utilities from Windows Installer files. При установке пакетов установщик Windows в Server Core используйте параметр /QB для вывода основного пользовательского интерфейса. When installing Windows Installer packages on Server Core, use the /qb option to display the basic user interface.
- Чтобы изменить часовой пояс, выполните команду Set-Date. To change the time zone, run Set-Date.
- Чтобы изменить международные параметры, выполните intl.cplуправления. To change international settings, run control intl.cpl.
- Control.exe не будет выполняться самостоятельно. Control.exe won’t run on its own. Его необходимо запустить с помощью Timedate.cpl или Intl.cpl. You must run it with either Timedate.cpl or Intl.cpl.
- Winver.exe недоступна в Server Core. Winver.exe isn’t available in Server Core. Чтобы получить сведения о версии, используйте Systeminfo.exe. To obtain version information use Systeminfo.exe.
Управление ядром сервера с помощью центра администрирования Windows Managing Server Core with Windows Admin Center
Windows Admin Center — это браузерное приложение для управления системами с Windows Server независимо от Azure или облака в локальной среде. Windows Admin Center is a browser-based management app that enables on-premises administration of Windows Servers with no Azure or cloud dependency. Windows Admin Center предоставляет полный контроль над всеми аспектами серверной инфраструктуры и особенно полезен для управления серверами в частных сетях, которые не подключены к Интернету. Windows Admin Center gives you full control over all aspects of your server infrastructure and is particularly useful for management on private networks that are not connected to the Internet. Можно установить центр администрирования Windows в Windows 10, на сервере шлюза или в установке Windows Server с возможностями рабочего стола, а затем подключиться к системе Server Core, которой требуется управлять. You can install Windows Admin Center on Windows 10, on a gateway server, or on an installation of Windows Server with Desktop Experience, and then connect to the Server Core system that you want to manage.
Удаленное управление ядром сервера с помощью диспетчер сервера Managing Server Core remotely with Server Manager
Диспетчер сервера — это консоль управления в Windows Server, которая помогает подготавливать локальные и удаленные серверы под управлением Windows и управлять ими с настольных компьютеров, не требуя физического доступа к серверам или необходимости включать подключения протокола удаленный рабочий стол (RDP) к каждому серверу. Server Manager is a management console in Windows Server that helps you provision and manage both local and remote Windows-based servers from your desktops, without requiring either physical access to servers, or the need to enable Remote Desktop protocol (RDP) connections to each server. Диспетчер сервера поддерживает удаленное управление несколькими серверами. Server Manager supports remote, multi-server management.
Чтобы разрешить управление локальным сервером с помощью диспетчер сервера, запущенного на удаленном сервере, выполните командлет Windows PowerShell Configure-SMRemoting.exe — Enable. To enable your local server to be managed by Server Manager running on a remote server, run the Windows PowerShell cmdlet Configure-SMRemoting.exe –Enable.
Управление с помощью консоли управления (MMC) Managing with Microsoft Management Console
Для управления сервером Server Core можно использовать множество оснасток для удаленной консоли управления (MMC). You can use many snap-ins for Microsoft Management Console (MMC) remotely to manage your Server Core server.
Чтобы использовать оснастку MMC для управления сервером Server Core, который является членом домена, выполните следующие действия. To use an MMC snap-in to manage a Server Core server that is a domain member:
- Запустите оснастку MMC, например Управление компьютером. Start an MMC snap-in, such as Computer Management.
- Щелкните правой кнопкой мыши оснастку и выберите пункт подключиться к другому компьютеру. Right-click the snap-in, and then click Connect to another computer.
- Введите имя компьютера сервера Server Core и нажмите кнопку ОК. Type the computer name of the Server Core server, and then click OK. Теперь оснастку MMC можно использовать для управления сервером Server Core так же, как любой другой компьютер или сервер. You can now use the MMC snap-in to manage the Server Core server as you would any other PC or server.
Чтобы использовать оснастку MMC для управления сервером Server Core, который не является членом домена, выполните следующие действия. To use an MMC snap-in to manage a Server Core server that is not a domain member:
Установите альтернативные учетные данные, используемые для подключения к компьютеру Server Core, введя следующую команду в командной строке на удаленном компьютере: Establish alternate credentials to use to connect to the Server Core computer by typing the following command at a command prompt on the remote computer:
Если требуется ввести пароль, опустите параметр /Пасс . If you want to be prompted for a password, omit the /pass option.
При появлении запроса введите пароль для указанного имени пользователя. When prompted, type the password for the user name you specified. Если брандмауэр на сервере Server Core еще не настроен для подключения оснасток MMC, выполните следующие действия, чтобы настроить брандмауэр Windows для разрешения оснастки MMC. If the firewall on the Server Core server is not already configured to allow MMC snap-ins to connect, follow the steps below to configure Windows Firewall to allow MMC snap-in. Затем перейдите к шагу 3. Then continue with step 3.
На другом компьютере запустите оснастку MMC, например » Управление компьютером«. On a different computer, start an MMC snap-in, such as Computer Management.
В левой области щелкните правой кнопкой мыши оснастку и выберите пункт подключиться к другому компьютеру. In the left pane, right-click the snap-in, and then click Connect to another computer. (Например, в примере «Управление компьютером» щелкните правой кнопкой мыши элемент Управление компьютером (локальный)). (For example, in the Computer Management example, you would right-click Computer Management (Local).)
На другом компьютере введите имя компьютера сервера ядра сервера и нажмите кнопку ОК. In Another computer, type the computer name of the Server Core server, and then click OK. Теперь при помощи оснастки MMC вы можете управлять сервером, работающим в режиме основных серверных компонентов, так же, как вы это делаете с любым другим компьютером под управлением Windows Server. You can now use the MMC snap-in to manage the Server Core server as you would any other computer running a Windows Server operating system.
Разрешение подключений оснасток MMC в брандмауэре Windows To configure Windows Firewall to allow MMC snap-in(s) to connect
Чтобы разрешить подключение всех оснасток MMC, выполните следующую команду: To allow all MMC snap-ins to connect, run the following command:
Чтобы разрешить подключение только для конкретных оснасток MMC, выполните следующую команду: To allow only specific MMC snap-ins to connect, run the following:
Где группу правил является одним из следующих, в зависимости от того, какую оснастку вы хотите подключить: Where rulegroup is one of the following, depending on which snap-in you want to connect:
| Оснастка MMC MMC snap-in | Группа правил Rule group |
|---|---|
| Средство просмотра событий Event Viewer | Удаленное управление журналом событий Remote Event Log Management |
| Службы Services | Удаленное управление службами Remote Service Management |
| Общие папки Shared Folders | Общий доступ к файлам и принтерам File and Printer Sharing |
| Планировщик заданий Task Scheduler | Журналы и оповещения производительности, общий доступ к файлам и принтерам Performance Logs and Alerts, File and Printer Sharing |
| Управление дисками Disk Management | Удаленное управление томами Remote Volume Management |
| Брандмауэр Windows и расширенная безопасность Windows Firewall and Advanced Security | Удаленное управление брандмауэром Windows Windows Firewall Remote Management |
Некоторые оснастки MMC не имеют соответствующей группы правил, которая позволяет им подключаться через брандмауэр. Some MMC snap-ins don’t have a corresponding rule group that allows them to connect through the firewall. Однако включение групп правил для оснасток «Просмотр событий», «Службы» или «Общие папки» позволит подключаться и большинству других оснасток. However, enabling the rule groups for Event Viewer, Services, or Shared Folders will allow most other snap-ins to connect.
Кроме того, некоторые оснастки требуют дополнительной настройки для подключения через брандмауэр Windows: Additionally, certain snap-ins require further configuration before they can connect through Windows Firewall:
- Управление дисками. Disk Management. Сначала необходимо запустить виртуальную дисковую службу (службу VDS) на компьютере в режиме основных серверных компонентов. You must first start the Virtual Disk Service (VDS) on the Server Core computer. Также необходимо должным образом настроить правила для оснастки «Управление дисками» на том компьютере, где она запущена. You must also configure the Disk Management rules appropriately on the computer that is running the MMC snap-in.
- Монитор IP-безопасности. IP Security Monitor. Сначала необходимо разрешить удаленное управление этой оснасткой. You must first enable remote management of this snap-in. Для этого в командной строке введите cscript c:\windows\system32\scregedit.WSF/IM 1 To do this, at a command prompt, type cscript c:\windows\system32\scregedit.wsf /im 1
- Надежность и производительность. Reliability and Performance. Эта оснастка не требует дополнительной настройки, но с ее помощью можно наблюдать только за производительностью компьютера в режиме основных серверных компонентов. The snap-in does not require any further configuration, but when you use it to monitor a Server Core computer, you can only monitor performance data. Данные о надежности недоступны. Reliability data is not available.
Управление с помощью службы удаленных рабочих столов Managing with Remote Desktop Services
Удаленный рабочий стол можно использовать для управления сервером Server Core с удаленных компьютеров. You can use Remote Desktop to manage a Server Core server from remote computers.
Прежде чем можно будет получить доступ к Server Core, необходимо выполнить следующую команду: Before you can access Server Core, you’ll need to run the following command:
Это разрешит подключения к удаленному рабочему столу для администрирования. This enables the Remote Desktop for Administration mode to accept connections.
Локальное Добавление оборудования и Управление драйверами Add hardware and manage drivers locally
Чтобы добавить оборудование на сервер Server Core, следуйте инструкциям, предоставленным поставщиком оборудования для установки нового оборудования. To add hardware to a Server Core server, follow the instructions provided by the hardware vendor for installing new hardware.
Если оборудование не Plug and Play, необходимо вручную установить драйвер. If the hardware is not plug and play, you’ll need to manually install the driver. Для этого скопируйте файлы драйверов во временное расположение на сервере, а затем выполните следующую команду: To do that, copy the driver files to a temporary location on the server, and then run the following command:
Где дриверинф — имя файла INF для драйвера. Where driverinf is the file name of the .inf file for the driver.
При появлении запроса перезагрузите компьютер. If prompted, restart the computer.
Чтобы узнать, какие драйверы установлены, выполните следующую команду: To see what drivers are installed, run the following command:
Для успешного выполнения команды после знака равенства должен быть пробел. You must include the space after the equal sign for the command to complete successfully.
Чтобы отключить драйвер устройства, выполните следующую команду: To disable a device driver, run the following:
Где service_name — имя службы, полученной при запуске SC Query Type = Driver. Where service_name is the name of the service that you got when you ran sc query type= driver.


