- Поддержка intel® HD Graphics 5500
- Все категории статей
- Совместимость
- Сообщения об ошибке
- Информация о продукции и документация
- Определить мой продукт
- Установка и настройка
- Обслуживание и производительность
- Поиск и устранение неисправностей
- Гарантия и программа гарантийной замены
- Новейшие драйверы и ПО
- Действие
- Получить спецификацию продукции для данного продукта
- Вам нужна дополнительная помощь?
- Оставьте отзыв
- [solved] Intel HD graphic 5500 4mb
- keronei
- [GUIDE] Intel HD Graphics 5500 on OS X Yosemite 10.10.3
- Austere.J
- Intel HD Graphics 5500 on OS X El Capitan 10.11.2
- axydas
- RehabMan
- FireWolf Pl.
- A Place of Freedom
- @FireWolf 6 years ago
- [GUIDE] Intel HD Graphics 5500 on OS X Yosemite 10.10.3
- After several weeks’ work with @lisai9093, now it’s time to post a guide. 😀
- GUIDE: Intel HD Graphics 5500 on OS X Yosemite 10.10.3
- Update Logs:
- V1.2 @ 2015.06.07
- V1.1 @ 2015.04.24
- Successful cases and related guides added.
- More FAQ added.
- V1.0 @ 2015.04.16
- initial release
- Successful cases so far:
- Before we get started:
- The basic idea to make Broadwell’s integrated graphics card work does not change.
- If you have Intel HD Graphics 5300 or other IGPU models supported by AppleIntelBDWGraphicsFramebuffer.kext, you can try it by yourself.
- I also start new threads on both insanelymac and tonymacx86 forum.
- http://www.insanelymac.com/forum/topic/305710-guide-intel-hd-graphics-5500-on-os-x-yosemite-10103/
- http://www.tonymacx86.com/yosemite-laptop-support/162062-guide-intel-hd-graphics-5500-os-x-yosemite-10-10-3-a.html
- Brief Introduction:
- The basic idea to let Intel HD Graphics 5500 work is still injecting AAPL, ig-platform-id.
- However, Apple raised the minimum stolen memory in the AppleIntelBDWGraphicsFramebuffer binary of OS X Yosemite 10.10.3. Kernel panic will happen if the DVMT pre-allocated memory in BIOS settings is lower than 64MB. This is not a big deal for Desktop PCs users, because one can easily change the DVMT pre-allocated memory in BIOS. But this is catastrophic for laptop users, because (1) the default value of DVMT pre-allocated memory in laptop BIOS is 32MB. (2) OEM will not unlock these advanced settings/menus for us. (3) We can try to modify BIOS but cannot pass the security check during flashing modified BIOS.
- Detailed Step-by-step guide:
- STEP 1: Check the current DVMT pre-allocated memory size.
- TABLES: Relationship between Dedicated Video Memory detected by OS and DVMT pre-allocated memory in BIOS settings.
- Now let’s come back to our topic, Dedicated Video Memory >=64MB (i.e. DVMT pre-allocated memory >= 96MB) will pass the assertion/kernel panic.
- STEP 2.1: Apply the patch to pass the Stolen Memory assertion.
- STEP 2.2: Using EFI Shell to change DVMT settings in BIOS.
- STEP 3: Injecting AAPL, ig-platform-id
- Some Issues you may encounter:
- (1) Garbled Screen Issue
- (2) Screen Freeze Issue (GPU hang and restart)
- Reference and Special Thanks:
- Thanks to Rehabman @ tonymacx86 for his advice on garbled screen issue.
- Thanks to nguyenmac @ tonymacx86for his clues on freeze issue.
- Thanks to sontrg @ insanelymac for his direction to BIOS modification.
- Thanks to Google for providing information.
- Thanks to the-darkvoid @ tonymacx86 for his QHD+ Guide on HD4600.
- [GUIDE] Intel HD Graphics 5500 on OS X Yosemite 10.10.3
Поддержка intel® HD Graphics 5500
Информация о поддержке графических ® Intel® HD Graphics 5500, включая рекомендуемые материалы, загружаемые материалы, спецификации, гарантия и т. д.
Сообщения об ошибке
Определить мой продукт
Установка и настройка
Коды продукции и запасные части
Информация о продукции и документация
Поиск и устранение неисправностей
Гарантия и программа гарантийной замены
Обслуживание и производительность
Поиск не дал результатов для запроса
Все категории статей
Совместимость
Сообщения об ошибке
Информация о продукции и документация
Определить мой продукт
Установка и настройка
Обслуживание и производительность
Поиск и устранение неисправностей
Гарантия и программа гарантийной замены
- Популярность
- Последняя редакция
- Категория
Просмотреть параметры загрузки
Поиск не дал результатов для запроса
Новейшие драйверы и ПО
Действие
Получить спецификацию продукции для данного продукта
Вам нужна дополнительная помощь?
Оставьте отзыв
Содержание данной страницы представляет собой сочетание выполненного человеком и компьютерного перевода оригинального содержания на английском языке. Данная информация предоставляется для вашего удобства и в ознакомительных целях и не должна расцениваться как исключительная, либо безошибочная. При обнаружении каких-либо противоречий между версией данной страницы на английском языке и переводом, версия на английском языке будет иметь приоритет и контроль. Посмотреть английскую версию этой страницы.
Для работы технологий Intel может потребоваться специальное оборудование, ПО или активация услуг. // Ни один продукт или компонент не может обеспечить абсолютную защиту. // Ваши расходы и результаты могут отличаться. // Производительность зависит от вида использования, конфигурации и других факторов. // См. наши юридические уведомления и отказ от ответственности. // Корпорация Intel выступает за соблюдение прав человека и избегает причастности к их нарушению. См. Глобальные принципы защиты прав человека в корпорации Intel. Продукция и программное обеспечение Intel предназначены только для использования в приложениях, которые не приводят или не способствуют нарушению всемирно признанных прав человека.
Источник
[solved] Intel HD graphic 5500 4mb

keronei
Hello,
Recently i successfully followed a guide in this platform and made a MacOS sierra 10.12.6 Hackintosh from a dell Latitude E5550 laptop with the use of Clover UEFI .
with the workarounds provided , i managed to fix the audio,Battery status and slight of brightness(was lucky my bios comes with an inbuilt brigness slider).
Now I have realized i can do less when it comes to task with graphics, I have followed this ( http://www.tonymacx86.com/el-capita. de-booting-os-x-installer-laptops-clover.html ) guide and the FAQs that are redirected from it.
what i have tried:
1. changed ig-platform-id from 0x19120000 to 0x16260006, this resulted in panic along the boot process several times.
i used an invalid id(0x12345678), then rebulit the kext cache and used the intended id, no success still (although i feel there’s a step i missed because i did not add anything to kexts).
2. I tried the config.plist provided by Rehabman in his Git account (Os X clover laptop config/config_HD5300_5500_6000.plist), renamed it to config.plist, but in the clover boot menu, only one option for Ubuntu came. I tried to compare the two files but i could not figure out where exactly i should alter.
3. Changed my model id from 12,2 to 6,2 in Multibeast.
From this thread by RehabMan,( https://www.tonymacx86.com/threads/. lensize-patch-with-32mb-dvmt-prealloc.221506/) I feel thats the guide for my issue but some few things, «AppleIntelBDWGraphicsFramebuffer» being one of them still makes me feel that some steps not mentioned (assumed by author as basic,are what i’m missing).
I’m not familiar with that, I’ll appreciate if i can get a hint of a workaround for the actual patching. I have attached some files,will
highly appreciate your assistance.
Источник
[GUIDE] Intel HD Graphics 5500 on OS X Yosemite 10.10.3

Austere.J
After several weeks’ work with @lisai9093, now it’s time to post a guide.
GUIDE:
Intel HD Graphics 5500 on OS X Yosemite 10.10.3
Before we get started:
The basic idea to make Broadwell’s integrated graphics card work does not change.
If you have Intel HD Graphics 5300 or other IGPU models supported by AppleIntelBDWGraphicsFramebuffer.kext, you can try it by yourself.
Detailed framebuffer information and this guide can be found on my blog.
Brief Introduction:
The basic idea to let Intel HD Graphics 5500 work is still injecting AAPL, ig-platform-id.
However, Apple raised the minimum stolen memory in the AppleIntelBDWGraphicsFramebuffer binary of OS X Yosemite 10.10.3.
Kernel panic will happen if the DVMT pre-allocated memory in BIOS settings is lower than 66MB.(based on experimental data; not sure; please correct me if I was wrong.) This is not a big deal for Desktop PCs users, because one can easily change the DVMT pre-allocated memory in BIOS.
But this is catastrophic for laptop users, because
(1) the default value of DVMT pre-allocated memory in laptop BIOS is 32MB.
(2) OEM will not unlock these advanced settings/menus for us.
(3) We can try to modify BIOS but cannot pass the security check during flashing modified BIOS.
Detailed Step-by-step guide:
STEP 1: Check the current DVMT pre-allocated memory size.
Open the Screen Resolution window, click the Advanced settings and check Dedicated Video Memory.

After I played with changing DVMT pre-allocated memory in BIOS, the following pattern can be found.
If Dedicated Video Memory = 0MB, then DVMT pre-allocated memory in BIOS settings is 32MB.
If Dedicated Video Memory = 32MB, then DVMT pre-allocated memory in BIOS settings is 64MB.
If Dedicated Video Memory = 64MB, then DVMT pre-allocated memory in BIOS settings is 96MB.
If Dedicated Video Memory = 128MB, then DVMT pre-allocated memory in BIOS settings is 128MB.
In general, if DVMT pre-allocated memory in BIOS settings is less or equal to 96MB , the StolenMemory that could be detected by OS is (DVMT — 32) MB.
If DVMT pre-allocated memory in BIOS settings is larger or equal to 128MB , the StolenMemory that could be detected by OS is (DVMT) MB. (equal to the value of DVMT pre-allocated memory)
Now let’s come back to our main topic, Dedicated Video Memory >=64MB (i.e. DVMT pre-allocated memory >= 96MB) will pass the assertion/kernel panic.
Note that OS X can not boot on some laptops if DVMT pre-allocated memory is >= 128MB.
Therefore, if your current DVMT pre-allocated memory size
STEP 2.1: Apply the patch to pass the Stolen Memory assertion.
We need to patch AppleIntelBDWGraphicsFramebuffer binary file.
Find 39CF763C and replace it with 39CF773C.
After using this patch, in theory you don’t have to change your BIOS settings.
You can try to inject ig-platform-id and see what happens.
If you encounter some problems, try to modify Framebuffer data in AppleIntelBDWGraphicsFramebuffer binary.
Detailed information on Broadwell’s framebuffer can be found on this page.
STEP 2.2: Using EFI Shell to change DVMT settings in BIOS.
(1) Prepare a bootable USB drive with EFI Shell
Prepare a USB stick and format it with FAT32 filesystem .
Download this EFI shell and you can find a folder named BOOT after extracting.
Copy this BOOT folder to your USB stick.
(2) Dump/Fetch a completed BIOS file.
You can use specific BIOS utility to save a copy of your BIOS on Desktop.
e.g. For AMI Aptio UEFI BIOS, you can use AMI BIOS Utility.
(3) Extract BIOS Settings from a BIOS file.
Download UEFITools from https://github.com/LongSoft/UEFITool/releases
Open your BIOS file with UEFITools.
Find the module labeled with Setup and extract the PE32 image section in this module as a binary file.
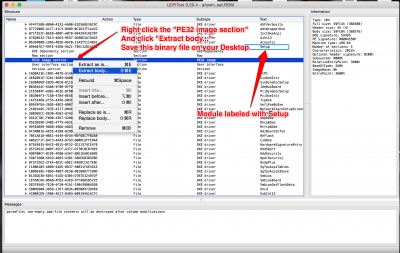
Now, you will have a binary file on your Desktop. In my case, I name it Setup.bin .
Next, download the Universal IFR Extractor (Windows version only) from http://donovan6000.blogspot.ca/2014/02/universal-ifr-extractor.html or from here: Universal IFR Extractor.exe.
Open the Universal IFR Extractor in Windows, open the binary you just extracted from UEFITools and click Extract to save the BIOS settings in plain text format.

Now open the extracted setup IFR.txt and find the keyword » DVMT «.
And you can find the variable representing DVMT pre-allocated memory and its values.
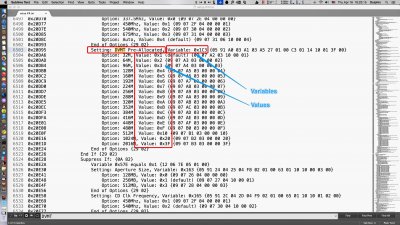
In this case, DVMT pre-allocated memory’s variable is 0x1C3 . The value of 96MB is 0x3 . Record these two values.
Next, restart your computer and boot from the USB drive with EFI Shell.
Here, we use setup_var command to change our BIOS settings.
OK, now type the command in EFI shell.
In this case, the command is setup_var 0x1C3 0x3. (Change the value of 0x1C3 to 0x3, which means changing the DVMT to 96MB.)
After changing the DVMT pre-allocated memory, go back to Windows and double check whether your current Dedicated Video Memory is 64MB. (96 — 32 = 64MB)
STEP 3: Injecting AAPL, ig-platform-id
Currently, Clover does not support inject AAPL, ig-platform-id for Broadwell’s integrated graphics.
So we can use DSDT/SSDT to inject AAPL, ig-platform-id. 0x16160002 is working fine.
Open your DSDT, find Device (GFX0) or Device (IGPU) or Name (_ADR, 0x00020000) and add the Device-Specific Method .
Place your DSDT in /EFI/Clover/ACPI/Patched/
Restart your computer and you will find Intel HD Graphics 5500 is working now.
Some Issues you may encounter:
(1) Garbled Screen Issue
Enable Legacy Support in your BIOS settings.
(2) Screen Freeze Issue (GPU hang and restart)
Using FakeSMC 5.3.820 or other 5.x.xxx version will decrease the opportunity to freeze.
(Note that please delete CPUSensors.kext from FakeSMC.kext if you get kernel panic related to CPUSensors.kext)
Reference and Special Thanks:
Thanks to Rehabman @ tonymacx86 for his advice on garbled screen issue.
Thanks to nguyenmac @ tonymacx86 for his clues on freeze issue.
Thanks to sontrg for his direction to BIOS modification.
Thanks to the-darkvoid @ tonymacx86 for his QHD+ Guide on HD4600.
Источник
Intel HD Graphics 5500 on OS X El Capitan 10.11.2

axydas
I successfully installed the Mac OS El Capitan 10.11.2 on my laptop with the below specs:
CPU: Intel i7 5th Generation 5500U
Chipset: Intel Broadwell-ULT
Graphics: Intel HD Graphics 5500
RAM: DDR3 8GB
WiFi: Intel Dual Band Wireless AC 3160
Ehternet: Realtek PCIe GBE Family Controller
Audio: Realtek High Definition Audio
The main problem i have is with the graphics — Intel HD Graphics 5500. First of all the only option i have in the display setting regarding the resolution is 1920*1080. There a problem with graphic when i load a photo or when i open the launchpad. I update the AppleIntelBDWGraphicsFramebuffer but still i have the same problem. Any suggestion?

RehabMan
Moderator
I successfully installed the Mac OS El Capitan 10.11.2 on my laptop with the below specs:
CPU: Intel i7 5th Generation 5500U
Chipset: Intel Broadwell-ULT
Graphics: Intel HD Graphics 5500
RAM: DDR3 8GB
WiFi: Intel Dual Band Wireless AC 3160
Ehternet: Realtek PCIe GBE Family Controller
Audio: Realtek High Definition Audio
The main problem i have is with the graphics — Intel HD Graphics 5500. First of all the only option i have in the display setting regarding the resolution is 1920*1080. There a problem with graphic when i load a photo or when i open the launchpad. I update the AppleIntelBDWGraphicsFramebuffer but still i have the same problem. Any suggestion?
Follow the Clover guide linked from the FAQ.
Pay attention the Broadwell info in the FAQ. It is important.
Источник
FireWolf Pl.
A Place of Freedom
![]()
@FireWolf 6 years ago
[GUIDE] Intel HD Graphics 5500 on OS X Yosemite 10.10.3
After several weeks’ work with @lisai9093, now it’s time to post a guide. 😀
GUIDE: Intel HD Graphics 5500 on OS X Yosemite 10.10.3

Update Logs:
V1.2 @ 2015.06.07
Layout changes due to new themes.
minimum DVMT pre-allocated memory changes to (>=) 64MB
V1.1 @ 2015.04.24
Successful cases and related guides added.
More FAQ added.
V1.0 @ 2015.04.16
initial release
Successful cases so far:
Lenovo Thinkpad Carbon X1 3rd Gen:
Intel i7-5600U with Intel HD Graphics 5500 + 1080P internal display from jcsnider.
Dell XPS 13 Touch 2015:
Intel i7-5500U with Intel HD Graphics 5500 + 3200×1800 internal display (IOKit patch needed to unlock pixel clock frequency) from frizinko.
Dell inspiration 7548:
Intel i5-5200U with Intel HD Graphics 5500 + 1080P internal display from lisai9093.
Dell inspiration 7348/7352:
Intel i5-5200U/i7-5500U with Intel HD Graphics 5500 + 1080P internal display from Frankie.
Hmm, still no response from Intel HD Graphics 5300……
Before we get started:
The basic idea to make Broadwell’s integrated graphics card work does not change.
If you have Intel HD Graphics 5300 or other IGPU models supported by AppleIntelBDWGraphicsFramebuffer.kext, you can try it by yourself.
I also start new threads on both insanelymac and tonymacx86 forum.
http://www.insanelymac.com/forum/topic/305710-guide-intel-hd-graphics-5500-on-os-x-yosemite-10103/
http://www.tonymacx86.com/yosemite-laptop-support/162062-guide-intel-hd-graphics-5500-os-x-yosemite-10-10-3-a.html
Brief Introduction:
The basic idea to let Intel HD Graphics 5500 work is still injecting AAPL, ig-platform-id.
However, Apple raised the minimum stolen memory in the AppleIntelBDWGraphicsFramebuffer binary of OS X Yosemite 10.10.3. Kernel panic will happen if the DVMT pre-allocated memory in BIOS settings is lower than 64MB. This is not a big deal for Desktop PCs users, because one can easily change the DVMT pre-allocated memory in BIOS. But this is catastrophic for laptop users, because (1) the default value of DVMT pre-allocated memory in laptop BIOS is 32MB. (2) OEM will not unlock these advanced settings/menus for us. (3) We can try to modify BIOS but cannot pass the security check during flashing modified BIOS.
Detailed Step-by-step guide:
STEP 1: Check the current DVMT pre-allocated memory size.
Open the Screen Resolution window, click the Advanced settings and check Dedicated Video Memory.
After I played with changing DVMT pre-allocated memory in BIOS, the following pattern can be found.
If Dedicated Video Memory = 0MB, then DVMT pre-allocated memory in BIOS settings is 32MB.
If Dedicated Video Memory = 32MB, then DVMT pre-allocated memory in BIOS settings is 64MB.
If Dedicated Video Memory = 64MB, then DVMT pre-allocated memory in BIOS settings is 96MB.
If Dedicated Video Memory = 128MB, then DVMT pre-allocated memory in BIOS settings is 128MB.
TABLES: Relationship between Dedicated Video Memory detected by OS and DVMT pre-allocated memory in BIOS settings.

In general, if DVMT pre-allocated memory in BIOS settings is less or equal to 96MB , the StolenMemory that could be detected by OS is (DVMT – 32) MB.
If DVMT pre-allocated memory in BIOS settings is larger or equal to 128MB , the StolenMemory that could be detected by OS is (DVMT) MB. (equal to the value of DVMT pre-allocated memory)
Now let’s come back to our topic, Dedicated Video Memory >=64MB (i.e. DVMT pre-allocated memory >= 96MB) will pass the assertion/kernel panic.
Note that OS X can not boot on some laptops if DVMT pre-allocated memory is >= 128MB.
Therefore, if your current DVMT pre-allocated memory size I suggest you change your DVMT settings in BIOS.
STEP 2.1: Apply the patch to pass the Stolen Memory assertion.
We need to patch AppleIntelBDWGraphicsFramebuffer binary file.
Find 39CF763C and replace it with 39CF773C.
Note that you can either use Hex Editor such as 0xED, Hex Fiend or Clover’s KextsToPatch to apply the patch above.
After using this patch, in theory you don’t have to change your BIOS settings. You can try to inject ig-platform-id and see what happens.
If you encounter some problems, try to modify Framebuffer data in AppleIntelBDWGraphicsFramebuffer binary.
Detailed information on Broadwell’s framebuffer can be found on this page.
STEP 2.2: Using EFI Shell to change DVMT settings in BIOS.
(1) Prepare a bootable USB drive with EFI Shell
Prepare a USB stick and format it with FAT32 filesystem .
Download this EFI shell and you can find a folder named BOOT after extracting.
Copy this BOOT folder to your USB stick.
(2) Dump/Fetch a completed BIOS file.
You can use specific BIOS utility to save a copy of your BIOS on Desktop.
e.g. For AMI Aptio UEFI BIOS, you can use AMI BIOS Utility.
(3) Extract BIOS Settings from a BIOS file.
Download UEFITools from https://github.com/LongSoft/UEFITool/releases
Open your BIOS file with UEFITools.
Find the module labeled with Setup and extract the PE32 image section in this module as a binary file.

Now, you will have a binary file on your Desktop. In my case, I name it Setup.bin .
Next, download the Universal IFR Extractor (Windows version only) from http://donovan6000.blogspot.ca/2014/02/universal-ifr-extractor.html or from here: Universal IFR Extractor.exe.
Open the Universal IFR Extractor in Windows, open the binary you just extracted from UEFITools and click Extract to save the BIOS settings in plain text format.
 Now open the extracted setup IFR.txt and find the keyword “ DVMT “.
And you can find the variable representing DVMT pre-allocated memory and its values.

In this case, DVMT pre-allocated memory’s variable is 0x1C3 . The value of 96MB is 0x3 . Record these two values.
Next, restart your computer and boot from the USB drive with EFI Shell.
Here, we use setup_var command to change our BIOS settings.
OK, now type the command in EFI shell.
In this case, the command is setup_var 0x1C3 0x3. (Change the value of 0x1C3 to 0x3, which means changing the DVMT to 96MB.)
After changing the DVMT pre-allocated memory, go back to Windows and double check whether your current Dedicated Video Memory is 64MB. (96 – 32 = 64MB)
STEP 3: Injecting AAPL, ig-platform-id
You can use either Clover or DSDT/SSDTs to inject AAPL, ig-platform-id.
If you want to use Clover, let InjectIntel = True and ig-platform-id=0x16160002.
If you want to use DSDT/SSDT to inject AAPL, ig-platform-id, 0x16160002 is working fine.
Then open your DSDT, find Device (GFX0) or Device (IGPU) or Name (_ADR, 0x00020000) and add the Device-Specific Method .
Place your DSDT in /EFI/Clover/ACPI/Patched/
Restart your computer and you will find Intel HD Graphics 5500 is working now.
Some Issues you may encounter:
(1) Garbled Screen Issue
Enable Legacy Support in your BIOS settings.
(2) Screen Freeze Issue (GPU hang and restart)
Change DVMT pre-allocated memory back to 32MB and apply the patch. (Case from XPS13 2015)
OR
Restart from Windows. (i.e. Do not cold boot to OS X) or Wait for BIOS update from OEM. (Case from Dell Inspiration 7548)
(3) Kernel panic caused by CPUSensors.kext
Please delete CPUSensors.kext from FakeSMC.kext.
(4) Kernel panic caused by AppleACPIPlatform.kext and Machine Check at 0xHexAddress
You may encounter this issue after changing the BIOS (i.e. change DVMT settings in BIOS).
You can either removing custom DSDT.aml OR extracting NEW DSDT.aml from Windows (via AIDA64 or other utilities)
Reference and Special Thanks:
Thanks to Rehabman @ tonymacx86 for his advice on garbled screen issue.
Thanks to nguyenmac @ tonymacx86 for his clues on freeze issue.
Thanks to sontrg @ insanelymac for his direction to BIOS modification.
Thanks to Google for providing information.
Thanks to the-darkvoid @ tonymacx86 for his QHD+ Guide on HD4600.
[GUIDE] Intel HD Graphics 5500 on OS X Yosemite 10.10.3
Congratulations!! 海豚、学神,thanks for your efforts.
Nice to hear your success.
Good job… 已经翻译到http://bbs.pcbeta.com/viewthread-1593048-1-1.html
For those who are too lazy to read this. I made a config.plist for you guys.
This plist will patch things on the fly so you don’t have to worry about editing the binaries.
I personally prefer this since you won’t modify the binaries and thus more likely to work after updates.
This is proven to make the graphics work on Inspiron 13 7348/7352
pastebin.com/VE4gZDrK
Great and thanks!
I saw your Config.plist.
So currently you didn’t change DVMT pre-allocated memory in BIOS settings, directly used the patch and injected AAPL, ig-platform-id and everything worked fine? Especially no garbled screen?
Nothing, works perfectly. But I added a section to patch AppleIntelBDWGraphicsFramebuffer.
My bios prevents me from editing the Setup Variable using the EFI Shell.
(My bios has 2 variables named as “Setup”, one has an invalid guid, so direct injection has no effect.)
BTW, you can always modify the bios settings using linux: it’s right under /sys/firmware/efi/efivars. Just edit it using a hexeditor.
However, DVMT options are not correctly implemented in my bios, so I have to use the other method.
还有楼主哪里的大学,是CMU的吗,是的话面基一下?
So I assume you have not encountered “freeze” issue.
I guess Dell 7348 is identical to Dell 7548 except the latter one is equipped with 15 inch screen.
BTW, what’s your current BIOS version?
I tried A01, A03 and A04. I am currently using A03.
Hello my laptop is Dell 7348, can you share the EFI file?
and now I cannot get the BIOS,please share the software
By the way. This plist requires you to have HFSPlus-64.efi in your EFI drivers folder. Google it for details.
Hey Frankie I’m excited to know about your colaboration to do work Intel Graphics, but I don’t know how to apply it. I read all this page and yours comments and your public info
but i don’t know how to create that info.plist file.
First. I have to say you that I installed OSX 10.11 using Unibeast by TonyMac. Is the first time that I use it because before I used another tool, but I knowed that Unibeast is based in Clover.
Well. I have installed without problems, installed custom files and works fine, but I don’t have the correct funcionality of video card.
My sound works with VoodoHDA tool
My External USB Wifi Stick works with special installer (It’s got Realtek chip)
Keyboard works with Kexts and patch of RehabMan
Do Not works
Internal Wifi Qualcom Atheros QCA61x4
Internal Bluetooh Qualcom Atheros QCA61x4
Battery Status
and the most important my Intel Graphics 5500
I have an aditional Geforce 840M Graphics card but i know is impossible to do works togueter with Intel.
My request for help is to know if were possible to tell me how to do work my video card, injecting with Clover or maybe if you got the file *.plist to patch my OS.
Please tell me the correct way to do it if were possible with step by step.
I’ll thank so much
PD. I attempted modify AppleIntelBDWGraphicsFramebuffer.kext, opening the file content and editing the info.plist file to paste it after inside /system/library/extensions, but no works video info. I have to say you that info video on OSX appear like 7MB.
I’ll wait for your help.
I forgot tell you, FireWolf mentioned that is possible inject AAPL, ig-platform-id using Clover or editing DSDT/SSDT. But your method sounds better or in two word “more practice”
FireWolf comment in
Step 3
You can use either Clover or DSDT/SSDT to inject AAPL, ig-platform-id
I wait for your answer for my before message. Thanks
please send me our config philst for dell inspiron 7348 i5-5200U… iam having problems with the intel hd graphics 5500 which shows only 7 mb memory [email protected]
danny
> STEP 1
> Dedicated Video Memory = 0MB, then DVMT pre-allocated memory in BIOS settings is 32MB.
Patch OK!
boot log IGPU enable
ThinkPad X1 Carbon Gen 3
Grayout If: <19 82>
Security: 85B75607-F7CE-471E-
Not <17 02>
End <29 02>
Setting: DVMT Pre-Allocated, Variable: 0x37
Default: 8 Bit, Value: 0x1
Default: 8 Bit, Value: 0x1
Option: 32MB, Value: 0x1
Option: 64MB, Value: 0x2
Option: 128MB, Value: 0x4
End of Options <29 02>
End If
DVMT Pre-Allocated, Variable: 0x37
Over 96MB to 0x4?
But! EFI Shell がうまく動かない!? Grub console は正しいの?
setup_var 0x37 0x4 setting. Reboot Windows 8.1 のDVMTは、0MBのまま
Screen Freeze Issue… 🙁
STEP 2.2 が正しく設定出来ていないのかな.
もしSTEP2.1のPatchを使ったら、STEP2.2が必要ない。
直接に AAPL, ig-platform-id をインジェクするべきだ。
いまは、-v で起動して、IGPUが有効になって、画面が切り替わり
ステータスバーが、少し動いた時点で、ブラックアウトになる。
ハングアップは、していないようだが、なにも表示されないし、何も出来ない。
この状況から、解決できますか?
Thanks for your great work!
I have a question about the STEP 2.1: Apply the patch to pass the Stolen Memory assertion.
In the System installion,can we use the “KernelAndKextPatches” in Clover?
Like this:
Comment
patch to pass the Stolen Memory
Name
AppleIntelBDWGraphicsFramebuffer
Find
39CF763C
Replace
39CF773C
Now let’s come back to our topic, Dedicated Video Memory >=64MB (i.e. DVMT pre-allocated memory >= 96MB) will pass the assertion/kernel panic.
Well, I don’t understand what you said here. You said we will pass the assertion/kernel panic. Actually, I met a problem. When I try to boot with args “slide=0 dart=0 darkwake=1 kext-dev-mode=1”, the screen stopped at “sound assertion in AppleHDAXXXXXXXXXXXXX at line XXXX”. I didn’t use any patched AppleHDA or insert any patches in Clover or use DSDT&SSDT.
Then I tried to boot in safe mode, I saw a sentence kernel panic.
So, if I expand the DVMT pre-allocated memory, whether I can pass these two?
I think I ran into the same issue as you have described Geoferry. What I did to remedy it was to manually patch AppleIntelBDWGraphicsFramebuffer.
Maybe we are different.. I haven’t seen the install screen yet.. There might be something else wrong.
You got success after you patch AppleIntelBDWGraphicsFramebuffer, did you use DSDT or SSDT?
Which SMBios did you choose.. I cannot find the SMBios for the latest Macbook air.
Oh, I just found the information about SMBios on geekbench.. I’ll try later.
but not detailed.
hey man. would you be able to help me change the DVMT. i uploaded my bios here. please help me find it. because i cant find it. and im trying to work it on my lenovo yoga 3 14inch. Intel 5500u with Intel 5500 hd with 0mb DVMT (32mb). i tried patching the Framebuffer but still no luck with QE/CL with the graphics card. i am using 0x16160002 and i can get to the installation screen but no QE/CL. please help
I could not find Setup in your BIOS dump either.
Please make sure that it is not an update rom.
You don’t have to enable QE/CI during the installation process.
After you finish the installation, inject ig-platform-id and see whether your graphics card will work.
Okay so.. i just downloaded this bios from the lenovo support.. maybe thats why. how do i backup my bios??
please tell me all the tools i can use. coz i tried universal bios backup 2.0
Use specific tools to extract your BIOS.
For instance, if your BIOS’s vendor is AMI, you should download AMI Aptio Utility from AMI’s website.
Can you link it? There are many utility on the website. Which one should we use ?
To anyone with an XPS 13, how did you get dsdt to compile? I’m using DSDT editor for windows and I get 26 errors just trying to compile without the patch. When I click fix errors it cycles through and gives me 26 errors out again.
Thanks
How do i Backup My Bios from dell xps 13 9434 5Th Generation so i can do the dmv update any one please help i try api software there no were i can save the bios or anything any help will be great thanks …i read the instruction many time there noting i can find to back up my bios from dell xps 13 thanks for help ….
I got an HP notebook with i3 5005u cpu and HD 5500 graphics chip. Failed by using both methods 2.1 (bios locked, can’t be edited with uefi shell) and 2.2 (patched the kext, but still stuck at installer boot). Is there any other way to turn the notebook into a Yosemite hackintosh? Any hope?
I’ve got this working on my Gigabyte Core i5-5200U Brix (GB-BXi5H-5200) using Multibeast and Chimera 4.1. Without injecting the ig-platform-id, ‘About This Mac’ showed ‘Intel HD Graphics 5500 1024 MB’. Now it shows ‘Intel HD Graphics 5500 1536 MB’. Hopefully it has also sorted out the GPU restarts that was freezing the screen…
Nope, still getting the screen freezing 🙁
This is with FakeSMC 5.3.820. Here’s a sample from the console log:
Event: GPU Reset
Data/Time: Wed May 20 15:53:22 2015
Application:
Path:
OS Version: Mac OS X Version 10.10.3 (Build 14D136)
Graphics Hardware: Intel HD Graphics 5500
Signature: 823
BDW Graphics is running in Execlist mode
Scheduler interface revision 1
Processing hang for hardware context ID[3]
— Summary of Status for ALL Rings —
MAIN Ring is hung in the ring
(2) Screen Freeze Issue (GPU hang and restart)
Change DVMT pre-allocated memory back to 32MB and apply the patch. (Case from XPS13 2015)
Restart from Windows. (i.e. Do not cold boot to OS X) or Wait for BIOS update from OEM. (Case from Dell Inspiration 7548)
first check this.
(I assume you can easily change the DVMT pre-allocated memory in your BIOS setting without using efi shell.)
Thanks. After experimenting the only thing that prevents random freezes is making the computer sleep. After it’s woken from sleep it never freezes. Rebooting from Windows didn’t help.
Finally by using method 2.1, I managed to install Yosemite on my HP 15-r200tu notebook (i3 5050u / 8G Ram / 32mb pre-allocated DVMT), but it suffers from dim screen (even set to max brightness) and random freeze. The graphics kext can be loaded successfully.
I wonder if there’s a way modify the hex of the appleintelbdwframebuffer.kext to assign less memory to the graphics card? The current memory of the HD5500 seen in “about this mac” is 1024mb. I suspect reducing the amount of assigned memory might make the graphics card and the system more stable with less freeze.
model number, typo, it should be 15-r220tu
Hi eze even I have the same laptop could u enlighten me as to how you got it to work?
which guides u referred and what patches u had to use.It would be of great help to me if u could do me the favour.
in the xps 13 case, opting for the patch assertion is the permanent solution or just a temporary one until a better method is discovered?
Thanks!
Is there a new patch for 10.11?
The Dedicated Video Memory is 64MB, but it still KP.
hi,big brother,I’m the dell 5548 computer.My computer can change DVMT. If you can, can you send me the computer ‘setup.bin’ to me. Or send the DVMT chart directly.. I am looking for you to do so is that my BIOS can not extract, the vortex of the country a lot of methods are not, I hope to save me.
My default memory is also 32M. Windows video memory is 0M.
I also have dell n5548, i already installed it, but it random freeze screen. Hope it will have kext or Apple will support it. :'(
I don’t know if Ethernet kext is the cause ?
Cause when i don’t have ethernet kext install, doesn’t freeze screen, but when i installed it, the screen random freeze ?
According to my friend, OS X El Capitan solves the random freeze issue OOB.
Well this is my first time to hear that ethernet kext may cause the freeze issue.
BTW, what’s your ethernet card?
Hi guys. Hello, like our computer, we can not put the value of pre-allocated memory DVMT variables and variables.
Issue me. I am very grateful to you because my computer extract BIOS always fails. If you would like to send it to my email [email protected]
Use this tool to dump BIOS, it will create a results.rar in desktop.
http://www.mediafire.com/download/rir9z3ih1pi812b/BACKUP_Tools12.exe
Extract it, you will find a BIOS.bin file.
Do the guide : http://www.firewolf.science/2015/04/guide-intel-hd-graphics-5500-on-os-x-yosemite-10-10-3/
Try to find setup, may be it will show setup** or ** setup.
Hello,
I was able to have QE/CI on an Acer Switch 12 HD5300 32MB pre-allocated memory! Kext patch, platform injection and Legacy BIOS through Clover config.
A huge thank to you, regards.
Hi necano, Congratulations! Could you post a screen shot of About This Mac?
BTW, what ig-platform-id did you inject? 0x161E0001?
No boot with 0x161e0001, I had to use 0x16160002.
Will post screen shot as soon as I can, I have no access to the mac partition from windows and no working wifi yet in osx, I need to get a broadcom m2 card.
Thanks to your guide, I was able to get full QE/CI on Yosemite. I can confirm that screen lock is fixed with El Capitan 10.11 Beta.
Dell Latitude E7450
i7-5600u
HD 5500
1080P
@Jake
Hi. What do you mean by ‘full QE/CI’? Does it mean that everything on that particular laptop works fine?
If so, which method did you use? What should I take into consideration while installing the OS?
Tested, Asus ZenBook UX 305 – M5Y10 (Taiwan Store)
FULL QECI (install hackintosh without delete original window)
DVMT is adjustable in default BIOS
Facebook: https://www.facebook.com/vincent.ong.3323
Method:
0) DVMT must be adjust to 64MB DVMT( 128 or 256MB DVMT will crash)
1) Install The 10.10.3 into the Drive D
2) put UEFI clover into 100 mb System
3) smbios:macbook air 7,1m inject EDID (using Moninfo), igplatform id: 0x161e0001
Patch bios, inject EDID, inject ATI
Well, my laptop is Dell Inspiron 3543. I follow your way to set Setup – DVMT Pre-Allocated Value, but ‘0x16EB4 Setup (0x6 from string package 0x0)’. In GRUB EFI Shell, I try ‘setup_var 0x*** 0x3’, I got a error ‘error: offset not range’. So how?
Upload your Rom file. You might have gotten the address wrong
I use afuefix64.efi backup to
Umm, It looks like I just didn’t reply successful.
0x1FE4B Setting: DVMT Pre-Allocated, Variable: 0x229
I don’t think so I gotten the address wrong. It say:
successfully obtained “Setup” variable from VSS (got 6 (0x6) bytes).
error: offset is out of range..
Means it only has 6 offset. So can’t find 0x229.
Did you manage to successfully install mac on dell 3543?
Ahh, yes!
When install 0x16160005 is used for injection.
‘Your comment is waiting for examine.’
Fine, owner, you win! My fault.
Sorry for disturbing again but I followed your guide but cannot get into the efi shell to input the “setup_var” command. When I boot from the usb, it just shows a blank screen. Any help? Thanks!
Make sure that you put the BOOTX64.efi in /EFI/BOOT
To be more specific, there is a folder named EFI inside your USB stick. Inside this EFI folder, there should be a folder named BOOT. And BOOTX64.efi is inside the folder named BOOT.
And try to restart your computer and boot from your USB again.
Hmm… Still giving me a blank screen. Don’t think this can work. 2 questions then.
1) Where do I find AppleIntel Frame buffer binary file on my Unibeast installer?
2) What hex values should I change if I want to mod my bios and flash it in order to edit my dvmt settings? Screenshots:
Thanks so much for your help! Will definitely support with donation once I get Yosemite up and running.
A1. I am not familiar with the Unibeast installer, so I don’t know. But the kext itself should be in /System/Library/Extensions/, and you can use Clover’s kextstopatch function to apply the patch.
A2. Sorry, no idea about the binary. Try to google your laptop and see whether there is an unlocked BIOS available. Or try to request an unlocked BIOS in https://www.bios-mods.com/.
Good luck and cheers,
FireWolf
Oh sorry, typo on the links.
Excuse me sr, im new in this. Could you please explain me how do I patchAppleIntelBDWGraphicsFramebuffer binary file.? What program do I need to use? Thank you so much
Use hex editor program such as Hex Fiend, 0xED or use Clover’s KextsToPatch function to apple the patch.
你好,我在我的台电平板上测试了你的驱动,能驱动HD5300,但是就是不是很稳定,容易随机冻屏,(GPU hang reset),我是在dsdt里加了识别代码,把AppleIntelBDWGraphicsFramebuffer里改了后,就可以驱动了,bios里没有办法设置DVMT,win下显示的是128MB,用setup_var 0x41a 0x3,提示找不到这个位置,求帮助
Hi,can you tell me how to get the file of bios?
dell 7348
thanks ! i appreciate your work !
I am trying to install to my broadwell based laptop hp
and kind of bypass it or whatever i used clover method now i am facing some problem it kind of act like cpu not laptop means i dont get battery on top panel and whenever i logon to screen my screen fluctuated so please firewolf i need your how to use my laptop perfectly ( graphics wise )
thanks
your follower
hi Austere.J i dont know who you are but i do know you helped me alot ..my broadwell base laptop work dude thanks dude i wanna meet you i am too excited thanks brother/sir thanks alot
I am glad to hear you have made your laptop working.
hi auster j. thanks for replying my comment 🙂 i am facing brightness problem please help me about and sometime in 10.10.5 screen grabbed/glitches when i am working any idea you have ? i follow your first method ( no bios change only patch frame buffer.kext)
thanks alot
cheers
sorry for disturb you again please help me about its brightness its low please help me thanks
Hey,
its great job, and i desperately need your help.
i posted in your tonymacx86’s thread but i didnt find help there so here i am.
I have a Dell inspiration 7348 and i’m trying since almost 3 weeks now to install hackintosh but with no success.
bottom line is, i just cant get passed the black installer screen after booting with clover, unibeast, chimera, etc. whenever i type the boot flags (tried different combinations) all i get is a black screen.
just to mention, i have windows 10 already installed so will removing it would make any difference? and what can i do to make the installer work and did you face such a problem?
i realy need your help with this
I have the xps13 touch 2015 with 3200×1800 I can’t make the graphic card work, can you tell me what you mean by “IOKit patch needed to unlock pixel clock frequency”.
thank you……
Basically we need to patch the IOKit binary located in /System/Library/Frameworks/IOKit.framework/Versions/A/ to unlock the pixel clock restriction.
Hi FireWolf, I’m having some issues, I just got a Dell Inspiron 5558 with Intel HD 5500, and I have no clue how to extract my bios on it or do any of the following steps, I’m a bit lost. I’ve been trying to get Mac OS X for a while now and I’m having no luck, I’m hoping you would be able to help me
Hey guys. Before start, I’m very thankful for this long post from Firewolf. It really helped me a lot to figure out how to get the Intel HD 5500 fully working on my Yosemite install.
I’ve followed many times the process described here, with no sucess till now.
As my machine has no way to set DVMT inside BIOS and, I wouldn’t like to risk trying to modify DVMT pre-allocated memory manually, I followed the easy path to patch AppleIntelBDWGraphicsFramebuffer. No sucess at all 🙁
So, I decided to take some risk to get it working.
First, extracted the DVMT info from BIOS as the guide. After, applied the setup_var to change the allocated memory. And finally patched my config.plist (used the one that the user ReHab has made. Search for the guide on tonymacosx86 website). And “Voilà”. Working like a charm.
My machine specs are: Dell 5548 I7-5500U. 15.6″ Full HD display with Intel HD 5500 Graphics and16Gb RAM. If somebody with same specs are in trouble, try contact me. I’ll be glad trying to help. Thanks again Firewolf.
Hey Gilberto, I can see your name and can guess that you´re a latin guy like me, playing with this things on mac over a custom laptop. ja ja
Well. I need your help to solve my problem, I got a latop lenovo with i7-5500U like you and the same graphics card and I can´t get works completly.
I need your complete process since clean install OSX until the graphics card, maybe I could apply on my laptop and better if you could contact me by mail. this is mine [email protected]
Hello Gilberto Rodrigues
i have Dell 5558 i extract the bios with phoenixtool266 and Universal IFR Extractor giv me Unknown protocol detected
how did you extract your bios?
Dell Inspiron 5558 and Inspiron 5458
DVMT Pre-Allocated, Variable: 0x15B
DVMT Pre-Allocated, Variable: 0x15C
Option: 32M, Value: 0x1 (default) <09 07 be 03 10 00 01>
0x1A607C Option: 64M, Value: 0x2 <09 07 bf 03 00 02>
0x1A6083 Option: 96M, Value: 0x3 <09 07 c0 03 00>
0x1A608A Option: 128M, Value: 0x4 <09 07 c1 03 00 04>
0x1A6091 Option: 160M, Value: 0x5 <09 07 C2 03 00 0
Hey I have a inspirion 5458. Could you help to install osx in my computer? Please
Dell 7352. How to extract the bios file from dell support. I am unable to extract the bin / rom file from exe.
Please use the Universal BIOS dumper or AIDA64 to extract a completed BIOS image from your BIOS.
The exe you downloaded from DELL support does not contain the full BIOS image.
你好,我的电脑是thinkpad e550,bios是Phoenix的,我在备份的bios里没有发现setup,但是用搜索DVMT,可以看到文件在PlatformHiiAdvancedDxe下,然后根据你的教程,我能找到如下: Setting: DVMT Pre-Allocated, Variable: 0x37
Default: 8 Bit, Value: 0x1
Default: 8 Bit, Value: 0x1
Option: 32MB, Value: 0x1
Option: 64MB, Value: 0x2
Option: 128MB, Value: 0x4
我用教程里的 setup_var 0x37 0x4
发现不能修改,提示寻找地址,估计地址是错误的,别人的dvmt值好像是三位的,但我的是两位的,有什么关系吗?
我的备份bios下载地址: 链接:http://pan.baidu.com/s/1dFoFFUh 密码:a0sc
how come some websites in a blogroll do not have their most recent post listed and more do? How you can change that?
Hi FireWolf, I’m trying to change dvmt in LG Gram 14. I tried to do this with AIDA64 without any success, but I did it with Intel Flash Programming Tools for Broadwell CPU. However, I can’t find a Setup module in extracted BIOS. Where I can find it?
Thank you, Dmitry
How did you extract your BIOS?
Sorry for the late answer. I was on the way back home. I download from I tel website fptw64.exe v10 and used it to dump BIOS to a file. In fact, in my BIOS dvmt is set to 128 MB and everything works fine until I put a display to sleep. After waking the gpu starts to freeze or hang and restart, I don’t know what exactly happening, but I see black horizontal lines and screen flickering. I guessed it is the problem you described in your guide and decided to change the dvmt to 64MB to get rid of this problem. may be you know another way how to get rid of this annoying screen flickering in my case.
Thank you, Dmitry
Try to update to the latest version of OS X. (10.11.5)
Broadwell’s GPU drivers under OS X Yosemite are problematic.
It’s done already. I’m on 10.11.5 now and was on 10.11.4 before. No differences.
Firewolf, so, as far as I understand, there is no other way to resolve flickering problem on HD550. Just to try to set dvmt to 64MB in BIOS. Can you help me to find Setup module in BIOS dump?
Thank you, Dmitry
Please try to use the Universal BIOS Backup Toolkit to dump a complete image from your BIOS.
(You can also find a download link in that Reddit page.)
Then send me your bios image via Google Drive or MEGA Drive or other cloud services.
Looking for an update regarding Intel HD 5500 status in the new MacOS Sierra. Is the assertion still present? Can you provide a new patch?
Hi Firewolf and all, i have a dell inspiron 5558 i5 5th gen, and i am trying to change the DVMT prealloc, but i am unable to fetch the rom/bin file for my bios, please if someone can
help and tell me how i can get the dump file, /writeromfile, /writebinfile, are not present in the command line options
Use the Universal BIOS Backup Tool found in https://www.reddit.com/r/hackintosh/comments/49tx7v/guide_for_dumping_your_bios_and_extracting_dvmt/. Run the executable in Windows or WinPE. First select Read, once read is done, then select Backup. You now have the ROM file.
Thanks Jake,
I was actually not able to change my dvmt due to fear of bricking my board, so i tried to install OS x 10.11.6, and i followed NeTech’s guide to make graphics work and it really worked, my dvmt in windows was 0mb.
Hi I have successfully installed mac OS X El Capitan
At first I am having problem with sound and ethernet.
I fixed audio with AppleHDa.kext (ALC-282) and HDA enabler3.kext
now I have two problem to fix.
1) Intel HD5500 graphics do not working
2) Laptop do not shut down. It restarts as well bt when i click on shutdown after some seconds it stucks.
I tried to fix graphics from step 3 you described above. becasuse I have 128mb preallocated memory.
I tried injecting ID platform ID. but not worked.
But it do not working for me…
please help me to fix my graphics.
My laptop config:
name : HP 240 g4
CPU : core i3 2 ghz
RAM : 4gb
HDD: 1tb
graphics: Intel HD graphics 5500
I hope you will help me .
In this ling i shared my screenshot as well as my efi folder
Источник


