- Infinity.
- Как заставить работать Intel GMA 3600 на Windows 10
- Intel gma 3600 with windows 10
- Intel GMA 3600 drivers into Windows 10
- Replies (9)
- Windows 10 and Intel GMA 3600: Making it Work
- Intel GMA 3600 Windows 7 Driver in Windows 10
- Step 1: Removing the Driver
- Step 2: Removing SystemApps and WindowsApps Folders
- Step 3: Reinstall the Driver
- The Results
- Fixes and Some Possible Solutions
- Conclusion
Infinity.
Как заставить работать Intel GMA 3600 на Windows 10
Недавно у меня появился маленький старенький лаптопный ноутбук ASUS Eee PC X101CH.
Естественно, сразу захотелось его ускорить и улучшить)). В идеале надо бы нарастить оперативной памяти. Из интернета нашел информацию, что это возможно путем перепаивания микросхемы памяти — замена чипа 1Гб на 2 Гб. Больше не поддерживает материнская плата. Нужно отдавать спецам, перепрошивать BIOS. В общем, пока этого делать не буду, да и специалистов таких не знаю. Если кто-то знает — пишите)
Поставил Виндовс 10 и начались танцы с бубном. Всё та же известная история с разрешением экрана и попытками установки GMA 3600. Базовый драйвер от винды поддерживает только разрешение 600х800. Нам это не подходит — картинка не четкая.
Даю рабочую инструкцию преодоления этой печальки:
- Устанавливаем Windows 10 LTSC
- Устанавливаем StartIsBack — возврат классического меню Windows 7
- Загружаемся с Live CD
- Меняем названия следующих папок на своё:
- WindowsApps: C:\Program Files\WindowsApps
- SystemsApps: C:\Windows\Systemspps
Например так:
- C:\Program Files\Fix_WindowsApps
- C:\Windows\Fix_Systemspps
5. Включаем компьютер в обычном режиме и устанавливаем последние драйвера с оф. сайта (IntelVGA-V8_14_8_1075 — тут можно найти видеодрайвер отдельно) для Win7 (они пока доступны)
6. Перезагружаемся
Новость дня! Нашел новую прошивку BIOS с повышением разрядности до 64 (mod)! Перепрошил — полет отличный! Можно ставить 64-разрядную винду. Но 1 Гб оперативки маловато. Перепаивать сам не буду. Пока остаюсь на 32 (30.03.21)
Intel gma 3600 with windows 10

Сообщения: 25638
Благодарности: 4279
| кто-нибуть подскажет решение проблемы |
Сообщение оказалось полезным? Поблагодарите автора, нажав ссылку  Полезное сообщение чуть ниже.
.gif)
| Просто вот здесь написано не по русски » |
Во-первых, нужно выполнить чистую установку операционной системы, удалив все с вашего жесткого диска. Убедитесь, что ваша ОС не сборка, что в ней не вирусов и предустановленных драйверов в том числе и GMA 3600 драйверы.
-Шаг 2:
Затем нужно загрузится с Live CD или использовать установщик Windows, нажав в нем Shift+F10 и вызвать командную строку.
Находим куда установили Windows, проверяем видны ли скрытые и системные файлы
Затем удалите подпапку “C:\Windows\Systemsapps” и папку “C:\Program файлы\WindowsApps”. Удаление может быть немного рискованно, система может после этого не работать
После удаления приложения, перезагрузить компьютер, и установить тот же драйвер Вы использовали для Windows 10. (Они советуют модифицированный драйвер какого Ньютона)
Драйвер должен корректно работать, но может (и будет) иметь некоторые проблемы с иконками, и другими элементарными элементами операционной системы.
Мы рекомендуем установить простую программу для этого. Имеется в ввиду “Classic Shell”
Даже после установки “Classic Shell”, могут быть некоторые проблемы с значком WiFi и значком батареи,и др
2ATi, Надеюсь вы смогли все по русски прочитать. Как вам ранее сообщали нормального драйвера для указанной вами видеокарты — нет! А то что вы нашли, а я адаптировал — это как костыли.
——-
ВНИМАНИЕ ознакомьтесь, прежде чем создать тему! Процессор — мозг компьютера, блок питания — сердце и печень.
Intel GMA 3600 drivers into Windows 10
I have installed manually Windows 10 Final on my EEE PC X101CH without any problem, but the used video driver is the generic one with 800×600 resolution.
Then I met the horror of the Intel GMA 3600. an old video adapter with bad drivers.
I downloaded the Intel drivers, and I discovered that they are older then the ones present somewhere into the system.
During the setup, a warning pops up, asking me if I really want to overwrite the newer drivers.
Intel Graphics Media Accelerator 3600 series v10.0.10240.16384
Display Audio Intel v10.0.10240.16384 (I translated this from italian)
Now. the installed drivers don’t work properly (ie they crash at every logon), but the logon screen seems to the right screen resolution (1024×600).
The system only offers the generic video driver (from Device Manager).
Is there any way I can install these v10 embedded drivers?
Replies (9)
![]()
Thank you for posting on Microsoft Communities.
I will be glad to help you with the issue you have with the computer. I understand the frustration when things don’t work the way it should.
What is the make and model of the computer?
I suggest you to download the display drivers and install them in compatibility mode. Please follow the below linlk to know how to install the drivers in compatibility mode:
Hope this information is helpful. Please post in case you have any further issues, I will be glad to help you.
Was this reply helpful?
Sorry this didn’t help.
Great! Thanks for your feedback.
How satisfied are you with this reply?
Thanks for your feedback, it helps us improve the site.
How satisfied are you with this reply?
Thanks for your feedback.
[Asus Eee PC X101CH]
I spent some time to follow any installation tips but the driver still crashes.
The tip to install it in Compatiblity Mode (CM) doesn’t work in this case probably because the system uses it only during the installation process. The driver still have to run into Win10 system.
My issue doesn’t seem to be related to the driver delivery.
There are 2 points that I wish to raise.
The first one is I find crazy to disable by default the boot menu from which you can trigger safe mode. By default the user can trigger it, only by logging into the system and do same specific task.
My experience is that you usually need it, when you aren’t able to logon.
This is what happened in my case.
The second one is the Microsoft generic video driver. This could have been the solution to my problem if only it can be more flexible. I cannot run it into 1024×600. it only ran in 800×600.
… and this means I see everything deformed losing about 20% my little display space.
Sadly, after about 2 days of work, I decided to roll back to my Win7.
Excluding this video driver issue, it seems to run fine, but I cannot use it with the display in that condition.
66 people found this reply helpful
Was this reply helpful?
Sorry this didn’t help.
Great! Thanks for your feedback.
How satisfied are you with this reply?
Thanks for your feedback, it helps us improve the site.
Windows 10 and Intel GMA 3600: Making it Work
So of late I’ve been getting some hits with the Intel GMA 3600 and I know exactly why. Some months ago I wrote a post on how to fix the low resolution of the chip on Linux systems, and to be specific, on Arch-based distros. On that post I didn’t touch on Windows because I was fully aware the problem was much complicated on that end. Here’s why:
The chip was designed for the Windows 7 system, and particularly the 32-bit variant, though the atom chip it’s paired with is 64-bit capable. Contrary to expectations, that is as you would have with other similar graphic chips, this one became quite problematic in running anything else other than Windows 7.
With Linux it was expected but when it showed issues with Windows 8/8.1 I wasted no time getting back to Windows 7. The new UI was enough of a reason to downgrade then. Flash forward to 2015 and Microsoft is all up on our desktop’s paining us to upgrade to their new OS – Windows 10.
Knowing very well the problems I had faced with Windows 8.1 I decided not to take up the offer. It’s been over a year now and thanks to those queries I’ve decided to revisit that decision. As it turns out I wasn’t mistaken.
Intel GMA 3600 Windows 7 Driver in Windows 10
After loading Windows 10 on my Samsung netbook as I expected it defaulted to the Microsoft Basic driver which meant it had to run with a resolution of 800×600 and of course with no brightness control.
So the next thing I did was use the good old device manager to install the last updated Windows 7 driver from Intel (who by the way we have to thank for all this mess on account of them dropping support for this driver).
The driver installation went smoothly but after the restart came the issues: blank screen followed by BSOD. The error message: VIDEO_TDR_FAILURE. The same exact error witnessed on Windows 8.1 if I’m not mistaken.
After that I didn’t even want to waste my time troubleshooting, but seeing I had nothing to lose, well apart from my time, I decided to tinker around with it using some solutions being offered online. And talking about online, I have to say this issue is troubling quite a good number of us. But going with the response, it’s easy to conclude that we mean very little to both Intel and Microsoft.
The first solution which I came across was to remove the SystemApps and WindowsApp from the system then reinstall the driver. Seemed a bit too drastic but again nothing to lose was the mantra here.
Step 1: Removing the Driver
First order of business was to remove the Intel driver seeing the computer was useless at this point. This is how I did that:
- First get into safe mode. Since the BSOD is triggered after logging in, the trick is to not log in first but instead Restart from the log in screen while holding down the Shift-key. That should take you to the recovery options. Go to Troubleshoot >> Advanced options >>Startup Settings. You should restart from there to enter safe mode.
- After restarting you should be taken to Safe Mode. Logging in won’t trigger the BSOD because only basic drivers are loaded in this environment. Now go to Device Manager, uninstall the Intel Display Driver and Restart to the normal mode. There shouldn’t be a BSOD this time round.
Step 2: Removing SystemApps and WindowsApps Folders
These are essentially System folders, so deleting them is not a walk in the park. It’s either you acquire their ownership first then try deleting them or the more elegant solution, boot into a Windows neutral environment like a Linux Live CD and yank them out from there. All these seem like good ideas but I wouldn’t advise on deleting anything.
While deleting the WindowsApps folder might not be a big deal the same however is not true for SystemApps since it contains important system apps. So a less invasive approach seems to make more sense and that’s just renaming the folders. This is just in case you need to revert to the modern apps at some later point.
At this point I think I should address the big elephant in the room – doing this will mean losing all your modern apps. That’s the price to pay. So if you’re not ready for that, better to stop here.
For renaming the folders I went with a Linux Live CD. There are quite many out there so use what you’re most comfortable with. Of course if you’re in a hurry you can take ownership of the folders from within Windows and rename them form there. You can read on that here.
The exact location of the folders is as follows:
WindowsApps: C:\Program Files\WindowsApps
SystemsApps: C:\Windows\SystemsApps
Rename the folders as you feel like. For instance, I renamed mine as follows:
WindowsApps: C:\Program Files\Back_WindowsApps
SystemsApps: C:\Windows\Back_Systemsapps
After you’re done, restart your system.
Step 3: Reinstall the Driver
After you’re done restarting, reinstall the Intel driver. I would stick to installing it from the Device Manager rather than using the executable so as to avoid compatibility issues. This is what I mean:
- Put your driver in an easy to locate place like the desktop. If it’s a single executable file (*.exe), first extract it using 7-zip or Uniextract. The latest driver is available from Intel here.
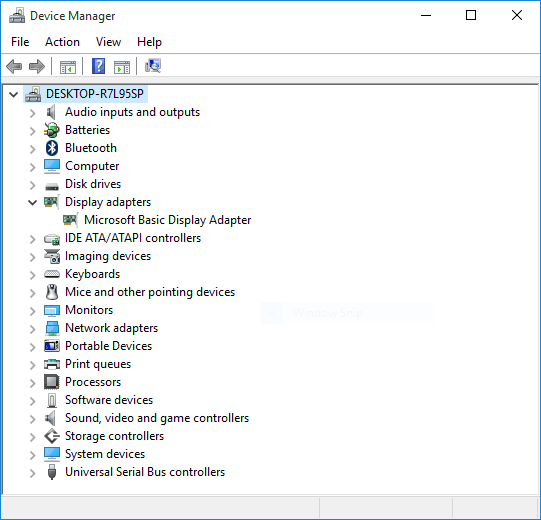
- Open the Device Manager by opening the run menu (Win + R), type devmgmt.msc without the quotes then press Enter.

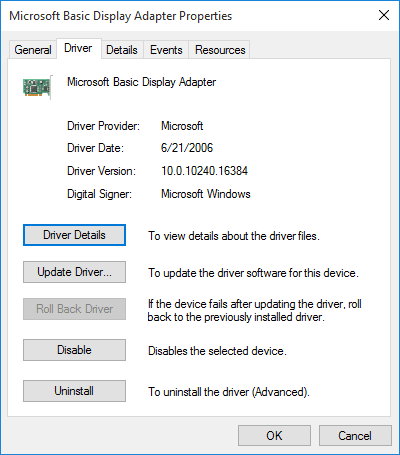
- From the list of devices, locate Display Adapters. Under it, you should find Microsoft Basic Display Adapter. Double click to open it then go to the Driver tab.
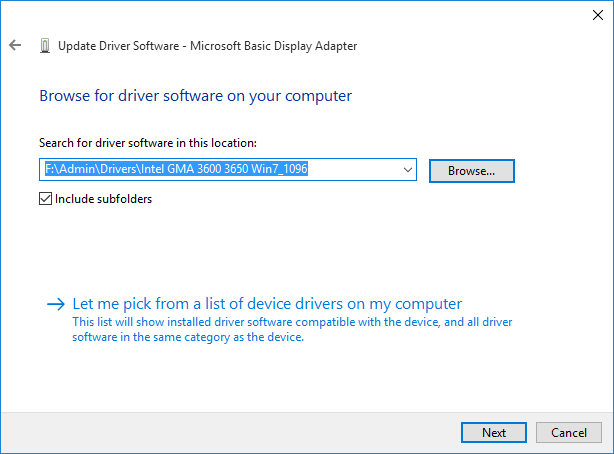
- Select Update Driver… and in the pop-up window select Browse my computer for driver software.
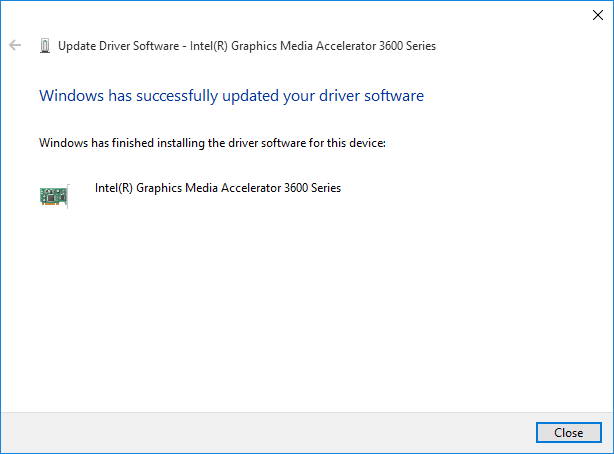
- Point it to the folder containing the driver and make sure to check the Include subfolders option. Click Next to install the driver.
- The driver should be installed successfully as shown below.
- Exit the device manager and restart your computer.
The Results
So after doing all that and restarting, here are the results:
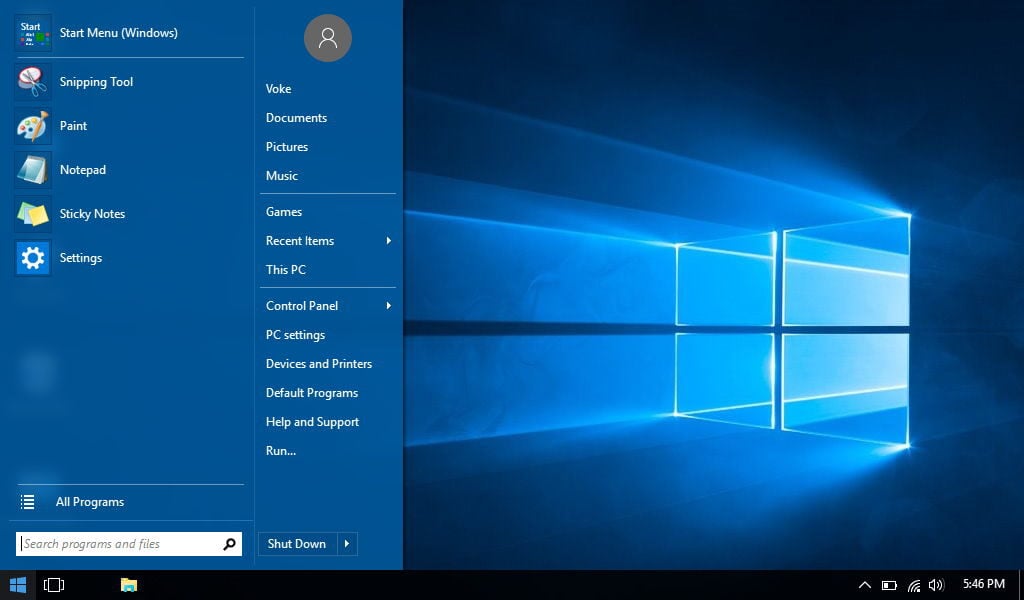 Desktop: 1024 x 600, Classic Shell Start Menu
1024 x 600 resolution (native resolution), no more BSODs after logging in and finally brightness control.
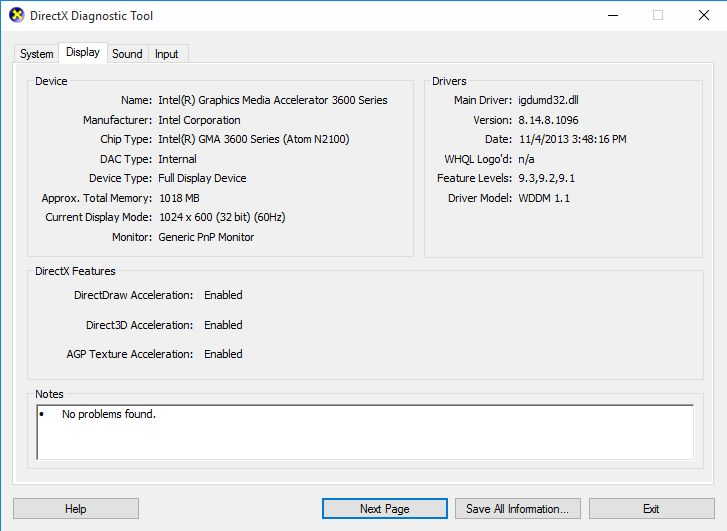 DierctX Display Driver Properties
Fixes and Some Possible Solutions
However, all these come at some added costs, other than losing the Modern apps:
- The Start Menu doesn’t launch when clicked.
Possible Solutions:- Install ClassicShell (no longer updated, use its fork Open Shell) to replace the start menu.
- Use a launcher like Launchy – if you don’t use the start menu that much, Launchy makes it easy to launch apps and do other fancy stuff using your keyboard.
- The Battery, Sound, Wi-Fi and Time notification icons don’t work when clicked though their tool tips and right-clicking on them works. Just hover over them to get the battery level and Wi-Fi status.
Possible Solutions:- Battery: Right-click Battery icon >> Power Options to manage battery settings. You can also pin it to the task bar or create a desktop shortcut for it.
- Sound: Right-click Battery to manage volume and sound devices. You can also use your keyboard buttons to adjust the volume
- Wi-Fi: Connect Wi-Fi from the lock screen. Oddly, the menu works perfectly from there. You can easily go to the lock screen using Win + L.
- Time: Right click Time to adjust time/date.
- Search box and Action Centre (Notifications) don’t work.
Possible Solutions:- Search box: Hide the search box by Right-click on the Taskbar >> Search >> Hidden
- Search function: For local search use ClassicShell Start Menu search or give Everything a try.
- Action Centre: Disable Action Centre Icon by Right-click Taskbar >> Notification area: Customize >> Turn system icons on or off.
- Adjusting screen brightness using the keyboard buttons will most likely not work. To do that, right-click on the battery icon on the taskbar and select Adjust brightness.
Conclusion
Initially I had my doubts whether this solution would work but after trying it, the laptop is at last usable. Of course this comes at a hefty price of doing without the modern apps, which is an integral part of Windows 10. Actually I think it’s the main selling point of Windows 10.
So as far as using Windows 10 in this state is concerned, I think I will pass and stick to Windows 7 – and it’s not just about the chip, I’m just too used to the Windows 7 desktop environment. However that’s just me, so if you really need that Windows 10 upgrade badly I think this is worth giving a try.
I’ll advise on trying this on a dual-boot, which by the way is what I did. This way in case you’re not happy with the results, you can easily switch back to your old system without having to start over again. If you find that too complicated, a proper system back up should suffice. Good luck!.


