- Поддержка графических Intel® Iris® Xe графических услуг
- Все категории статей
- Совместимость
- Сообщения об ошибке
- Информация о продукции и документация
- Определить мой продукт
- Установка и настройка
- Обслуживание и производительность
- Поиск и устранение неисправностей
- Гарантия и программа гарантийной замены
- Новейшие драйверы и ПО
- Действие
- Получить спецификацию продукции для данного продукта
- Вам нужна дополнительная помощь?
- Оставьте отзыв
- Поиск драйверов графики в Linux*
- Поиск информации о графике в Linux
- Драйверы графики Intel® для Linux
- Разработчики драйверов графики Intel® для Linux
- Установка драйвера Intel в Ubuntu
- Официальный установщик драйверов Intel
- Установка драйвера Intel в Ubuntu
- Выводы
- Ubuntu 20.04 no driver loaded for Intel Iris Xe Graphics
- IntelВ® IrisВ® Xe MAX Graphics with Linux*
- Overview
- Configure the host
- Configure the host to bind vfio-pci to Intel Iris Xe MAX graphics adapter
- Install the linux-oem-20.04 kernel
- Reboot
- Identify PCI device bound to the vfio-pci driver
- Configuring the VM guest
- Prepare kernel for Intel Iris Xe MAX graphics
- Create an Ubuntu virtual machine
- Start a VM with GPU passthrough
- Connection to the VM
- Verify the Intel Iris Xe MAX graphics driver is initialized
- Install user space media and compute packages
- Configure the package repository
- Install the compute and media packages
- Configure permissions to access GPU
- Tests
- Verify the kernel is the version you built
- Verify the graphics platform name
- Verify Open CL
- Verify media
- Additional guides
- Feedback on this page?
Поддержка графических Intel® Iris® Xe графических услуг
Информация о поддержке графических Intel® Iris® Xe, включая рекомендуемые материалы, загружаемые материалы, спецификации, гарантию и т. д.
Сообщения об ошибке
Определить мой продукт
Установка и настройка
Коды продукции и запасные части
Информация о продукции и документация
Поиск и устранение неисправностей
Гарантия и программа гарантийной замены
Обслуживание и производительность
Поиск не дал результатов для запроса
Все категории статей
Совместимость
Сообщения об ошибке
Информация о продукции и документация
Определить мой продукт
Установка и настройка
Обслуживание и производительность
Поиск и устранение неисправностей
Гарантия и программа гарантийной замены
- Популярность
- Последняя редакция
- Категория
Просмотреть параметры загрузки
Поиск не дал результатов для запроса
Новейшие драйверы и ПО
Действие
Получить спецификацию продукции для данного продукта
Вам нужна дополнительная помощь?
Оставьте отзыв
Содержание данной страницы представляет собой сочетание выполненного человеком и компьютерного перевода оригинального содержания на английском языке. Данная информация предоставляется для вашего удобства и в ознакомительных целях и не должна расцениваться как исключительная, либо безошибочная. При обнаружении каких-либо противоречий между версией данной страницы на английском языке и переводом, версия на английском языке будет иметь приоритет и контроль. Посмотреть английскую версию этой страницы.
Для работы технологий Intel может потребоваться специальное оборудование, ПО или активация услуг. // Ни один продукт или компонент не может обеспечить абсолютную защиту. // Ваши расходы и результаты могут отличаться. // Производительность зависит от вида использования, конфигурации и других факторов. // См. наши юридические уведомления и отказ от ответственности. // Корпорация Intel выступает за соблюдение прав человека и избегает причастности к их нарушению. См. Глобальные принципы защиты прав человека в корпорации Intel. Продукция и программное обеспечение Intel предназначены только для использования в приложениях, которые не приводят или не способствуют нарушению всемирно признанных прав человека.
Источник
Поиск драйверов графики в Linux*
Тип материала Совместимость
Идентификатор статьи 000005520
Последняя редакция 09.09.2021
Поиск информации о графике в Linux
Чтобы обнаружить графическое оборудование в вашей системе, выполните следующую команду
Вы также можете использовать эту команду
> lspci -k | grep -EA3 ‘VGA|3D|Display’
Пример ответа системы см. ниже. В этом примере графическим контроллером является HD Graphics 500


Драйверы графики Intel® для Linux
Не существует одной официальной версии драйвера графики для Linux, поскольку драйвер включает в себя различные подсистемы, в частности драйвер ядра, драйвер Mesa 3D и другие драйверы. Каждый из них имеет свою текущую версию выпуска.
Большинство дистрибутивов Linux* уже содержит драйверы графических систем Intel®. Эти драйверы предоставляются и поддерживаются поставщиками дистрибутивов Linux*, а не корпорацией Intel. Мы рекомендуем обращаться к поставщикам операционных систем Linux*.
Разработчики драйверов графики Intel® для Linux
Драйверы графических систем Intel® для Linux* доступны в виде исходного кода. Подробная информация представлена на сайте графики Intel® для Linux.
Источник
Установка драйвера Intel в Ubuntu
В отличие от драйверов видеокарт от других производителей, таких как Nvidia и AMD, часть драйвера Intel для интегрированных видеокарт встроена в ядро, а другая часть в пакет mesa-utils. Таким образом если вы используете последнюю версию ядра и свежую версию mesa-utils то, скорее всего, вы используете самую свежую версию драйвера Intel.
В этой статье мы рассмотрим как выполняется установка драйвера Intel в Ubuntu если он не установлен по умолчанию, а также как получить самую последнюю версию.
Официальный установщик драйверов Intel
Раньше существовал установщик драйверов от Intel, позволяющий установить последнюю версию драйвера в Ubuntu или Fedora, но потом компания прекратила поддержку этой утилиты. Скачать её можно здесь. Но последняя версия пакета вышла в 2018 году, и с тех пор уже вышло много новых ядер и новых версий дистрибутива Ubuntu. Сейчас в репозиториях Ubuntu версия драйвера более новая чем там.
Установка драйвера Intel в Ubuntu
Вы можете посмотреть какой сейчас драйвер видеокарты используется с помощью команды lspci:
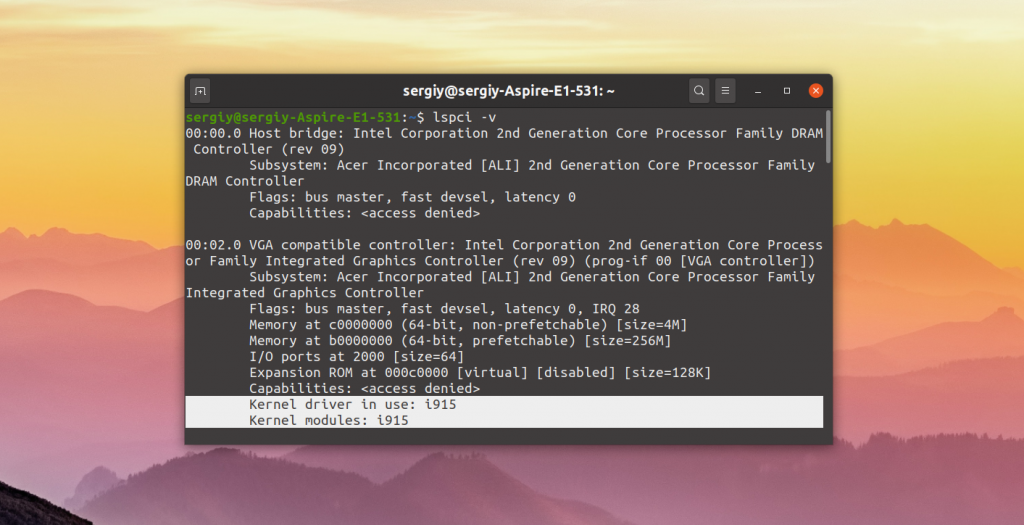
Как видите, в данном примере используется i915, это драйвер видеокарты от Intel. Он работает и ничего больше устанавливать не нужно. Если же в этой строчке находится что-то другое, можно попытаться установить драйвер.
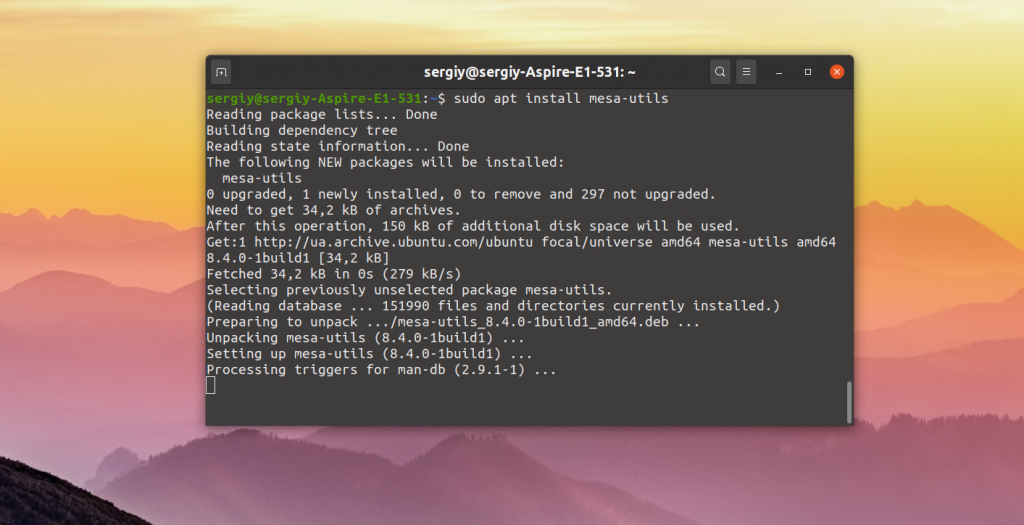
Для установки части драйвера для Xorg и Mesa достаточно установить в систему такие пакеты:
sudo apt install xserver-xorg-video-intel
sudo apt install mesa-utils
Если вы хотите получить самую последнюю версию драйвера можно воспользоваться специальным PPA. Для добавления репозитория в систему выполните:
sudo add-apt-repository ppa:oibaf/graphics-drivers
Затем просто обновите систему и перезагрузите компьютер:
sudo apt full-upgrade
Выводы
Вот и все. Теперь вы знаете как выполняется установка драйвера Intel Ubuntu. В отличие от драйверов для Nvidia, в большинстве случаев здесь всё уже установлено. И вам не надо думать как поддерживать актуальную версию этого драйвера в своей системе. Если у вас остались вопросы, спрашивайте в комментариях!
Источник
Ubuntu 20.04 no driver loaded for Intel Iris Xe Graphics
I set up a dual-booted Ubuntu 20.04 for Asus ZenBook UX393EA, which has an integrated graphics card ‘Intel(R) Iris(R) Xe Graphics’. However I find llvmpipe (LLVM 11.0.0, 256 bits) is used but not the integrated graphics card.
I believe some other issues are due to this, such as:
- xrandr failed to get size of gamma for output default
- the screen resolution can only be set to one value
- no control bar for screen brightness
Here are some info:
(as you can see, the driver for Intel graphics is not loaded)
where the last one log is:
there’s another log concerning i915, I’m not sure if it’s related:
I guess the root cause is that the graphics card is not supported by the current driver i915. I don’t know what to do or if there are other reasons for this issue. Here are what I have tried:
- changed /etc/default/grub GRUB_CMDLINE_LINUX_DEFAULT to «», as the way in Ubuntu 20.04 Intel HD 615: No Brightness control or no Boot / Stuck on Boot Screen
- configure xorg to prefer the Intel or disable modeswitching out of IGD, as the way in Ubuntu 18.04 not working with Intel Integrated Graphics
- remove xserver-xorg-video-fbdev, as the way in https://forums.linuxmint.com/viewtopic.php?t=287323, which only made the boot procedure stuck in splash screen.
None of them works for me. I would be grateful if someone could give any help or ideas.
Источник
IntelВ® IrisВ® Xe MAX Graphics with Linux*
Laptops are now available in market to purchase that provide both a discrete IntelВ® IrisВ® Xe MAX graphics processor and an integrated IntelВ® IrisВ® Xe Graphics processor. You can find more information about those systems here.
While support for the Intel Iris Xe Graphics processor has already been integrated into Linux* and integrated into Linux-based distributions such as Ubuntu 20.04.1, enabling work for the Intel Iris Xe MAX graphics processor in Linux* is ongoing.
In the meantime, we are excited to provide early access to that software and instructions to configure an Ubuntu 20.04.1 system so you can take advantage of both graphics adapters today. By following these instructions, your system’s display will be using the Intel Iris Xe Graphics processor and the Intel Iris Xe MAX graphics processor can then be used for 3D, media, and compute processing.
Overview

To use both the Intel Iris Xe graphics and Intel Iris Xe MAX graphics processors at the same time currently requires two different kernels. To isolate the two required kernel versions, virtualization will be used.
The virtual machine (VM) host will have direct control of the display through the Intel Iris Xe graphics processor (via the kernel provided by Ubuntu.) The VM host will also be configured to use PCI passthrough to provide the Intel Iris Xe MAX graphics processor to the VM guest. The VM guest will be running the custom Linux kernel.
Once the host is configured, instructions are provided to to configure and use a VM guest for compute and media offload. Using the standard QEMU virtualization machine manager, you can setup a local compute node using the Intel Iris Xe MAX graphics for executing media and compute applications while you continue using the Intel Iris Xe graphics adapter for your display.
Configure the host
These instructions begin with the laptop having the Desktop image for Ubuntu 20.04.1 LTS]1 (or newer) successfully installed and booting. This can be done either as the sole operating system, configuring as a dual boot environment, or by using external storage. As the specific steps for installing Linux onto a laptop is very platform specific, we do not provide those instructions here. Please refer to your platform or operating system supplier for information.
Prior to starting this guide, ensure that you have enabled virtualization in your system’s BIOS. Please refer to your platform supplier for information on configuring the BIOS. On some systems, you may also need to enable Secure Boot.
Prior to running the instructions below, activate sudo in your session by running sudo -l . This will allow you to copy/paste the instructions which use sudo without being prompted for your password.
Configure the host to bind vfio-pci to Intel Iris Xe MAX graphics adapter
Binding the Intel Iris Xe MAX graphics adapter to the vfio-pci driver detaches it from the host operating system, freeing it for use by the virtual machine. The PCI device and vendor ID for the Intel Iris Xe MAX graphics adapter is 8086:4905. Edit your system’s /etc/default/grub configuration to append intel_iommu=on vfio-pci.ids=8086:4905. The following shell script will check if those two parameters are set in /etc/default/grub, and set them if not.
The above should display the GRUB_CMDLINE_LINUX_DEFAULT including both intel_iommu=on and vfio-pci.ids=8086:4905.
Install the linux-oem-20.04 kernel
The default kernel provided in Ubuntu 20.04.1 does not provide a kernel driver for the Intel Iris Xe graphics adapter. To enable that graphics adapter, you need to configure the system to use the linux-oem-20.04 kernel.
Reboot
At this point, the system is configured to:
Enable Intel Iris Xe Graphics adapter for the host using linux-oem-20.04 kernel.
Bind the vfio-pci driver to the Intel Iris Xe MAX graphics adapter so it can be passed through to the VM.
Reboot into the new configuration. The next section provides steps to verify the devices enumerate correctly.
Identify PCI device bound to the vfio-pci driver
After rebooting, verify the changes worked. The following will output the PCI information as well as the kernel driver bound to those devices:
The output of the above command should look similar to the following, listing two devices. One will be bound to the i915 driver and the other to vfio-pci.
Make a note of the address of the PCI device that is bound to the vfio-pci driver, 03:00.0 in this case. This is the PCI address that will be provided to the VM, giving it access to the Intel Iris Xe MAX graphics adapter.
Configuring the VM guest
At this point the host is configured in a way which allow the Intel Iris Xe MAX graphics adapter to be passed to a VM guest. Next, you will compile a custom kernel to boot inside of that VM guest, with support for the Intel Iris Xe MAX graphics adapter.
On the host, we recommend you continue using the kernel supplied by the operating system vendor.
Prepare kernel for Intel Iris Xe MAX graphics
Install packages necessary for building the Linux kernel from source:
The following will clone the kernel sources from GitHub, configure it, and compile it in the $
NOTE: Cloning and building the kernel can take a while, varying on Internet connection and hardware.
At the end of the build, a tarball will be ready in $
Create an Ubuntu virtual machine
The following steps will install the required packages to manage and configure a VM, create an initial disk image, download the Ubuntu 20.04.1 live server image, and boot the VM with that image.
We will be using QEMU directly from the command line, but you could use a graphical configuration tool such as virt-manager as well.
Install packages to manage the VM
Check that virtualization is enabled
You can now run the utility вЂkvm-ok’ to determine VT-d is enabled on your system:
You should see a message similar to:
If you do not see that, make sure that virtualization is enabled in your system’s BIOS. Please refer to your platform supplier for information on configuring the BIOS. On some systems, you may also need to enable Secure Boot.
Create a disk image file for the VM
The following will create disk image file for the VM with 50G. If you don’t want to place the disk image in /opt you can place it wherever you have write access on the host.
Install Ubuntu 20.04.1 LTS image into VM
You can install either Ubuntu Server or Ubuntu Desktop within the VM. Because the graphics display is not required for GPU offloading, you may chose to install the server image to reduce disk usage.
Since you just installed the Desktop image on the host platform, you may wish to re-use the ISO image you already downloaded, instead of downloading the Server image.
If you wish to download a new image, you can do so with the following command:
The above will download the file ubuntu-20.04.1-live-server-amd64.iso, which you will pass to QEMU below. We set those values into the BOOT_MEDIA environment variable:
Install OS into VM
The following will start the VM with 4G of RAM. The CPU configuration will be copied from the host CPU. The VM will boot the OS image specified in the BOOT_MEDIA variable declared previously.
A window will open and after several seconds the Ubuntu installer will start.
NOTE: During the package installation, make sure to configure network and install openssh-server when prompted. ssh will be used later to connect to the VM.
If the installation asks how to partition the disk:
You do not need to use volume management (deselect LVM)
Add a 2G partition mounted to /boot, formatted as ext4. This will allow plenty of space for changing kernels. The default is closer to
Set the remaining space on / (approximately 47G)
After the installation has completed, shut down the VM during reboot.
Log into the VM guest and configure it
The disk image now includes an installed operating system, so you no longer need to pass the boot media to the VM, so start the VM without $
On the host, launch the VM:
Once the virtual machine starts, it will boot the Ubuntu operating system you just installed.
If you didn’t install openssh-server when you installed the OS into the VM, you will need to do it from the virtual machine window launched when you started qemu-system-x86_64.
In the VM, run the following:
When the VM is started above, port 10022 on the host is forwarded to port 22 in the guest. The next command will use that local port forward to copy the built kernel from the host system into the guest. You can then ssh into the VM to run the commands to install that kernel.
Now you can ssh into the guest VM to install the kernel:
On the host, connect to the VM:
OPTIONAL: If you installed the Server OS version, you may want to disable вЂcloud-init’ inside the VM to improve boot times:
OPTIONAL: If you installed the Desktop OS version, you may want to disable the graphics display to reduce memory usage and improve performance:
Prior to installing the custom kernel, you need to install the firmware files required by the Intel Iris Xe MAX graphics adapter. The following will download an archive of the latest firmware files and decompress them into /lib/firmware/i915, where the kernel will look for them while booting:
You can now install the custom kernel. This is done after the firmware files are installed to make sure that the firmware files are available while the initial ramdisk is created during the kernel installation:
Next, modify grub to enable serial output so console output can be seen from the virtual machine manager (VMM). This will allow you to launch the VM later without a virtual display.
The two lines you want to modify are the GRUB_CMDLINE_LINUX_DEFAULT and GRUB_TERMINAL as follows. You can use вЂnano’ to edit the file:
Finally, update the bootloader with the additional grub configuation and power off the VM.
Start a VM with GPU passthrough
Now that the VM is configured to boot the kernel containing support for the Intel Iris Xe MAX graphics adapter, we will re-start QEMU kvm using the disk image we created using and passthrough the GPU to the guest OS.
In the below example, the address 03:00.0 used with the vfio-pci option corresponds to the PCI address for xe-max that we got from running lspci on the host.
Since this will now be passing in physical hardware, you need to run it as root:
It may take several seconds before you see any output from the VM.
Connection to the VM
As part of launching the VM, the above command forwards connections to port 10022 on the host to port 22 in the guest. This is then used for connecting to the guest:
It is recommended to login into the guest via SSH to execute below commands and to run demos requiring terminal output.
Verify the Intel Iris Xe MAX graphics driver is initialized
Use lspci to verify the PCI device was passed through and initialized by the i915 kernel driver:
Output should look similar to the following:
Install user space media and compute packages
The following is taken from the installation guides, and should be executed on the guest VM:
First, activate a sudo session so you are not prompted for a password while copy/pasting instructions to the terminal:
Configure the package repository
Install the compute and media packages
The following will install the latest versions of the OpenCL* runtime, Level Zero, Media SDK, and Media driver:
Configure permissions to access GPU
In order to access GPU capabilities, a user needs to have the correct permissions on the system. The following will add the user to the render group owning /dev/dri/render*:
Tests
Verify the kernel is the version you built
This should report вЂLinux 5.4.48-xe-max’.
Verify the graphics platform name
Verify вЂplatform: DG1’ is listed in i915_capabilities:
Verify Open CL
To verify that the intel-opencl packages have installed correctly, you can use the clinfo program:
Verify media
To verify that media driver have installed correctly, you can use the vainfo program:
Additional guides
We have the following guides you can follow to demonstrate how to user the Intel Iris Xe MAX graphics adapter within the VM environment:
Feedback on this page?
If you have feedback on this page, please visit the community documentation project project on GitHub and file an issue.
Источник


