- Tool windows
- Open a tool window
- Hide the active tool window
- Hide all tool windows
- Navigate between the editor and a tool window
- Tool window bars and buttons
- Show or hide tool window bars
- Tool window components
- Add Maven support to an existing project
- Add Maven support
- Create an executable JAR
- Maven
- Maven
- Create a new Maven project
- Create a Java EE project with Maven as a build tool
- Open an existing Maven project
- Configure the Maven settings before opening a new project
- Add a new Maven module to an existing project
- Configure a multi-module Maven project
- Access the Maven settings
- Use the Maven wrapper or a custom version of Maven
- Change the JDK version in a Maven project
- Change the JDK version in the Project Structure
- Change the JDK version for the Maven runner
- Change the JDK version for the Maven importer
Tool windows
Tool windows provide access to useful development tasks: viewing your project structure, running and debugging your application, integration with version control systems and other external tools, code analysis, search, and navigation, and so on. By default, tool windows are attached to the bottom and sides of the main window. However, you can rearrange and even detach them to use as separate windows, for example, on another monitor.
The following screenshot shows several common tool windows occupying space around the editor:

Project tool window
Structure tool window
Run tool window
Maven tool window
Some tool windows are always available (for example, Project and Structure ), some are activated when a specific plugin is enabled or your project has a specific structure (for example, Maven , Gradle , and Spring ), and some appear only when you perform a certain action (for example, Run , Debug , and Find ).
For example, the Run tool window appears only after you run your code. It is accessible from the main menu View | Tool Windows | Run or using the shortcut Alt+4 as long as there is some output in the console and you don’t close all the tabs in it.
Open a tool window
To show or hide a tool window, do one of the following:
From the main menu, select a tool window under View | Tool Windows .
Use the corresponding shortcut, for example, Alt+1 to open the Project tool window. If there is no shortcut for a tool window, you can assign it as described in Configure keyboard shortcuts.
Click the corresponding tool window button on the tool window bar.

Hover the mouse pointer over the quick access button / in the lower left corner of the main window and select a tool window.

Hide the active tool window
Press Shift+Escape or select Window | Active Tool Window | Hide Active Tool Window from the main menu. Press Shift+Escape again to show the hidden tool window.
Hide all tool windows
This can help you focus on the editor.
Press Ctrl+Shift+F12 or select Window | Active Tool Window | Hide All Windows from the main menu. Press Ctrl+Shift+F12 again to show the hidden tool windows.
Navigate between the editor and a tool window
To change focus from a tool window to the editor, press Escape .
To change focus from the editor back to the last active tool window, press F12 or select Window | Active Tool Window | Jump to Last Tool Window from the main menu.
Tool window bars and buttons
Tool window bars on the edges of the main window contain buttons to show and hide tool windows. Right-click a tool window button to open its context menu, where you can change the viewing mode and move the tool window. You can also drag tool window buttons to rearrange tool windows on the bars.
Show or hide tool window bars
Click the quick access button in the lower left corner of the main window to hide the tool window bars. The button changes to and you can click it to show the tool window bars.
Alternatively, select or clear Tool Window Bars from the main menu under View | Appearance .
When the tool window bars are hidden, you can double-press and hold Alt to show hidden tool window bars.
Tool window components
Generally, all tool windows have a title bar, a toolbar, and a content pane.

Some tool windows are also separated using tabs or a dropdown selector in the title bar, based on the functionality that it covers. Select Window | Active Tool Window | Group Tabs to show tabs. Disable this option to show a dropdown menu.

The title bar contains the tool window options menu for changing the viewing mode and the position of the tool window. You can also access these options by right-clicking the title bar or the tool window button. Some tool windows can have other options in this menu, depending on the functionality (for example, to sort, filter, and group items listed in a tool window).
Click to hide the tool window and use other buttons that may be on the title bar, for example:
and to expand and collapse the contents of the tool window
to locate and select the file from the editor in the tool window
Actions from the tool window toolbar are usually also available in the main menu and context menus. Some of them can also be executed with a default shortcut. You can assign shortcuts for actions as described in Configure keyboard shortcuts.
For all tool windows that display tree-like structures (for example, Project tool window) you can display vertical lines that mark indent levels in tree views and help you better understand the hierarchy of the components in your project. To display these lines, enable Show tree indent guides on the Appearance and Behavior | Appearance page of the Settings/Preferences Ctrl+Alt+S .
Add Maven support to an existing project
You can open an existing non-Maven project and add a Maven support via IntelliJ IDEA UI.
Add Maven support
Open an existing project, for example, a Java project.
In the Project tool window, right-click your project and select Add Framework Support . 
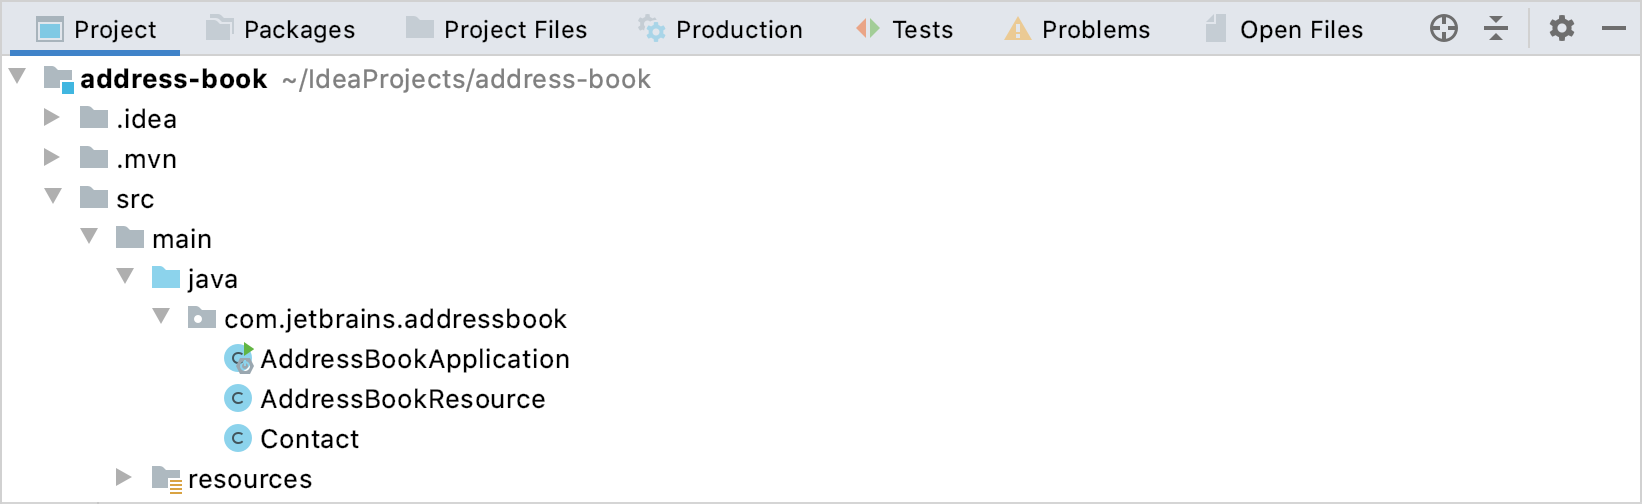
In the dialog that opens, select Maven from the options on the left and click OK .  IntelliJ IDEA adds a default POM to the project and generates the standard Maven layout in Project tool window.
  IntelliJ IDEA also creates a corresponding structure with Lifecycle and Plugins in the Maven tool window.
Open the generated POM and specify a groupId . The artifactId and version are specified automatically.  Every time you change the POM, IntelliJ IDEA displays a popup suggesting to import your changes.
At this point you can further develop your project using Maven. We recommend making all your project changes in POM since IntelliJ IDEA considers pom.xml as a single source of truth.
Create an executable JAR
You can conclude the following optional steps to create an executable JAR.
Click to build project. IntelliJ IDEA generates target folder. Note that IntelliJ IDEA only compiles sources and doesn’t create either JAR file or Manifest file.
Create a Manifest file in the resources directory. 
In your POM specify the Manifest file information, so you can use Maven to generate an executable jar file. 
In the Maven tool window, in the Lifecycle list, double-click the install command to generate the jar file. IntelliJ IDEA generates the appropriate information in the target folder and an executable JAR in the Project tool window.  You can right-click the generated JAR and select Run to execute the file.
If the existing project contains more than one module, converting such a project into the Maven project becomes quite challenging. In this case we recommend that you create an external POM where you describe your project and open your POM as you would open a regular Maven project.
Maven
File | Settings | Build, Execution, Deployment | Build Tools | Maven for Windows and Linux
IntelliJ IDEA | Preferences | Build, Execution, Deployment | Build Tools | Maven for macOS
On how to install and work with Maven in IntelliJ IDEA, refer to the Maven support section.
| Item | Description |
|---|---|
| Work offline | If this checkbox is selected, Maven works in the offline mode and uses only the resources that are available locally. |
This option corresponds to the —offline command line option.
This option corresponds to the —no-plugin-registry command line option.
Clearing this checkbox corresponds to the —non-recursive command line option.
This option corresponds to the —errors command line option.
At the very first failure, which corresponds to the command line option —fail-fast .
Fail at the end, which corresponds to the command line option —fail-at-end .
Ignore failures, which corresponds to the command line option —fail-never .
You can opt for the following:
Check for updates, which corresponds to the command line option —check-plugin-updates .
Suppress checking for updates, which corresponds to the command line option —no-plugin-updates .
This option is ignored for Maven 3 and later versions.
For more information, see parallel builds in Maven 3 feature.
Maven2 is not bundled with IntelliJ IDEA. If you need to use it in your project, install it locally.
Maven
IntelliJ IDEA supports a fully-functional integration with Maven that helps you automate your building process. You can easily create a new Maven project, open and sync an existing one, add a Maven support to any existing IntelliJ IDEA project, configure and manage a multi-module project.
If you want to use a custom Maven version that is not bundled with IntelliJ IDEA, you need to install it locally.
Create a new Maven project
If no project is currently open in IntelliJ IDEA, click New Project on the Welcome screen. Otherwise, select File | New | Project from the main menu.
Select Maven from the options on the left.
Specify project’s SDK (JDK) or use the default one and an archetype if you want to use a predefined project template (configure your own archetype by clicking Add Archetype ).
GroupId — a package of a new project.
ArtifactId — a name of your project.
Version — a version of a new project. By default, this field is specified automatically.
For more information on Maven coordinates, see Maven naming conventions.
Click Next .
If you are creating a project using a Maven archetype, IntelliJ IDEA displays the Maven settings that you can use to set the Maven home directory and Maven repositories. Also, you can check the archetype properties.
Specify the name and location settings.
IntelliJ IDEA creates a Maven project with the pom.xml file that includes compiler and target versions of Java, dedicated Maven tool window, and all the necessary dependencies to start you work.
The version of Java specified in the pom.xml file overrides the version specified in the JDK for Importer option, located in the Maven settings.
Create a Java EE project with Maven as a build tool
Launch the New Project wizard. If no project is currently opened in IntelliJ IDEA, click New Project on the welcome screen. Otherwise, select File | New | Project from the main menu.
Select Java Enterprise from the options on the left.
Leave the default option Maven as your build tool and click Next .
On the next page of the wizard, select additional libraries and frameworks for your project and click Next .
On the next page of the wizard, specify your project’s name, location, and artifact coordinates. Click Finish .
IntelliJ IDEA creates a Maven project with the dedicated Maven tool window and adds necessary dependencies.
For the more detailed information, refer to Tutorial: Your first Java EE application.
Open an existing Maven project
- From the main menu, select File | Open .
Alternatively, click Open on the welcome screen.
If you have some custom plugins that require you to import your project from the IntelliJ IDEA model, press Ctrl+Shift+A and search for the Project from Existing Sources action.
In the dialog that opens, select the pom.xml file of the project you want to open.
In the dialog that opens, click Open as Project .
IntelliJ IDEA opens and syncs the Maven project in the IDE. If you need to adjust importing options when you open the project, refer to the Maven settings.
If you have a Maven project with the configured Maven wrapper then IntelliJ IDEA will take the Maven version from the maven.properties file.
Configure the Maven settings before opening a new project
You can configure IntelliJ IDEA to display Maven settings before you open a new Maven project. Since these are application-level settings, they are applied to any new project you open.
- On the Welcome screen, select Customize | All Settings .
Alternatively, from the main menu, select File |New Project Settings | Preferences for New Projects .
In the Settings/Preferences dialog, select Build, Execution, Deployment | Build Tools | Maven .
In the Maven settings dialog, select the Show settings dialog for new Maven projects .
Click OK to save the changes.
Next time you open a new project, IntelliJ IDEA displays the Maven Settings dialog where you can specify a location of the local Maven repository and a user settings file.

Add a new Maven module to an existing project
You can add a Maven module to the project in which you are already working.
In the Project tool window, right-click the project folder and select New | Module . Alternatively, from the main menu, select File| New | Module to open the New Module wizard.
If you used main menu to add a module then the process of adding a module is the same as Creating a new Maven project.
If you are adding sub modules by right-clicking the root folder then the process of adding a new module is shorter. You need to specify the name of your module in the Name field. The rest of the information is added automatically and you can use either the default settings or change them according to your preferences.
Configure a multi-module Maven project
You can create a multi-module Maven project in IntelliJ IDEA. The multi-module project is defined by a parent POM file with several sub modules.
If you have the Maven version 3.7 or later installed, IntelliJ IDEA will support importing a project from the MNG-6656 model.
In this case when you open a child POM file in the editor, you don’t have to specify a version inside the parent tags if it is located in the relativePath by default. If you add a dependency to a module in the same project, you don’t have to specify a version of the dependent module.
Create a Maven parent project. IntelliJ IDEA creates a standard Maven layout including an src folder.
In the Project tool window, remove the src folder since you would only need it in the very rare cases. For your general project, you don’t need the src folder for the parent POM.
In the Project tool window, right-click your project (or from the main menu, click File ) and select New | Module to add a sub project.
In the New Module wizard following the instructions on how to add a module, specify the necessary information and click Finish .
The src folder is created automatically and you can open POM and add a packaging that you need. IntelliJ IDEA adds the module to the parent project. IntelliJ IDEA also adds name and the description of the sub project to the parent POM.

In a multi-module project, the parent POM needs to have a pom packaging.
Last, but not least, IntelliJ IDEA adds the description of the parent POM to the sub project’s POM.
 You can click
  in the left gutter to quickly open the parent POM from your sub project.
You can also add dependencies to the parent POM that will be inherited by the sub projects.

Open Maven tool window to see that all changes made in the parent POM are reflected in sub projects. 
Access the Maven settings
Use the Maven settings to configure options such as Maven version, local repository, offline mode, and so on.
- In the Settings/Preferences dialog Ctrl+Alt+S , go to Build, Execution, Deployment| Maven .
Click on the toolbar, in the Maven tool window to access the Maven settings.
On the Maven settings page, configure the available options and click OK to save the changes.
Use the Maven wrapper or a custom version of Maven
For a custom version, Download the needed Maven version on your computer.
From the main menu select File | Settings/Preferences | Build, Execution, Deployment |Build Tools | Maven .
On the Maven settings page, in the Maven home directory field, specify the location of the Maven custom version installation. For the Maven wrapper, select the use Maven wrapper option from the list. In this case the version of Maven defined in the .mvn/wrapper/maven-wrapper.properties file will be used. 
Change the JDK version in a Maven project
There are several places where you can change the JDK version that will affect not only your current project, but the whole application as well.
Change the JDK version in the Project Structure
Changing the JDK version in the Project Structure dialog will only affect the current project.
From the main menu, select File | Project Structure Ctrl+Alt+Shift+S .
In the dialog that opens, in Project SDK , specify the JDK version and click OK to save the changes. 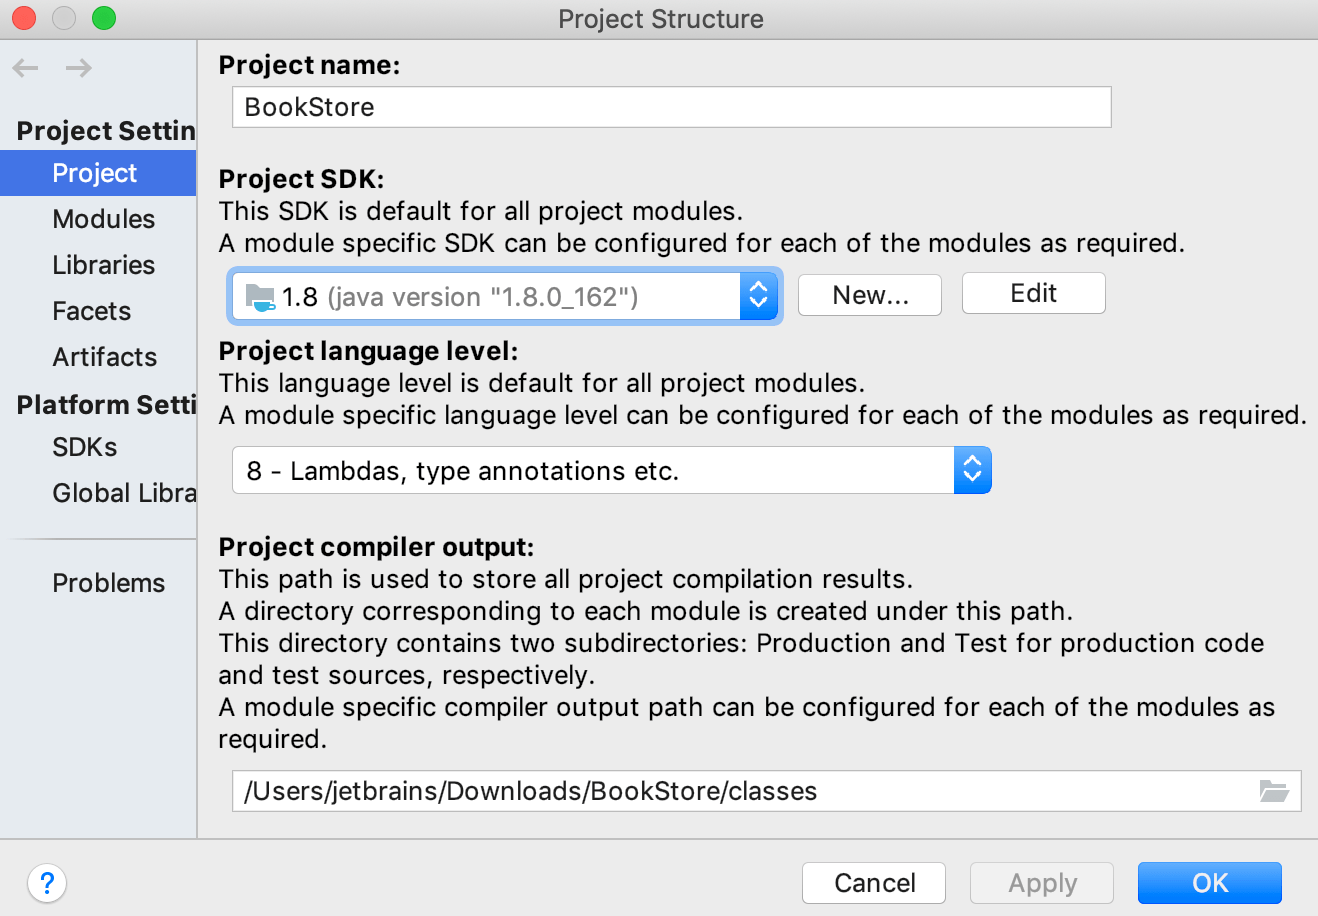
Change the JDK version for the Maven runner
When IntelliJ IDEA runs Maven goals, it will use the JDK version specified for the Maven runner. By default, IntelliJ IDEA uses the project’s JDK.
Changing the JDK for the Maven runner will only affect the current project.
In the Settings/Preferences dialog Ctrl+Alt+S , go to Build, Execution, Deployment | Maven | Runner .
On the page that opens, in the JRE field, select the JDK version. 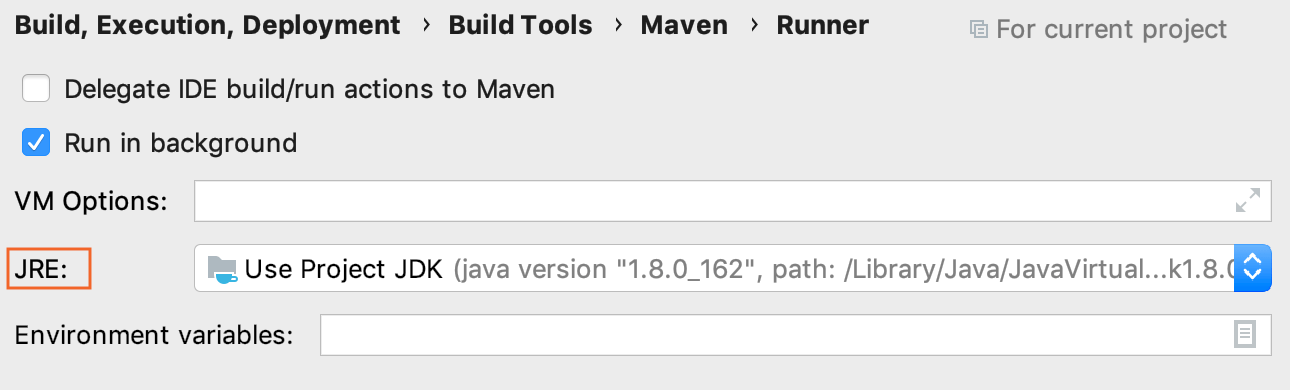
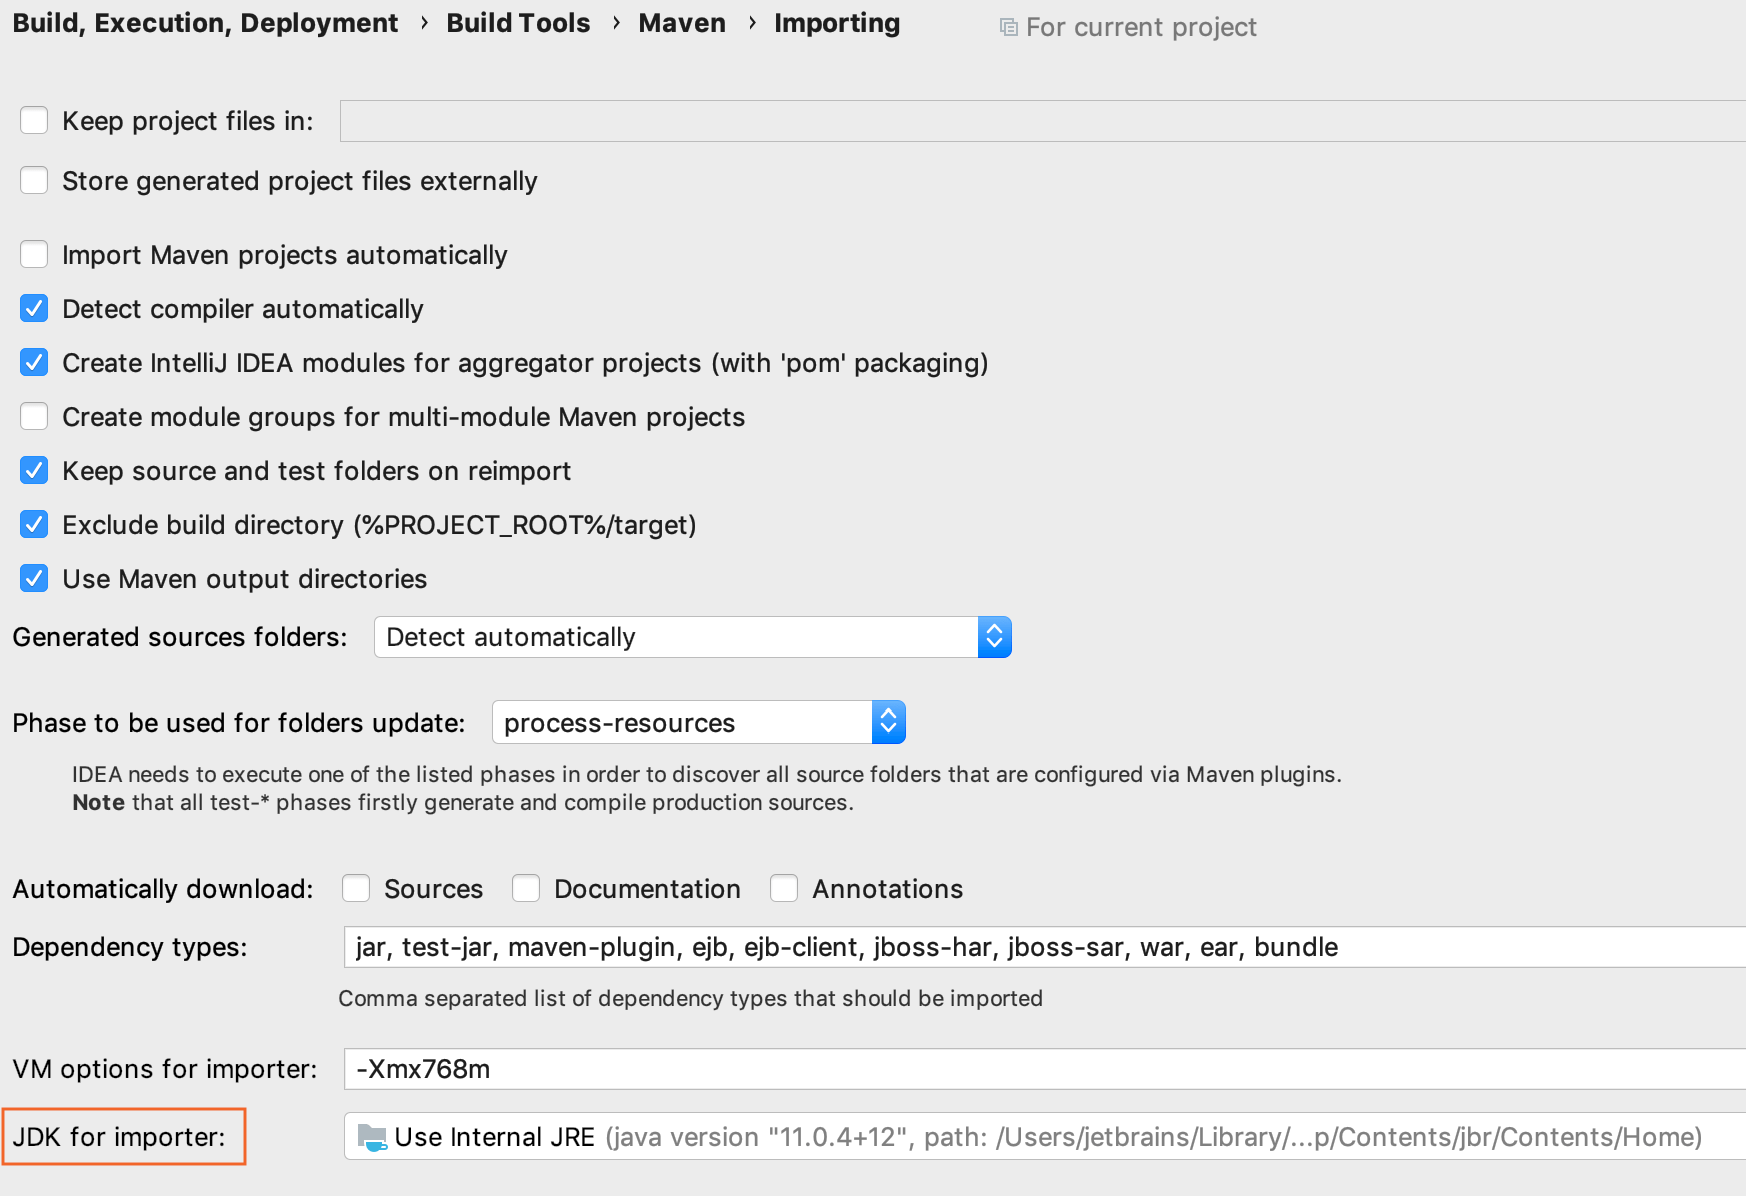
Change the JDK version for the Maven importer
Changing the JDK version for the Maven importer will affect the whole application since it is a part of the Maven global settings. If you want to use the same JDK version as you use in your project for syncing or resolving dependencies, change the JDK version for the importer.
In the Settings/Preferences dialog Ctrl+Alt+S , go to Build, Execution, Deployment | Maven | Importing .
On the page that opens, in the JDK for importer field, select the same JDK version as you used in the Project Structure and click OK to save the changes.