- Network bridge
- Contents
- Creating a bridge
- With iproute2
- With bridge-utils
- With netctl
- With systemd-networkd
- With NetworkManager
- Assigning an IP address
- With iproute2
- With NetworkManager
- Tips and tricks
- Wireless interface on a bridge
- Speeding up traffic destinated to the bridge itself
- Troubleshooting
- No networking after bridge configuration
- No networking on hosted servers after bridge configuration
- How to setup and configure network bridge on Debian Linux
- How to install the brctl
- How to setup network bridge on Debian Linux
- Step 1 – Find out your physical interface
- Step 2 – Update /etc/network/interface file
- Step 3 – Configuring bridging (br0) in /etc/network/interfaces.d/br0
- Step 4 – Restart networking service in Linux
- Как настроить сетевой мост (br0) на Ubuntu Linux 14.04 и 16.04 LTS
- Установка bridge-utils
- Создаем сетевой мост на сервере с Ubuntu
Network bridge
A bridge is a piece of software used to unite two or more network segments. A bridge behaves like a virtual network switch, working transparently (the other machines do not need to know about its existence). Any real devices (e.g. eth0 ) and virtual devices (e.g. tap0 ) can be connected to it.
This article explains how to create a bridge that contains at least an ethernet device. This is useful for things like the bridge mode of QEMU, setting a software based access point, etc.
Contents
Creating a bridge
There are a number of ways to create a bridge.
With iproute2
This section describes the management of a network bridge using the ip tool from the iproute2 package, which is required by the base meta package.
Create a new bridge and change its state to up:
To add an interface (e.g. eth0) into the bridge, its state must be up:
Adding the interface into the bridge is done by setting its master to bridge_name :
To show the existing bridges and associated interfaces, use the bridge utility (also part of iproute2 ). See bridge(8) for details.
This is how to remove an interface from a bridge:
The interface will still be up, so you may also want to bring it down:
To delete a bridge issue the following command:
This will automatically remove all interfaces from the bridge. The slave interfaces will still be up, though, so you may also want to bring them down after.
With bridge-utils
This section describes the management of a network bridge using the legacy brctl tool from the bridge-utils package, which is available in the official repositories. See brctl(8) for full listing of options.
Create a new bridge:
Add a device to a bridge, for example eth0 :
Show current bridges and what interfaces they are connected to:
Set the bridge device up:
Delete a bridge, you need to first set it to down:
With netctl
With systemd-networkd
With NetworkManager
GNOME’s Network settings can create bridges, but currently will not auto-connect to them or slave/attached interfaces. Open Network Settings, add a new interface of type Bridge, add a new bridged connection, and select the MAC address of the device to attach to the bridge.
KDE’s plasma-nm can create bridges. In order to view, create and modify bridge interfaces open the Connections window either by right clicking the Networks applet in the system tray and selecting Configure Network Connections. or from System Settings > Connections. Click the Configuration button in the lower left corner of the module and enable «Show virtual connections». A session restart will be necessary to use the enabled functionality.
nm-connection-editor can create bridges in the same manner as GNOME’s Network settings.
nmcli from networkmanager can create bridges. Creating a bridge with STP disabled (to avoid the bridge being advertised on the network):
Making interface enp30s0 a slave to the bridge:
Setting the existing connection as down (you can get it with nmcli connection show —active ):
Setting the new bridge as up:
If NetworkManager’s default interface for the device you added to the bridge connects automatically, you may want to disable that by clicking the gear next to it in Network Settings, and unchecking «Connect automatically» under «Identity.»
Assigning an IP address
 This article or section needs expansion.
When the bridge is fully set up, it can be assigned an IP address:
With iproute2
With NetworkManager
Give it the desired address:
Set up a DNS server (this will also avoid not being able to load any pages after you apply the changes):
Set the IP address to static:
Apply the changes:
Tips and tricks
Wireless interface on a bridge
To add a wireless interface to a bridge, you first have to assign the wireless interface to an access point or start an access point with hostapd. Otherwise the wireless interface will not be added to the bridge.
Speeding up traffic destinated to the bridge itself
In some situations the bridge not only serves as a bridge box, but also talks to other hosts. Packets that arrive on a bridge port and that are destinated to the bridge box itself will by default enter the iptables INPUT chain with the logical bridge port as input device. These packets will be queued twice by the network code, the first time they are queued after they are received by the network device. The second time after the bridge code examined the destination MAC address and determined it was a locally destinated packet and therefore decided to pass the frame up to the higher protocol stack.[1]
The way to let locally destinated packets be queued only once is by brouting them in the BROUTING chain of the broute table. Suppose br0 has an IP address and that br0’s bridge ports do not have an IP address. Using the following rule should make all locally directed traffic be queued only once:
The replies from the bridge will be sent out through the br0 device (assuming your routing table is correct and sends all traffic through br0), so everything keeps working neatly, without the performance loss caused by the packet being queued twice.
The redirect target is needed because the MAC address of the bridge port is not necessarily equal to the MAC address of the bridge device. The packets destinated to the bridge box will have a destination MAC address equal to that of the bridge br0, so that destination address must be changed to that of the bridge port.
Troubleshooting
No networking after bridge configuration
![]() This article or section needs language, wiki syntax or style improvements. See Help:Style for reference.
This article or section needs language, wiki syntax or style improvements. See Help:Style for reference.![]()
It may help to remove all IP addresses and routes from the interface (e.g. eth0 ) that was added to the bridge and configure these parameters for the bridge instead.
First of all, make sure there is no dhcpcd instance running for eth0 , otherwise the deleted addresses may be reassigned.
Remove address and route from the eth0 interface:
Now IP address and route for the earlier configured bridge must be set. This is usually done by starting a DHCP client for this interface. Otherwise, consult Network configuration for manual configuration.
No networking on hosted servers after bridge configuration
![]() This article or section needs language, wiki syntax or style improvements. See Help:Style for reference.
This article or section needs language, wiki syntax or style improvements. See Help:Style for reference.![]()
Источник
How to setup and configure network bridge on Debian Linux
How to install the brctl
Type the following apt command/apt-get command:
$ sudo apt install bridge-utils
How to setup network bridge on Debian Linux
You need to edit /etc/network/interface file. However, I recommend to drop a brand new config in /etc/network/interface.d/ directory. The procedure to configure network bridge on Debian Linux is as follows:
Step 1 – Find out your physical interface
Use the ip command:
$ ip -f inet a s
Sample outputs:
eno1 is my physical interface.
- No ads and tracking
- In-depth guides for developers and sysadmins at Opensourceflare✨
- Join my Patreon to support independent content creators and start reading latest guides:
- How to set up Redis sentinel cluster on Ubuntu or Debian Linux
- How To Set Up SSH Keys With YubiKey as two-factor authentication (U2F/FIDO2)
- How to set up Mariadb Galera cluster on Ubuntu or Debian Linux
- A podman tutorial for beginners – part I (run Linux containers without Docker and in daemonless mode)
- How to protect Linux against rogue USB devices using USBGuard
Join Patreon ➔
Step 2 – Update /etc/network/interface file
Make sure only lo (loopback is active in /etc/network/interface). Remove any config related to eno1. Here is my config file printed using cat command:
$ cat /etc/network/interfaces
Step 3 – Configuring bridging (br0) in /etc/network/interfaces.d/br0
Create a text file using a text editor such as vi command:
$ sudo vi /etc/network/interfaces.d/br0
Append the following config:
If you want bridge to get an IP address using DHCP:
Step 4 – Restart networking service in Linux
Before you restart the networking service make sure firewall is disabled. The firewall may refer to older interface such as eno1. Once service restarted, you must update firewall rule for interface br0. Type the following restart the networking service:
$ sudo systemctl restart network-manager
Verify that service has been restarted:
$ systemctl status network-manager
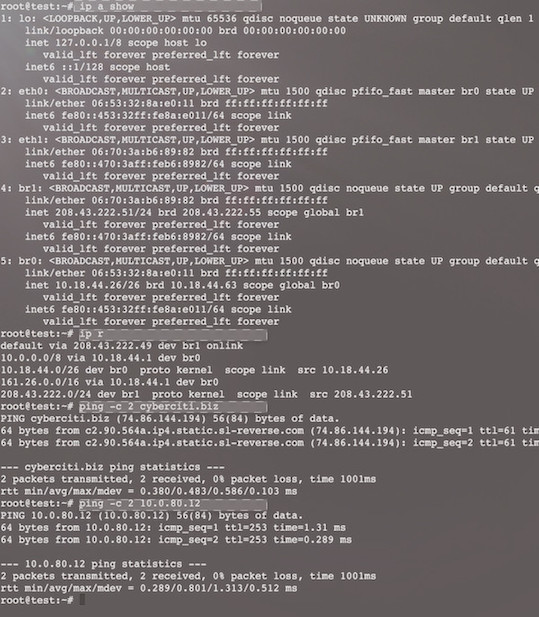
Look for new br0 interface and routing table with the help of ip command:
$ ip a s
$ ip r
$ ping -c 2 cyberciti.biz
Sample outputs:
You can also use the brctl command to view info about your bridges:
$ brctl show
Show current bridges:
$ bridge link
🐧 Get the latest tutorials on Linux, Open Source & DevOps via
| Category | List of Unix and Linux commands |
|---|---|
| Documentation | help • mandb • man • pinfo |
| Disk space analyzers | df • duf • ncdu • pydf |
| File Management | cat • cp • less • mkdir • more • tree |
| Firewall | Alpine Awall • CentOS 8 • OpenSUSE • RHEL 8 • Ubuntu 16.04 • Ubuntu 18.04 • Ubuntu 20.04 |
| Linux Desktop Apps | Skype • Spotify • VLC 3 |
| Modern utilities | bat • exa |
| Network Utilities | NetHogs • dig • host • ip • nmap |
| OpenVPN | CentOS 7 • CentOS 8 • Debian 10 • Debian 8/9 • Ubuntu 18.04 • Ubuntu 20.04 |
| Package Manager | apk • apt |
| Processes Management | bg • chroot • cron • disown • fg • glances • gtop • jobs • killall • kill • pidof • pstree • pwdx • time • vtop |
| Searching | ag • grep • whereis • which |
| Shell builtins | compgen • echo • printf |
| Text processing | cut • rev |
| User Information | groups • id • lastcomm • last • lid/libuser-lid • logname • members • users • whoami • who • w |
| WireGuard VPN | Alpine • CentOS 8 • Debian 10 • Firewall • Ubuntu 20.04 |
Comments on this entry are closed.
Thank you so much. I have trie all the other examples on the web, none worked as well as yours.
Only comment; I did not have any use for the part about Network-Manager. (not sure why, but works great)
Cudos
Источник
Как настроить сетевой мост (br0) на Ubuntu Linux 14.04 и 16.04 LTS
В данном посте пойдет речь о том, как настроить сетевой мост на сервере с ОС Ubuntu 14.04 LTS или 16.04 LTS.
Сетевой мост — это ничто иное, как простой технический способ соединения с внешней сетью через физический интерфейс. Это полезно при использовании виртуализации LXC/KVM/Xen/Containers и других виртуальных интерфейсов. В этом туториале будет рассказано как можно настроить мост Linux используя bridge-utils (brctl) на сервер с Ubuntu.
Пример сетевого моста:
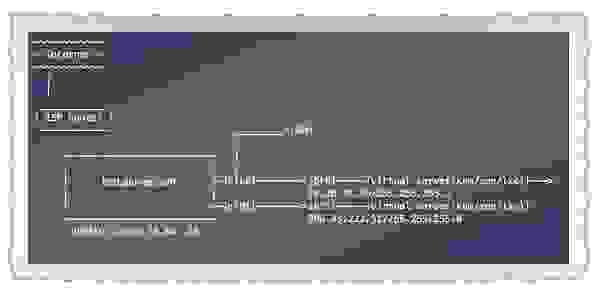
В этом примере eth0 и eth1 — это физический сетевой интерфейс. eth0 соединяется с LAN и eth1 соединен непосредственно с оборудованием провайдера.
Установка bridge-utils
Введите команду apt-get для установки bridge-utils:

Создаем сетевой мост на сервере с Ubuntu
Редактируем /etc/network/interfaces используя текстовый редактор такой как nano, vi или любой другой любимый Вами редактор, и вводим:
Далее установим eth1 и метим его как br1, вводим:
Устанавливаем eth0 и метим его как br0, вводим:
Заметка про br0 и DHCP
Сохраните и закройте файл.
Перезапускаем сервер или сетевой сервис
Теперь нужно перезагрузить сервер или ввести команду для перезапуска сетевого сервиса:
Если используется Ubuntu 14.04 LTS или более старая версия дистрибутива, введите:
Команда проверки связности
Используем команду ping/ip для того, чтобы убедиться в доступности интерфейсов LAN и WAN:
Теперь можно сконфигурировать XEN/KVM/LXC контейнеры, чтобы использовать br0 и br1 и получить доступ непосредственно к Интернету или внутренней LAN. Таким образом отпадает потребность в установке специальной таблицы маршрутизации или создания iptables, SNAT правил.
Источник


