- Share Your Windows Internet With Your Android Phone VIA USB Cable
- Internet sharing between Windows 7 and Windows Mobile 6.1
- 2 Answers 2
- How to share internet from an Android smartphone to a PC via USB
- Step 1. Enable internet on your Android smartphone
- Step 2. Connect your Android smartphone to your Windows PC using a USB cable
- Step 3. Turn on the USB tethering feature on your Android smartphone (share internet from Android to PC)
- Step 4. Wait for a moment or two until your Windows PC installs the required drivers
- Ending with a warning or two
- Do you share mobile internet via USB to your laptop or PC?
- Share WiFi in Windows 10 and Use Your PC as a Mobile Hotspot
- How to Turn Your Windows 10 PC into a Wireless Hotspot
- Setup a Mobile WiFi Hotspot with Windows 10 Using Connectify
- You might also be interested in.
- 4 Steps to Share WiFi on Windows 10 with Connectify Hotspot Free Software
- Connectify Hotspot: Share WiFi on Windows 10 and Get So Much More
Share Your Windows Internet With Your Android Phone VIA USB Cable
How To Share Your Windows Internet With Your Android Phone VIA USB Cable:- Wondering whether it’s possible to browse through the Internet without WiFi or Mobile data? Yes, it is possible. If your PC has an Internet connection, you can share it with your Android device just by using a USB port and USB cable. Sounds cool? Read on then, this post is for you.
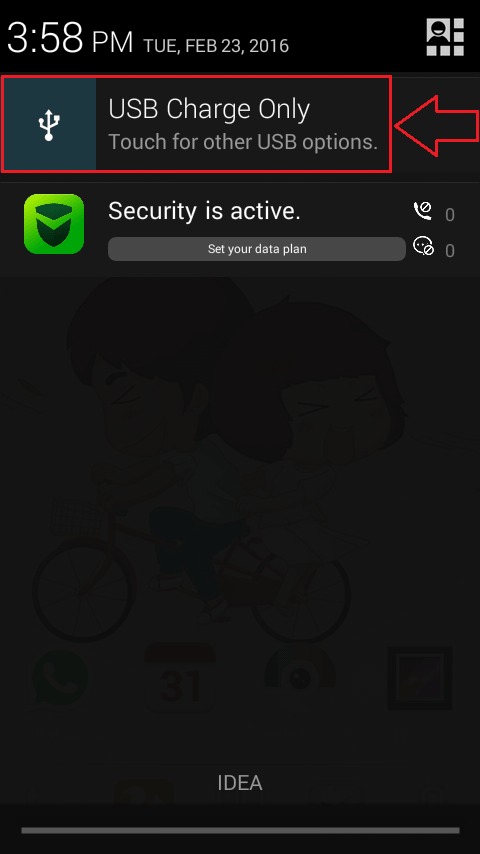
STEP 1
- First of all, connect your Android phone with your PC via the USB port. Your phone will be connected automatically in the USB Charge Only mode. Simply click on the notification as shown in the screenshot. This will open up other options for USB computer connection.
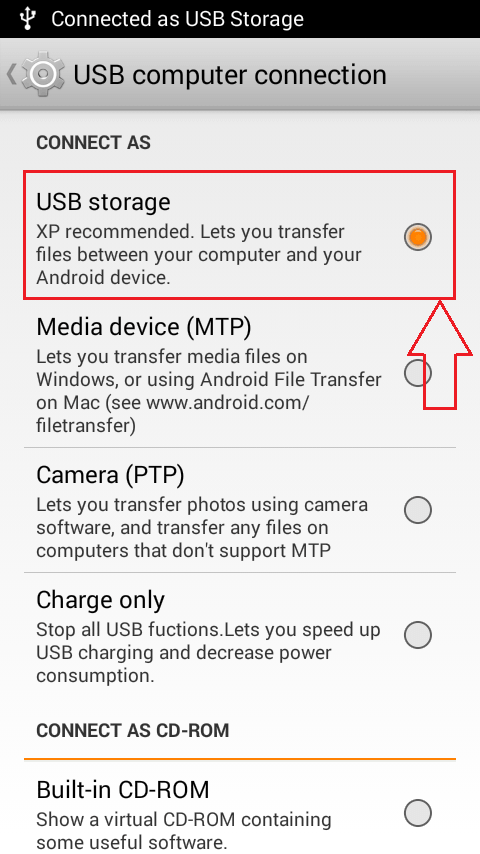
STEP 2
- Find the section named CONNECT AS under USB computer connection. Now check the radio button corresponding to USB storage option as shown in the screenshot.
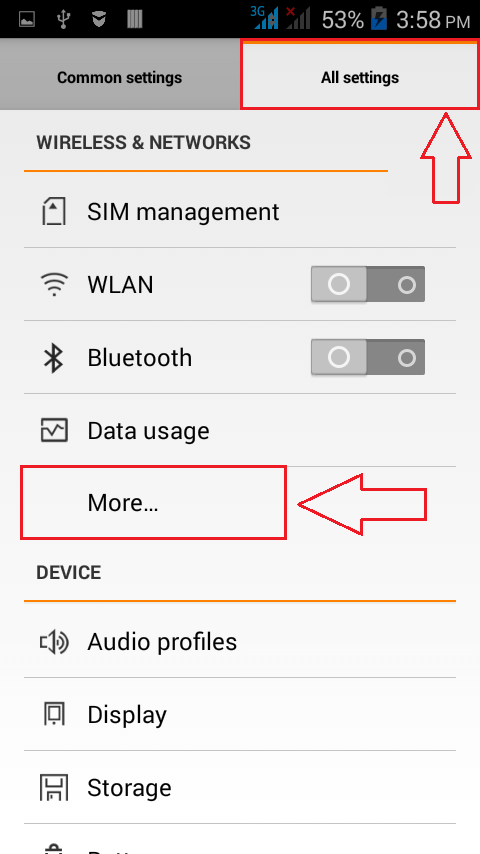
STEP 3
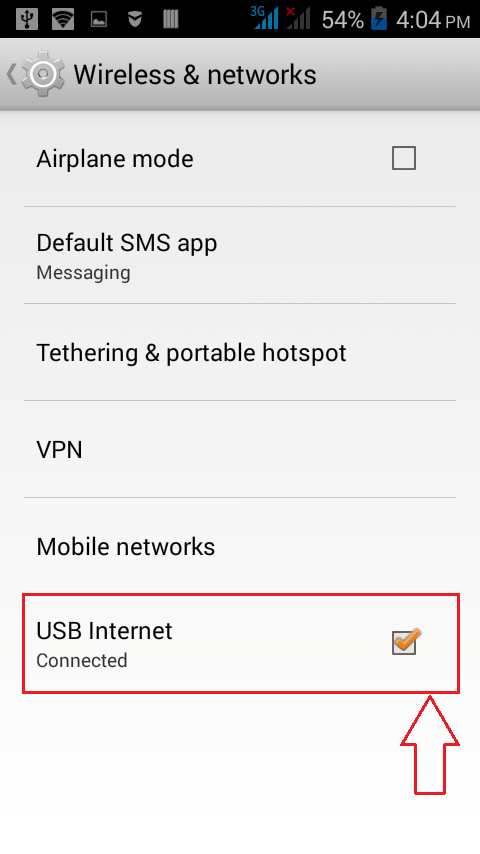
- Once you are done, launch the Settings screen in your Android phone. As next, click on the More option under the section WIRELESS & NETWORKS as shown.
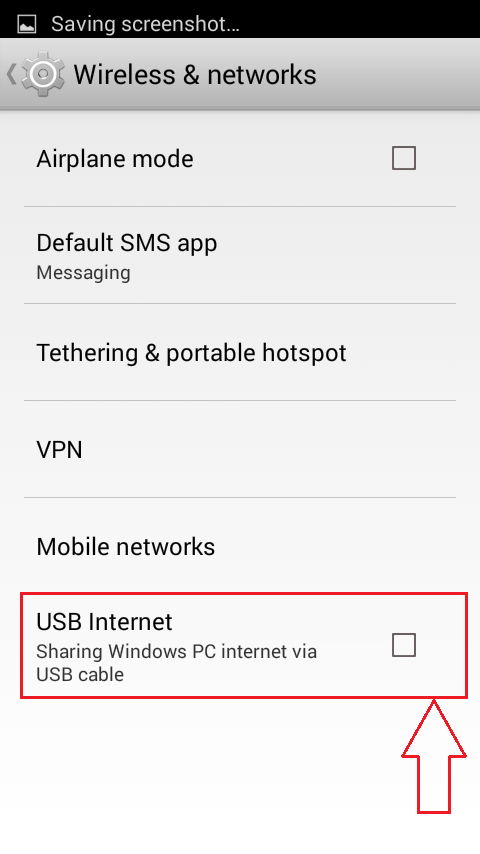
STEP 4
- Now find the option named USB Internet under the Wireless & networks section and click on it.
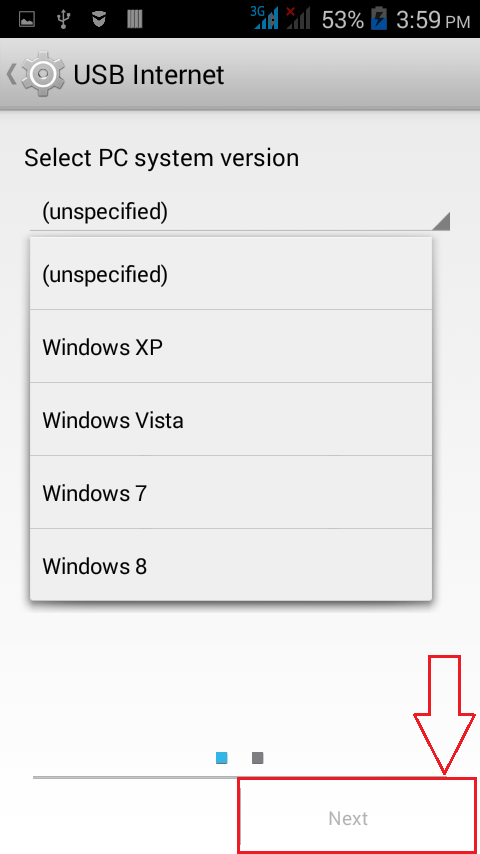
STEP 5
- Select your PC system version from the drop down menu. Once you are done, click on the Next button at the bottom of the screen.
STEP 6
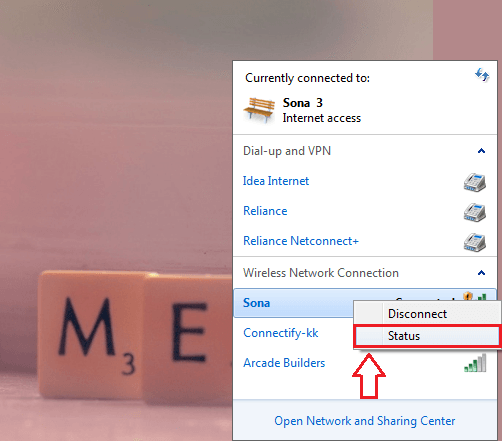
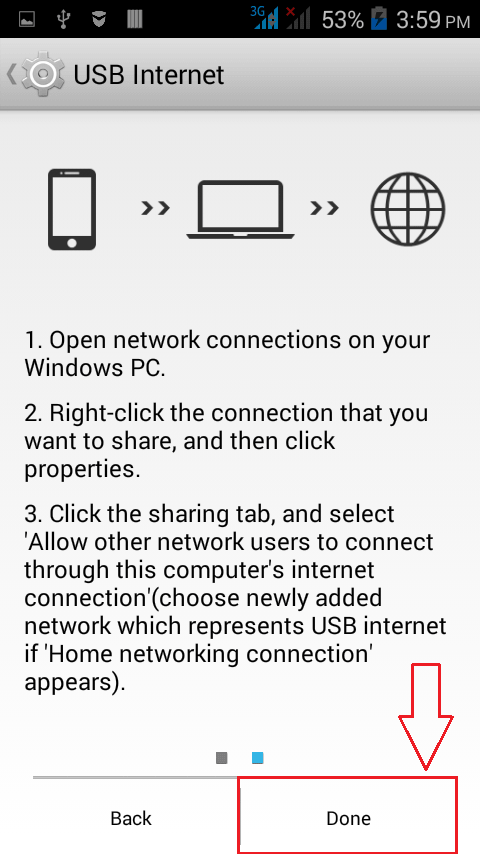
- Now you need to open up the Network center in your PC as shown in the screenshot. Locate and right click on the network that you want to share with your Android device via USB cable. From the options that gets expanded out, click on Status option or Properties option.
STEP 7
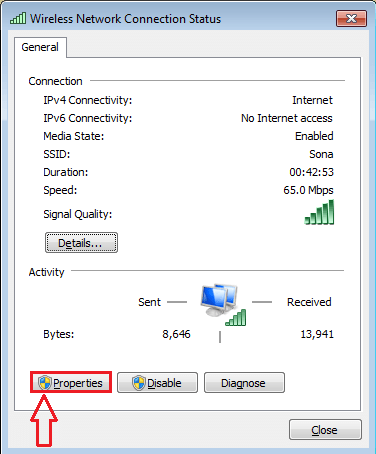
- A new window named Wireless Network Connection Status opens up. You need to locate and click on the button named Properties.
STEP 8
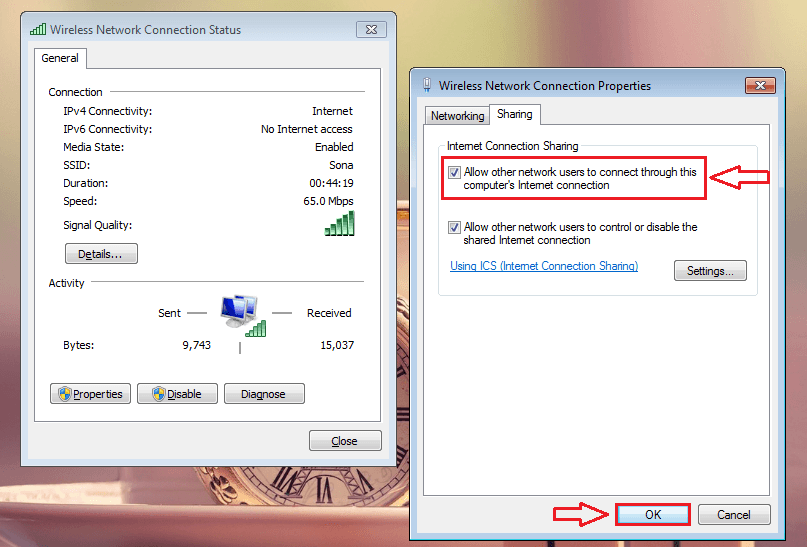
- When the Wireless Network Connection Properties window opens up, click on the Sharing tab and check the checkbox that says Allow other network users to connect through this computer’s Internet connection. Once you are done, simply click on the OK button.
STEP 9
- Now let’s get back to your Android phone from where we left off. Just click on the Done button at the bottom of your phone screen.
STEP 10
- There you are! Your phone is now equipped to browse through the Internet using your PC’s Internet connection.
Try out this trick today itself. Just turn off your WiFi or Mobile data and access any web page via USB cable to amuse your friends. Hope you found the article useful.

Someone who is in love with writing and technical tricks & tips.
Internet sharing between Windows 7 and Windows Mobile 6.1
I have Samsung phone running Windows Mobile 6.1 and a laptop running Windows 7 with a USB Modem to access the internet and I would like to share the internet between my laptop and my phone. I tried to make Ad Hoc network and I successfully connected to the Ad Hoc network but unfortunately I can’t browse the internet or access MSN Messenger on my phone. Does anyone here have an idea as to how I can connect my phone to the internet via my laptop?
2 Answers 2
If your PC and phone are bluetooth enabled then you can do this by:
Plug the phone into the computer via USB, Windows Mobile Device Center should install (if not then you can download it from: http://www.microsoft.com/download/en/details.aspx?id=14) once it is installed set up a sync connection. (you can sync whatever you want)
Connect your phone to your computer via Bluetooth
On your PC go to your Bluetooth settings (just search in the start menu) and go under the COM Ports tab, click «Add. » and select «Incoming» then click okay (note which port was just created) and then okay again on the first dialog.
On your PC go to the Windows Mobile Device Center click Mobile Device Settings then Connection settings (it may take a minute to show the dialog box) select all of the checkboxes, then under «Allow connections to one of the following» select the COM port that you assigned in the last step then select that the computer is connected to the internet.
Go to your phone under sync settings there should be a check box labeled «Allow advanced network functionality» check it.
Test the network connection on your phone if it is working disconnect the USB cable and then test it again (make sure that you are connected to the computer via Bluetooth).
The downside is that every time you want to connect to the internet you have to connect via Bluetooth and you have to be in range and sometimes you even have to tell the phone to sync immediately!
How to share internet from an Android smartphone to a PC via USB
Sharing the internet data connection available on your mobile smartphone with your Windows PC through a USB cable is called USB tethering. In other words, if you’re wondering “what is USB tethering?”, the answer is quite simple: it’s a way of using your Android smartphone as a modem or router to get mobile internet via USB on any PC. Say you have access to a Wi-Fi network in your home but your desktop PC doesn’t have a wireless card in it. You might want to use your Android’s USB tethering feature to establish a connection between them. Or, what if you find yourself in a situation where you don’t have any internet access except for your generous mobile data plan on your Android phone. You might want to give some of that to your Windows computers and devices, right? Here’s how to share internet from an Android phone to any PC via USB:
NOTE: To create this guide, we used a Huawei P20 smartphone running Android 10. Although some screenshots might differ a bit on a smartphone running another flavor or version of Android, most settings should look and work the same.
Step 1. Enable internet on your Android smartphone
The first thing you should do is make sure that your Android smartphone has internet connectivity. The easiest way to do that is from the Quick settings panel. To get to it, swipe with your finger from the top of the screen – if you don’t see it, swipe twice. Then, on the actions panel, look for the Wi-Fi or Mobile data buttons and tap on the internet connection that you want to enable and use as the internet source for USB tethering.
The Settings app also offers you an alternative method to enable the internet connection on your Android. Slide your finger from the top of the screen and tap on the Settings button. It’s the one that looks like a small gear. For more ways to open Settings, read: 5 ways to get to the Android Settings menu.
Then, if you want to use a wireless network to connect to the internet on your Android, go to Wi-Fi, turn it on, select and connect to a Wi-Fi network.
If you don’t have Wi-Fi access or if you prefer to use your mobile data plan as the internet source for USB tethering, on the Settings screen, go to Mobile network. Look for an entry called Mobile data and make sure that its switch is turned on.
Step 2. Connect your Android smartphone to your Windows PC using a USB cable
Use a USB cable to connect your Android smartphone to your Windows PC. If you still have it, it’s preferable that you use the original USB cable that you received with your Android smartphone. If you use a desktop PC, it’s also recommended to use one of the back USB ports to plug the USB cable. They are usually faster and more reliable than those on the front.
Step 3. Turn on the USB tethering feature on your Android smartphone (share internet from Android to PC)
Once you’ve connected your Android smartphone to your Windows PC, get back to your smartphone and open its Settings again. Then, go to the Mobile network and tap to open the Tethering & portable hotspot settings panel. There, turn the USB tethering switch on.
Step 4. Wait for a moment or two until your Windows PC installs the required drivers
On your Windows PC, you might see the operating system install a series of drivers that are necessary for the USB tethering to work. That’s because your Android smartphone works as a USB modem and your Windows PC needs the appropriate drivers for it. This process should be done in a moment, and it’s something that takes place only the first time you use your Android smartphone to connect to the internet on your PC through a USB cable.
That was it! Now you should have internet connectivity on your Windows PC, through the USB cable that is connected to your Android smartphone or tablet. Open your favorite web browser and start browsing the web.
Ending with a warning or two
Although connecting to the internet through your Android smartphone’s USB connection is easy, keep in mind the following points:
- If you’re using your mobile data plan, that can incur high costs if you overstep your plan’s boundaries, depending on your contract with the mobile operator.
- While using your smartphone’s internet connection through USB, the smartphone might charge slower than usual. Although that can be a good thing because it doesn’t let your smartphone’s battery die, it can also be a problem if your Windows device is a laptop or a tablet that is not connected to a power plug. Unless your Windows device is connected to a power socket, its battery will deplete faster than usual, because it’s also charging your Android device.
Do you share mobile internet via USB to your laptop or PC?
Now you know how easy it is to use your Android smartphone or tablet to get internet access on any Windows PC, whether it’s a desktop computer, a laptop, a 2-in-1, or a tablet. Do you find the USB tethering feature useful? Do you use it often? Let us know in the comments below.
Share WiFi in Windows 10 and Use Your PC as a Mobile Hotspot

How to Turn Your Windows 10 PC into a Wireless Hotspot
With Windows 10 it’s very easy to turn your PC into a WiFi hotspot. You can use the free Internet Connection Sharing or the Mobile Hotspot functionality. But if you need more flexibility in terms of connections to share and a proven record of compatibility with any wireless device, then you need to step up.
Connectify Hotspot is the most popular free hotspot software that you can use to share WiFi on Windows 10. If you need to share your Internet connection with other devices such as smartphones, game consoles, etc. or extend your WiFi range without any additional routers – this is the perfect solution to do that.
Read below to find out more about your perfect mobile hotspot companion – Connectify Hotspot
Setup a Mobile WiFi Hotspot with Windows 10 Using Connectify
With Connectify Hotspot free wireless hotspot software you can easily share any type of Internet connection (WiFi, 4G/LTE, wired, VPN virtual adapters) on Windows 10 with all your devices: computers, smartphones, tablets, gaming consoles, etc.
Whether you’re at home or traveling in airports or hotels , the free Connectify Hotspot PC software is the easiest way to make sure you’re always connected across iPads, smartphones, kindles, and all of the other wired-only or WiFi-enabled devices that you use on a daily basis.
Check out the short video below and easy tutorial below to learn how to share WiFi on a Windows 10 PC, laptop or tablet at the click-of-a-button.
You might also be interested in.

4 Steps to Share WiFi on Windows 10 with Connectify Hotspot Free Software
Connectify Hotspot is a true virtual router software app for Windows 10 computers. It allows you to easil share WiFi on Windows 10 with other devices such as smartphone, tablet, media player, game console, e-reader, other laptops or computers, and even your nearby friends.
By far, the most popular functionality for Connectify Windows 10 mobile hotspot software is the WiFi Internet sharing. Here’s how you can turn your Windows 10 computer into a WiFi hotspot:
- Download and install the latest version of Connectify Hotspot on your laptop or PC.
- Give your Hotspot a Name (SSID) and Password. Starting with Connectify Hotspot 2018 you can even add Emojis and Special Characters to your Hotspot Name!
- Press the ‘Start Hotspot’ button to share your Internet connection. Make sure you have the ad blocker option selected, to save bandwidth, money and battery life.
- Connect your devices. Any WiFi enabled devices can connect to your Hotspot!
Connectify Hotspot: Share WiFi on Windows 10 and Get So Much More
Other laptop WiFi hotspot software apps for Windows 10 only “help” you share your Internet connection. This includes inherent issues like NAT levels problems , peering, Chromecast apps won’t find your Chromecast, your Apple TV won’t show up for your Mac to stream to… ). Connectify Hotspot offers you more than just the possibility to share WiFi on Windows 10:
- Boost your WiFi range with WiFi Repeater Mode in your dorm room or office and getting full coverage in your dorm room.
- Save up to 60% of Internet bandwidth by using the built-in universal ad blocker. It even blocks in-app ads on iPhones and Android smartphones!
- Easily bridge other devices onto your home network with WiFi Bridging Mode: eliminate all game consoles (Nintendo, Playstation, Xbox) and smart TV issues with your home WiFi network!
- Save Money While Traveling: Get all devices online for the price of one when being charged for Internet per device at hotels, on airplanes, etc.
- Share any Type of Internet Connection with All your Devices: share Internet from existing WiFi networks, LAN, DSL, 3G/4G, tethered smartphones. You can even share a VPN protected connection to secure all connected devices!
What are you waiting for? Download Connectify Hotspot now and share WiFi on Windows 10 with all your devices!


