- Dr.Fone toolkitiOS Screen Recorder
- How to Record iOS Screen
- Step 1: Install the recorder on your device.
- Step 2: Trust the developer.
- Step 3: Start to record your screen.
- Dr.Fone toolkitiOS Screen Recorder
- iOS Screen Recorder:
- How to mirror and record iOS screen on the computer
- 2. How to use iOS Screen Recorder App to record iPhone screen (for iOS 7-10)
- 3. Troubleshooting: the AirPlay option is not showing up
- 4. Troubleshooting: can’t find Mirroring button
- 5. Troubleshooting: iOS screen not showing up or disappeared on the computer
- Ios screen recorder ios windows
- Share your screen wirelessly
- Record your your iOS live contents on the computer.
- Export HD videos to your computer
- Work greatly with iPhone, iPad and iPod touch
- Wireless Mirroring for Any Situation
- Presentations
- Education
- Gaming
- Business
- Developers
- Recording
- The smoothest iOS screen recording experience!
- Dr.Fone’s Guarantee
- 100% Secure
- iOS APP
- Easy to Use
- How to install App Version
- Reviews
- Thanks a lot!
- Very convenient and easy-to-use product
- Awesome!
- Record the Screen of iPhone, iPad, or iPod Easily.
- Guide: How to install or uninstall the software
- How to install:
- How to uninstall:
Dr.Fone toolkitiOS Screen Recorder
Easily record the screen of your iPhone, iPad, or iPod.
Note: This iOS Screen Recorder app is only for iPhone, iPad and iPod touch. For a desktop version, please get it by CLICKING HERE.
How to Record iOS Screen
Step 1: Install the recorder on your device.
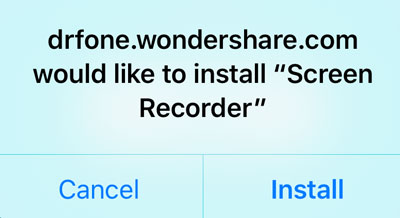
- • Click the Install button above to get the recorder on your iPhone/iPad.
- • After that, you’ll be asked for permission to continue the installation.
- • Click «Install» to confirm it, and then click your home button to wait until the install is complete.
Note: If you are reading this page on your computer, please switch to visit it on your iPhone/iPad/iPod touch through either of the ways below:
Method 1. Open Safari on your device and enter drfone.wondershare.com/isr/
Method 2. Scan the QR code below to install this app on your iOS device.

Step 2: Trust the developer.
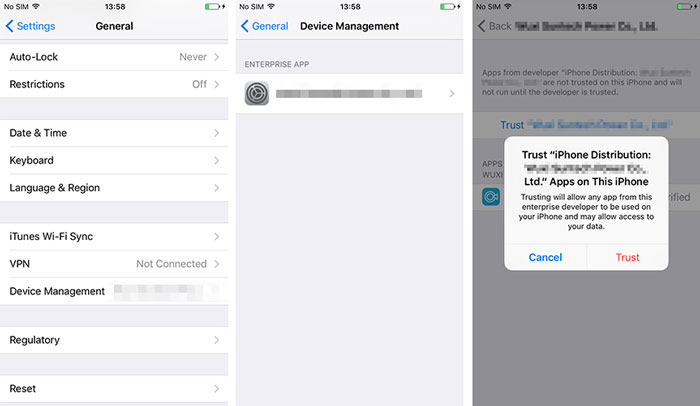
- • Once the installation is complete, directly go to «Settings» > «General» > «Device Management».
- • Tap the name of the distributor that has «Screen Recorder» listed in it and hit the «Trust» button.

Step 3: Start to record your screen.
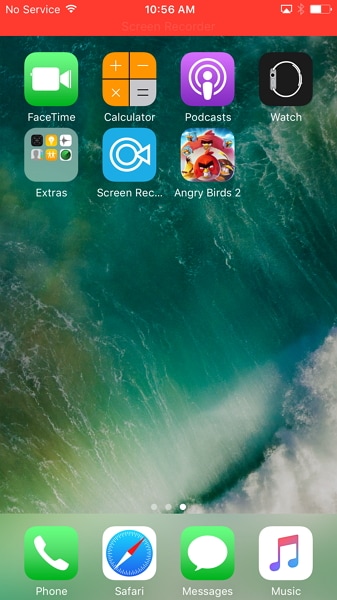
- • After the installation of the recorder, go to launch to the Screen Recorder.
- • Click «Next» to record the screen of your iOS device.
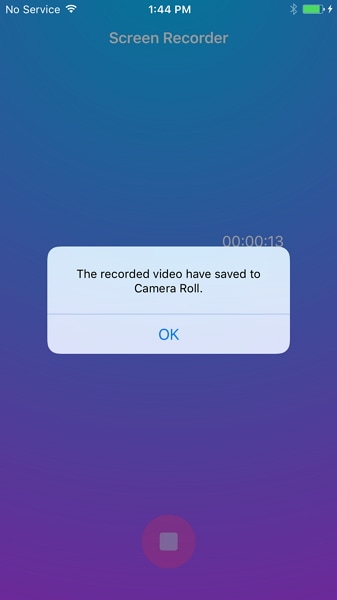
- • When it is completed, your video will be sent to the Camera Roll. You can find your HD recording videos there.

Dr.Fone toolkitiOS Screen Recorder
Easily Record Screen on iPhone, iPad and iPod touch.
Please note: the «Install» button only works when:
- 1. Using your iPhone, iPad or iPod touch to visit, not your PC.
- 2. Using the Safari browser on your device.
iOS Screen Recorder:
How to mirror and record iOS screen on the computer
Firstly, download and run iOS Screen Recorder on your computer.
Next, let’s check how to use «iOS Screen Recorder» in steps.
Step 1. Connect to the same local area network (LAN).
Connect your iOS device and computer to the same network.
- If your computer is connected to a Wi-Fi network, then connect the iOS device to the same Wi-Fi network.
- If your computer is not connected to a Wi-Fi network, you should put your iOS device and the computer in the same local area network (LAN).
Here is the window of iOS Screen Recorder.
Step 2: Mirror your device
- For iOS 7, iOS 8, and iOS 9:
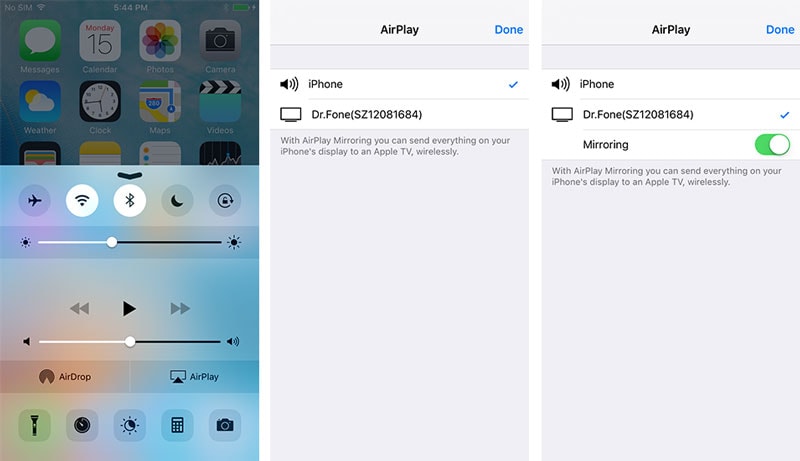
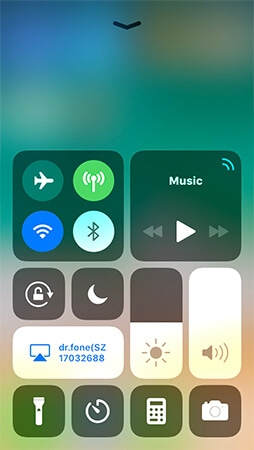
On your iOS device, swipe up from the bottom of the screen to open the control center. Tap on «AirPlay», choose «Dr.Fone» and enable «Mirroring».
Swipe up from the bottom of your screen to open Control Center. Tap on «AirPlay Mirroring» and select «Dr.Fone» to mirror your device to the computer.
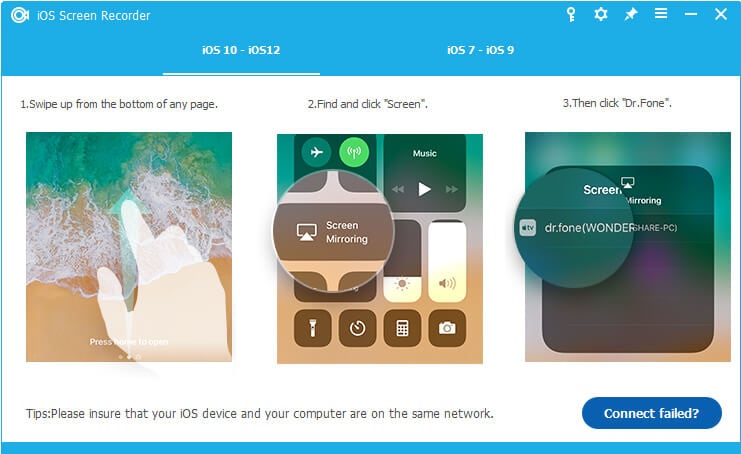
For iOS 11 and iOS 12:
Swipe up so that the Control Center appears. Touch «Screen Mirroring», select the mirroring target and wait a short while until your iPhone is successfully mirrored.
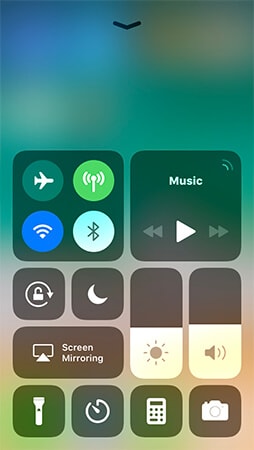
That’s it. You just mirror your device to the computer.
Step 3: Record your iPhone screen
Here we can see two buttons at the bottom of the screen on your computer. You can click the left circle button to start recording your iPhone and click the right square one to display a full screen.
If you want to exit full-screen mode, just click the square button again or press ESC on your keyboard. And you can stop recording your device by clicking the circle button. Simultaneously, iOS Screen Recorder will lead you to the folder where the record video file is saved.


2. How to use iOS Screen Recorder App to record iPhone screen (for iOS 7-10)
Step 1. Install iOS Screen Recorder App
Download the iOS Screen Recorder app from the Install button below on your iPhone/iPad. During the installation process, click on Install to grant permission to continue the installation. Then just in a few seconds, iOS Screen Recorder will be installed on your device.
Step 2. Trust the developer on your iPhone/iPad
After iOS Screen Recorder is installed on your iPhone/iPad, go to Settings > General > Device Management. Tap on iOS Screen Recorder distributor and Hit the Trust button.
Step 3. Start recording your iOS screen
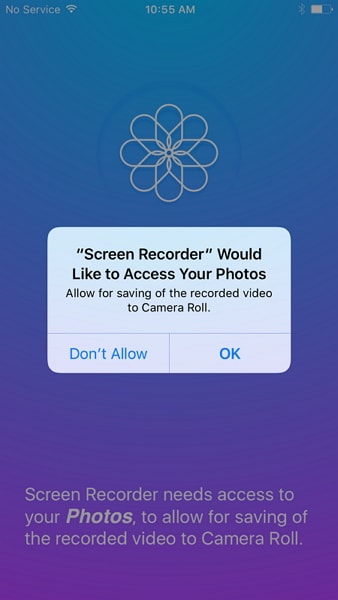
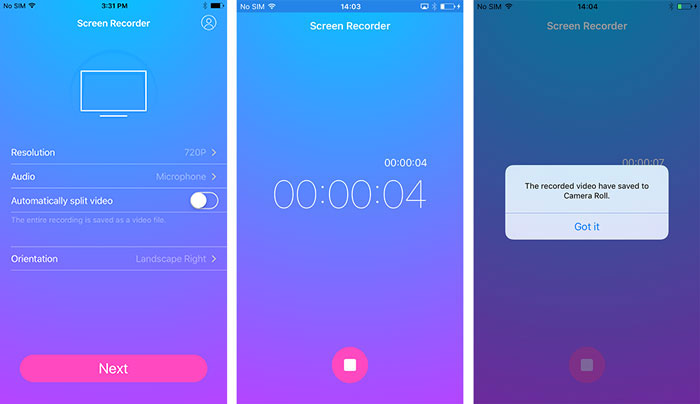
1. When you use iOS Screen Recorder for the first time on your device, it will ask for access to your Microphone and Photos. Tap on OK.
2. Before we start to record the iPhone screen, we can change the Resolution, Audio source, Orientation, etc for the recorded video. Currently, iOS Screen Recorder supports to record 720P and 1080P videos and capture the sounds from Microphone and Device Audio.

3. Then tap on Next to start recording your iOS screen. iOS Screen Recorder app will minimize the App window when it’s ready to record.
4. Open your favorite game app, Snapchat video, or start any other activity on your iPhone/iPad which you want to record. All these activities will be recorded.

5. After you’re finished, tap on Screen Recorder red bar on the top of your phone, or just exit your game and open iOS Screen Recorder again, the recording will stop, and the recorded video will be saved to your Camera roll automatically.
3. Troubleshooting: the AirPlay option is not showing up
There are some users complaining that they are unable to find Airplay options in Control Center. Here we provide four solutions to help you get it through.
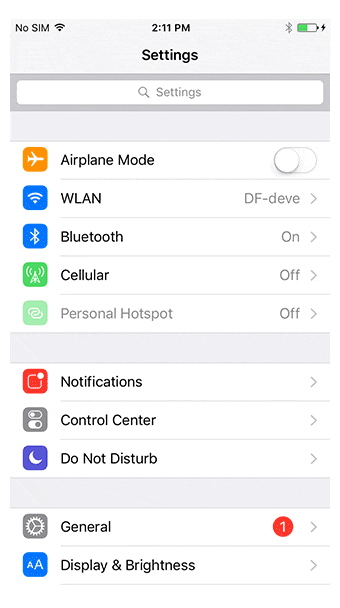
Solution One: Make sure your device and the computer are connected to the same network.
Go to Settings > Wi-Fi, choose the network your computer is connecting to.

If it doesn’t work, let’s try the second solution below.
Solution Two: Check if iOS Screen Recorder is blocked by the firewall
When you launch the iOS Screen Recorder for the first time, your computer will pop up a Security Alert from your Windows Firewall, click on «Allow Access» to allow Wondershare ScreenRecorder to communicate on your private networks and public networks.

If you accidentally click on «Cancel», follow the steps below to allow access.
Step 1: Go to «Start» > «Control Panel» > «All Control Panel Items» > «Windows Firewall» > «Allowed apps». You will now see a list of apps that are allowed to communicate through the Windows Firewall. Click on the «Change settings» button and tick «Wondershare ScreenReocrder» to allow the iOS Screen Recorder to communicate.

And also, make sure «Bonjour Service» is allowed to communicate through the Windows Firewall.

Step 2: Check if your antivirus software blocks the start of AirPlay, iOS Screen Recorder, and Bonjour Service.
Step 3: Make sure the firewall is turned off.
Directly go to «Start» > «Control Panel» > «System and Security» > «Windows Firewall» > «Customize Settings» and turn off Windows Firewall under the «Private network settings» and «Public network settings».

Step 4: Restart the iOS Screen Recorder to see if you can see the AirPlay option.
Solution Three: Restart Bonjour Service
Step 1: Go to «Start» > «Run», input «services.msc» and click «OK».

Step 2: Locate «Bonjour Service» in the column under «Name.» Right-click «Bonjour Service» and select «Start» from the menu. If your Bonjour Service is already started, then select «Restart».

If you find the «Start» option is grey, it says the Service is disabled. Follow the steps below to enable it:
- Right-click «Bonjour Service» and select «Properties»
- Go to select «Automatic» in «Startup type»
- Tap on «Apply» and select «Start» under «Service status»
- Click on «OK» to finish the settings.

Step 3: Launch the iOS Screen Recorder again to check if you can see the AirPlay option on the Control Center.
Solution Four: Reboot your iOS device
If all the above solutions still don’t work for you, please reboot your device and you will find the AirPlay option in Control Center.
4. Troubleshooting: can’t find Mirroring button
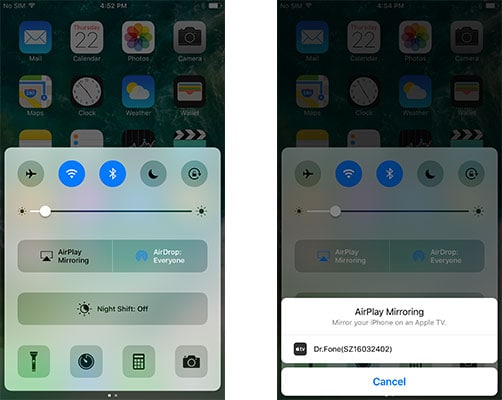
«Why I can’t find the Mirroring button after I select ‘Dr.Fone(PC Name)’ option on my iPad?»
If you encounter such kind of problems, you can follow the steps below to solve it.
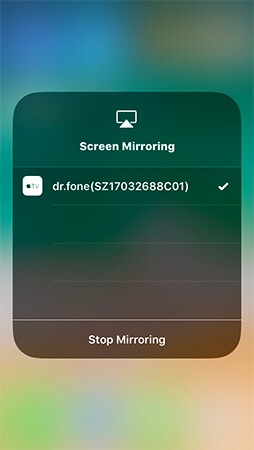
Step 1: On your iPad, swipe up to open Control Center. Tap AirPlay and you will see the window below:

Step 2: Select «Dr.Fone(PC Name)» from the list. Then scroll up and you will find the «Mirroring» button, just enable it.

5. Troubleshooting: iOS screen not showing up or disappeared on the computer
Some users may find their iPhone or iPad screens do not show up or disappear on the computer after the Mirroring button is enabled. Usually, this problem can be solved by the solution in Troubleshooting: AirPlay option is not showing up. You can follow the steps there to solve it.
Ios screen recorder ios windows
With iOS Screen Recorder, you can play the most polular games (like Clash royale, clash of clans, Pokemon . ) on your PC easily and smoothly.
Share your screen wirelessly
iOS Screen Recorder lets you share your pictures on a big screen wirelessly without uploading them.
Record your your iOS live contents on the computer.
You can easily record your games, videos and more with one click.
Export HD videos to your computer
Dr.Fone — iOS Screen Recorder can export HD videos to you computer. It is saved as MP4 file and you can share it to your friends or upload to Youtube.
Work greatly with iPhone, iPad and iPod touch
No matter you’re using the latest iPhone 7, iPad Pro, or the old iPhone 4, iPad 1, this iOS Screen Recorder is fully compatible with all models of iPhone, iPad and iPod touch.
Wireless Mirroring for Any Situation

Presentations
Use a projector to share your device’s screen with a room full of people.

Education
Record assignments and share them wirelessly with an entire classroom.

Gaming
Mirror and record mobile gameplay on a larger screen.

Business
Use your iPhone in your presentations at work.

Developers
Use real-time mirroring to showcase products and create demonstrations.

Recording
Record apps, games, and other content from your iPhone.
The smoothest iOS screen recording experience!
Dr.Fone’s Guarantee
Safe, fast, and simple.
100% Secure
No jailbreak required
iOS APP
Available for iOS 10
Easy to Use
Simple, intuitive, process.
How to install App Version
Please switch to visit the mobile page on iPhone/iPad/iPod touch through either of the ways below:
Method 1. Open Safari on your device and enter drfone.wondershare.net/isr/
Method 2. Scan the QR code below to Download this app on your iOS device.


Reviews
Thanks a lot!
Thanks so much of recording and mirroring my iPhone 5 to the computer.
Hassan, iPhone 5
Very convenient and easy-to-use product
Dr.Fone helps me to record games from my iPhone 6s, it is very easy to use. I like it.
N. Socas, iPhone 6s
Awesome!
It is amazing that Dr.Fone can both mirror and record my iPhone to my computer.
Joshua Brenne, iPhone
No. Your videos are saved to your computer. Dr.Fone cannot access them, or any other data stored on your computer or mobile device.
Do I need to plug my phone into the computer or projector?
No. Make sure the computer or projector is on the same WIFI network as your phone and connect wirelessly.
Does Dr.Fone — iOS Screen Recorder have a mobile app?
Not yet, but we’re working on it.
Does Dr.Fone — iOS Screen Recorder support jailbroken devices?
Yes. Dr.Fone — iOS Screen Recorder supports both jailbroken and non-jailbroken devices.
Wondershare Dr. Fone for iOS
Record the Screen of iPhone, iPad, or iPod Easily.
Guide: How to install or uninstall the software
How to install:
1 Download the program
Download for Windows
2 Double click the setup file to install
3 Run the progarm
1 Download the Mac application
Download for Mac
2 Double-click the .dmg file
3 Open the installer provided and follow the onscreen instructions
How to uninstall:
Open the Start menu in the lower left corner of your desktop. Select the All Programs menu item, then follow:
Wondershare >> Uninstall.
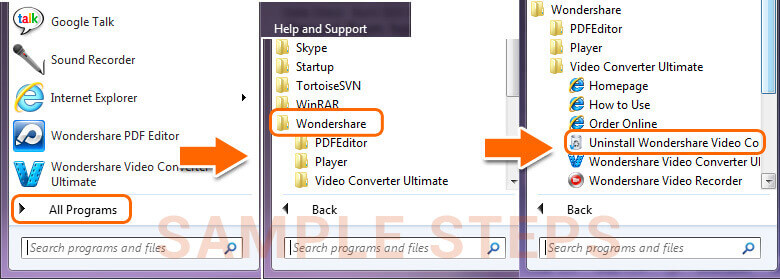
Note: After upgrading to Windows 8, the Uninstall tile may not be represented on the new Start screen. To access it, please right-click on any blank area of the screen, then click the All apps button in the lower right-hand corner of the screen. All the programs installed on your PC will be displayed on the Appsscreen. The Uninstall item can be found in the Wondershare section.
1.Drag the app to the Trash (the Trash is located at the end of the Dock)
2.Choose Finder > Empty Trash.


