- Как узнать IP адрес через командную строку Windows 10 или Windows 7
- Внутренний и внешний IP
- Команда ipconfig
- Команда nslookup
- Консоль PowerShell
- Check IP address from CMD
- How To Find Your Local IP Address In Windows 7 or Vista
- How To Find Your Local IP Address In Windows 7 Using CMD
- Step 1
- Step 2
- Step 3 (optional)
- Further reading
- Windows IP Commands – ipconfig-nslookup-ping-tracert-netstat etc
- Windows IP Commands
- ipconfig command
- nslookup command
- ping command
- tracert command
- netstat command
- route command
- arp command
Как узнать IP адрес через командную строку Windows 10 или Windows 7
Необходимость узнать IP адрес компьютера может возникнуть в разных ситуациях. Например, это может потребоваться для подключения к серверу, который работает на компьютере, или просто для проверки подключения с помощью команды ping. В данной инструкции мы расскажем, как узнать IP адрес компьютера через командную строку Windows 10 или Windows 7.
Внутренний и внешний IP
Перед тем как переходить к рассмотрению основного вопроса данной статьи нужно сказать несколько слов о том, что такое внутренний (или локальный) IP адрес и что такое внешний IP адрес.
- Внутренний IP – это IP адрес, который доступен исключительно в локальной сети. Внутренние IP принадлежат к специальным диапазонам и не являются уникальными. Они выдаются локальным роутером и используются для подключения внутри локальной сети, при этом из Интернета внутренние IP адреса не доступны. Внутренние IP адреса также могут называться локальными, частными, внутрисетевыми или серыми.
- Внешний IP – это IP адрес, который доступен из Интернета. Внешние IP уникальны в пределах всего Интернета и позволяют подключаться к компьютеру из любой точки мира. Внешние IP адреса могут также называться реальными или белыми.
Чаще всего, интернет провайдеры выдают пользователям внешние IP адреса. Но, поскольку количество внешних IP ограниченно, то в целях экономии могут выдаваться и внутренние IP адреса.
Команда ipconfig
Для того чтобы узнать IP адрес компьютера с помощью командной строки нужно использовать команду « ipconfig ». Данная команда выведет базовую информацию обо всех сетевых подключениях, которые доступны на компьютере. Среди этой информации будет указан и IP адрес.
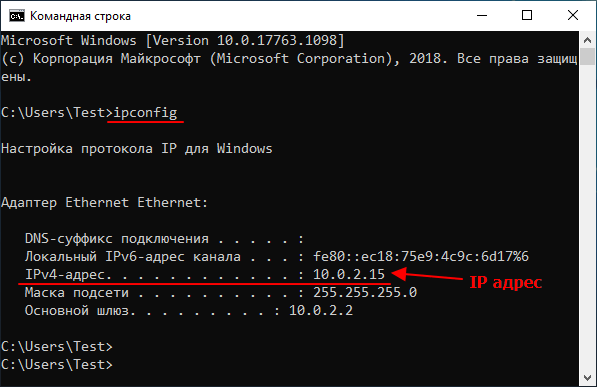
Также можно использовать команду « ipconfig /all ». В этом случае будет выведена более подробная информация о сетевых подключениях. Хотя для получения информации об IP адресе это не обязательно.

Важно понимать, что в зависимости от ситуации, команда « ipconfig » может показывать вам как внутренний, так и внешний IP адрес. Если ваш интернет провайдер выдает вам белый IP и кабель от провайдера подключен напрямую в компьютер, то вы увидите именно внешний IP адрес. Если же вы подключаете кабель не напрямую, а через роутер, либо ваш провайдер выдает вам серый, то вы увидите внутренний IP адрес.
Внутренние IP очень легко отличить от внешних, так как они всегда относятся к этим подсетям:
- От 10.0.0.0 до 10.255.255.255;
- От 172.16.0.0 до 172.31.255.255;
- От 192.168.0.0 до 192.168.255.255;
- От 100.64.0.0 до 100.127.255.255;
Команда nslookup
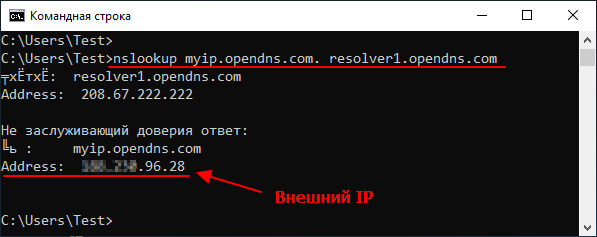
Если команда « ipconfig » показывает вам внутренний IP адрес, то можно прибегнуть к некоторой хитрости и таки получить внешний IP адрес. Для этого нужно использовать вот такую команду:
Команда « nslookup » позволяет выполнять запросы к системе DNS через командную строку. В указанной выше команде выполняется запрос к DNS серверу « resolver1.opendns.com », который должен выдать IP домена « myip.opendns.com. ». Указанный DNS сервер сконфигурирован таким образом, что при запросе этого специального домена, обратно отправляется IP-адрес, с которого поступает запрос. Таким образом мы можем получить внешний IP через командную строку.
Консоль PowerShell
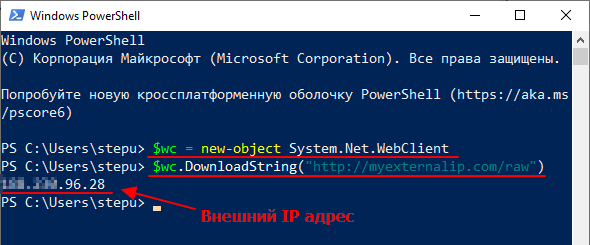
Также можно использовать возможности консоли PowerShell. Для этого последовательно одну за одной нужно выполнить две команды:
Данные команды просто скачивают и выводят на экран содержимое веб-страницы http://myexternalip.com/raw, которая всегда возвращает внешний IP адрес пользователя, который ее запросил.
Как видно, с помощью командной строки можно очень легко узнать внешний IP адрес компьютера, причем сразу несколькими различными способами.
Check IP address from CMD
Ipconfig command is used to find the IP address of a system from command line. Run the command ipconfig to print IP addresses for all network adapters installed on the system.
If you are interested in just knowing the IP address and not bothered about all other details printed by the command, you can use findstr to filter out unwanted details.
Here, it shows IP addresses for various interfaces installed on the computer, it includes IPv6 interfaces as well.
If the system is connected to a DHCP configured network then you can release the IP obtained from DHCP.
The above command works for IPv4. To release IPv6 address the command is given below.
Not show DHCP in my computer
I run cmd / ipconfig using an admin account and it displays the Default Gateway 86.187.161.242, but as it’s a dynamic IP address it both changes each log in and always times out after about 20 seconds. How can I extend the time out to say a minute?
Default Gateway = Router
If you login on your firmware of the router and go to your DHCP server settings.
And change your Client Lease Time. That should do the trick. (https://www.wikihow.com/Configure-a-Router-to-Use-DHCP)
If the default gateway it self changes after 20 seconds. Then I suggest to contact your ISP provider. Or google how to set a static IP to your default gateway.
i want to get only ip 192.168.x.x
but it’s showing me like IPv4 Address. . . . . . . . . . . : 192.168.x.x
i dont want (IPv4 Address. . . . . . . . . . . 🙂 this part
and also i want this in a vbscript that can store this value in a variable
please help .
How To Find Your Local IP Address In Windows 7 or Vista


Finding your IP address under Windows 7 is a very simple process. The process is exactly the same whether you’re using Windows 7, Windows Vista, Windows XP or even Windows Server 2003/2008.
In most circumstances, the majority of users don’t need to worry about their “IP Address” due to DHCP from your local network or ISP. For system administrators, knowing the IP address of your machine, server, or customer’s PC is imperative.
How To Find Your Local IP Address In Windows 7 Using CMD
Step 1
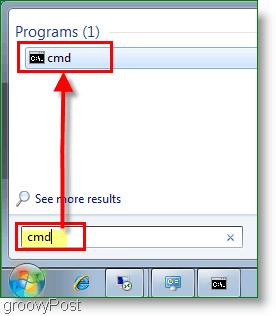
Click Start, in the search Type in cmd. Next, Click on the program cmd. This click will open the Command Prompt/Windows.
Step 2
The command prompt should open; now in the open line, you’ll need to type in ipconfig and press Enter
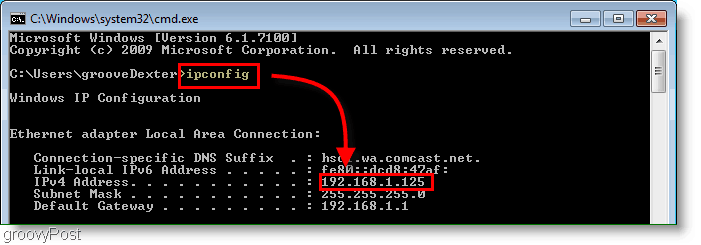
You’ll see your IP address listed right above the subnet mask. Usually, it will say IPv4 Address and follow the prefix 192.168.1.# or 192.168.0.# for home networks as shown in the screenshot above.
Step 3 (optional)
If you’re not looking for your LOCAL IP address but instead the IP address provided by your ISP to your Cable Modem or FIOS Router, just open your browser and go to https://whatismyip.org.
Please note – This is not the actual IP you’re using on your LOCAL computer as shown above in Step 2. This IP address is the one assigned to your Cable Modem/FIOS Router on the Internet.
Further reading
What is an IP Address?
- If you want to call someone, you use their Telephone or Mobile number, right? Well, an IP Address or Internet Protocol Address for a computer or network device is a phone number for your computer. That’s it. It’s pretty simple.
- Because no one knows the “ Phone Number IP Address” for www.google.com, another technology was created to act as an Automatic Phonebook for IP Addresses. It’s called DNS. When you type www.groovypost.com into your browser, DNS will translate that into an IP Address and send you to the website. It’s all very simple once you understand it.
IPV6 Address?
- In a system or network that uses IPv6, you won’t see a Subnet mask, and the address will follow the fe80::## prefix. However, for most home users, IPv6 use is uncommon.
IPv4 Vs. IPv6?
- IPv4 is the old system we currently use to designate IP addresses across all of the public computers that are connecting to the internet. The problem with IPv4 is the address is only 32bit’s in length which means there are not enough addresses to go around.
- IPv6 is 128 bits in length which should allow for more than enough addresses in the foreseeable future. The good news is most modern operating systems understand both, so when the times comes for the cutover, it should be invisible for most users.
Do You Have Any Groovy Questions or Comments? Drop your comment below, or join us in the groovyPost Free Tech Support Community.
Windows IP Commands – ipconfig-nslookup-ping-tracert-netstat etc
As Network Engineers we need to be versatile and troubleshooting-savvy in our work environment.
In addition to having strong knowledge of networking protocols and commands on network devices (routers, switches, firewalls etc) we need also to have very good knowledge of IP and other networking related commands on end-point devices such as Windows computers, Linux servers and workstations etc.
In this article we’ll list and describe the most useful and helpful IP Commands on Windows operating system. Most of these commands (with some exceptions and variations) are also available on Linux OS.
I have found myself thousands of times to start troubleshooting network and connectivity problems from an end-point device first (computer, server etc) before moving on to the actual core network devices for further investigation.
Having knowledge of the following IP commands will add a strong array of resources in your troubleshooting arsenal.
At the end of this post you will find a download link for the PDF version of this article with all the commands which you can download for your own use.
Table of Contents
Windows IP Commands
Let’s now examine the most popular Windows CMD commands (from the DOS prompt) that are related to networking etc:
ipconfig command
This is one of the most useful IP commands on Windows. It displays tons of useful information about the current network settings on the machine such as IPv4 and IPv6 address of all network interface cards (Ethernet adapters, WiFi adapters, virtual network adapters etc), MAC address, default gateway, subnet mask, DNS server, DHCP information etc.
If you want to find the local IP address assigned to your computer or the MAC address of your Ethernet Adapter (shown as “Physical Address” in the command output as shown in the picture below), this is the quickest way to find this information.
Here is a screenshot example of what you can expect as output from ipconfig:

As shown above, you get information such as IPv4 and IPv6 address, MAC address, Default Dateway, DNS Servers etc.
Here are some different options of this command:
ipconfig /? : Displays all available options.
ipconfig /all : This will display output as shown on the screenshot above but for ALL network connection adapters of the computer (Wired Ethernet, WiFi, Vmware adapters etc).
ipconfig /release : This will release the current IPv4 addresses which were assigned dynamically from a DHCP server. If you specify also a connection name at the end, it will release only the IP of that connection adapter.
ipconfig /release6 : Same as above but for the IPv6 address.
ipconfig /renew : This usually comes after the above command and is used to request a new IP address from a DHCP server.
ipconfig /renew6 : Same as above but for the IPv6 address.
ipconfig /flushdns : This deletes the local DNS resolver cache of the computer. This cache stores DNS entries of frequently accessed internet resources so that the computer will not query an external DNS server every time you try to access an internet resource (website etc). This command is useful when troubleshooting DNS connection problems.
ipconfig /displaydns : It shows the local DNS resolver cache entries as explained above.
ipconfig /registerdns : Refreshes all DHCP addresses and also communicates again with the external DNS server to make sure its reachable etc. Very useful when troubleshooting DNS and network connectivity problems of the local computer.
nslookup command
“nslookup” stands for “Name System Lookup” and is very useful in obtaining Domain Name System (DNS) related information about a domain or about an IP address (reverse DNS lookup).
nslookup [domain name] : The most popular usage of this command is to find quickly the IP address of a specific domain name (A-record) as shown below:
nslookup www.networkstraining.com
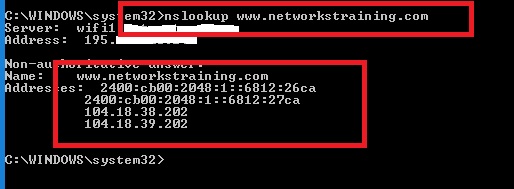
As shown above, the “nslookup” command followed by a domain name will show you the IPv4 and IPv6 addresses (A records and AAAA records) assigned to the specific domain.
nslookup [IP Address] : This will perform a reverse-DNS lookup and will try to match the given IP address in the command with its corresponding domain name.
nslookup 8.8.8.8
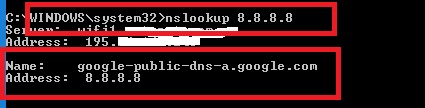
As shown on the screenshot above, the IP address 8.8.8.8 is mapped with the name “google-public-dns-a.google.com”. You should note however that not all IP addresses are assigned to a domain name so a lot of times you will not get any information from the command above.
There are several other interesting features of the nslookup command such as finding the authoritative DNS servers of a domain, the SOA and MX records of a domain and much more.
ping command
Now let’s examine one of the most popular utilities related to network connectivity.
Probably the first command that every computer user runs on the command line when having connectivity problems is the “ping” command.
This will quickly show you if can send and receive packets (icmp packets to be exact) from your computer and hence shows whether you have network connectivity or not.
Note also that “ping” is useful for testing connectivity for both the local computer from where you execute the command and also for a remote computer or server which you try to reach.
If for example you try to “ping” your local default gateway IP address and you get replies back (icmp echo replies), this means your local computer is properly connected to the network.
Now, if you “ping” a remote server on the Internet and you get replies back, it means that the remote server is properly connected to its network as well.
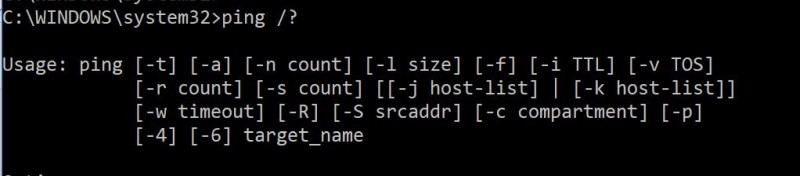
ping /? : Displays all available options as shown below:
ping [IP Address] : By default it will send 4 ICMP packets to the stated IP address.
ping 8.8.8.8
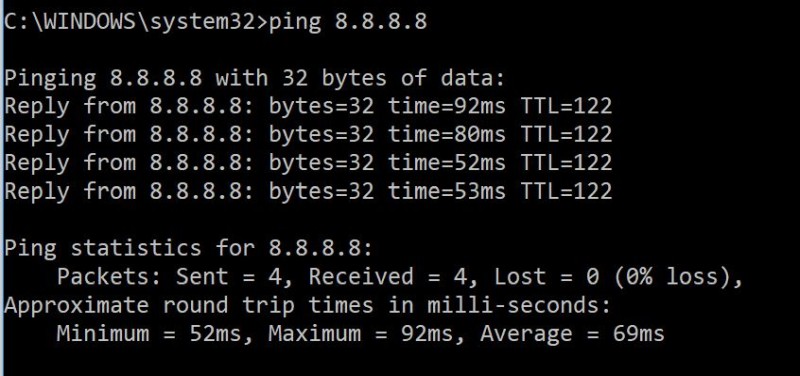
As you can see from the screenshot above, pinging the IP 8.8.8.8 results in sending 4 packets and then receiving back 4 packets from that IP.
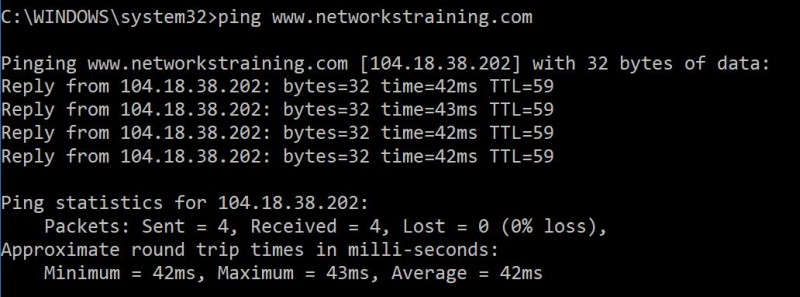
ping [hostname or domain] : When “pinging” a hostname or domain name, the command will resolve first the name to IP address and then send the icmp packets to that IP.
ping www.networkstraining.com
ping [IP address] -t :This will send ping packets (icmp echo requests) continuously to the target IP.
ping -n 10 [IP address] :This will send 10 ping packets (icmp echo requests) to the target IP.
ping -l 1500 [IP address] :This will send ping packets (icmp echo requests) with size of 1500 bytes length to the target IP.
ping -a [IP address] :The -a switch tells the computer to try to find the hostname assigned to the specific IP address and then ping the IP.
ping -6 [domain or IP] :The -6 switch tells the computer to send IPv6 packets to the target.
tracert command
“tracert” in Windows stands for “Trace Route”. In Linux, the same command is “traceroute”.
The command traces the path that a TCP/IP packet takes towards a destination target and shows some information (if available) of the routing nodes within this path.
Just like the “ping” command, “tracert” sends also ICMP echo packets to the destination with varying Time-to-Live (TTL) values.
tracert [domain or IP] : Traces the TCP/IP path to the specified destination target IP or domain.
tracert www.networkstraining.com
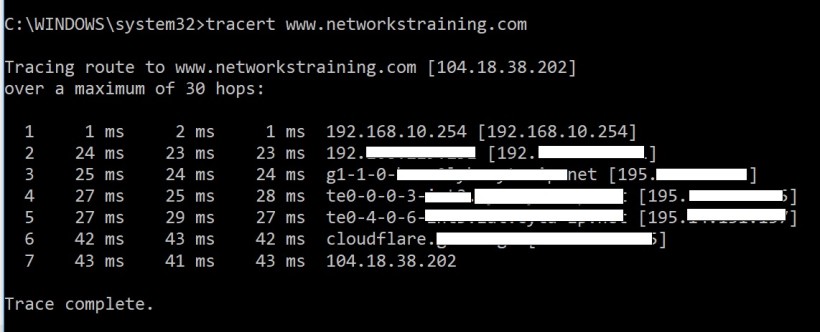
As shown above, tracing the path to domain www.networkstraining.com shows all the intermediary routing nodes (with their hostname and IP address) until the final target destination.
When troubleshooting connection problems in a large network, you can use tracert to see where the packets stop before reaching the target and focus your efforts to find the problem on the node which does not route packets.
netstat command
Another important command is the Network Statistics (“netstat”) utility found in both Windows and Linux OS.
It shows the established network TCP/IP connections of the local computer with remote hosts, open ports on the machine, the process ID (PID) of each connection etc.
Personally I use this command mostly for security forensic purposes to identify if there are backdoors running on the computer, malicious connections to external Command-and-Control servers etc.
Here are some popular usages of this command:
netstat -ano : Displays all connections and listening ports (-a), addresses and ports in numerical form (-n) and also the process ID of each connection (-o).
netstat -vb : Very useful to examine also which executable and which sequence created each connection and each port.
C:\WINDOWS\system32>netstat -vb
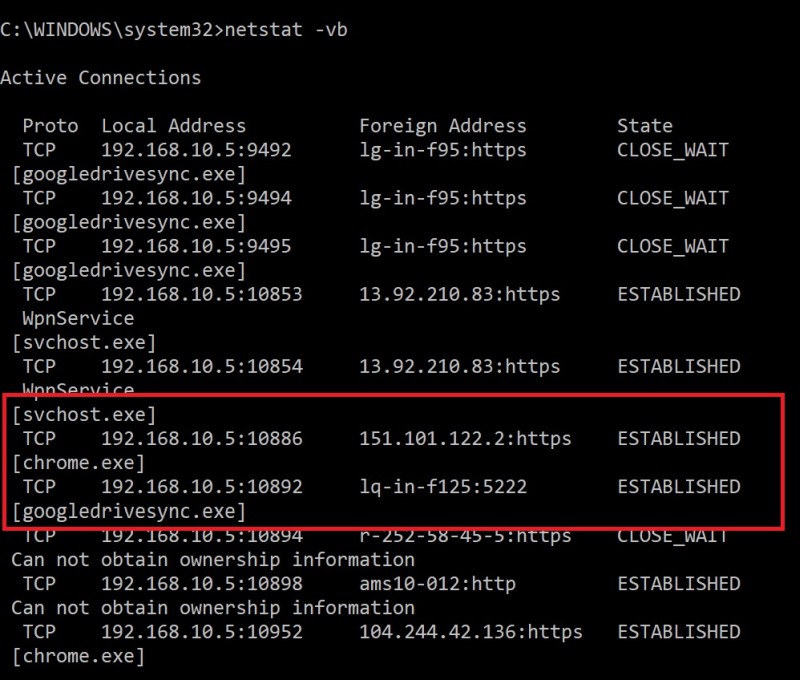
As shown above, for each established connection you can see the executable (e.g chrome.exe, googledrivesync.exe etc) that created the connection.
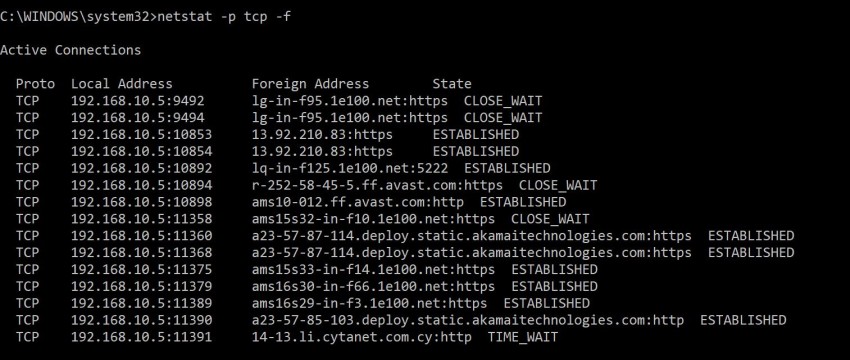
netstat -p tcp -f : The “-p tcp” switch will show only TCP connections and the “-f” switch will show the FQDN name of each connection instead of just IP address.
C:\WINDOWS\system32>netstat -p tcp -f
route command
The “route” command is used to manipulate the local routing table of the computer. You can print the current routing table, add new static routes, delete entries etc.
Personally, the way I use the “route” command is to add a permanent static route entry in a computer. For example, there might be a specific network subnet which is not accessible via the default gateway of the computer. Instead, this remote subnet might be accessible via a different gateway IP. By adding a static route in the computer’s routing table you will be able to reach that remote subnet from a different gateway.
route PRINT : Displays the current routing table of the computer
route ADD [Destination network] MASK [mask] [gatewayIP] : This adds a static route in the table.
route ADD 10.10.10.0 MASK 255.255.255.0 192.168.1.2
The above command will add a static route for destination subnet 10.10.10.0/24 via gateway 192.168.1.2
arp command
ARP stands for “Address Resolution Protocol” and is one of the core networking protocols that work in Layer 2 level and facilitate communication in a LAN.
The job of ARP is to find the physical address (MAC address) of the target and map it with its corresponding Layer 3 IP address when communicating in a LAN. The ARP cache table stores mappings of IP addresses with their corresponding MAC address.
arp -a : Displays all ARP cache mappings (IP to MAC address)
C:\WINDOWS\system32>arp -a
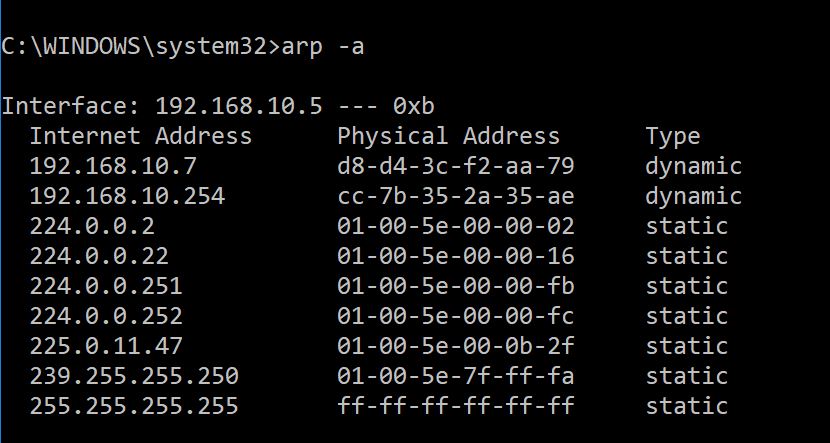
As you can see from above, the local computer has learned dynamically (type=dynamic) using the ARP protocol two other local devices (192.168.10.7 and 192.168.10.254) and has stored their MAC address (Physical Address) in the ARP table.
arp -d [IP address] : This will delete the arp entry for the specified IP address.
The above is useful when you changed hardware on a specific node (e.g you have changed the default gateway router) and you want to remove old arp entries. Usually it’s not needed to do anything in such a case but sometimes its required on some older computers.


