- Настройка port mapping в windows с помощью netsh
- О чём речь и зачем это нужно
- Как сделать port mapping (port forwarding) через netsh
- Проверка правильности настройки port mapping
- Удаление port mapping
- Изменение настроек port mapping через netsh
- File Mapping
- Creating a File Mapping Object
- File Mapping Size
- Find the IP address of a Mapped Network drive in Windows
- Find the IP address of a Mapped Network drive in Windows
- One small request: If you liked this post, please share this?
- About the author
- 2 thoughts on “Find the IP address of a Mapped Network drive in Windows”
Настройка port mapping в windows с помощью netsh
О чём речь и зачем это нужно
В windows, начиная с версии Windows XP существует возможность настроить проброс портов (port forwarding или port mapping) без каких-либо внешних программ (и даже не используя встроенный брандмауэр!).
Зачем это может быть нужно? Например, для настройки еще одного (дополнительного) порта, на котором будет «висеть» служба. К примеру, вдобавок к порту 80 (на котором находится apache) можно вдобавок «открыть» порт 1580 или 65123, который будет фактически выполнять ту же роль, что и 80-й порт, но при этом он будет «секретным» портом.
Или же можно таким образом «прятать» фактические серверы: разрешать подключения на какой-либо локальный порт (на localhost, 127.0.0.1), а затем «пробрасывать» это подключение на другой сервер (и на другой порт).
Ограничение: данные перенаправления действуют только на TCP порты, UDP трафик таким образом перенаправить не удастся.
Как сделать port mapping (port forwarding) через netsh
Для этого в netsh есть контекст portproxy, который находится в контексте interface. Для создания port mapping выполните из командной строки (в windows Vista и выше — от имени администратора):
netsh interface portproxy add v4tov4 listenport= <целое_число или имя_службы>listenaddress=
- listenport — обязательный параметр. Задает порт IPv4, который должен прослушиваться, по номеру порта или имени службы;
- listenaddress — задает IPv4-адрес, который должен прослушиваться. Может быть введен IP-адрес, NetBIOS-имя или DNS-имя компьютера. Если адрес не задан, по умолчанию используется локальный компьютер;
- connectaddress — задает IPv4-адрес, к которому следует подключаться. Может быть введен IP-адрес, NetBIOS-имя или DNS-имя компьютера. Если адрес не задан, по умолчанию используется локальный компьютер;
- connectport — задает порт IPv4, к которому следует подключаться, по номеру порта или имени службы. Если параметр connectport не задан, по умолчанию используется значение listenport на локальном компьютере.
например:
netsh interface portproxy add v4tov4 listenport=5556 listenaddress=192.168.1.1 connectport=3389 connectaddress=192.168.1.10
В этом примере на компьютере с IP адресом 192.168.1.1 был открыт порт № 5556. При подключении к этому порту все пакеты, приходящие на порт, автоматически будут пересылаться на IP адрес 192.168.1.10, на порт 3389 (RDP).
Проверка правильности настройки port mapping
В первую очередь проверяем, появилось ли наше правило в списке правил netsh:
netsh interface portproxy show all
Если правило появилось, убеждаемся, что настроенный нами порт прослушивается. Для этого выполним команду:
netstat -ano | findstr :
например:
netstat -ano | findstr :5556
Если порт не прослушивается (т.е. port mapping не выполняется), то эта команда не отобразит ничего. Если же наша затея увенчалась успехом, то мы увидим что-то типа такого сообщения:
TCP . 5556 0.0.0.0:0 LISTENING .
В случае возникновения проблем с подключением проверьте, что у Вас правильно настроен (или отключен) брандмауэр (который может блокировать подключения на открытый Вами порт).
Удаление port mapping
Для того, чтобы удалить все правила перенаправления (простейший случай) достаточно выполнить команду (напоминаю, командная строка должна быть запущена от имени администратора!):
netsh interface portproxy reset
После этого убедитесь, что все правила удалены: по команде
netsh interface portproxy show all
не должно ничего отображаться.
Если же Вы хотите удалить только одно правило перенаправления портов, команда будет немного сложнее:
netsh interface portproxy delete v4tov4 listenport= <целое_число или имя_службы>listenaddress=
- listenport — обязательный параметр. Задает удаляемый порт IPv4;
- listenaddress — задает удаляемый адрес IPv4. Если адрес не задан, по умолчанию используется локальный компьютер.
например:
netsh interface portproxy delete v4tov4 listenport=5556
В этом примере мы удаляем port mapping, который был настроен на локальном компьютере, на порту 5556.
Изменение настроек port mapping через netsh
Если Вы хотите изменить значения параметров существующей на portproxy-сервере (т.е. на компьютере, где Вы запускали команду netsh interface portproxy add . ) записи, созданной командой add v4tov4, или добавить новую запись port mapping / port forwarding, выполните следующую команду:
netsh interface portproxy set v4tov4 listenport= <целое_число или имя_службы>listenaddress=
- listenport — обязательный параметр. Задает порт IPv4, который должен прослушиваться, по номеру порта или имени службы;
- listenaddress — задает IPv4-адрес, который должен прослушиваться. Может быть введен IP-адрес, NetBIOS-имя или DNS-имя компьютера. Если адрес не задан, по умолчанию используется локальный компьютер;
- connectaddress — задает IPv4-адрес, к которому следует подключаться. Может быть введен IP-адрес, NetBIOS-имя или DNS-имя компьютера. Если адрес не задан, по умолчанию используется локальный компьютер;
- connectport — задает порт IPv4, к которому следует подключаться, по номеру порта или имени службы. Если параметр connectport не задан, по умолчанию используется значение listenport на локальном компьютере.
например:
netsh interface portproxy set v4tov4 listenport=5556 listenaddress=192.168.1.1 connectport=3300 connectaddress=192.168.1.10
В этом примере на компьютере с IP адресом 192.168.1.1 была изменена настройка порта № 5556: теперь при подключении к этому порту все пакеты, приходящие на порт, автоматически будут пересылаться на IP адрес 192.168.1.10, на порт 3300.
Примечание: Можно изменять любые значения параметров для существующей записи сервера portproxy. Если значения не заданы, изменения не производятся.
File Mapping
File mapping is the association of a file’s contents with a portion of the virtual address space of a process. The system creates a file mapping object (also known as a section object) to maintain this association. A file view is the portion of virtual address space that a process uses to access the file’s contents. File mapping allows the process to use both random input and output (I/O) and sequential I/O. It also allows the process to work efficiently with a large data file, such as a database, without having to map the whole file into memory. Multiple processes can also use memory-mapped files to share data.
Processes read from and write to the file view using pointers, just as they would with dynamically allocated memory. The use of file mapping improves efficiency because the file resides on disk, but the file view resides in memory. Processes can also manipulate the file view with the VirtualProtect function.
The following illustration shows the relationship between the file on disk, a file mapping object, and a file view.
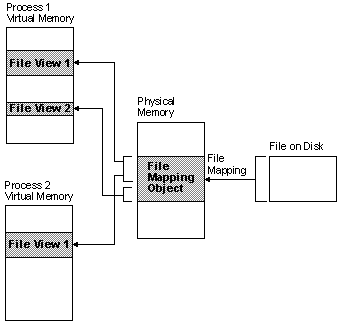
The file on disk can be any file that you want to map into memory, or it can be the system page file. The file mapping object can consist of all or only part of the file. It is backed by the file on disk. This means that when the system swaps out pages of the file mapping object, any changes made to the file mapping object are written to the file. When the pages of the file mapping object are swapped back in, they are restored from the file.
A file view can consist of all or only part of the file mapping object. A process manipulates the file through the file views. A process can create multiple views for a file mapping object. The file views created by each process reside in the virtual address space of that process. When the process needs data from a portion of the file other than what is in the current file view, it can unmap the current file view, then create a new file view.
When multiple processes use the same file mapping object to create views for a local file, the data is coherent. That is, the views contain identical copies of the file on disk. The file cannot reside on a remote computer if you want to share memory between multiple processes.
For more information, see the following topics:
Creating a File Mapping Object
The first step in mapping a file is to open the file by calling the CreateFile function. To ensure that other processes cannot write to the portion of the file that is mapped, you should open the file with exclusive access. In addition, the file handle should remain open until the process no longer needs the file mapping object. An easy way to obtain exclusive access is to specify zero in the fdwShareMode parameter of CreateFile. The handle returned by CreateFile is used by the CreateFileMapping function to create a file mapping object.
The CreateFileMapping function returns a handle to the file mapping object. This handle will be used when creating a file view so that you can access the shared memory. When you call CreateFileMapping, you specify an object name, the number of bytes to be mapped from the file, and the read/write permission for the mapped memory. The first process that calls CreateFileMapping creates the file mapping object. Processes calling CreateFileMapping for an existing object receive a handle to the existing object. You can tell whether or not a successful call to CreateFileMapping created or opened the file mapping object by calling the GetLastError function. GetLastError returns NO_ERROR to the creating process and ERROR_ALREADY_EXISTS to subsequent processes.
The CreateFileMapping function fails if the access flags conflict with those specified when the CreateFile function opened the file. For example, to read and write to the file:
- Specify the GENERIC_READ and GENERIC_WRITE values in the fdwAccess parameter of CreateFile.
- Specify the PAGE_READWRITE value in the fdwProtect parameter of CreateFileMapping.
Creating a file mapping object does not commit physical memory, it only reserves it.
File Mapping Size
The size of the file mapping object is independent of the size of the file being mapped. However, if the file mapping object is larger than the file, the system expands the file before CreateFileMapping returns. If the file mapping object is smaller than the file, the system maps only the specified number of bytes from the file.
The dwMaximumSizeHigh and dwMaximumSizeLow parameters of CreateFileMapping allow you to specify the number of bytes to be mapped from the file:
When you do not want the size of the file to change (for example, when mapping read-only files), call CreateFileMapping and specify zero for both dwMaximumSizeHigh and dwMaximumSizeLow. Doing this creates a file mapping object that is exactly the same size as the file. Otherwise, you must calculate or estimate the size of the finished file because file mapping objects are static in size; once created, their size cannot be increased or decreased. An attempt to map a file with a length of zero in this manner fails with an error code of ERROR_FILE_INVALID. Programs should test for files with a length of zero and reject such files.
The size of a file mapping object that is backed by a named file is limited by disk space. The size of a file view is limited to the largest available contiguous block of unreserved virtual memory. This is at most 2 GB minus the virtual memory already reserved by the process.
The size of the file mapping object that you select controls how far into the file you can «see» with memory mapping. If you create a file mapping object that is 500 Kb in size, you have access only to the first 500 Kb of the file, regardless of the size of the file. Since it does not cost you any system resources to create a larger file mapping object, create a file mapping object that is the size of the file (set the dwMaximumSizeHigh and dwMaximumSizeLow parameters of CreateFileMapping both to zero) even if you do not expect to view the entire file. The cost in system resources comes in creating the views and accessing them.
If you want to view a portion of the file that does not start at the beginning of the file, you must create a file mapping object. This object is the size of the portion of the file that you want to view plus the offset into the file.
Find the IP address of a Mapped Network drive in Windows
Network shares are accessed using their UNC paths (begin with \\ ). For frequently accessed network shares, the UNC path can be mapped to a drive letter in Windows. You may be wondering how to find out the IP address of a mapped network drive — i.e., the IP of the network computer that hosts the shared folder. This post tells you how to find it.
Find the IP address of a Mapped Network drive in Windows
Let’s say you mapped a drive letter for \\media-pc\shared and assigned the Z: drive letter to it. The network computer name is usually displayed near the mapped drive letter when you view it in File Explorer.

To get the IP address of the computer (mapped drive target PC), open a Command Prompt window and type:
This shows the IPv4 address for the computer. If the -4 switch is not used, you’ll see the IPv6 address instead.
Using Command Prompt, to find the computer name that hosts the shared folder, run the net use command.
Once you find the computer name, ping it.
Ping returns the IPv4 address of the computer named media-pc .
One small request: If you liked this post, please share this?
About the author
Ramesh Srinivasan founded Winhelponline.com back in 2005. He is passionate about Microsoft technologies and he has been a Microsoft Most Valuable Professional (MVP) for 10 consecutive years from 2003 to 2012.
Microsoft → Windows → Find the IP address of a Mapped Network drive in Windows
2 thoughts on “Find the IP address of a Mapped Network drive in Windows”
> The network computer name is usually displayed near the mapped drive letter when you view it in File Explorer.
It wasn’t for me. The rest of the guide doesn’t help if this isn’t true.


