- Изучаю Linux. Любой Линукс 🙂
- четверг, 7 октября 2010 г.
- Простой Port Mapping
- Как посмотреть открытые порты в Linux
- Как посмотреть открытые порты linux
- 1. netstat
- 3. lsof
- 4. Nmap
- 5. Zenmap
- Выводы
- 1. Implement port mapping on Linux or Windows
- 1. Port mapping under Windows
- Two, port mapping under Linux
- Experiment: Map the services deployed in the internal network to the external network
- Configure port mapping on Server4
- If Server4 is Windows, just replace the corresponding command
- 2. Linux iptables port forwarding: external network access internal network
Изучаю Linux. Любой Линукс 🙂
четверг, 7 октября 2010 г.
Простой Port Mapping
Эта заметка из серии «Записки склерозника» 🙂 Так что я не буду вдаваться в подробности, тем более суть всей заметки сводится к двум командам для iptables.
Предыстория: под виндой в UserGate раньше иногда пользовался функцией portmapping. Трудно в двух словах описать что это такое, поэтому лучше приведу живой пример.
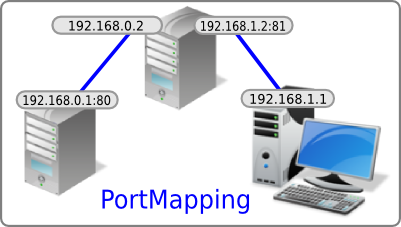
Итак, в сети у нас есть 3 машины:
1. Сервер, на котором крутится сайт (80-й порт) IP-адрес машины 192.168.0.1
2. Рабочая станция. Нужно с неё получить доступ к сайту на вышеуказанном сервере. IP-адрес машины: 192.168.1.1
3. Шлюз/сетевой экран (стоит между сервером и рабочей станцией, имеет два сетевых интерфейса, смотрящий в разные сети). IP-адреса: 192.168.0.2 (смотрит в сторону сервера) и 192.168.1.2 (в сторону рабочей станции)
На рисунке все понятно и наглядно показано.
# echo 1 > /proc/sys/net/ipv4/ip_forward
# iptables -t nat -A PREROUTING -p tcp —dst 192.168.1.2 —dport 81 -j DNAT —to-destination 192.168.0.1:80
# iptables -t nat -I POSTROUTING -p tcp —dst 192.168.0.1 —dport 80 -j SNAT —to 192.168.0.2
Т.е., чтобы попасть на сайт, расположенный на сервере (192.168.0.1), в браузере рабочей станции нужно просто ввести адрес шлюза (192.168.1.2:81)
Если на шлюзе использовать 80-й порт, то в браузере можно просто писать адрес, не указывая порт. Здесь я использовал 81-й порт для наглядности и на тот случай, если он вдруг будет занят.
Источник
Как посмотреть открытые порты в Linux
Сетевые порты — это механизм, с помощью которого операционная система определяет какой именно программе необходимо передать сетевой пакет. Здесь можно привести пример с домом. Например, почтальону необходимо доставить посылку. Он доставляет посылку к дому, это IP адрес компьютера. А дальше в самом доме уже должны разобраться в какую квартиру направить эту посылку. Номер квартиры — это уже порт.
Если порт открыт это означает, что какая либо программа, обычно сервис, использует его для связи с другой программой через интернет или в локальной системе. Чтобы посмотреть какие порты открыты в вашей системе Linux можно использовать множество различных утилит. В этой статье мы рассмотрим самые популярные способы посмотреть открытые порты Linux.
Как посмотреть открытые порты linux
1. netstat
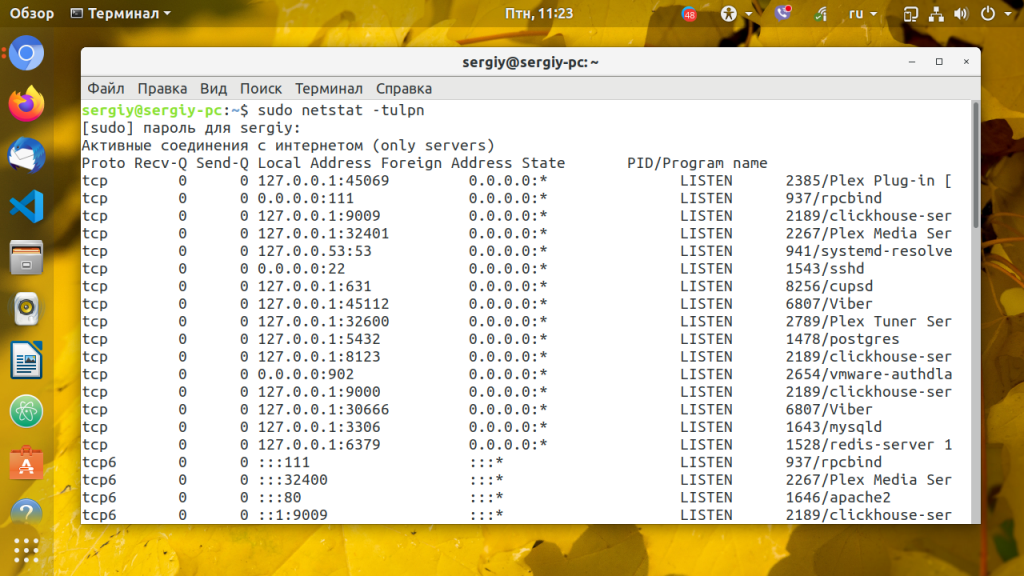
Утилита netstat позволяет увидеть открытые в системе порты, а также открытые на данный момент сетевые соединения. Для отображения максимально подробной информации надо использовать опции:
- -l или —listening — посмотреть только прослушиваемые порты;
- -p или —program — показать имя программы и ее PID;
- -t или —tcp — показать tcp порты;
- -u или —udp показать udp порты;
- -n или —numeric показывать ip адреса в числовом виде.
Открытые порты Linux, которые ожидают соединений имеют тип LISTEN, а перед портом отображается IP адрес на котором сервис ожидает подключений. Это может быть определенный IP адрес или */0.0.0.0 что означают любой доступный адрес:
sudo netstat -tulpn
Утилита ss — это современная альтернатива для команды netstat. В отличие от netstat, которая берет информацию из каталога /proc, утилита ss напрямую связывается со специальной подсистемой ядра Linux, поэтому работает быстрее и её данные более точные, если вы хотите выполнить просмотр открытых портов это не имеет большого значения. Опции у неё такие же:
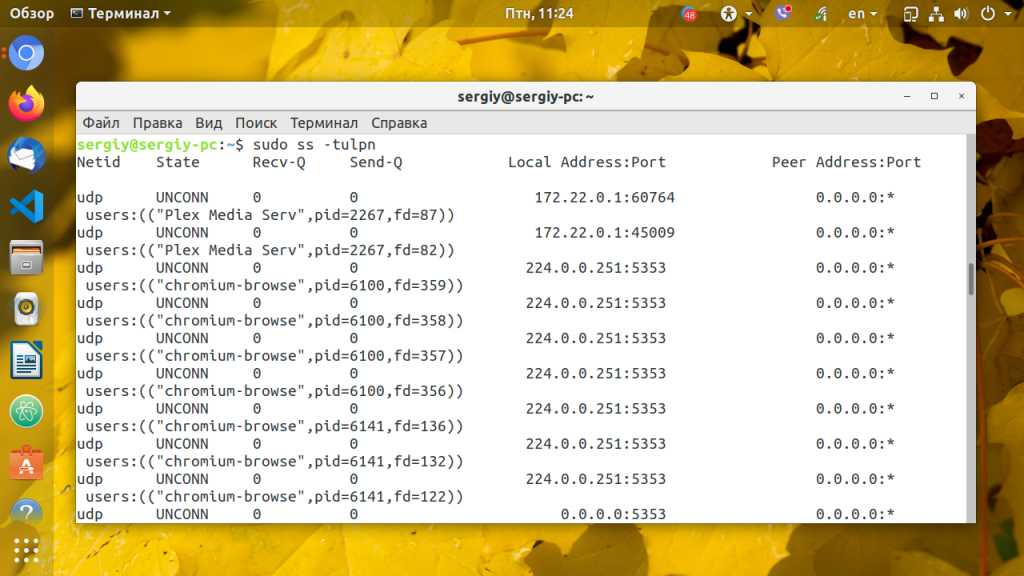
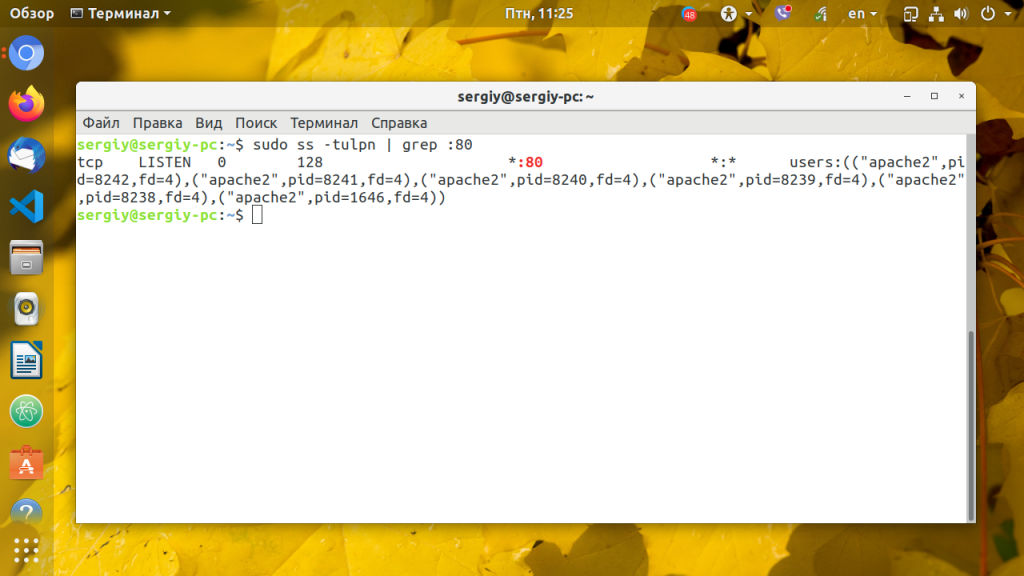
Можно вывести только процессы, работающие на 80-том порту:
sudo ss -tulpn | grep :80
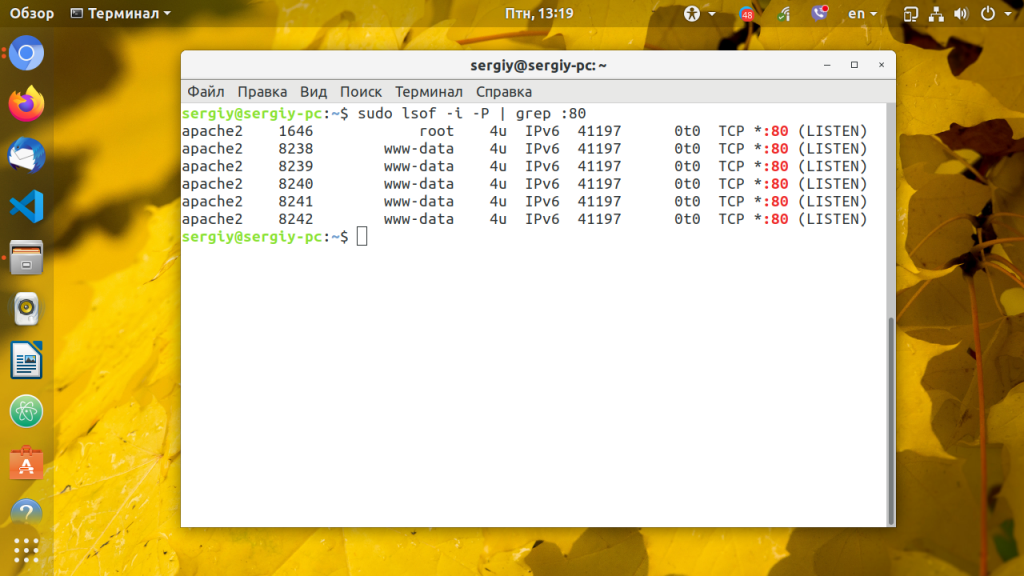
3. lsof
Утилита lsof позволяет посмотреть все открытые в системе соединения, в том числе и сетевые, для этого нужно использовать опцию -i, а чтобы отображались именно порты, а не названия сетевых служб следует использовать опцию -P:
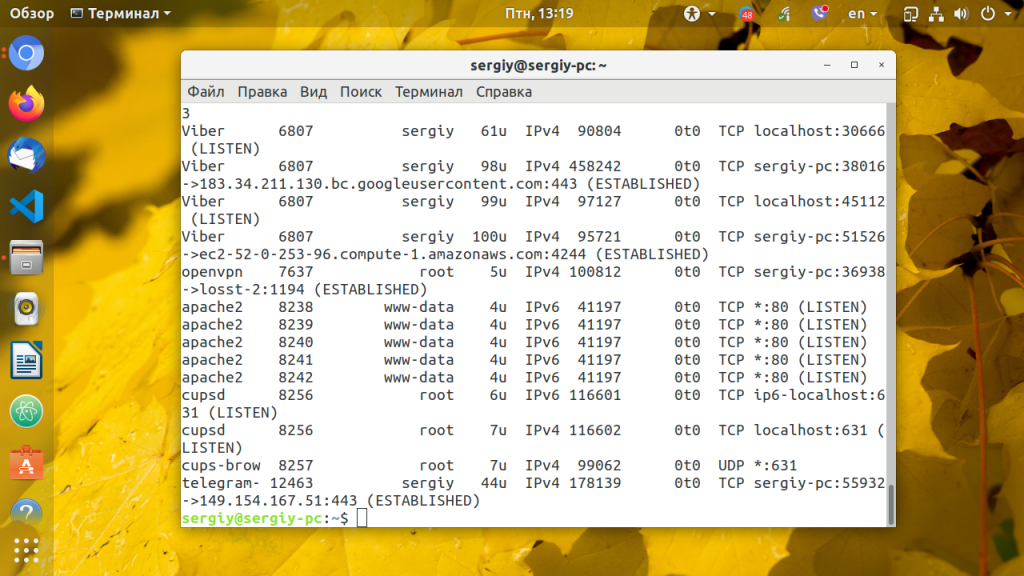
Ещё один пример, смотрим какие процессы работают с портом 80:
sudo lsof -i -P | grep :80
4. Nmap
Программа Nmap — мощный сетевой сканер, разработанный для сканирования и тестирования на проникновение удаленных узлов, но ничего не мешает направить его на локальный компьютер. Утилита позволяет не только посмотреть открытые порты, но и примерно определить какие сервисы их слушают и какие уязвимости у них есть. Программу надо установить:
sudo apt install nmap
Затем можно использовать:
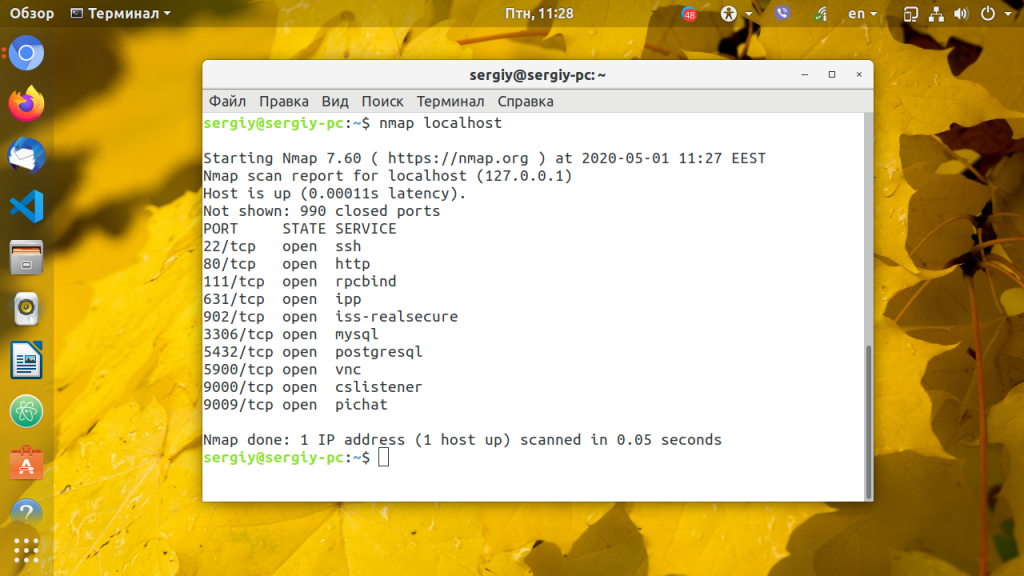
Для простого сканирования можно запускать утилиту без опций. Детальнее о её опциях можно узнать в статье про сканирование сети в Nmap. Эта утилита ещё будет полезна если вы хотите посмотреть какие порты на компьютере доступны из интернета.
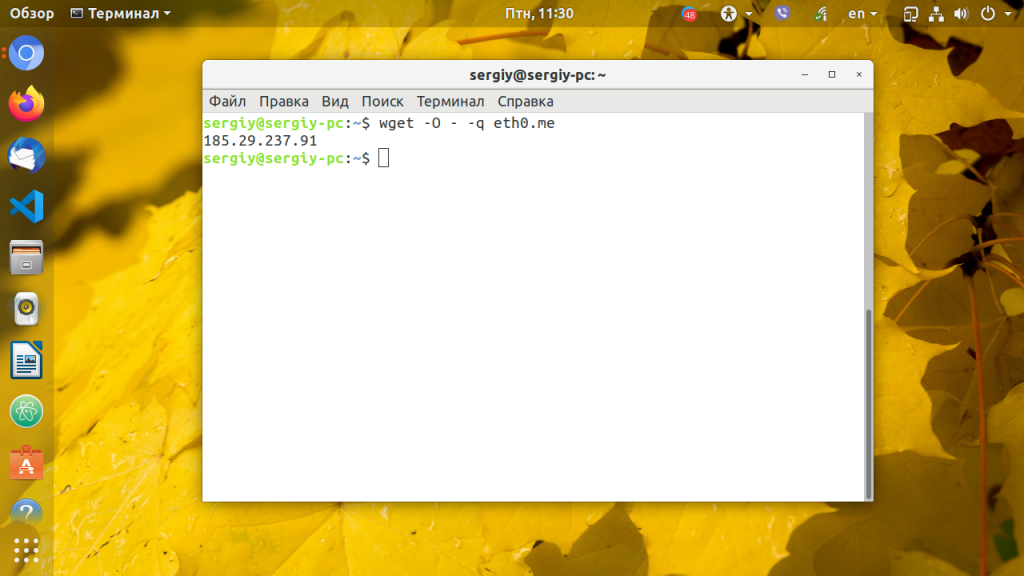
Если это публичный сервер, то результат скорее всего не будет отличатся от локального сканирования, но на домашнем компьютере все немного по другому. Первый вариант — используется роутер и в сеть будут видны только порты роутера, еще одним порогом защиты может стать NAT-сервер провайдера. Технология NAT позволяет нескольким пользователям использовать один внешний IP адрес. И так для просмотра открытых внешних портов сначала узнаем внешний ip адрес, для надежности воспользуемся онлайн сервисом:
wget -O — -q eth0.me
Дальше запускаем сканирование:
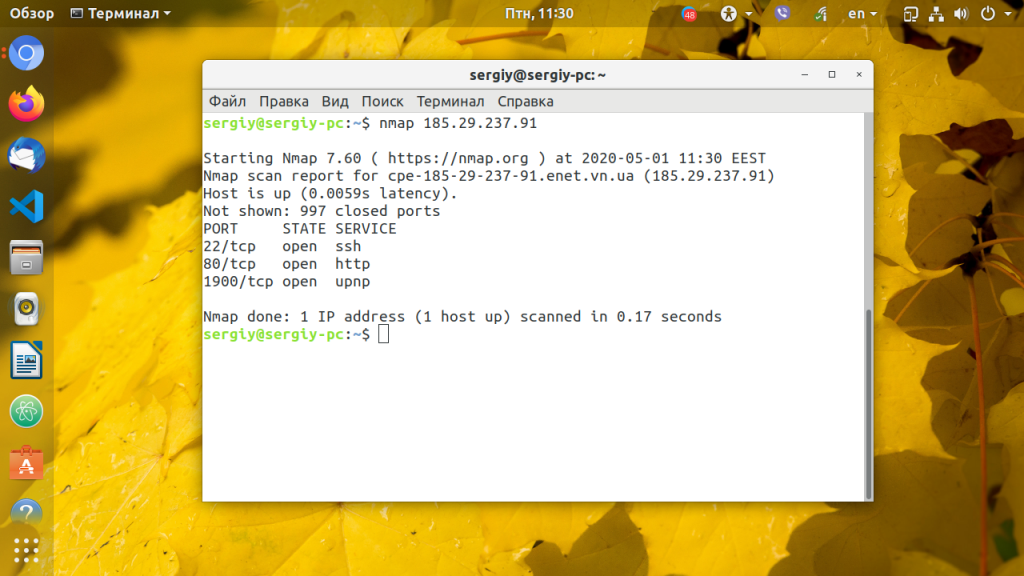
В результате мы видим, что открыт порт 80 веб-сервера и 22 — порт службы ssh, я их не открывал, эти порты открыты роутером, 80 — для веб-интерфейса, а 22 для может использоваться для обновления прошивки. А еще можно вообще не получить результатов, это будет означать что все порты закрыты, или на сервере установлена система защиты от вторжений IDS. Такая проверка портов может оказаться полезной для того, чтобы понять находится ли ваш компьютер в безопасности и нет ли там лишних открытых портов, доступных всем.
5. Zenmap
Программа Zenmap — это графический интерфейс для nmap. Она не делает ничего нового кроме того, что может делать nmap, просто предоставляет ко всему этому удобный интерфейс. Для её установки выполните:
sudo apt install zenmap
Запустить программу можно из главного меню или командой:
Затем введите адрес localhost в поле Цель и нажмите кнопку Сканирование:
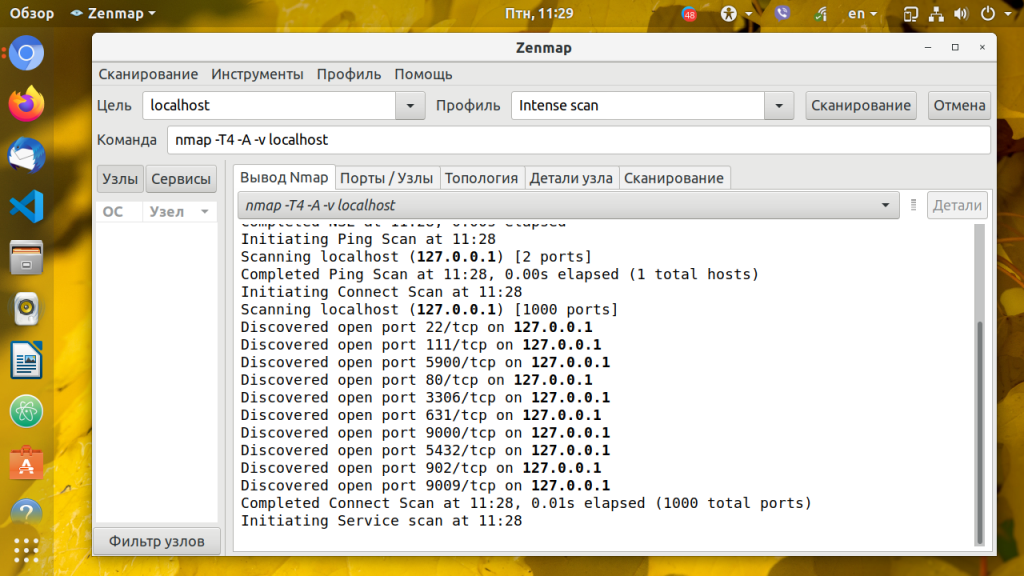
После завершения сканирования утилита вывела список открытых портов Linux.
Выводы
В этой статье мы рассмотрели инструменты, которые вы можете использовать для того чтобы узнать узнать открытые порты linux. Инструментов не так много как для просмотра информации об оперативной памяти или процессоре, но их вполне хватает. А какими программами пользуетесь вы? Напишите в комментариях!
Источник
1. Implement port mapping on Linux or Windows
Usually the server has many network cards, so it may also be connected to different networks. In an isolated network, some services may need to communicate. At this time, the server can be configured to take on the function of forwarding data packets.
1. Port mapping under Windows
- Query port mapping
- Query all port mappings of a certain IP
- Add a port mapping
- Delete a port mapping
Two, port mapping under Linux
- Allow packet forwarding
- Set up port mapping
Experiment: Map the services deployed in the internal network to the external network
lab environment
1、VMWare Workstation Pro
2. 5 minimally installed centos 7 virtual machines
Experimental topology 
IntranetwithExtranetIt is relative to Server4.
Server1 and Server2 are two servers in the intranet environment;
Server3 is a server in the external network environment;
Server4 is a dual-NIC host, which is connected to two networks, 192.168.50.0/24 and 172.16.2.0/24.
Configure the experimental environment
1. Build HTTP service on Server1,2,3
Use Python to build a simple HTTP service on Server1

Same for Server2 and Server3
Control experiment
Access Server1’s resources on the client

Access Server2’s resources on the client

Access Server3 resources on the client

It can be seen that the client on the external network cannot access the resources of the internal network Server1 and Server2.
Configure port mapping on Server4
Permanent configuration
If you need permanent configuration, append the above command to the /etc/rc.local file.
Check the effect
Access Server1’s resources on the client

Access Server2’s resources on the client

Access Server3 resources on the client

If Server4 is Windows, just replace the corresponding command
The IP information of Windows is as follows 

Configure and view port mapping

Check the effect
On the client node

2. Linux iptables port forwarding: external network access internal network
0 background
Consider a network topology application scenario. There are multiple servers in an internal LAN that provide different services, such as web services, FTP services, ssh, telnet, etc., and connect to the external network through the server (or gateway, firewall). If the host needs to access these servers, it needs to implement forwarding on the gateway.
Translated into another application scenario, multiple devices are connected to a server, and the server has two network cards, which are connected to the internal and external networks respectively. The external network cannot directly access the data and services on the device. After realizing the forwarding on the server, the goal can be achieved.
The network topology is as follows: 
For example, you can access the web service of No. 1 device through port 8081 of the server, and access the web of No. 2 device through port 8082, so that you can configure and adjust the parameters of the internal network device on the external network. Similarly, access the telnet service of the No. 1 device through 2321, and access the telnet of the No. 2 device through 2322, so as to facilitate logging in to the device system, device status monitoring, log processing, and so on.
This article will directly quote the names and IP addresses in this network topology diagram. The actual configuration is modified according to the actual situation. In addition, it is not necessary to stick to the names given in this article. Like the «device» in the topology diagram, it can be replaced by a server with Linux installed. The others are similar.
1. Principle
Use iptables to implement firewall, data forwarding and other functions in Linux system. iptables has different tables, each table has a different chain, and each chain has one or more rules. This article uses NAT (network address translation, network address translation) table to realize the data packet forwarding. The iptables command uses -t to specify the table, if not specified, the system default table «filter» is used. So when using NAT, you must use the «-t nat» option.
The NAT table has three default chains, which are PREROUTING, POSTROUTING, and OUTPUT.
First give the NAT structure, as shown below: 
1. PREROUTING: When a data packet comes in, it enters the PREROUTIING chain. What this chain performs is to modify the destination IP address in the data packet, that is, DNAT (change destination IP address). PREROUTING can only perform DNAT. Because DNAT is performed, it can be judged in the routing table and decided to send it to the local or other network ports.
2. POSTROUTING: In contrast, after the POSTROUTING chain, data packets are transmitted, which is the end of the entire NAT structure. The implementation is to modify the source IP address of the data packet, that is, SNAT. POSTROUTING can only perform SNAT.
3. OUTPUT: Define the destination NAT rules for locally generated data packets.
Each data packet goes through three different mechanisms in turn, first to PREROUTING (DNAT), then to the routing table, and finally to POTROUTING (SNAT). The direction of the packet flow is given below: 
The data packets shown in the network topology diagram in the article are in from eth0 and out from eth1. However, no matter from eth0 to eth1, or from eth1 to eth0, all follow the above principles. In other words, SNAT and DNAT do not stipulate that they can only be connected to a certain network port (one side).
By the way, give the complete structure diagram of netfilter: 
Second, realize
For security reasons, the Linux system prohibits packet forwarding by default. The so-called forwarding means that when the host has more than one network card, one of them receives the data packet and sends the packet to another network card of the machine according to the destination ip address of the data packet, and the network card continues to send the data packet according to the routing table. This is usually what the router wants to achieve.
Configure the ip forwarding function of the Linux system, first ensure the hardware connection, and then turn on the forwarding function of the system
cat /proc/sys/net/ipv4/ip_forward, the content of the file is 0, which means that packet forwarding is prohibited, and 1 means that it is allowed. Modify it to 1. You can use the command echo «1»> /proc/sys/net/ipv4/ip_forward to modify the content of the file, and the effect will no longer be effective after restarting the network service or the host. To execute it automatically, you can write the command echo “1”> /proc/sys/net/ipv4/ip_forward into the script /etc/rc.d/rc.local or add FORWARD_IPV4= in the /etc/sysconfig/network script «YES»
But these two files are not available in my system, so you can modify the /etc/sysctl.conf file and uncomment the net.ipv4.ip_forward=1
According to the topology diagram, the mapping of different IPs and different ports is realized one by one. The following command is an example form:
Take the first device forwarding command as an example, and explain it in vernacular.
- The first is the PREROUTING chain, which can only perform DNAT. This command is for entering from eth0 and the destination IP is 172.18.44.44 (Note: -s can be used to specify the source address of the data packet, but at this time it is impossible to know the source IP, although it can Use the network segment method, but with -d, it must be specified that the only one must be the eth0 address of the machine, which is relatively better). The destination address of the data packet with the port number of 2321 is changed to 100.100.100.101, and the port is 23. That is, the destination of this packet is the telnet service of the first device.
- The second is the POSTROUTING chain, which can only perform SNAT, that is, modify the source IP address of the data packet that has been DNAT previously. In this way, when the data packet reaches the first device, the source IP address and destination IP address are both in the 100.100.100.0/24 network segment.
The SNAT of the above command is somewhat redundant and can be simplified. The command is as follows:
The actual commands used may be changed (simplified), so this article will not show them anymore.
Three, test
In order to ensure the correctness of the text, this section lists the results of the operation, as well as the information of the experimental process. The routing table on the server (gateway) is as follows:
You can see that there are two network cards on the server, and the network segments are different. The NAT table of iptables is as follows:
As you can see, PREROUTING and POSTROUTING each have a rule, these rules are generated by the above command. Correspondingly, check the routing information on the first device, as follows:
You can see that this device has 2 network cards, and the default gateway is the IP address of the server. However, one of the network cards eth1 is the same network segment as the PC! If the source IP address is not modified (masquerading), it will match the network port eth1 and cannot match eth0.
Telnet the device on the PC on the external network, and the packet capture information of the device is as follows:
It can be seen that the IP segments of all packets are the same. Capture the internal network eth1 on the server. Due to DNAT and SNAT, the IP address of the network card data packet is still the 100.100.100.0/24 network segment, as follows:
However, the packet captured on the server eth0 will be a network segment packet of 172.18.0.0/16:
From the analysis of packet capture, the commands used in this article have been able to perform DNAT and SNAT correctly.
Four, other
It is recommended to use the root user when using the iptabls command, otherwise it will easily fail
Источник


