- Access your iPhone App’s data and files
- Before you begin
- In-Depth Tutorial
- 1. Launch iMazing on your computer and connect your device.
- 2. Select your device in the iMazing’s sidebar, then click Back Up.
- 3. Select an app, then view its Backup folder
- 4. Browse files
- Куда вводить промокоды на iPhone, iPad, Mac и Windows
- На iPhone
- На iPad
- На Mac
- На Windows
- Лонгриды для вас
- Xcode for Windows (12 Ways to Build iOS Apps on PC)
- Rent a Mac
- Virtualize MacOS
- Build a “Hackintosh”
- Third Party Solutions
- Погашение подарочной карты App Store и iTunes
- Погашение подарочной карты на iPhone, iPad, iPod touch
- Погашение подарочной карты на компьютере
- Используете компьютер с ОС Windows?
- Погашение подарочной карты на устройстве с ОС Android
- Погашение подарочной карты App Store и iTunes, полученной по электронной почте
- На что можно потратить подарочную карту
- Дополнительная информация
Access your iPhone App’s data and files
An iPhone may be a pocket computer, but it doesn’t work the way a desktop or laptop computer works. On a computer, you interact directly with stored files: you open them, work on them, and save them; you organize them in folders using macOS Finder or Windows File Explorer; and you can view them when you want.
iOS is very different, you don’t have access to the entire file system. There’s a good reason for this: it’s called sandboxing. This is a security feature that ensures that apps are sequestered, and no app — or its data or files — can communicate with another app. There are some exceptions to this, of course: you can access your photo library from apps other than Photos to send pictures via email or Messages; you can play music files with third-party music player apps; and so on. But in general, sandboxing means that apps can’t access other apps, their data, or their files. An app has only access to its own folder (sandbox).
Therefore the focus is on apps, and, while apps do work with files under the hood, you don’t usually see them. Some apps do allow you to see files, but it depends on the apps. The ones that let you see files generally allow these files to be synced from a computer, using File Sharing:
How to Transfer files and folders to an iPhone or iPad App from a Mac or PC.
But most apps don’t have File Sharing enabled. Also even if the app has File Sharing enabled, you cannot access other folders than the Documents folder. In an app’s sandbox you also have a Library folder containing app’s settings, configuration, and sometimes content:
How to export, backup and transfer iOS Apps’ Data and Settings.
With iMazing, you can access the Library folder of apps as well as nearly the entire iOS file system via a backup of your device.
Here’s how to browse files on your iOS device:
- Back Up your device. Make sure to encrypt your backup so iMazing can back up all your data.
- Select your device in iMazing, then click Apps.
- Select an app, then enter its Backup folder.
- Navigate that folder to find files. Select files you want to view; you may or may not be able to view them, depending on which apps are needed to read their data.
- Select files, then click Copy to Mac or Copy to PC to copy them to your computer. You may then be able to view their contents with an app that wasn’t used to create them.
- Export an app’s file and data to your computer to restore it later or transfer it to an other device: Export, backup and transfer iOS Apps’ Data and Settings
Before you begin
Download and install iMazing on your Mac or PC computer
In-Depth Tutorial
1. Launch iMazing on your computer and connect your device.
Download and install iMazing. Launch the app, and connect your device to your Mac or PC.
2. Select your device in the iMazing’s sidebar, then click Back Up.
Select your device in the sidebar, then click Back Up. Tell iMazing to back up your device; this may take a minute or two. Follow the instructions in this article to perform the backup.
3. Select an app, then view its Backup folder
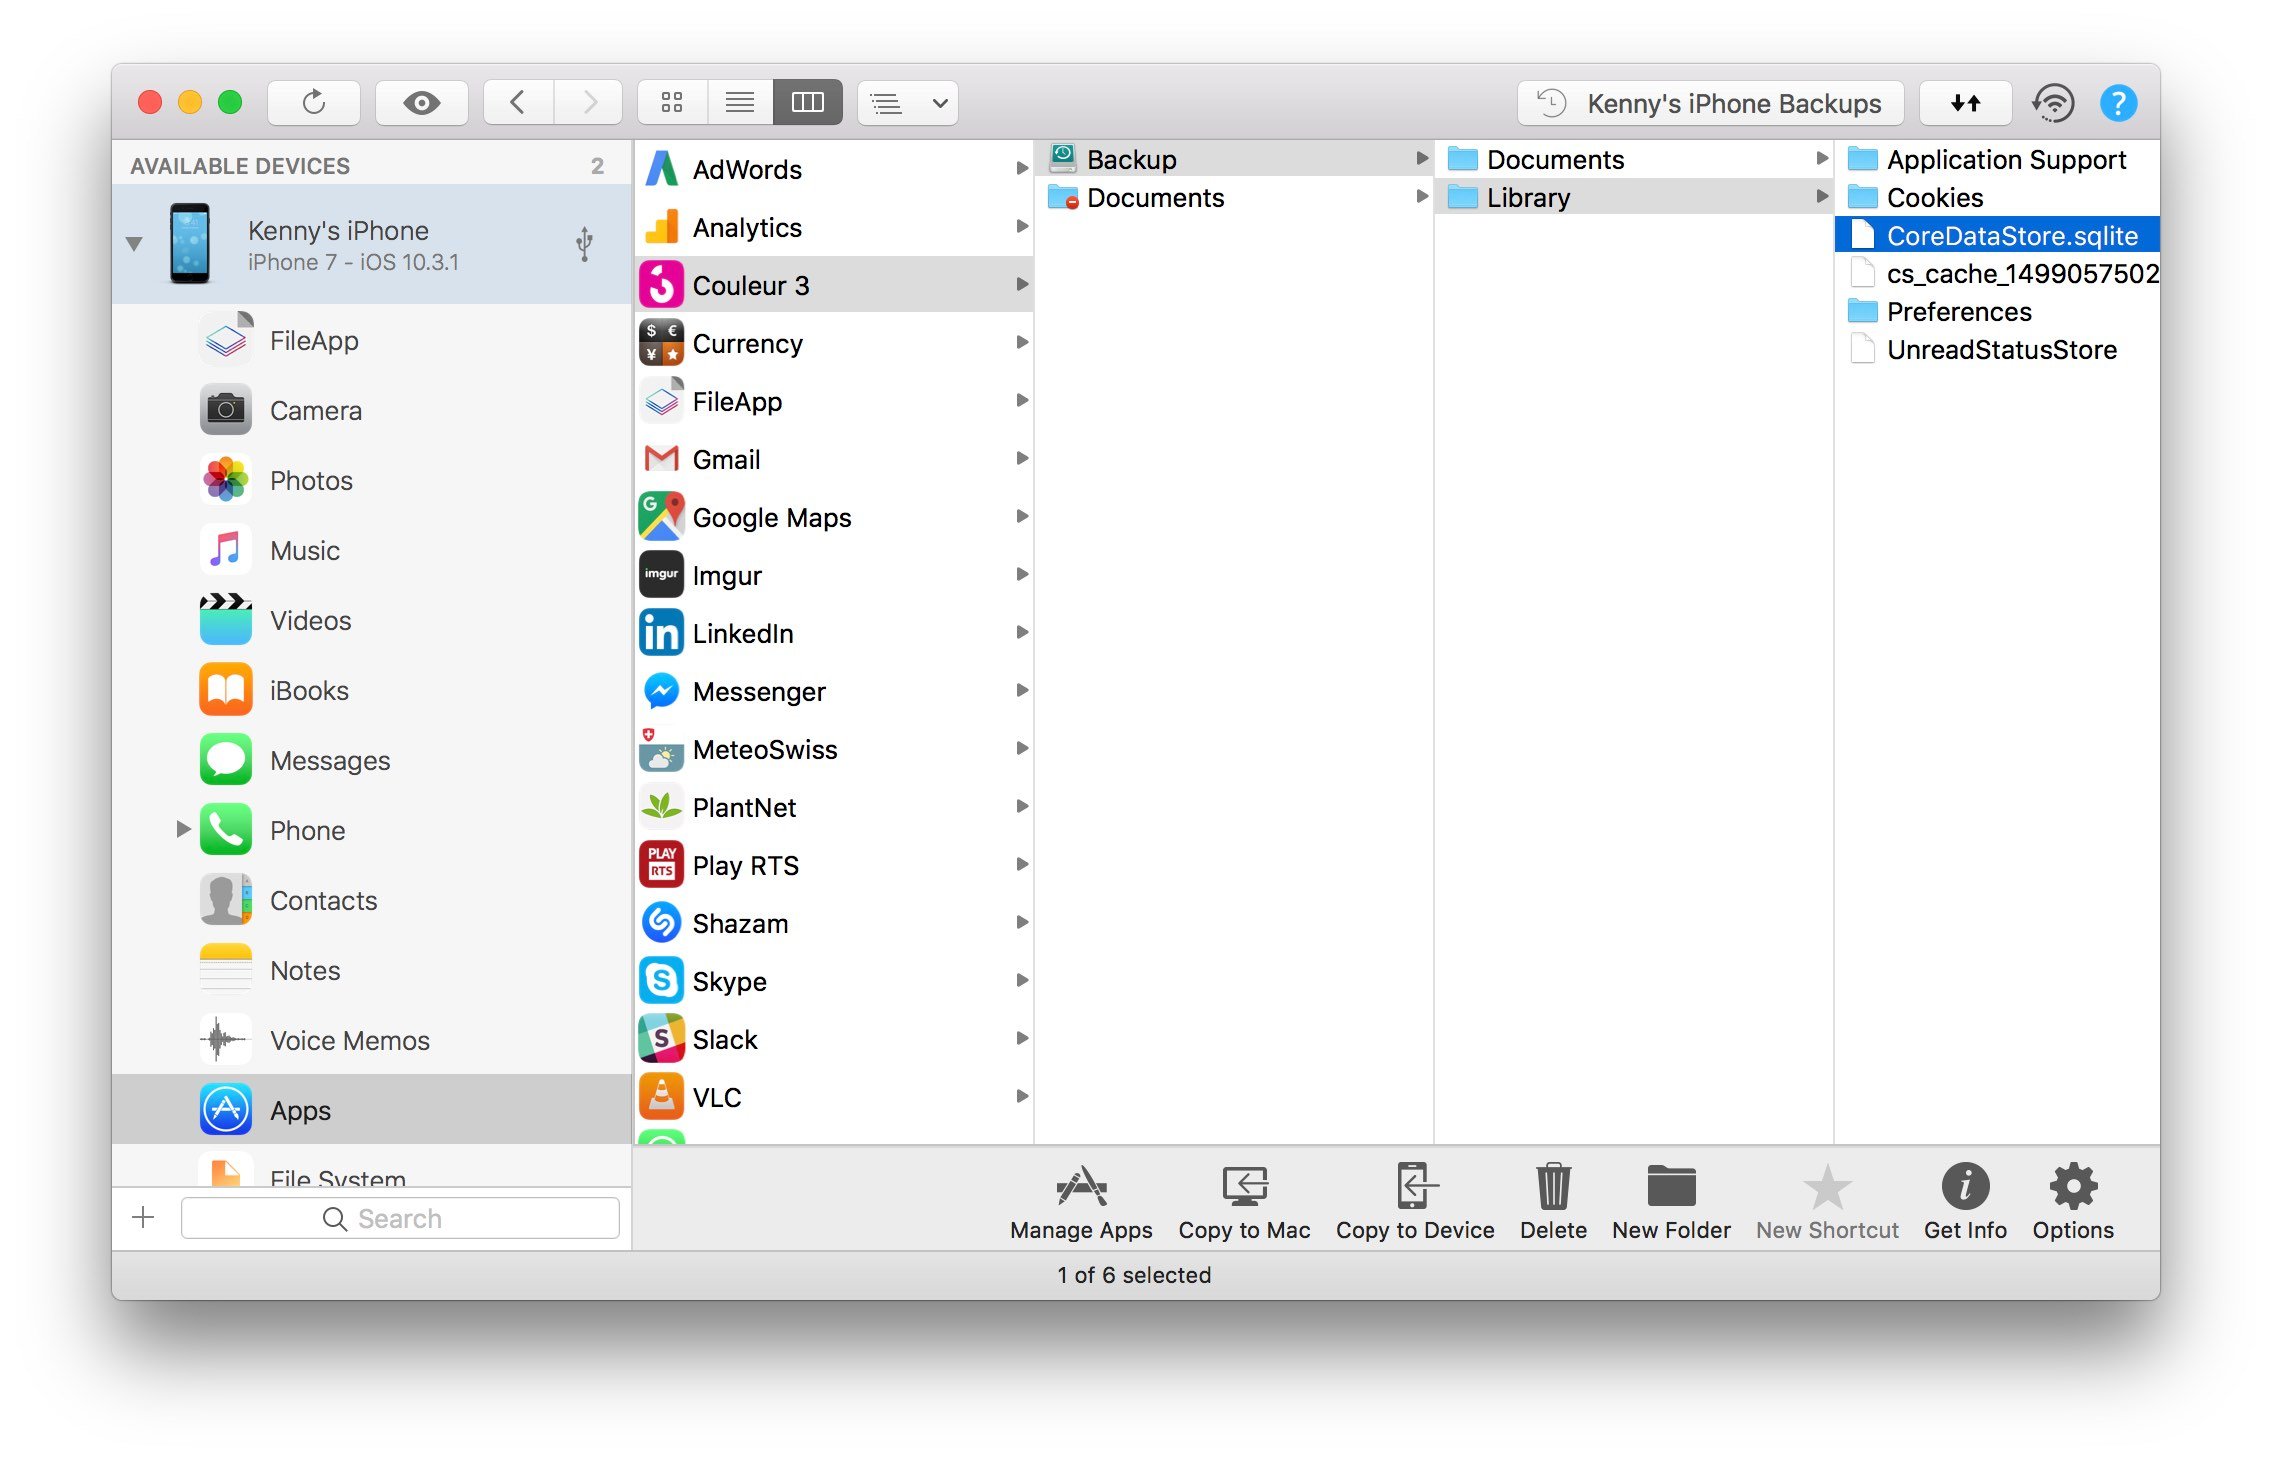
When the backup has completed, click your device in the iMazing sidebar. It expands to show its content: Apps, Camera, Photos, Music, and more.
Click Apps, then select the app whose files or data you want to view. You’ll see that for many apps the Documents folder shows a «Do Not Enter» icon; this means that these apps have not enabled file sharing. But this isn’t a problem. Since iMazing has just backed up your device, you can access these files from the app’s Backup folder. This folder gives you access to that part of your device’s backup that contains files and data for the specific app.
Select the Backup folder belonging to the app whose files you want to view.
4. Browse files
You can view these files in three ways from the View Mode button in iMazing’s toolbar: as icons, in list view, or in column view:
- Icon view: If you’re in Icon view, you can double click an app or a folder to view its contents, as you would on a computer. To move back in your viewing history, click the

Куда вводить промокоды на iPhone, iPad, Mac и Windows
Многие пользователи нашего приложения знают, что раньше в нем был крутой раздел «Скидочки», где ежедневно вручную отбирались новинки и приложения со скидкой из App Store. По независящим от нас причинам этот раздел пришлось убрать из обновленной версии AppleInsider.ru, но вскоре выход был найден: мы создали специальный Telegram-канал с лучшими новинками и приложениями, которые продаются со значительной скидкой или вовсе стали бесплатны на некоторое время в App Store. Ежедневно там также раздаются промокоды для бесплатной загрузки многих приложений. Но не все знают, куда их вводить.

Поэтому мы решили выпустить небольшое руководство и рассказать, где вам нужно вводить промокоды из Telegram-канала на iPhone, iPad, компьютере Mac или Windows.
На iPhone
Открываете приложение App Store, листаете экран вниз до меню «Ввести код». Копируете промокод во всплывающее окно и нажимаете «Погасить». После этого на устройство сразу начнется загрузка приложения, и вы увидите его вместе с остальными программами (как правило, на последнем экране).


На iPad
Действия ничем не отличаются от таковых на iPhone. Открываем App Store, листаем вниз до меню «Ввести код», вводим и нажимаем «Погасить».


На Mac
На компьютере Mac все чуточку сложнее. Предположим, вы открыли наш канал Telegram на OS X, увидели промокод и хотите сразу же его ввести. Открываете приложение iTunes и наверху переключаетесь на вкладку App Store.

После этого в правом боковом меню выбираем «Ввести код».

Гасим код, после чего приложение появится в ваших покупках. Его можно будет загрузить в разделе «Покупки» приложения App Store на iPhone или iPad.

На Windows
Здесь процесс в точности повторяет процедуру, которую мы описали выше для Mac. Просто запустите приложение iTunes для Windows и следуйте инструкциям.
Подписывайтесь на наш Telegram-канал по ссылке ниже и не пропускайте ни одной скидки и промокода!
Название: AppleInsider_sale
Цена: Бесплатно
Совместимость: iPhone/iPad/Mac
Ссылка: Установить

Новости, статьи и анонсы публикаций
Свободное общение и обсуждение материалов


Лонгриды для вас

Некоторые приложения для iOS расходуют больше ⚡️ зарядки, чем другие, хотя по ним так и не скажешь. Просто они непрерывно обновляются в фоновом режиме, отслеживают смену вашего местоположения и присылают десятки уведомлений, высаживая батарейку похлеще игр и приложений для монтаж

На этой неделе многие пользователи уже получили свои iPhone 12 и iPhone 12 Pro. Как быстро перенести данные со старого iPhone? А если раньше был Android? Спо…

У Apple больше нет выбора — с 1 апреля 2021 года компания будет обязана сделать возможной предустановку российских приложений из установленного списка. В противном случае — штраф в 200 тысяч рублей, причём для всех магазинов. Но как Apple это реализует? Разбираемся.
Xcode for Windows (12 Ways to Build iOS Apps on PC)
I wish I had known this when I first started because I delayed myself for 3 years before biting the bullet and buying a Mac.
Had I known about running Xcode on Windows or about the solutions below, I might’ve started building iPhone apps much earlier!
Rent a Mac
Before committing to buying a new Mac, you can actually “rent” one for development. You’ll remotely access the Mac and Xcode through your PC.
It’ll be like having the Mac desktop in a window on your Windows Desktop.
The really nice thing about this option is that the cost is really low and it’s the fastest option to get up and running.
If you decide that app development isn’t for you, you just cancel your plan.
1. MacStadium
These guys were featured in the recent Apple keynote when they introduced the updated Mac Mini! They have the newest Macs available.
(Use coupon code “CODEWITHCHRIS” for 50% off your first month. If you do, please let me know in the comments below. I’ll get a small kick back at no extra expense to you so thank you for supporting my site!)
If you go down this route for iOS app development, make sure you get my Xcode cheatsheet with references and keyboard shortcuts for Windows users.
There are a couple other companies that provide this service:
2. MacInCloud
This is the most well known service out of the three. You won’t have to install Xcode because it comes preinstalled. You can also do pay-as-you-go so it’s a pretty low commitment. Some people complain that it’s slow but you can try it out for yourself since it’s only about a buck an hour!
3. XcodeClub
XcodeClub is run by Daniel who is a passionate developer himself. From the reviews I see, the service is fast and friendly. The pricing is less flexible than MacInCloud and you’ll have to commit to at least a month.
Virtualize MacOS
If you’re a little more technically savvy, you can use virtualization software and run a “virtual Mac” on your PC.
The services above are essentially doing the same thing on their servers and then they charge you a fee to access the virtual machine.
By setting it up yourself on your own PC, you essentially cut the middle man out of the equation.
Unfortunately it does take a little bit of technical know-how to get this up and running.
The two most popular pieces of software to do virtualization are VirtualBox and VMWare Workstation.
You can download them below and then use Google to find a guide on how to install the latest MacOS (Mojave) with either VirtualBox or VMWare Workstation.
After that, spin up your new virtual Mac and download Xcode. This is as close as you’ll get to running actual Xcode on Windows!
4. VirtualBox
VirtualBox is open source software which means that it’s free. That probably explains why it’s a lot more popular than VMWare Workstation when it comes to running MacOS on your Windows machine!
5. VMWare Workstation
Unfortunately you’ll have to pay for this piece of software and at the time of this writing, a license costs about half the price of a brand new Mac Mini which is perfectly suitable for iOS app development. I would recommend you try VirtualBox first or try to buy a used Mac Mini.
Build a “Hackintosh”
You can also build a “Hackintosh” which is a PC that has been customized to run MacOS.
This requires the most effort out of all the options presented so far but it can work for someone who wants a separate physical computer running MacOS.
6. Hackintosh.com
A great resource for all things Hackintosh. The first How-To section contains links to a number of great tutorials for building your own Hackintosh and installing High Sierra.
7. Hackintosh Subreddit
I love looking for Reddit communities on anything that I’m interested in because there are always interesting conversations happening. Reddit provides a way to have a dialogue with like minded individuals, to get help and to help others!
8. Hackintosh Articles on 9to5mac.com
I included this link because it contains up to date news and articles for Hackintosh builds.
Third Party Solutions
Lastly, there are many third party solutions that you can use to do iOS development on Windows.
You won’t be using Xcode in these solutions but you’ll be able to generate an app that can run on iOS devices.
Check out these great Xcode alternatives:
9. React Native
Use JavaScript to build native mobile apps.
10. Xamarin
Use C# to build a mobile app that you can deploy natively to Android, iOS and Windows.
11. Appcelerator
Build native mobile apps using JavaScript.
12. PhoneGap
Build hybrid cross-platform mobile apps using HTML, CSS and JavaScript.
Погашение подарочной карты App Store и iTunes
Узнайте, как погасить подарочную карту App Store и iTunes. Узнайте, что делать, если не удается погасить подарочную карту.

Используйте подарочную карту для покупки приложений, подписок и многого другого.
Погашение подарочной карты на iPhone, iPad, iPod touch
- Снимите или осторожно сотрите защитное покрытие на обратной стороне подарочной карты, чтобы открыть 16-значный код, начинающийся с символа X.
- На iPhone, iPad или iPod touch откройте App Store.
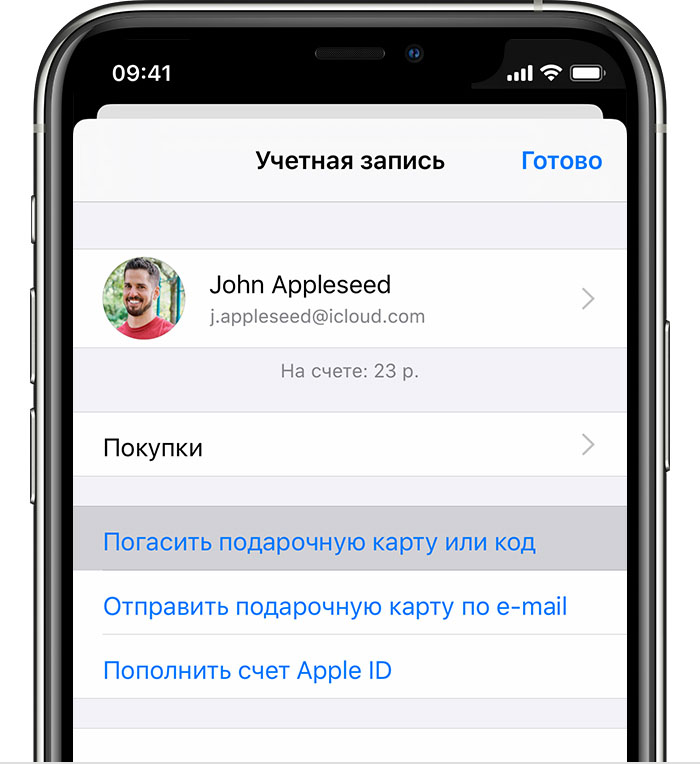
- В нижней части экрана нажмите «Сегодня».
- В верхней части экрана нажмите кнопку входа или свое фото.
- Нажмите «Погасить подарочную карту или код». Если надпись «Погасить подарочную карту или код» не отображается, войдите в учетную запись с помощью идентификатора Apple ID. Информацию о том, что делать, если вы забыли свой идентификатор Apple ID, см. в этой статье.

- Нажмите «Использовать камеру» и следуйте инструкциям на экране. Если у вас возникли проблемы с погашением карты, нажмите «Можно также ввести код вручную», затем следуйте инструкциям на экране. Введите 16-значный код, который начинается с X.
- Нажмите «Готово».
Погашение подарочной карты на компьютере
- Снимите или осторожно сотрите защитное покрытие на обратной стороне подарочной карты, чтобы открыть 16-значный код, начинающийся с символа X.
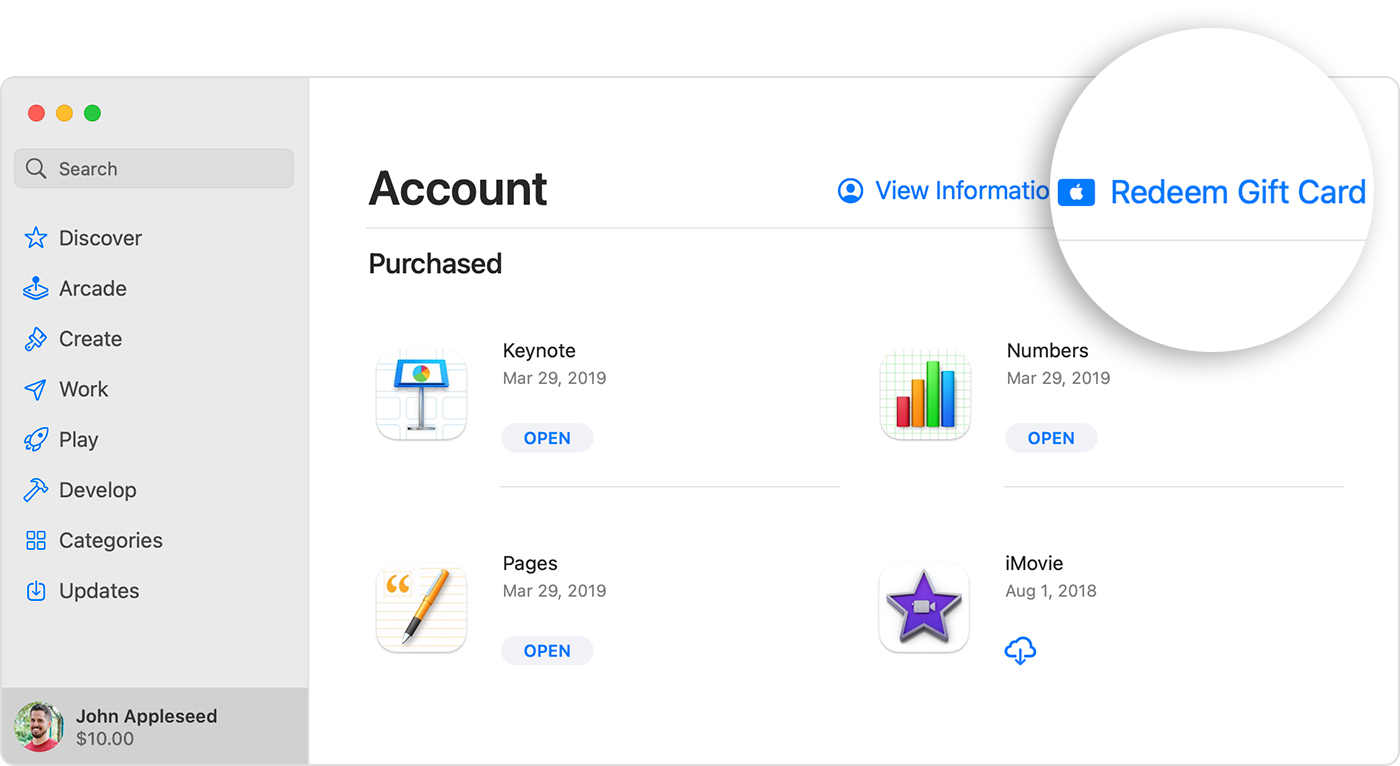
- Откройте App Store на компьютере Mac.
- Нажмите свое имя или кнопку входа на боковой панели.
- Нажмите «Погасить подарочную карту».
- Нажмите «Использовать камеру» и следуйте инструкциям на экране. Если у вас возникли проблемы с погашением карты, нажмите «Можно также ввести код вручную», затем следуйте инструкциям на экране. Введите 16-значный код, который начинается с X.
Используете компьютер с ОС Windows?
На компьютере с ОС Windows подарочную карту можно погасить в iTunes. В строке меню в верхней части окна iTunes выберите «Учетная запись», затем — «Погасить код», после чего выполните вход и следуйте инструкциям на экране.
Погашение подарочной карты на устройстве с ОС Android
- Снимите или осторожно сотрите защитное покрытие на обратной стороне подарочной карты, чтобы открыть 16-значный код, начинающийся с символа X.
- Откройте приложение Apple Music.
- Нажмите кнопку меню , затем нажмите «Учетная запись».
- Нажмите «Погасить подарочную карту или код».
- Введите 16-значный код, который начинается с символа X. Затем нажмите «Погасить».
Погашение подарочной карты App Store и iTunes, полученной по электронной почте
Чтобы погасить подарочную карту, полученную по электронной почте, откройте письмо и нажмите кнопку «Погасить».
На что можно потратить подарочную карту
С помощью подарочной карты App Store и iTunes можно совершать покупки со счета Apple ID, включая приложения, игры, место в хранилище iCloud, подписки, такие как Apple Music, и многое другое. Но для некоторых покупок нельзя использовать средства на счете Apple ID. Узнайте, что можно купить с помощью средств на счете Apple ID.
На устройстве Android можно использовать подарочную карту, чтобы купить подписку Apple Music. Чтобы совершать покупки в App Store, Apple Books или приложении Apple TV, используйте устройство Apple.
Дополнительная информация
- Проверить остаток на подарочной карте App Store и iTunes нельзя. Но вы можете проверить остаток средств на счете Apple ID. В средства на счете Apple ID входит остаток от любых погашенных подарочных карт App Store и iTunes.
- Для совершения некоторых покупок может требоваться наличие зарегистрированной кредитной карты, даже если покупка оплачивается со счета Apple ID.
- Нельзя использовать подарочные карты Apple Store в App Store или iTunes Store. Подарочные карты Apple Store имеют сплошной цвет лицевой стороны: серый, белый, серебристый или золотой. Узнайте, что делать, если вы не знаете, какой у вас тип подарочной карты.
Подарочные карты App Store и iTunes доступны не во всех странах и регионах. Узнайте, можно ли в вашей стране или регионе использовать подарочные карты.
Функции App Store и iTunes Store могут отличаться в зависимости от страны или региона. Узнайте, что доступно в вашей стране или регионе.


