- How to Get iPhone Text Messages on Windows 10
- Can You Get iPhone Messages on Windows 10
- Method 1. How to Get iPhone Text Messages on Windows 10
- Method 2. How to Get iPhone Messages on Windows
- Bonus Tip: How to Save WhatsApp data on PC
- The Bottom Line
- Общаемся в iMessage в любом браузере на Windows, Linux и OS X
- Want iMessage on Your Windows PC? How-To
- Quick Tips
- Related Articles
- What About a Browser-Based iMessage?
- What You Need
- A Quick Word for Mac Personal Computer Users
- To get iMessage on your Mac computer
- What about multiple Apple IDs and iMessage
- How to Access iMessage and Messages With Your Windows PC
- iMessage Through Remote Access to Mac
- Using the Chrome Remote Desktop
- #1: Set Up Chrome Remote Desktop
- #2: Use Chrome Remote Desktop on Another Computer
- Remove the Chrome Remote Desktop from your Mac
- How to Access iMessage and Messages By Jailbreaking
- What’s Jailbreaking?
- A Word of Caution
- Going for it
- How to Jailbreak your iPhone or another iDevice
- iMessage for Android Users
- Summary
How to Get iPhone Text Messages on Windows 10
Two ways for you to get iPhone messages (iMessage or Text Messages) on Windows 10.
Can You Get iPhone Messages on Windows 10
There are generally three types of messages on your iPhone, iMessage, text messages (SMS), and multimedia messages (MMS). For your information:
- iMessages are texts, photos, or videos that you can send across iPhone, iPad, iPod Touch, and Mac.
- Text messages and multimedia messages are texts and photos that you can send to any other cell phone.
Besides, iMessages are sent over Wi-Fi or cellular data network while SMS or MMS requires a text-messaging plan, which is provided by your wireless carrier.
If you want to get your iPhone messages on Windows 10, it could be easy or difficult, depending on the type of message you want to transfer.
For example, if you want to sync iMessages to PC, it will be complex since iMessages are only supported on Apple devices like iPhone, iPad, iPod Touch, and Mac. While if you want to save iPhone text messages to Windows 10, it could be easy for you to get things done with the help of an iPhone data transfer tool.
Here in this guide, I’d like to show you how to get iPhone text messages on Windows 10 with ease in two ways. One of them is also applicable to get iMessages on Windows 10.
Method 1. How to Get iPhone Text Messages on Windows 10
Applies to: Text messages
Do you want to transfer your iPhone messages to PC and then view or print the messages from your computer? If you do, you can use the iPhone transfer software — EaseUS MobiMover.
EaseUS MobiMover will help you get your iPhone data, including photos, videos, music, ringtones, contacts, and text messages, from your iPhone onto a computer, be it a PC or Mac.
In addition to the data transfer from iPhone to computer, it also supports the data transfer from computer to iPhone/iPad/iPod or between two iDevices. Thus, whether you want to save iPhone texts on Windows 10 or put music on iPhoneВ from a computer, you can do it easily using EaseUS MobiMover.
To get iPhone text messages on Windows 10:
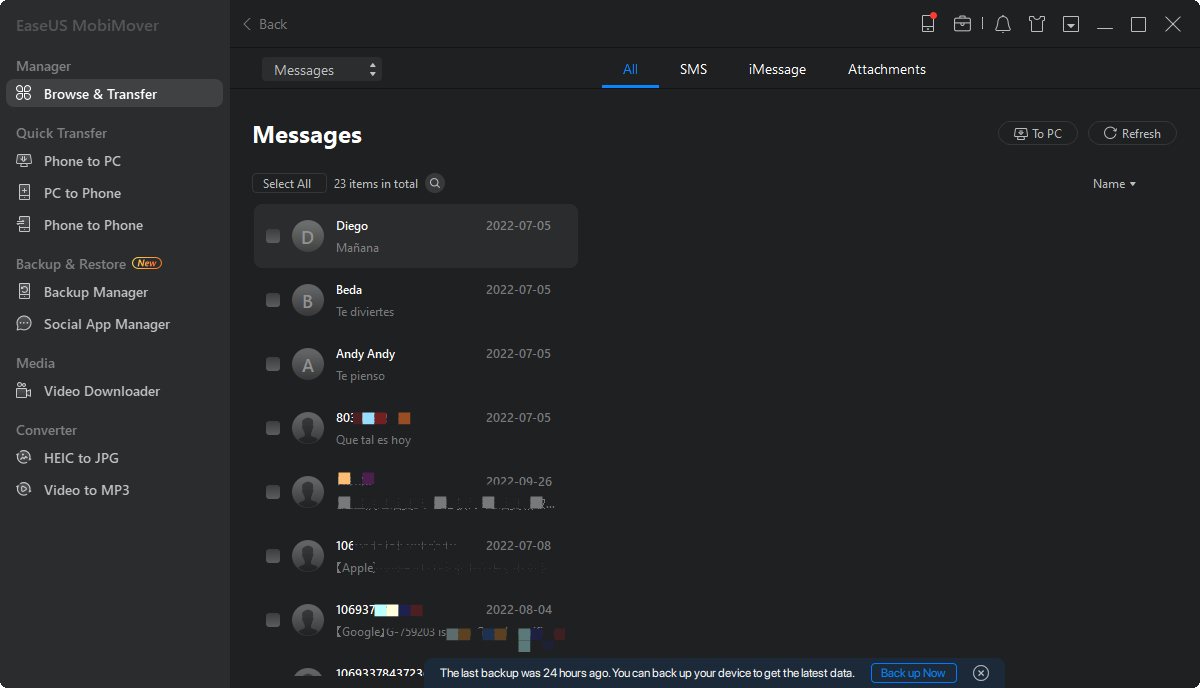
Step 1.В Connect your iPhone to your computer (Mac or PC) and click Trust on your iPhone to trust this computer. Launch EaseUS MobiMover and navigate to «Content Management». Choose «Messages».

Step 2.В Go to «Settings» to choose a folder to save the items to be transferred.В
![]()
Step 3.В Select the messages, including text messages (SMS) and iMessages, you want to save from your iPhone to the computer and click the «Transfer to PC» button.В After that, MobiMover will start downloading text messages from your iPhone to the computer automatically. When it has finished, you can go to the selected folder to check the messages. (The items will be saved an HTML file on your computer, thus you need to open it with a browser to view its details.)
Method 2. How to Get iPhone Messages on Windows
Applies to: iMessage, text messages, and multimedia messages
This method is not suitable for bulk data transfer. However, if you want to transfer one or several conversations from your iOS device to a Windows 10 PC, it will be quite simple and fast for you to get your iPhone text messages on Windows 10 using this way.
To get iPhone texts on Windows 10:
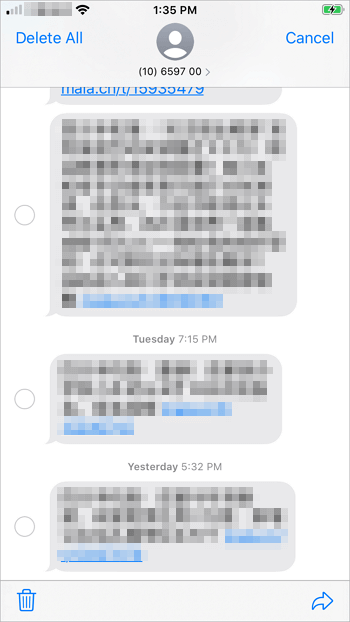
Step 1. Open the Messages app on your iPhone and click the conversation you want to transfer.
Step 2. Press and hold one of the messages in the conversation and until the options appear.
Step 3. Choose «More» and select all the texts in the conversation.
Step 4. Click the «Forward» icon to create a new message.
Step 5. Enter your email address and send the message to your own via email.
Step 6. Check the messages on your Windows 10 PC and save the content to your PC.
Bonus Tip: How to Save WhatsApp data on PC
Other than the built-in messaging utility on your iPhone, some of you may also use the popular messaging app -В WhatsApp. If you also want to transfer WhatsApp chats to your computer, you can export your WhatsApp messages, either with or without media, via the feature provided by the app or use a third-party tool to back up your WhatsApp data to PC all at once. For more details, refer to the guide on how to back up WhatsApp from iPhone to PC.
The Bottom Line
It’s relatively easy to get text messages from your iPhone to Windows 10. If you want to sync iMessages from iPhone to PC, there is no safe way for you to do it other than send the texts using method 2. While if you’d like to copy multimedia messages, you can find some third-party software tool that supports the transfer of MMS to help.
о™љо™љо™љо™љо™љ
4.5 out of 5 stars, based on 10 votes
EaseUS MobiMover allows you to easily transfer all data from your iPhone to your PC. The app is available for both Windows and Macs so irrespective of which platform you use, you are covered.

EaseUs MobiMover solves this problem as it allows you to transfer data from an iPhone to a Mac, Mac to an iPhone, or from one iPhone to another iPhone fast.

EaseUS MobiMover is a program that allows you to share files between your iOS device and your PC in an easy manner. This is very useful, since both operative systems are not compatible.

EaseUS MobiMover for Mac and PC is a powerful tool for transferring data from your Apple mobile device to your computer, managing the variety of files that you create, and moving those huge videos quickly.

Related Articles — ALSO ON EaseUS SOFTWARE
Общаемся в iMessage в любом браузере на Windows, Linux и OS X


Очень интересный твик. Батарейку хавает наверно только. А так как альтернатива. Очень удачный продукт.
Сообщение отправлено из мобильного приложения iGuides
Помечайте подобные новости пометкой «JB»,а то приходит разочарование после просмотра:(
P.S Не пользуюсь JailBreak
Сообщение отправлено из мобильного приложения iGuides
Сообщение отправлено из мобильного приложения iGuides
Отлично работает
Видимо так и просматривают всю инфу спецслужбы ))))))
Сообщение отправлено из мобильного приложения iGuides
Ну да, это что бы еще легче стало следить за нашими переписками везде
Сообщение отправлено из мобильного приложения iGuides
С этим никто не спорит
Сообщение отправлено из мобильного приложения iGuides
Общаемся через Скайп с любого мобильного устройства или компьютера без джейлбрейка! Телефон и компьютер не должны быть подключены к одной сети (WAT. Что за бред??)
Сообщение отправлено из мобильного приложения iGuides
Это какой-то прикол?) iMessage на любом компьютере, ура, но без телефона не работает))) гг Дык это статьи некоторые лишь бы заполнить эфир. Скажи внятно, чем может помочь этот метод? А вместо скайпа придумай другой способ, их много: VK (армия поболее на 2 порядка, чем ios), ICQ, да и позвонить никто не отменял). Ну пожалуйста, ну ответь, в какой ситуации этот imessage в браузере поможет! Придумаешь ситуацию — я удивлюсь, честно.
Сообщение отправлено из мобильного приложения iGuides
Ты о чем вообще. ) Скайп кроссплатформенный, работает везде, к этому его плету. А это чудо всего-лишь удаленный доступ к аймэссэджу телефона, еще и через джейл! )) И без айфона рядом оно не будет пахать. Вот если скайп г..(почему у Новикова не заблокировали слово, авторам можно хамить?)))), то что это тогда )) Ололо, больше нет слов. Ото лишь бы ляпнуть, да? ))
Сообщение отправлено из мобильного приложения iGuides
Want iMessage on Your Windows PC? How-To
By Andrew Martin 17 comments Last updated March 20, 2020
With the fresh updates to iMessage, many iPhone and other iDevice users want access to iMessage on their personal or workplace computers, so chatting with friends and family continues on all types of devices–at home and work.
Many of us iFolks have Apple computers so keeping up with iMessage is really easy. But there are also quite a few of us who have Windows PCs, at home and especially at work. So how do we get iMessage talking on ALL our machines
Quick Tips 

- Install Chrome’s Remote Desktop Extension on your Mac and share iMessages with all computers via Chrome and the internet
- For Jailbroken iPhones, use Remote Messages App
Related Articles
What About a Browser-Based iMessage?
You’d think Apple would have an online browser-based service for iMessage, so checking in no matter where we are is easy. But alas, there currently is no service for getting iMessages online!
The conventional thought is that Apple wants to keep its services limited to its own iDevices and Mac computers. That leaves millions of us, maybe even billions of us in the dark, unable to access iMessage when we are at work or using our home Windows PC.
Following these relatively straightforward steps makes it easier than ever to stay in contact with the people that matter most across your iPhone, iPad, iPod touch, Mac, and even your own Windows PC.
So without further ado, here’s how we do it.
What You Need
First off, you will need at least one Mac (work, home, school, or otherwise) unless you want to jailbreak your phone.
A Quick Word for Mac Personal Computer Users
Back in 2012, Apple released iMessage as a stock application in Mountain Lion (10.8.) From that OS onwards, your Mac’s Messages app lets you pick up conversations on your computer right where you left off on your iPhone, iPad, and iPod touch. Messages for Mac is completely free and works with anyone who has iMessage activated on their iOS, OS X, and macOS devices.
To get iMessage on your Mac computer
First, verify that the application is on your machine. Look for “Messages” in Spotlight Search or via your Applications folder. In case you do not have Messages installed, verify that you are running OS Mountain Lion (10.8) or higher. If not, download the latest OS that your Mac computer allows.
Supposing your OS is up-to-date and you still do not have Messages, visit the Mac App Store and download the Messages application from there.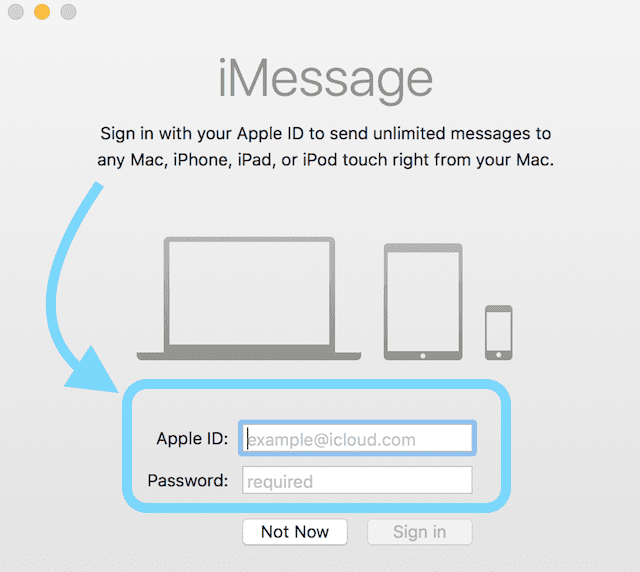
Once Messages is on your computer, open the application and sign in with your Apple ID and password. Messages only work with your Apple ID and password, so you must have an account to use iMessage on any device, including iPhones, iDevices, and computers.
If you do not have an Apple ID, check out this link to create yours. Remember that every Apple ID comes with 5 GB of iCloud storage at no charge.
After signing in with your Apple ID and password, Messages automatically downloads and syncs any previous conversations used with that Apple ID. So you pick up right where you left off and that new conversation syncs with all your iDevices and computers associated with that same Apple ID.
You can even send SMS texts with your Mac using the feature called Continuity!
Once Messages is set-up, you’re free to send text messages, voice messages, pictures and videos all through the internet.
What about multiple Apple IDs and iMessage
You cannot log into multiple accounts at once. You can use more than one Apple ID with Messages and iMessage. But you must switch between those Apple IDs and passwords manually every time you want to use a different Apple ID.
How to Access iMessage and Messages With Your Windows PC
iMessage Through Remote Access to Mac
One workaround for getting iMessage on your PC is to utilize Chrome’s great Remote Desktop feature. To get this going, you do need a Mac computer to set things up. What Chrome Remote Desktop provides is access to iMessages by connecting your Windows PC to your Mac computer remotely.
The major downside is that you are only able to access iMessages when the Mac computer is turned on (not asleep) and connected to the internet. And you need your Apple ID.
With Chrome Remote Desktop, all connections are fully secure. Access other computers or even allow another user to access your computer securely over the Internet. Everything is done via Chrome browser.
Using the Chrome Remote Desktop
#1: Set Up Chrome Remote Desktop
- Sign into Google in Chrome Browser (or create a new Google account)
- Download the Chrome Remote Desktop App from the Chrome App Store (MUST USE CHROME AS YOUR BROWSER!)
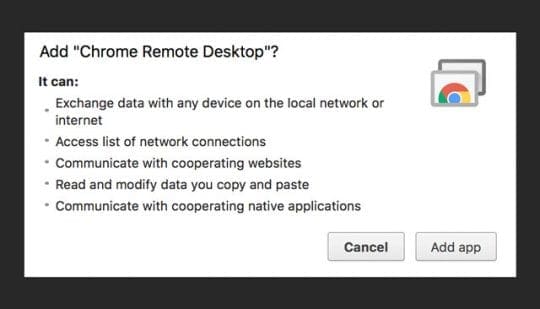
- Select Add App to Chrome
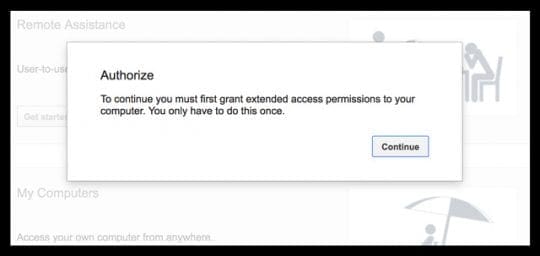
- If setting up for the first time, you may see a message requesting authorization. Click Continue if you see this message:
- If setting up for the first time, you may see a message requesting authorization. Click Continue if you see this message:
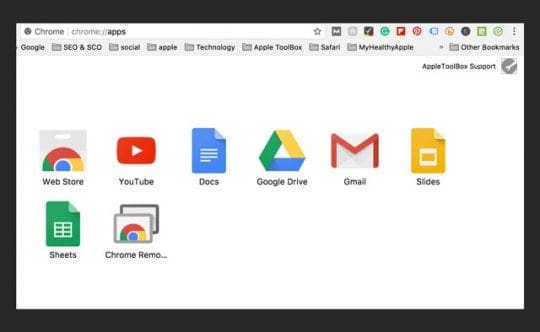
- The Chrome Remote Desktop App appears in your chrome://apps list
- Click on the App
- Click on the App
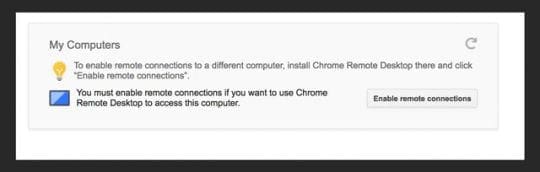
- In the pop-up, under My Computers tap Get Started
- Choose Enable remote connections
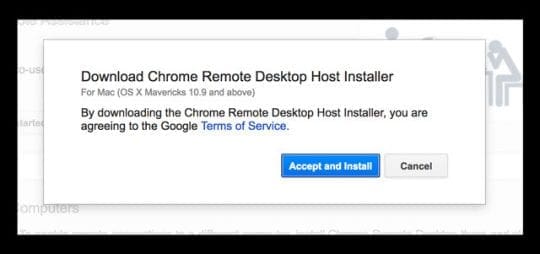
- Follow the on-screen instructions to download Chrome’s remote host installer
- Choose Enable remote connections
- In the Download Chrome Remote Desktop Host Installer, choose to Accept and Install
- Save the chromremotesektop file to your desktop, downloads folder, or preferred destination
- After the file downloads, open it
- Double-Click the Chrome Remote Desktop Host package
- Follow the instructions on-screen to install
- Enter your admin password when asked
- After successful installation, open the Chrome Remote Desktop App again
- Tap Enable remote connections
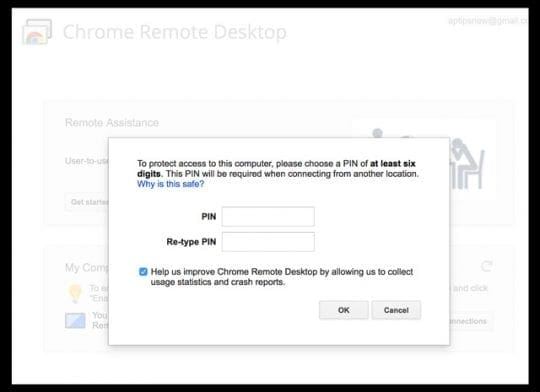
- Create a new PIN of at least 6 digits
- You’ll need this PIN to connect from another computer
- Choose something you’ll remember or write it down and keep it secure
- Enter your Mac’s admin password if asked
- If successful, a message appears letting you know remote connection are enabled
- When accessing your Mac remotely, make sure it’s ON, connected to the internet, and not set to sleep when idle to ensure access

#2: Use Chrome Remote Desktop on Another Computer
- To access your Mac on another computer, open Chrome and sign in using the same Google ID you used to set-up Chrome Remote Desktop
- Open the Chrome Remote Desktop App or type chrome://apps in the address bar to locate the app
- Look for your Mac under My Computers
- Double-Click to establish a connection
- If you see Get Started, click this first then double-click the remote computer’s name
- Type in your PIN and tap Connect
- You see your Mac’s Desktop once a connection establishes
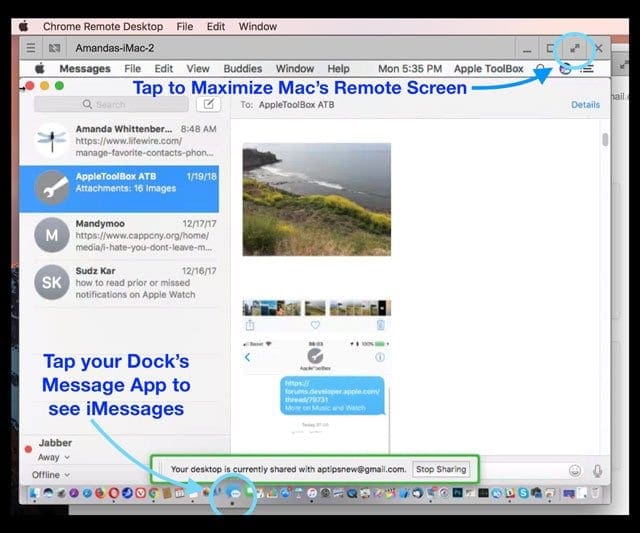
- Maximize your window to full-screen to better see your Mac’s Desktop
- To check your iMessages, tap the Message App in your Mac’s Dock (if available) or tap Launchpad to locate the Messages App
- Your iMessages should appear on screen in Chrome
- To end your connection to your Mac, tap the Stop Sharing button located at the bottom of your shared screen
- If you accidentally end a session, choose Reconnect (enter your PIN again)

Remove the Chrome Remote Desktop from your Mac
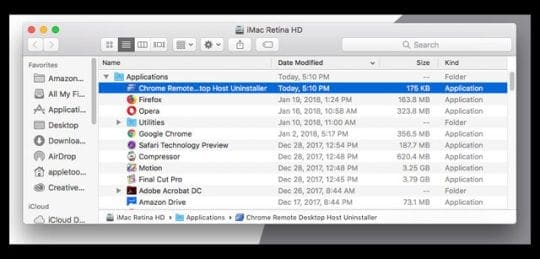
- First, uninstall the Chrome Remote Desktop Host app
- In your Mac’s Application folder, find the Chrome Remote Desktop Host Uninstaller app
- Launch the uninstaller and click Uninstall
- Enter your Mac’s admin password, if asked
- If successful, a message appears confirming uninstall
- In your Mac’s Application folder, find the Chrome Remote Desktop Host Uninstaller app
- Next, remove the Chrome Remote Desktop app from your Google account
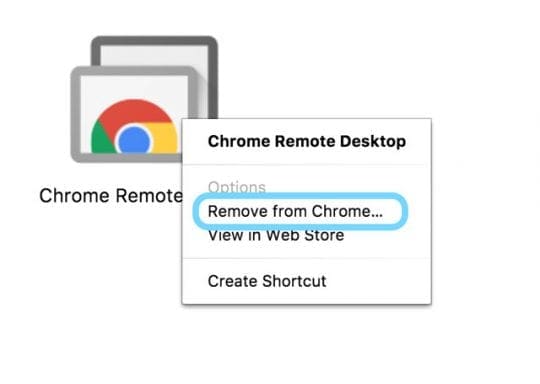
- On your Mac, open Chrome
- Locate your Chrome Remote Desktop app or type chrome://apps in the address bar
- Control-Click (or right-click) the app and choose Remove from Chrome
- At the dialog, click Remove

As a reminder, you need access to a Mac computer when implementing this method. And that Mac must be turned ON and connected to the internet Otherwise; this tip won’t work.
Chrome Remote Desktop is also fully cross-platform, providing remote assistance to Windows, Mac, and Linux users and access to your Windows (XP+) and Mac (OS X 10.6+) desktops at any time, all from the Chrome browser.
How to Access iMessage and Messages By Jailbreaking
What’s Jailbreaking?
Currently, the only other way to access iMessage on a browser is to jailbreak your iPhone. Jailbreaking is basically replacing the actual iOS with a new operating system that provides more flexibility.
You change the way your iDevice looks and feels and get to choose a ton of custom apps, tweaks, and add-ons that aren’t available in Apple’s official App Store.
Jailbreaking gives you the type of customization Android users are accustomed to. And among these many tweaks is the ability to use iMessages from anywhere on the internet. You even get your iPhone restored to factory settings afterward.
A Word of Caution
We do NOT recommend most users jailbreak their iPhones or other iDevices. Jailbreaking automatically voids your warranty and any additionally purchased AppleCare+.
You also run the risk of “bricking” your iDevice, encountering a lot of bugs, and a higher risk of security breaches and planted malware.
So jailbreaking your iPhone is really for iFolks who feel very comfortable working and troubleshooting their iPhones and other iDevices.
Going for it
For the brave of heart, ready to make the jailbreaking leap there are also a lot of pluses. Jailbroken iPhones have access to Cydia, an alternative to Apple’s App Store for “jailbroken” iDevices.
Cydia is not available in the app store. Instead, it’s installed on your iPhone using a “jailbreaking” tool, such as Pangu, TaiG, and others.
Jailbreaking allows you to customize your iPhone to your liking fully and even download apps that Apple currently prohibits. This jailbreaking includes things like customizing your lock screen, setting your own default apps, customizing control center, adding Touch ID or 3D Touch even for older devices, and creating shortcuts and other adjustments to the User Interface.
And of course, jailbreaking your iPhone or other iDevice gives you access to iMessage across all types of devices.
How to Jailbreak your iPhone or another iDevice
Before you even consider jailbreaking your iPhone, make sure you perform backups of your current iDevice preferably in at least 2 locations (cloud-based and local). Check out our article on backing up following our 2X2 rule.
Once you have your backups, the best practice is to restore your iDevice using iTunes. Having your iDevice clean yields to better results with the jailbreak.
The next step is downloading the jailbreak software onto your computer, Windows or Mac. Run the software and follow the steps to move through the jailbreak process.
Once the jailbreak OS is installed, look for an icon called Cydia. If it’s not there, download it. Cydia is basically your jailbroken app store.
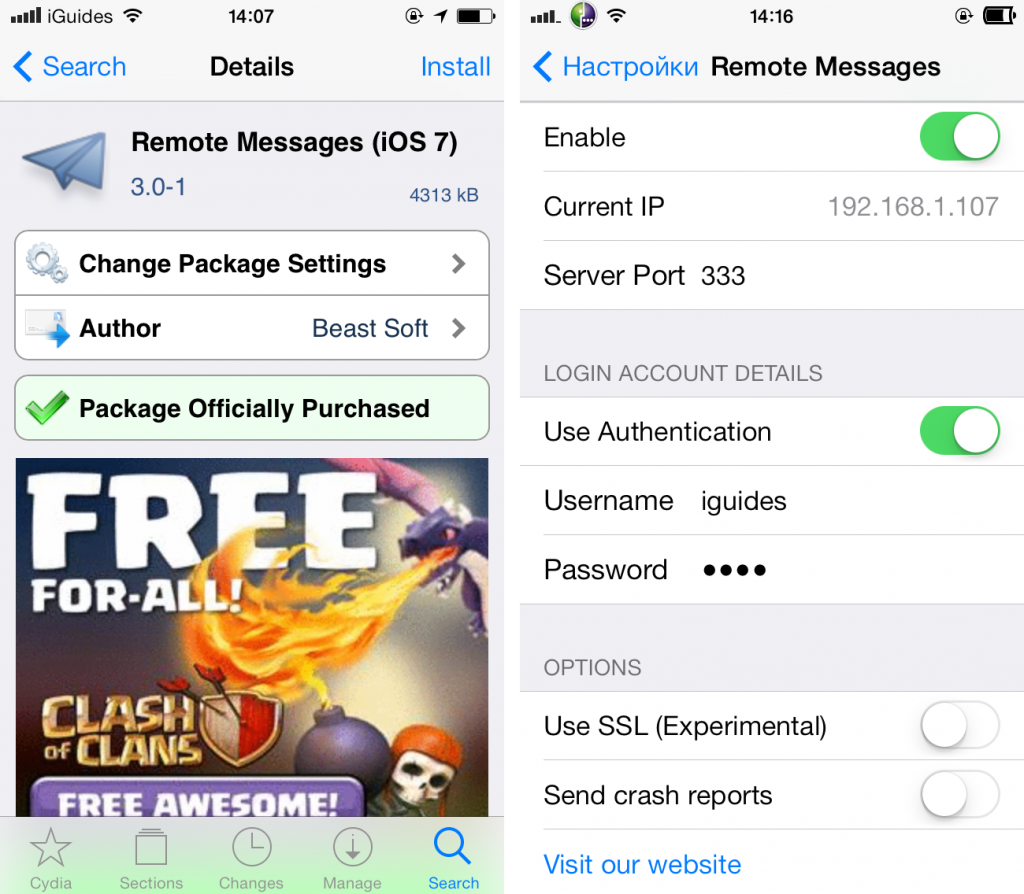
Next, you need to purchase an App called Remote Messages. With this app, iMessages is available to you online for all types of devices and computers, including Windows.
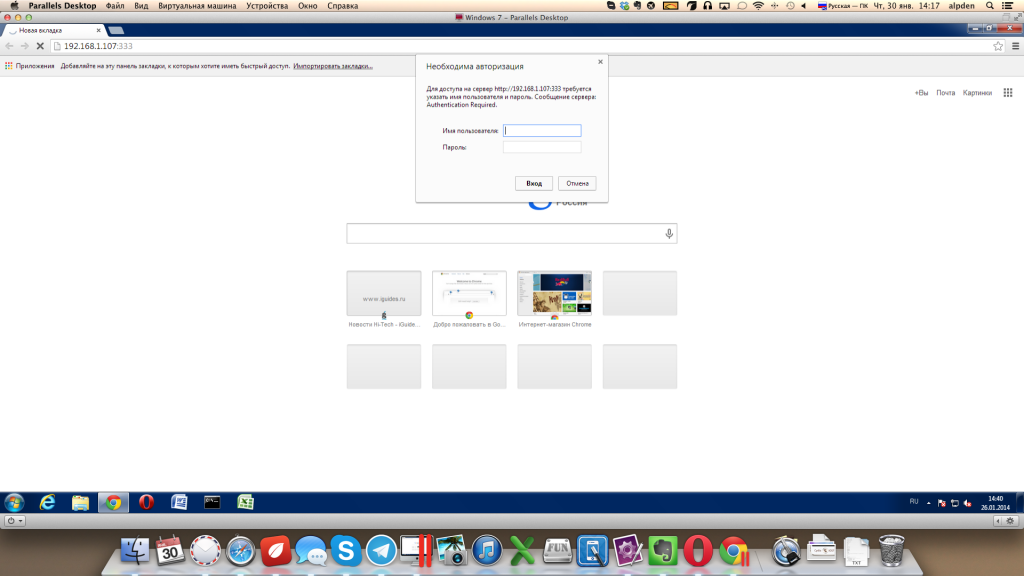
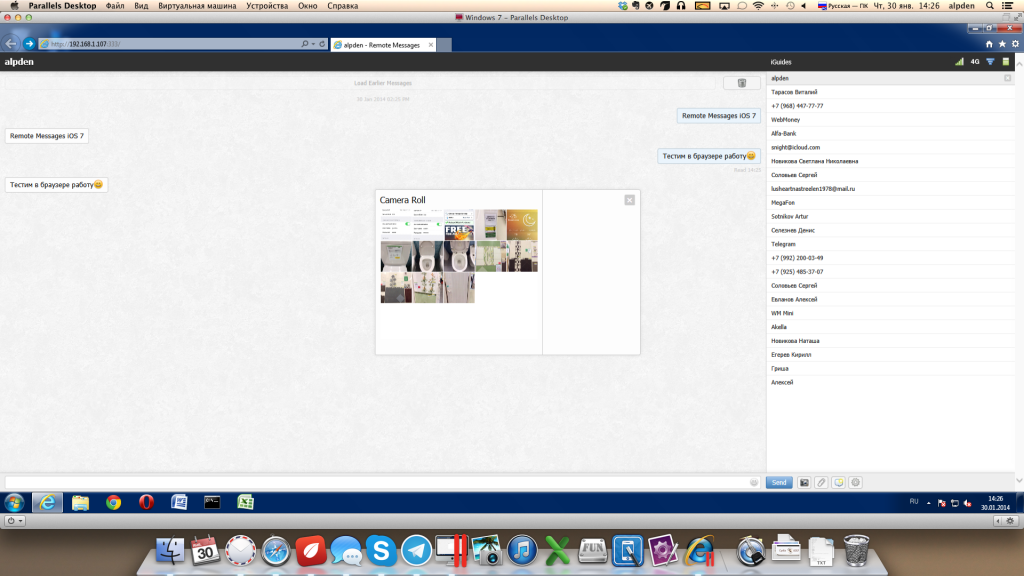
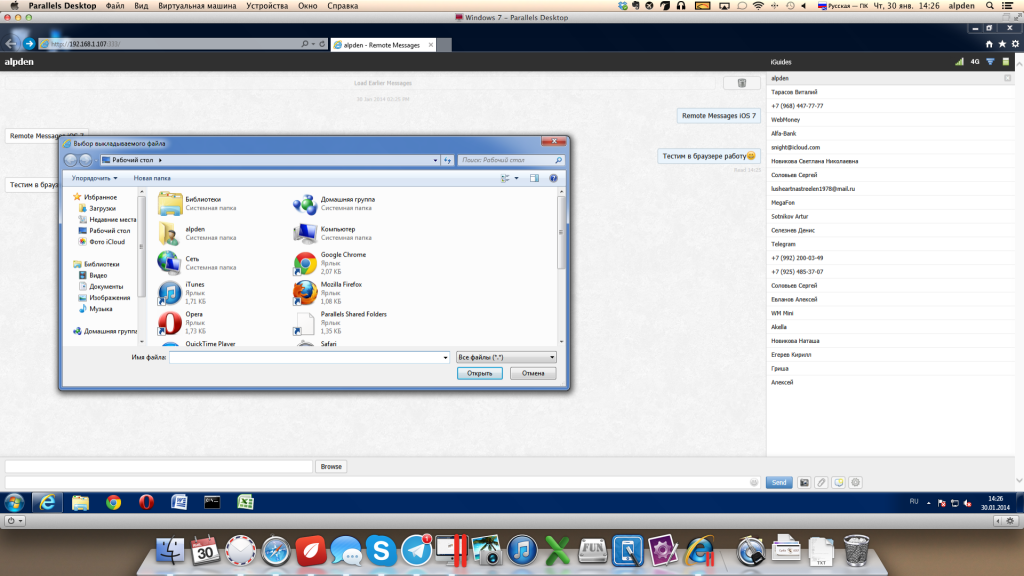
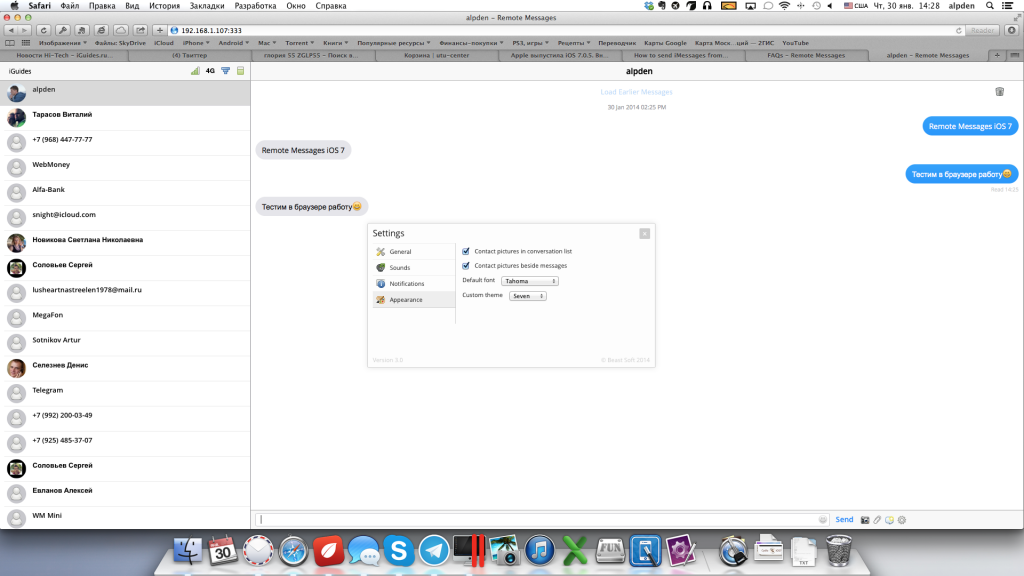
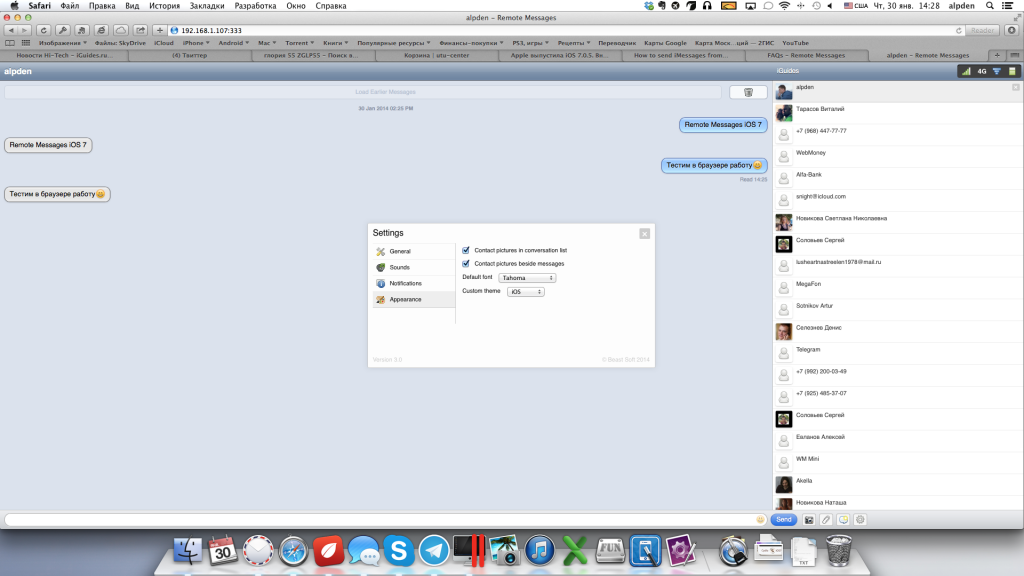
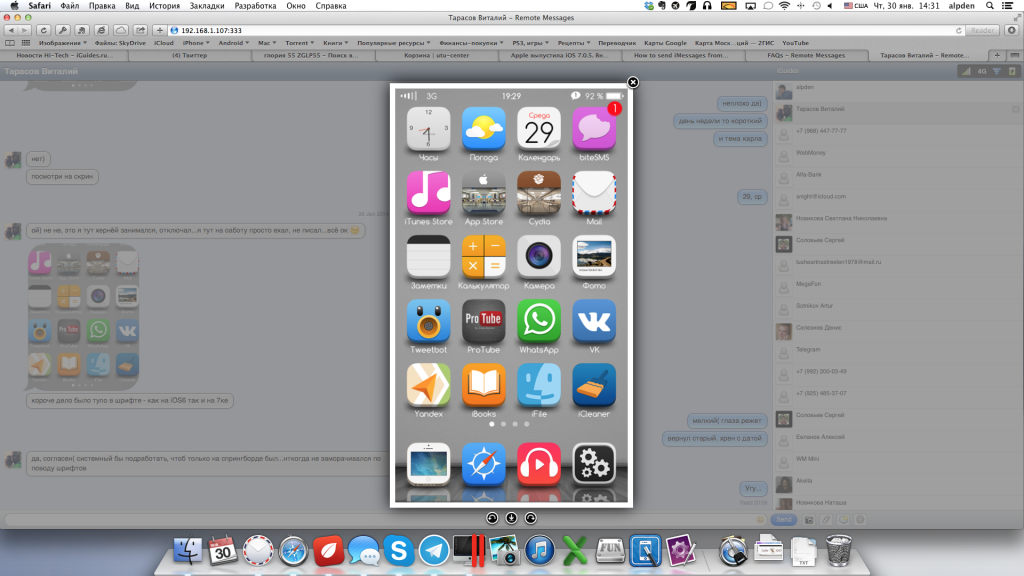
All you need to do is provide authentication credentials and then use your iPhone’s IP address on the browser followed by 333. You are required to log in to have full access to iMessages.
iMessage for Android Users
We were hoping that iOS 11 included a release of iMessage for Android users. But alas, no! So for those folks using Android phones, there are some options for you, including apps like iMessage Android and others available from the Google Play Store.
Using these apps allows you to iMessage between iPhones, other iDevices, Mac computers, and your Android phones. This means you send texts to iDevice users all from your Android phone–a genuinely cross-device chat experience.
Summary
We hope that someday soon, Apple releases a cross-platform version of iMessage for all types of devices and operating systems. An online messaging service is ideal so that we can access our iMessages and conversations anytime, from anywhere including work.
Unfortunately, that day is not here yet, so we have to use workarounds like Chrome Remote Desktop.
However, there are a ton of non-Apple message apps that cross all platforms already and include support for PCs. Whatsapp, Viber, Kik, Facebook Messenger, Telegram, and even Skype are some of the most popular iMessage alternatives.
Facebook Messenger and Telegram are particularly robust, pretty much working on anything via a web browser. We love that! Let us know in the comments if you have a favorite messaging app that works across all your devices and PCs–we love to hear from all of you.
Happy iMessaging and messaging (if using iMessage alternatives)!


