Summary
The IPIP tunneling implementation on the MikroTik RouterOS is RFC 2003 compliant. IPIP tunnel is a simple protocol that encapsulates IP packets in IP to make a tunnel between two routers. The IPIP tunnel interface appears as an interface under the interface list. Many routers, including Cisco and Linux, support this protocol. This protocol makes multiple network schemes possible.
IP tunnelling protocol adds the following possibilities to a network setups:
- to tunnel Intranets over the Internet
- to use it instead of source routing
Properties
| Property | Description |
|---|---|
| clamp-tcp-mss (yes | no; Default: yes) | Controls whether to change MSS size for received TCP SYN packets. When enabled, a router will change the MSS size for received TCP SYN packets if the current MSS size exceeds the tunnel interface MTU (taking into account the TCP/IP overhead).The received encapsulated packet will still contain the original MSS, and only after decapsulation the MSS is changed. |
| dont-fragment (inherit | no; Default: no) | |
| dscp (inherit | integer 47; Default: ) | Set dscp value in IPIP header to a fixed value or inherit from dscp value taken from tunnelled traffic |
| ipsec-secret (string; Default: ) | When secret is specified, router adds dynamic ipsec peer to remote-address with pre-shared key and policy with default values (by default phase2 uses sha1/aes128cbc). |
| local-address (IP; Default: ) | IP address on a router that will be used by IPIP tunnel |
| mtu (integer; Default: 1500) | Layer3 Maximum transmission unit |
| keepalive (integer[/time],integer 0..4294967295; Default: 10s,10) | Tunnel keepalive parameter sets the time interval in which the tunnel running flag will remain even if the remote end of tunnel goes down. If configured time,retries fail, interface running flag is removed. Parameters are written in following format: KeepaliveInterval,KeepaliveRetries where KeepaliveInterval is time interval and KeepaliveRetries — number of retry attempts. By default keepalive is set to 10 seconds and 10 retries. |
| name (string; Default: ) | Interface name |
| remote-address (IP; Default: ) | IP address of remote end of IPIP tunnel |
There is no authentication or ‘state’ for this interface. The bandwidth usage of the interface may be monitored with the monitor feature from the interface menu.
Example
Suppose we want to add an IPIP tunnel between routers R1 and R2:
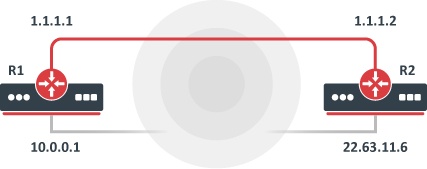
At first, we need to configure IPIP interfaces and then add IP addresses to them.
The configuration for router R1 is as follows:
The configuration of the R2 is shown below:
Источник
Manual:Interface/IPIP

Applies to RouterOS: 2.9, v3, v4+
Contents
Summary
Sub-menu: /interface ipip
Standards: IPIP RFC 2003
The IPIP tunneling implementation on the MikroTik RouterOS is RFC 2003 compliant. IPIP tunnel is a simple protocol that encapsulates IP packets in IP to make a tunnel between two routers. The IPIP tunnel interface appears as an interface under the interface list. Many routers, including Cisco and Linux, support this protocol. This protocol makes multiple network schemes possible.
IP tunnelling protocol adds the following possibilities to a network setups:
- to tunnel Intranets over the Internet
- to use it instead of source routing
Properties
| Property | Description |
|---|---|
| clamp-tcp-mss (yes | no; Default: yes) | Controls whether to change MSS size for received TCP SYN packets. When enabled, a router will change the MSS size for received TCP SYN packets if the current MSS size exceeds the tunnel interface MTU (taking into account the TCP/IP overhead).The received encapsulated packet will still contain the original MSS, and only after decapsulation the MSS is changed. |
| dont-fragment (inherit | no; Default: no) | |
| dscp (inherit | integer 13; Default: ) | Set dscp value in IPIP header to a fixed value or inherit from dscp value taken from tunnelled traffic |
| ipsec-secret (string; Default: ) | When secret is specified, router adds dynamic ipsec peer to remote-address with pre-shared key and policy with default values (by default phase2 uses sha1/aes128cbc). |
| local-address (IP; Default: ) | IP address on a router that will be used by IPIP tunnel |
| mtu (integer; Default: 1500) | Layer3 Maximum transmission unit |
| keepalive (integer[/time],integer 0..4294967295; Default: 10s,10) | Tunnel keepalive parameter sets the time interval in which the tunnel running flag will remain even if the remote end of tunnel goes down. If configured time,retries fail, interface running flag is removed. Parameters are written in following format: KeepaliveInterval,KeepaliveRetries where KeepaliveInterval is time interval and KeepaliveRetries — number of retry attempts. By default keepalive is set to 10 seconds and 10 retries. |
| name (string; Default: ) | Interface name |
| remote-address (IP; Default: ) | IP address of remote end of IPIP tunnel |
Note: There is no authentication or ‘state’ for this interface. The bandwidth usage of the interface may be monitored with the monitor feature from the interface menu.
Sub-menu: /interface ipipv6
IP/IPv6 over IPv6 tunnel functionality is added in v5RC6 and is configurable from menu: /interface ipipv6 IPv6 version uses the same properties as IPv4 version.
Setup examples
Suppose we want to add an IPIP tunnel between routers R1 and R2:
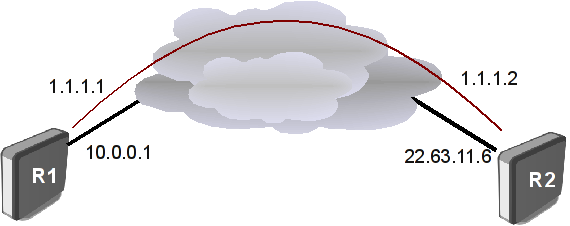
At first, we need to configure IPIP interfaces and then add IP addresses to them.
The configuration for router R1 is as follows:
The configuration of the R2 is shown below:
Источник
IPIP IPsec VPN туннель между Linux машиной и Mikrotik за NAT провайдера
upd: Отличный разбор про устройство современного стэка IPsec протоколов ESPv3 и IKEv2 опубликовал stargrave2. Рекомендую почитать.
Linux: Ubuntu 18.04.4 LTS (GNU/Linux 4.15.0-91-generic x86_64)
- Eth0 1.1.1.1/32 внешний IP
- ipip-ipsec0 192.168.0.1/30 будет наш туннель
Mikrotik: CCR 1009, RouterOS 6.46.5
- Eth0 10.0.0.2/30 внутренний IP от провайдера. Внешний IP NAT провайдера динамический.
- ipip-ipsec0 192.168.0.2/30 будет наш туннель
IPsec туннель на Linux машине будем поднимать с помощью racoon. Не буду описывать подробности, есть хорошая статья у vvpoloskin.
Устанавливаем необходимые пакеты:
Настраиваем racoon, он условно будет выступать в роли ipsec сервера. Так как mikrotik в main режиме не может передавать дополнительный идентификатор клиента, а внешний ip адрес через который он коннектится к Linux динамический, использовать preshared key (авторизацию по паролю) не получится, так как пароль должен сопоставляться либо с ip адресом подключающегося хоста, либо с идентификатором.
Будем использовать авторизацию по RSA ключам.
Демон racoon использует ключи в формате RSA, а mikrotik — в формате PEM. Если генерировать ключи утилитой plainrsa-gen идущей вместе с racoon, то конвертировать публичный ключ для Mikrotika в формат PEM с ее помощью не получится — она конвертирует только в одну сторону: PEM в RSA. Сгенерированный plainrsa-gen ключ не смогли прочитать ни openssl, ни ssh-keygen, поэтому с их помощью также не получится выполнить конвертацию.
Мы сгенерируем PEM ключ с помощью openssl, а затем конвертируем его для racoon с помощью plainrsa-gen:
Полученные ключи положим в папку: /etc/racoon/certs/server. Не забываем установить владельцем пользователя, от чьего имени запускается демон racoon (обычно root), права 600.
Настройку mikrotik опишу при подключении через WinBox.
Ключ server-name.pub.pem загрузим в mikrotik: Меню «Files» — «Upload».
Открываем раздел «IP» — «IP sec» — вкладка «Keys». Теперь генерируем ключи — кнопка «Generate Key», затем экспортируем публичный ключ mikrotika «Expor Pub. Key», скачать его можно из раздела «Files», правой кнопкой по файлу — «Download».
Импортируем публичный ключ racoon, «Import», в выпадающем списке поля «File name» ищем загруженный ранее нами server-name.pub.pem.
Публичный ключ mikrotik нужно сконвертировать
и положить в папку /etc/racoon/certs не забыв про владельца и права.
Возвращаемся в раздел «IP» — «IPsec»
| Вкладка «Profiles» Параметр | Значение |
|---|---|
| Name | На ваше усмотрение (по умолчанию default) |
| Hash Algorithm | sha512 |
| Encryption Algorithm | aes-128 |
| DH-Group | modp2048 |
| Proposhal_check | claim |
| Lifetime | 1d 00:00:00 |
| NAT Traversal | true (ставим галочку) |
| DPD | 120 |
| DPD Maximum failure | 5 |
| Вкладка «Peers» Параметр | Значение |
|---|---|
| Name | На ваше усмотрение (далее MyPeer) |
| Address | 1.1.1.1 (IP linux машины) |
| Local Address | 10.0.0.2 (IP WAN интерфейса mikrotik) |
| Profile | default |
| Exchange Mode | main |
| Passive | false |
| Send INITIAL_CONTACT | true |
| Вкладка «Proposal» Параметр | Значение |
|---|---|
| Name | На ваше усмотрение (далее MyPeerProposal) |
| Auth. Algorithms | sha512 |
| Encr. Algorithms | aes-128-cbc |
| Lifetime | 08:00:00 |
| PFS Group | modp2048 |
| Вкладка «Identities» Параметр | Значение |
|---|---|
| Peer | MyPeer |
| Atuh. Method | rsa key |
| Key | mikrotik.privet.key |
| Remote Key | server-name.pub.pem |
| Policy Tamplate Group | default |
| Notrack Chain | пусто |
| My ID Type | auto |
| Remote ID Type | auto |
| Match By | remote id |
| Mode Configuration | пусто |
| Generate Policy | no |
| Вкладка «Policies — General» Параметр | Значение |
|---|---|
| Peer | MyPeer |
| Tunnel | true |
| Src. Address | 192.168.0.0/30 |
| Dest. Address | 192.168.0.0/30 |
| Protocol | 255 (all) |
| Template | false |
| Вкладка «Policies — Action» Параметр | Значение |
|---|---|
| Action | encrypt |
| Level | requier |
| IPsec Protocols | esp |
| Proposal | MyPeerProposal |
Скорее всего у вас, как и у меня, на WAN интерфейсе настроен snat/masquerade, это правило надо скорректировать, чтобы исходящие пакеты ipsec уходили в наш туннель:
Переходим в раздел «IP» — «Firewall».
Вкладка «NAT», открываем наше правило snat/masquerade.
| Вкладка «Advanced» Параметр | Значение |
|---|---|
| IPsec Policy | out: none |
Рестартуем демона racoon
Если при рестарте racoon не запускается, значит в конфиге имеется ошибка, в syslog racoon выводит информацию о номере строки, в которой обнаружена ошибка.
Демон racoon при загрузке ОС стартует раньше поднятия сетевых интерфейсов, а мы указали в секции listen опцию strict_address, необходимо добавить в файл systemd юнита racoon
/lib/systemd/system/racoon.service, в секцию [Unit], строку After=network.target.
Сейчас наши ipsec туннели должны подняться, смотрим вывод:
Если туннели не поднялись, смотрите syslog, либо journalctl -u racoon.
Теперь необходимо настроить L3 интерфейсы, чтобы можно было маршрутизировать трафик. Есть разные варианты, мы будем использовать IPIP, так как его mikrotik поддерживает, я бы использовал vti, но, к сожалению, в mikrotik его до сих пор не реализовали. От IPIP он отличается тем, что дополнительно может инкапсулировать multicast и ставить метки (fwmark) на пакеты, по которым можно их фильтровать в iptables и iproute2 (policy-based routing). Если нужна максимальная функциональность — тогда, например, GRE. Но не стоит забывать, что за дополнительную функциональность платим большим оверхедом.
Перевод неплохого обзора туннельных интерфейсов можно посмотреть тут.
На Linux:
Теперь можно добавить маршруты для сетей за mikrotik
Чтобы наш интерфейс и маршруты поднимались после перезагрузки, нужно описать интерфейс в /etc/network/interfaces и там же в post-up добавлять маршруты, либо прописать все в одном файле, например, /etc/ipip-ipsec0.conf и дергать его через post-up, не забудьте про владельца файла, права и сделать его исполняемым.
На Mikrotik:
Раздел «Interfaces», добавляем новый интерфейс «IP tunnel»:
| Вкаладка «IP tunnel» — «General» Параметр | Значение |
|---|---|
| Name | На ваше усмотрение (далее IPIP-IPsec0) |
| MTU | 1480 (если не указывать, то mikrotik начинает резать mtu до 68) |
| Local Address | 192.168.0.2 |
| Remote Address | 192.168.0.1 |
| Ipsec Secret | Деактивируем поле (иначе будет создан новый Peer) |
| Keepalive | Деактивируем поле (иначе интерфейс будет постоянно выключаться, так как у mikrotika какой-то свой формат этих пакетов и с linux не работает) |
| DSCP | inherit |
| Dont Fragment | no |
| Clamp TCP MSS | true |
| Allow Fast Path | true |
Раздел «IP» — «Addresses», добавляем адрес:
| Параметр | Значение |
|---|---|
| Address | 192.168.0.2/30 |
| Interface | IPIP-IPsec0 |
Теперь можно добавлять маршруты в сети за linux машиной, при добавлении маршрута, gateway будет наш интерфейс IPIP-IPsec0.
PS
Так как наш сервер linux является транзитным, то на нем имеет смысл задать параметр Clamp TCP MSS для ipip интерфейсов:
создаем файл /etc/iptables.conf со следующим содержимым:
и в /etc/network/interfaces
post-up iptables-restore
Источник


