- linux-notes.org
- Настройка Iptables в Unix/Linux
- Настройка IPTables
- Конфигурация Iptables для веб-сервера
- Добавить iptables в автозагурзку ОС
- Сохранить правила.
- Старт\Спот\Рестарт службы
- Добавить комментарий Отменить ответ
- Setup and Configure Basic iptables on CentOS 7 Linux system
- What is Iptables?
- Step 1: Installing the required Linux packages
- Step 2: Iptables Administrative Commands
- Step 3: A Look at the default applied iptables rules
- Step 4: Changing the default policy, and securing your Linux Box
- Summary
- Настройка Linux-файрвола с помощью iptables в CentOS / RHEL 7
- Отключение firewalld в CentOS 7
- Синтаксис и правила iptables в CentOS/Red Hat
- Создание правил фильтрации трафика в iptables
- Фильтр iptables по интерфейсу
- Фильтр iptables по порту, протоколу или IP адресу
- Фильтр iptables по состоянию соединения
- Задание политики iptables по умолчанию
- Включить логи iptables
- Сохранение и восстановление правил фильтрации iptables
linux-notes.org

Настройка Iptables в Unix/Linux
У меня есть установленный веб-сервер Apache на CentOS. Как настроить брандмауэр, используя IPTables, разрешить или запретить доступ к веб-серверу под CentOS? В уроке я покажу вам, как я это делаю.
Что такое Iptables?
Iptables является приложением, что позволяет системному администратору настраивать таблицы в
брандмауэре ядра Linux (реализовано в виде различных Netfilter модулей) и цепей и правил. Различные модули и программы ядра в настоящее время используются для различных протоколов; Iptables относится к IPv4, ip6tables на IPv6, arptables к ARP и Ebtables для Ethernet.
Настройка IPTables
В большинстве дистрибутивов Linux, включая RedHat / CentOS Linux уже сразу с IPTables по умолчанию. Вы можете использовать следующую процедуру для проверки того, что Iptables был уже установлен. Откройте терминал и введите следующую команду:
Вы можете использовать следующую команду, чтобы просмотреть состояние команды Iptables, для этого выполните:
Если команда что выше не появляется, то введите следующую команду, чтобы установить ИПтейблес
Конфигурация Iptables для веб-сервера
Конфигурация Iptables по умолчанию на CentOS не разрешает доступ к HTTP (TCP порт 80) и HTTPS (TCP ПОРТ 443 )которые использует веб-сервер (например Apache).
Шаг 1: Flush или удалите все IPTABLES правила
Шаг 2: Установите правила по дефолту
Шаг 3: Разрешить доступ к HTTP для 80 порта и HTTPS для 443 порта
Добавить iptables в автозагурзку ОС
Введите следующие две команды, чтобы включить брандмауэр:
Сохранить правила.
Старт\Спот\Рестарт службы
Анти synflood с Iptables
Нужно отредактировать /etc/sysctl.conf, чтобы защититься от некоторых видов атак и добавить или обновить можно добавив эти строки в файл:
И введите следующие команды
ВСЕ! Тема «Как настроить Iptables в CentOS» завершена, надеюсь что все понятно изложено.
Добавить комментарий Отменить ответ
Этот сайт использует Akismet для борьбы со спамом. Узнайте, как обрабатываются ваши данные комментариев.
Источник
Setup and Configure Basic iptables on CentOS 7 Linux system
Posted by: Mohammed Semari | Published: July 3, 2016| Updated: July 8, 2016

In this article we will setup and configure Basic iptables on Linux systems (RPM Family “Redhat 7/CentOS 7/Scientific Linux 7”). This is the first step every experienced sysadmin must do Just after finishing installing the Linux OS “any member in any Family of Linux systems”. I’ll go and configure the iptables rules on RPM Linux Family releases 7 “CentOS 7”.
In RPM Linux Family release 7 iptables firewall is not the default firewall, instead of it Redhad/CentOS is using Firewalld as the default firewall in any installation type “Minimal installation, Server installation, Server with GUI installation, etc..”. This require us to install additional package and disable the exiting firewalld on Redhat 7 / CentOS 7 / Scientific Linux 7 Linux systems.
We will learn how to configure iptables for basic usage. Set the default chain policy for INPUT, OUTPUT, and FORWARD chains. We will learn how to start, stop, flush and restart the service, how to secure CentOS 7 after the installation process, and how to save our rules for loading it at Boot time “make a persistent rule”.
What is Iptables?
Iptables is an administration tool for IPv4 packet filtering and NAT. It’s a simple, a fast, and a powerful firewall installed on most Linux distributions. It’s a tool to secure, filter out, and block Internet traffic from accessing your Linux OS.
Iptables is used to set up, maintain, and inspect the tables of IPv4 packet filter rules in the Linux kernel. Several different tables may be defined. Each table contains a number of built-in chains and may also contain user-defined chains.
We will focus on the use of the default table “filter table”. All our rules in this article will be in this table. It contains the built-in chains INPUT, FORWARD, and OUTPUT. Here’s their definitions:
INPUT: Packets is going to be locally delivered “accepted by Linux OS”.
FORWARD: Packets being routed through the box “send to another interface”. Usually used when you setup Linux as router.
OUTPUT: Packets sent from the machine itself will be visiting this chain.
A firewall rule specifies criteria for a packet and a target. If the packet does not match one rule, the next rule in the chain will be examined; if it does match,then the packet’s target will be checked to determine what action will be taken to that packet. I’ll use three targets ACCEPT, DROP, and REJECT. Here’s their definitions:
ACCEPT means to let the packet through.
DROP means to drop the packet on the floor, and do not send any response.
REJECT means to drop the packet on the floor, and send a message as a response.
Step 1: Installing the required Linux packages
Iptables is not the default firewall in RPM Linux family release 7, so we need to disable the existing firewalld “if exists”. Run the following command to check the status of firewalld service:
From the above check we notice that firewalld is installed, and enabled by default, now run the following commands to stop, and disable firewalld service:
Now, we need to install, enable, and start iptables services on CentOS 7. Run the following commands:
At this point, we successfully installed, enabled, and started iptables on RPM Linux family release 7 “CentOS 7”, let’s proceed with some administrative commands.
Step 2: Iptables Administrative Commands
In this section, we will learn how to manage iptables service. Iptables service is managed via systemd system and service manager. So, we will use the systemctl command “which control the systemd system and service manager” to manage iptables with the following options (start|stop|reload|restart|condrestart|status), and will use the service command “which run a System V init script” to manage iptables with those two options (panic|save). Later we will use the command iptables “found in this location /usr/sbin/iptables ” to configure the iptables rules.
Option start is used to start the iptables service. This will apply all rules in /etc/sysconfig/iptables. To start the iptables service, run the following command:
Option stop is used to stop iptables service. This will remove all applied firewall rules, and will set the default policy for INPUT, FORWARD, and OUTPUT chains to ACCEPT. Your machine will be accessible on all running ports. To stop the iptables service, run the following command:
Option reload will reload the currently persistent iptables rules found in /etc/sysconfig/iptables. To reload the iptables service, run the following: command:
Option restart will restart iptables if it already running or will start iptables if it’s not running. To restart the iptables service, run the following:
Option condrestart will restart iptables service if and only if the service is already running. To condrestart the iptables service, run the following:
Option status will return the status of the service, does it enabled, running, and since when does the service UP. To show the status of the iptables service, run the following:
Option panic will set all chains to DROP policy. This is useful in cases when your machine is under attack. This will DROP every incoming packets “established, and new”, every forwarded, and ever outgoing packets of course it will DROP your SSH connection. To panic the iptables service, run the following:
Option save will save currently applied (including manually applied rules through cli) iptables rules to /etc/sysconfig/iptables configuration file, making it persistent. To save your currently applied iptables rules, run the following:
At this point you can deal with iptables service as you wish “start, stop, reload, etc..”. But there is some practical Hints you must be aware with when dealing with some of the above options.
Step 3: A Look at the default applied iptables rules
Now, after we introduced how to manage the iptables service, it’s time to secure your CentOS 7 box. Let’s take a look at the default applied rules found in /etc/sysconfig/iptables.
From the above output, we see that the existing rules applied for filter table, and the default policy is ACCEPT for the three chains INPUT, FORWARD, and OUTPUT. You may have this question in your mind Because the default policy is ACCEPT for all chains, so any new connection to my box is allowed?. The answer is ” NO “. Only SSH, and ICMP connections are allowed by default, take a look again to the above file, you will notice existence of the last INPUT rule ” -A INPUT -j REJECT –reject-with icmp-host-prohibited ” this rule will reject all connections not allowed in any rule above it with one message “connect to address : No route to host”.
Let’s show an example, I’ll telnet from my laptop to port 25 “smtp” on my server. I didn’t open this port in any rule, and according to my explanation this connection will be rejected. run the following command:
The connection is rejected with “connect to address : No route to host” message. If we changed the last INPUT rule to be “-A INPUT -j DROP “, and restarted the iptables service, then we run the telnet command again, we will not receive any message from the server, and the telnet will be always in trying state as follow:
Step 4: Changing the default policy, and securing your Linux Box
Now. it’s time for securing your box, but because most of sysadmins are connecting remotely to their servers, I STRONGLY RECOMMEND TO ADD A CRON JOB TO STOP THE IPTABLES SERVICE EVERY 10 MINUTES WHILE YOU ARE WORKING. This to avoid loosing the connections to your server if you put a wrong iptables rule “only you will wait 10 minutes to gain access again”, run the following command to add the cronjob rule:
And then add this cronjob and save the file:
Now, we safely start securing our CentOS 7 box, first of all we can either use iptables command to modify the iptables rules, all added rules will be gone when the system boots “because the added rules are non-persistent”, and this will require us to run “service iptables save” when we finish to make the added rules persistent OR Go directly and edit “/etc/sysconfig/iptables” file, this will require us to run “systemctl restart iptables” to apply the added/modified iptables rules. Personally I prefer modifying the iptables file. So, let’s modify it to be like this one
Here’s what I did in the above file. First I changed the default INPUT, and FORWARD chain policy to DROP. This will drop any INPUT, and FROWARD packets that do not have any iptables rule allowing it. When any new packet is delivered to the INPUT or FORWARD chain, it will be checked against the existing iptables rules, if no match found the packet will be dropped “because of the default policy”. We only allow three iptables rules for incoming packets. We allow all established, and related packets exist before applying the new rules. Also, We allow packets generated from the local interface. Finally, We allow external packets for port 22 “packets for SSH service to be able to remotely manage the box”.
Any other packets not defined in the existing three rules, will be dropped. And this is the Basic iptables configuration for securing your Linux box.
Now, let’s apply those iptables rules, as we edited “/etc/sysconfig/iptables” file, we need to reload/restart the iptables service. Run the following command:
Finally, If everything is well “you did not lose the SSH connection to your server”, we need to remove the cronjob, we created previously. Run the following command to remove the cronjob rule:
And then remove/comment out this cronjob you created previously, save the file, and exit. Also make sure that iptables service is running after removing the cronjob, run the following command again:
Summary
In this article we have explained the meaning of iptables, also we have showed the default table “filter” and it’s three chains “INPUT, FORWARD, and OUTPUT” and their default installation policies “ACCEPT”. We showed you how to control the iptables service “i.e start, stop, restart, etc…” using a mix of systemctl, and service commands. We did our changes to secure our Linux box by direct modify “/etc/sysconfig/iptables” file. we mentioned one tip to use to avoid losing connections to your server if something wrong happened.
I hope this article is good enough for you.
See you in other articles.
Источник
Настройка Linux-файрвола с помощью iptables в CentOS / RHEL 7
В этой статье мы покажем, как управлять файерволом Linux с помощью классическгого iptables вместо firewalld в CentOS / RHEL 7 для фильтрации входящего и исходящего трафика. В этой статье рассмотрена настройка iptables на CentOS 7 для фильтрации входящего трафика, на примере развернутого с нуля облачного виртуального сервера myserver01, доступного из Интернета.
Отключение firewalld в CentOS 7
В CentOS 7 для управления файрволом по умолчанию используется системная служба firewalld. Она предоставляет свой интерфейс, но в итоге также работает через утилиту iptables. При этом управление файроволом должно осуществляться либо через firewalld, либо напрямую через iptables.
firewalld не замена, а обертка вокруг iptables, пользоваться из этого можно тем, что больше нравится, или больше подходит в конкретных условиях. iptables более универсален, это базовый инструмент, но он немного сложнее в освоении. firewalld предоставляет более простой интерфейс, но, например, в CentOS 6 воспользоваться им не получится, да и для других дистрибутивов необходимо наличие нужных установочных пакетов. К тому же, если вы используете приложения, которые производят свои настройки в файрволе, они должны быть совместимы с firewalld (пример таких приложений docker, fail2ban).
Проверим статус firewalld и отключим его.
systemctl status firewalld
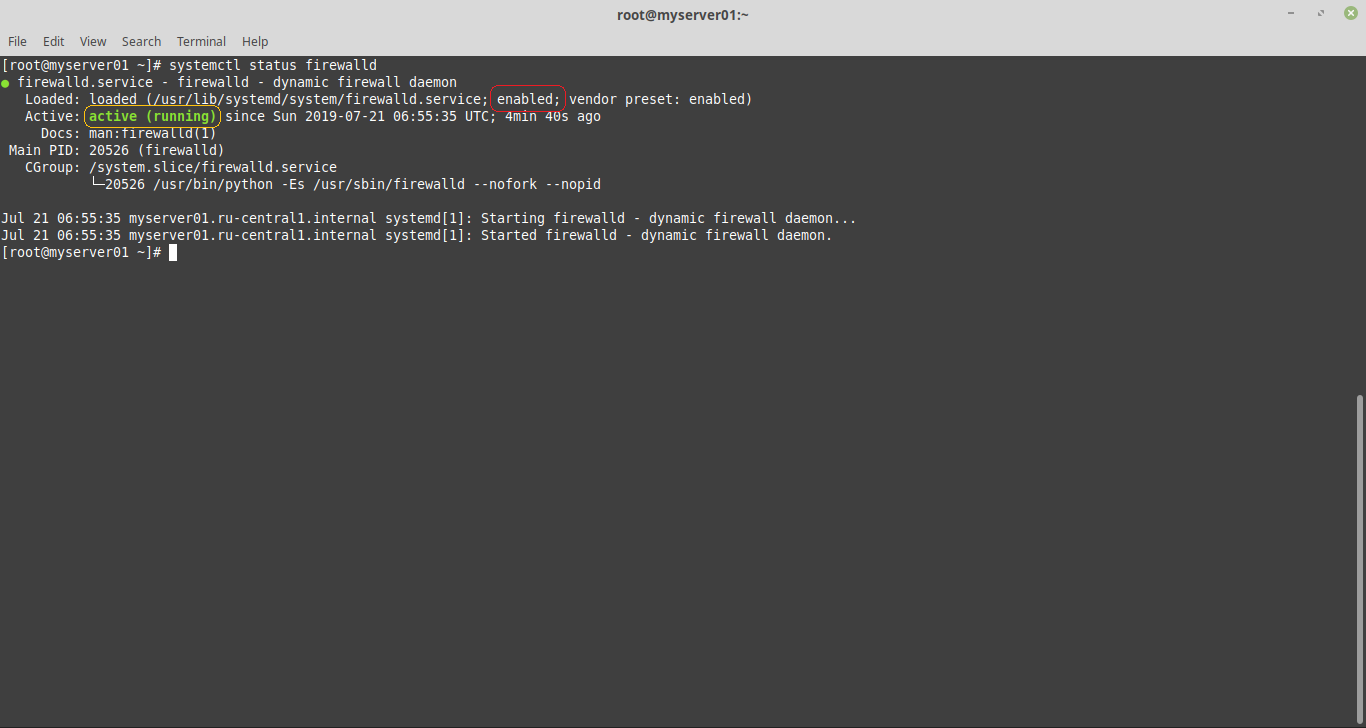
В выводе команды обведенная красным область со словом enabled, означает включенную автозагрузку, а область, обведенная желтым, со словом active, означает, что служба запущена.
Останавливаем службу и выключаем для нее автозагрузку:
systemctl stop firewalld
systemctl disable firewalld
Повторно проверяем статус:
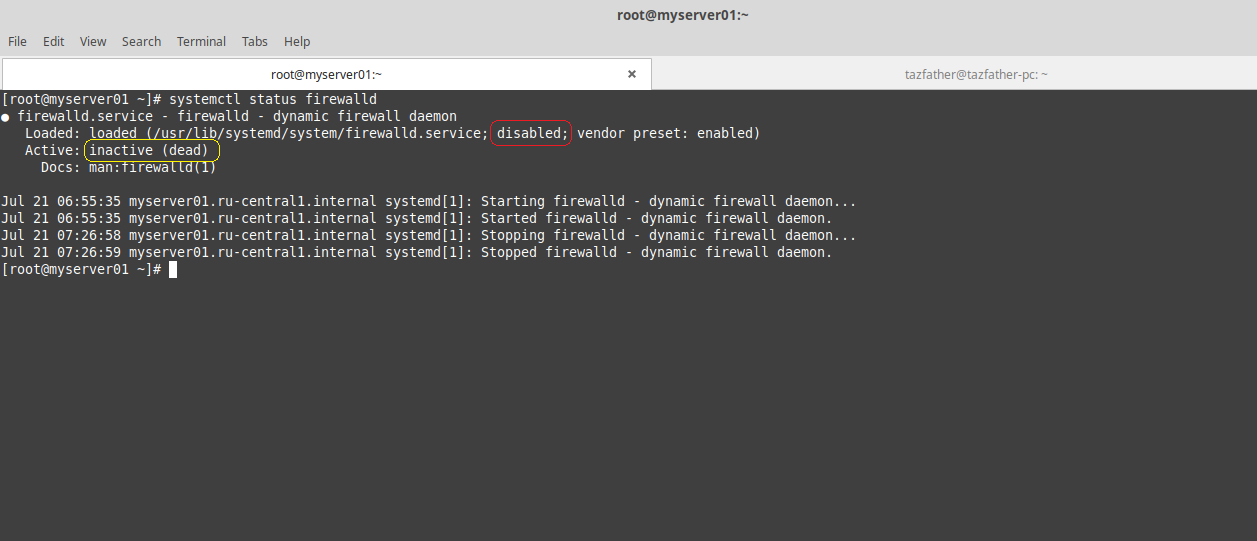
Теперь вывод команды показывает disabled для автозагруки (выключена), и inactive означает, что служба выключена.
Синтаксис и правила iptables в CentOS/Red Hat
Iptables – это утилита, с помощью которой настраиваются правила для файрвола в Linux.
Iptables группирует правила файрвола в таблицах, основные это:
- Таблица filter – используется для фильтрации трафика, то есть разрешения и запрещения соединений
- Таблица nat – используется для преобразования адресов (NAT)
- Таблица mangle – прочие модификации заголовков ip пакетов.
Для начала проверим, что iptables установлен в системе(должен быть умолчанию):
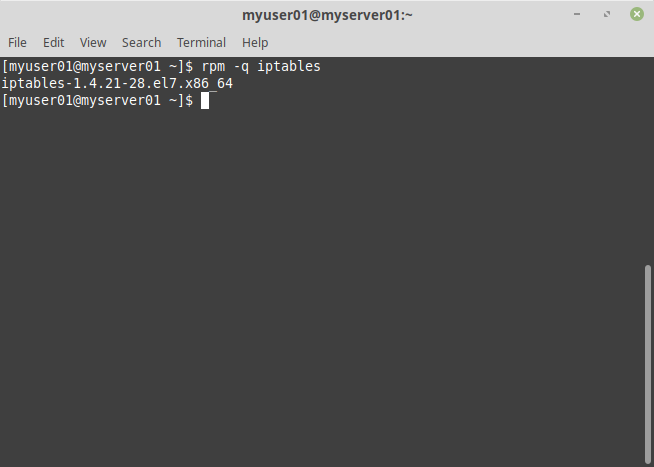
Вывод команды показывает, что текущая установленная версия iptables – 1.4.21.
Работа с iptables в командной строке требует root привилегий, поэтому далее будем работать под пользователем root.
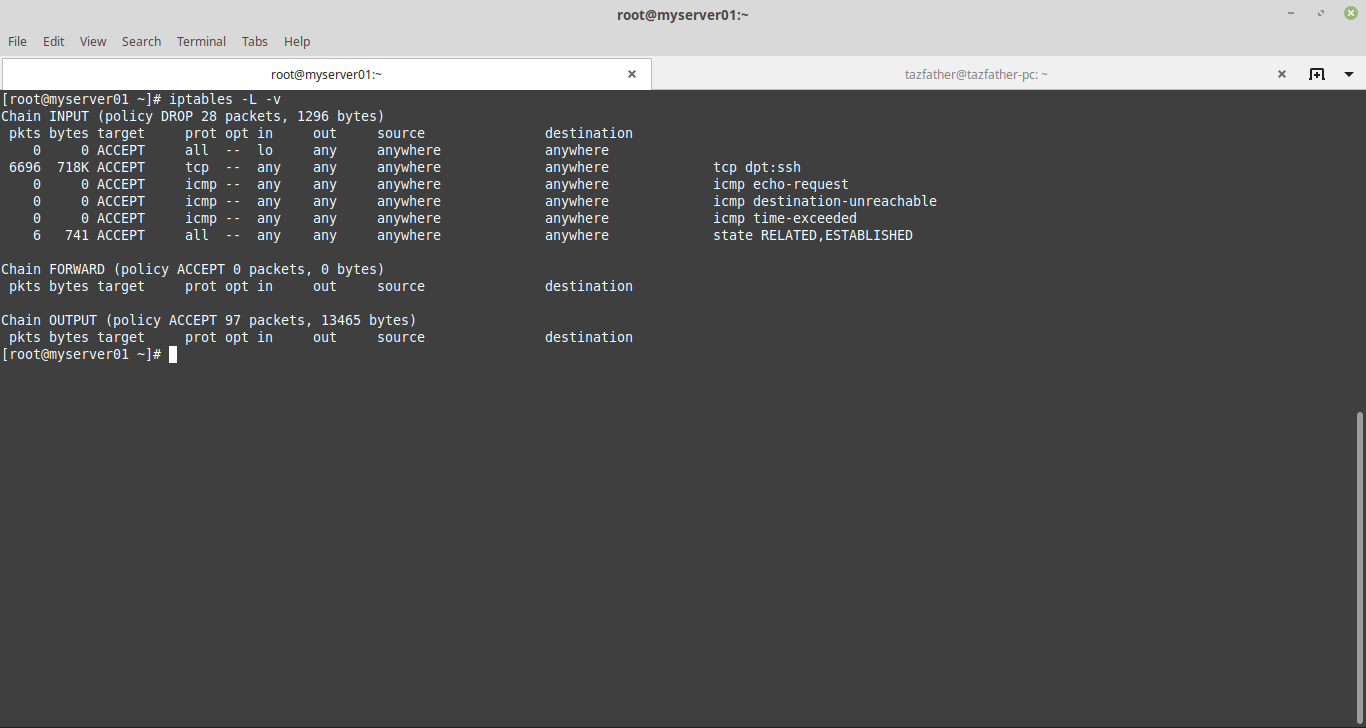
Чтобы вывести текущие правила, выполним команду:
iptables [-t таблица] -L [цепочка] [параметры]
Например, результат команды iptables -L, когда в таблицах еще не создано правил:
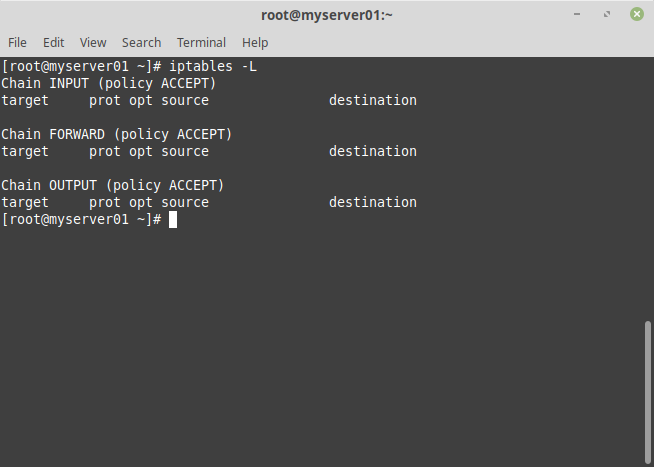
Рассмотрим вывод команды подробнее.
Таблица filter содержит три типа правил, так называемые chain(цепочки):
- INPUT – в этой цепочке обрабатываются входящие ip пакеты, предназначенные для самого хоста;
- OUTPUT – в этой цепочке обрабатываются исходящие ip пакеты от самого хоста;
- FORWARD – эта цепочка нужна для перенаправления ip пакетов. Используется, если вы хотите использовать сервер, как маршрутизатор.
Напротив каждой цепочки указана политика по умолчанию (policy), которая определяет, что нужно делать, в случае, если соединение не попало ни в одно из правил. Политика по умолчанию может принимать два значения и определяет сам подход к организации файрвола:
- ACCEPT – по умолчанию все соединения разрешены, правилами блокируются нежелательные соединения;
- DROP – по умолчанию все соединения запрещены, правилами разрешаются нужные соединения.
Создание правил фильтрации трафика в iptables
Фильтр iptables по интерфейсу
Начнем создавать правила. Синтаксис команды для добавления нового правила в конец указанной цепочки выглядит так:
iptables [-t таблица] -A -j
Для начала, разрешим трафик через локальный loopback интерфейс(127.0.0.1), что необходимо для работы некоторых приложений:
iptables -A INPUT -i lo -j ACCEPT
Разберем по порядку:
- Мы указываем цепочку INPUT, т.е. правило будет применяться для входящих соединений.
- Далее, используем ключ -i(—in-interface), чтобы определить входящий интерфейс, на который приходит ip пакет.
- Завершаем команду ключом -j(—jump), определяющим действие, которое будет выполнено для всех ip пакетов, соответствующих критерию из пункта 2. В данном случае ACCEPT – разрешить соединение. Кроме того, к основным действиям с соединениями также относятся:
- DROP – запретить соединение, источник соединения не информируется, ip пакет просто отбрасывается;
- REJECT – запретить соединение, источник соединения информируется сообщением.
Фильтр iptables по порту, протоколу или IP адресу
Теперь добавим разрешающее правило для подключения к нашему Linux серверу по SSH на порт 22.
iptables -A INPUT -p tcp —dport 22 -j ACCEPT
В этом правиле критериями являются порт и протокол. Протокол (tcp, udp, icmp, all) задается ключом -p(—protocol), порт назначения (т.е. порт на который будут приходить ip пакеты к серверу) —dport.
Допустимо указывать диапазон портов через двоеточие, например
Если нам известны ip адреса клиентов, с которых мы будет подключаться к серверу, более безопасным будет разрешить доступ только с этих ip адресов. В этом случае, в критерии нужно добавить ключ –s(—src, —source), задающий ip адрес или подсеть источника соединения, например, таким правилом:
iptables -A INPUT -p tcp -s 94.41.174.122 —dport 22 -j ACCEPT
доступ на 22 порт будет разрешен только с ip адреса 94.41.174.122.
Частично разрешим icmp запросы, 3-х типов:
iptables -A INPUT -p icmp —icmp-type echo-request -j ACCEPT
iptables -A INPUT -p icmp —icmp-type destination-unreachable -j ACCEPT
iptables -A INPUT -p icmp —icmp-type time-exceeded -j ACCEPT
Эти правила разрешают работу утилит ping, traceroute и позволяют работать механизму для определения MTU между двумя хостами.
Фильтр iptables по состоянию соединения
Для корректной работы потребуется создать правило, разрешающее уже установленные соединения:
iptables -A INPUT -m state —state ESTABLISHED,RELATED -j ACCEPT
Здесь в критерии используется ключ -m, для загрузки модуля state, который дает возможность определить текущее состояние ip пакета из возможных:
- NEW – относится к входящим ip пакетам, участвующим в установке соединения;
- ESTABLISHED и RELATED – относится к входящим ip пакетам, участвующим в уже установленных соединениях, или соединениях, инициированных из уже установленных(связанные соединения);
- INVALID — относится к входящим ip пакетам, если к ним не применимо ни одно из указанных выше состояний.
Задание политики iptables по умолчанию
Минимальный набор разрешающих правил для файрвола готов, осталось установить политику по умолчанию, запрещающую все входящие соединения, не соответствующие нашим правилам. Для этого в команде iptables служит ключ -P, устанавливает политику по умолчанию для заданной цепочки, в нашем случае:
iptables -P INPUT DROP
Включить логи iptables
Iptables позволяет записывать информацию о проходящих ip пакетах в системный журнал. Реализуется это с помощью специфичного действия LOG над соединением, после которого, ip пакет продолжает движение по цепочке нетронутым. Для примера, создадим правило, которое будет записывать в системный журнал все события соединений на порт 445 (tcp):
iptables -A INPUT -p tcp —dport 445 -j LOG —log-prefix «IN SMB DROP: «
здесь —log-prefix задает префикс для всех сообщений, логируемых нашим правилом. Это удобно, если у вас несколько разных правил логирования, или для дальнейшей программной обработки. Если теперь попробовать подключиться снаружи к нашему серверу на порт 445, например через telnet, в файле /var/log/messages появятся записи:
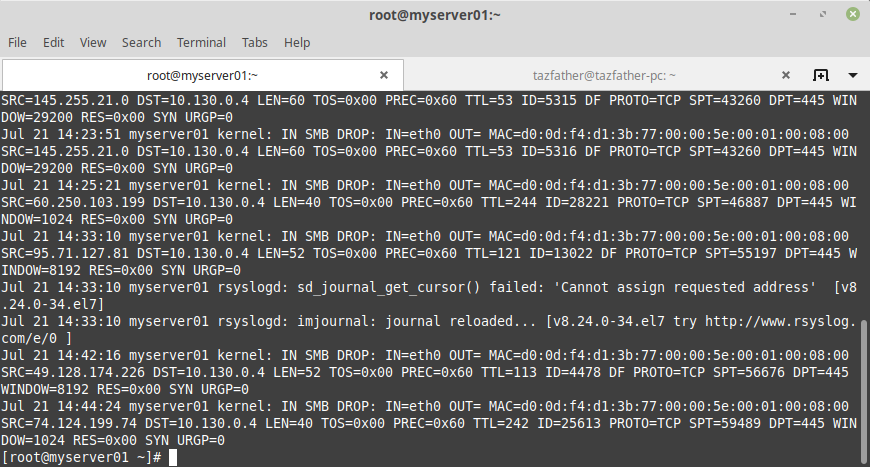 Разберем вывод:
- IN SMB DROP : префикс, который мы задали опцией —log-prefix
- IN=eth0 интерфейс, на который принят ip пакет, для исходящих соединений содержит пустое значение
- OUT= интерфейс, с которого отправлен ip пакет, для входящих соединений, содержит пустое значение
- MAC= соединенные вместе в следующем порядке: MAC-адрес назначения, MAC-адрес источника, EtherType — 08:00 соответствует IPv4.
- SRC= ip адрес источника, от которого отправлен ip пакет
- DST= ip адрес назначения, на который отправлен ip пакет
- LEN= размер ip пакета в байтах
- SPT= порт источника, от которого отправлен ip пакет
- DPT= порт назначения, на который отправлен ip пакет
Сохранение и восстановление правил фильтрации iptables
В заключении, настроим автозагрузку правил, после перезагрузки сервера. Для этого должен быть установлен пакет iptables-services и активирован сервис. Установим пакет через yum:
yum install iptables-services
systemctl enable iptables
Проверим статус службы iptables:
systemctl status iptables
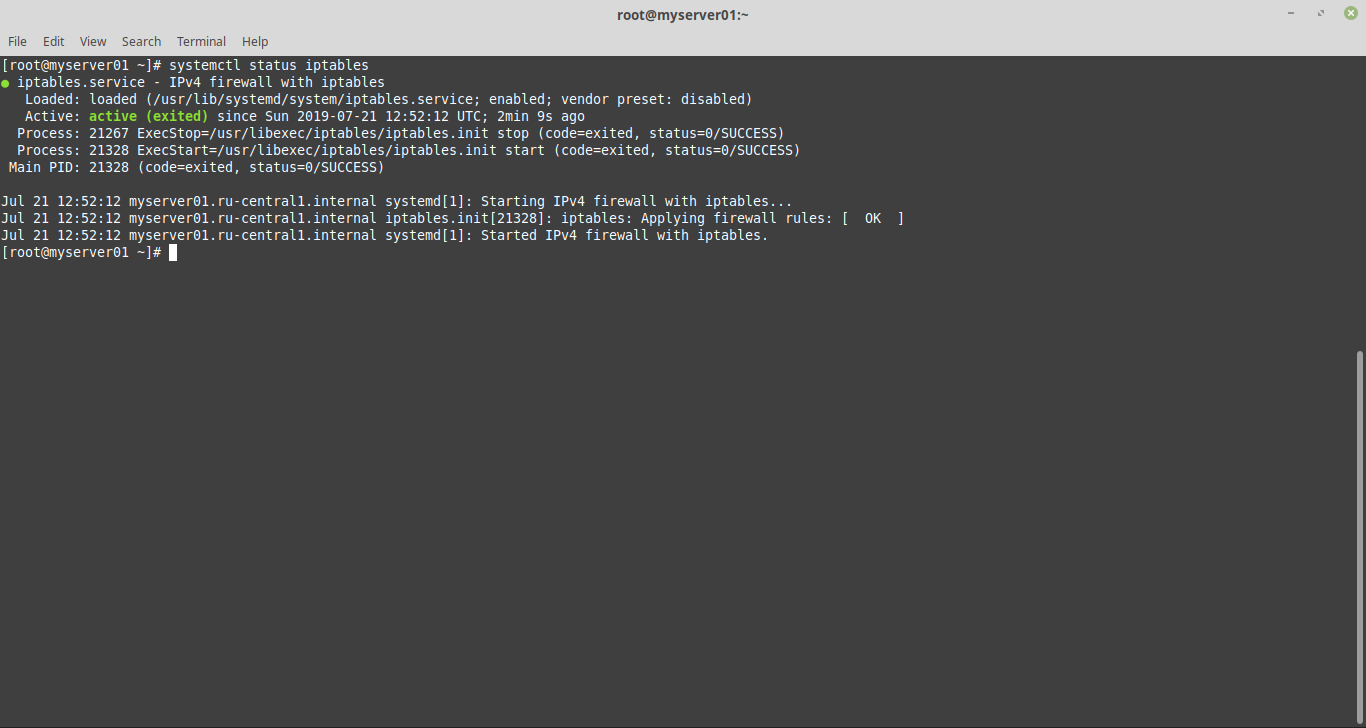
Параметр автозагрузки установлен в enabled (включена), параметр active указывает, что служба запущена.
При загрузке сервис будет читать содержимое файла /etc/sysconfig/iptables, и восстанавливать сохраненные правила. Чтобы сохранить в него наши правила, воспользуемся командой:
Можно восстановить правила из файла командой:
Теперь можно перезагрузить сервер, и убедиться, что правила файервола восстановились при загрузке.
В следующей статье мы покажем, как использовать iptables для создания NAT правил перенаправления трафика для шлюза-доступа на базе CentOS из / во внутренюю сеть организации.
Источник


