- How to install and use SSH on Linux
- Configure SSH on a Local Computer
- Configure SSH on a Remote Computer
- Install SSH server
- Check SSH status
- Find out Server’s IP
- Open SSH port in Firewall
- Connect using SSH
- SSH in FileZilla
- SSH in File Manager
- Forward X
- Transfer files
- Final thoughts
- Is ssh running on linux
- Setting Up SSH on UNIX and Linux Systems
- To Set Up SSH on Oracle Solaris Systems
- To Set Up SSH on MacOS Systems
- To Set Up SSH on Linux systems
- How to check if SSH is running on Linux?
- OpenSSH
- Contents
- Installation
- Client usage
- Configuration
- Server usage
- Configuration
- Daemon management
- Protection
- Force public key authentication
- Two-factor authentication and public keys
- Protecting against brute force attacks
- Limit root login
- Locking the authorized_keys file
- Tips and tricks
- Encrypted SOCKS tunnel
- Step 1: start the connection
- Step 2 (Variant A): configure your browser (or other programs)
- Step 2 (Variant B): set up a local TUN interface
- X11 forwarding
- Setup
- Usage
- Forwarding other ports
- Jump hosts
- Reverse SSH through a relay
- Multiplexing
- Speeding up SSH
- Mounting a remote filesystem with SSHFS
- Keep alive
- Automatically restart SSH tunnels with systemd
- Autossh — automatically restarts SSH sessions and tunnels
- Run autossh automatically at boot via systemd
- Alternative service should SSH daemon fail
- Terminal background color based on host
- Network specific configuration
- Private networks hostkeys verification
- Run command at login
- Agent forwarding
- Troubleshooting
- Checklist
- Connection refused or timeout problem
- Port forwarding
- Is SSH running and listening?
- Are there firewall rules blocking the connection?
- Is the traffic even getting to your computer?
- Your ISP or a third party blocking default port?
- Read from socket failed: connection reset by peer
- «[your shell]: No such file or directory» / ssh_exchange_identification problem
- «Terminal unknown» or «Error opening terminal» error message
- TERM hack
- Connection closed by x.x.x.x [preauth]
- id_dsa refused by OpenSSH 7.0
- No matching key exchange method found by OpenSSH 7.0
- tmux/screen session killed when disconnecting from SSH
- SSH session stops responding
- Broken pipe
- Slow daemon startup after reboot
- Terminate unresponsive SSH connection
- WARNING: REMOTE HOST IDENTIFICATION HAS CHANGED!
- Connecting to a remote without the appropriate terminfo entry
How to install and use SSH on Linux
SSH or Secure Shell allows you to connect between computers and encrypt traffic between them.
For example, I use SSH to connect to my virtual private server and to my office computer. Usually, it works only through the terminal. However, you can connect it to your file manager or use some graphical programs like FileZilla, if you do not want to type commands. You can also use graphical forwarding and open graphical programs from the remote server in your local computer.
SSH is a simple, reliable, and very secure way to establish a connection between computers. In this post, you will learn how to install, configure, and use SSH on Linux. In particular, I will show how to:
Configure SSH on a Local Computer
First, you need to set up your client Linux machine. This is the computer you will use to connect from.
You need to install openssh-client on your Linux computer.
If you also need to use Windows as a client install PuTTY.
Configure SSH on a Remote Computer
Next, configure the computer you want to connect to.
Install SSH server
On the remote computer, you need to install openssh-server .
Obviously, you will need to have physical access to the remote computer to install this package. For example, if it is my office computer, I will go to my office and install this openssh-server program.
Check SSH status
After the installation, check that SSH is running with:
You should see that it is active:
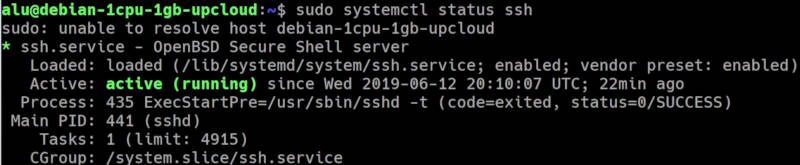
If it has not started, start it manually:
or simply reboot the system.
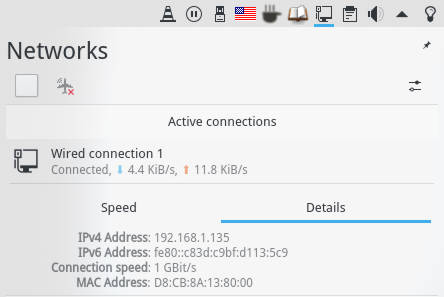
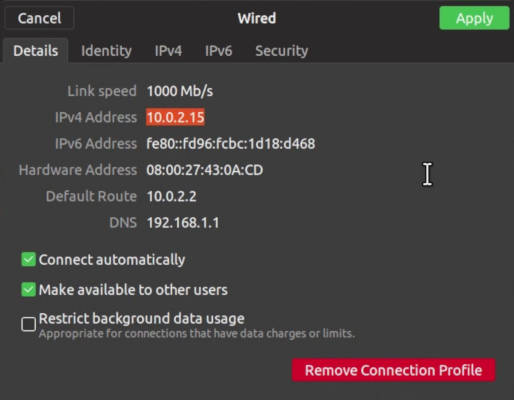
Find out Server’s IP
Next, you need to determine the IP address of this remote computer.
The easiest way is to check the network settings. If you have a graphical desktop in that computer, open the network settings and search for IP address.
This is how it looks in Plasma 5:
And in Ubuntu GNOME:
If you only have the command line, run:
Usually, you will see your IP address in the eth0 connection.
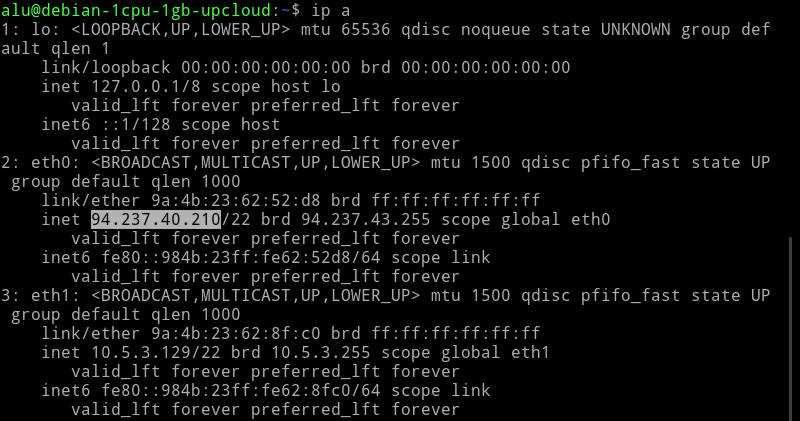
Write down this address, you will need it to be able to connect to this remote computer.
Open SSH port in Firewall
It is possible that you use a firewall and it may block your remote access. So, check open ports:
You should see that port 22 is open. If you do not find port 22 open among open ports, go to your firewall settings and open it.

If you use UFW run this command:
I discuss whether you need a firewall in Linux and how to use it in this post.
Connect using SSH
Now, I assume your remote computer is configured and you are sitting in front of your client Linux machine.
In your client Linux computer, run:
You use the username of the remote computer and the IP address is the address you wrote down in a previous step.
If you get a warning “Are you sure you want to continue connecting (yes/no)?”, type yes.
After you typed the password of your user at the remote computer, you will be logged in to a remote Linux computer.
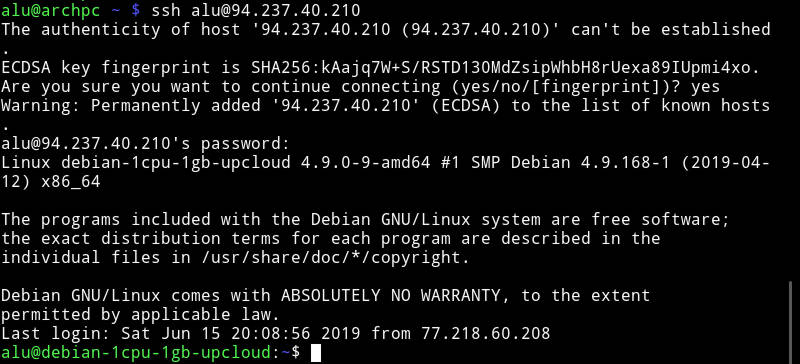
Now, you can work on this remote computer as if you would be sitting in front of that computer and using the terminal.
SSH in FileZilla
If you simply want to work with files without running any programs, you can also connect to your remote server with FileZilla.
In FileZilla, go to the Site manager and add a new site with SFTP protocol:
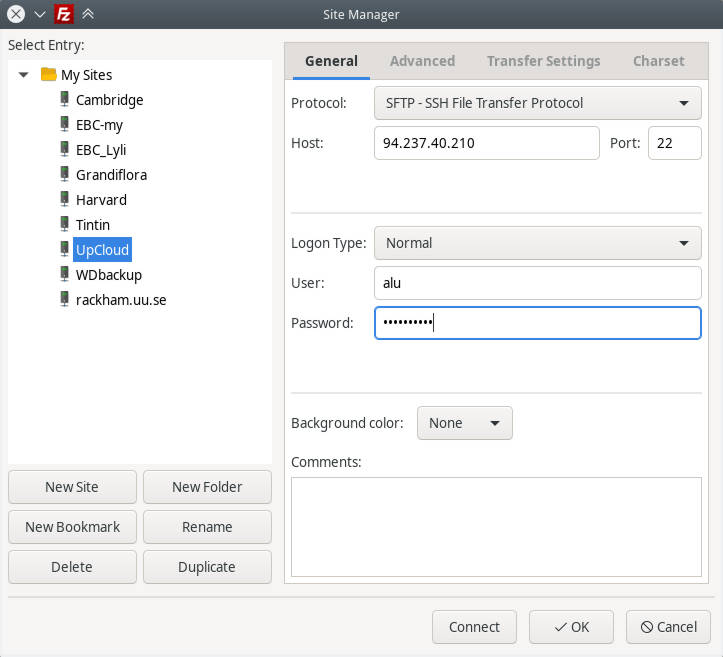
You will get your local files on the left and your remote files on the right.
![]()
You can navigate in FileZilla with your mouse and transfer files between your computers by simple drag-and-drop between these two panels.
SSH in File Manager
Similarly, you can add the remote server to your File Manager. I use Dolphin file manager of Plasma 5 but the procedure is very similar in other file managers.
Go to the Network in your file manager and add a Network folder:
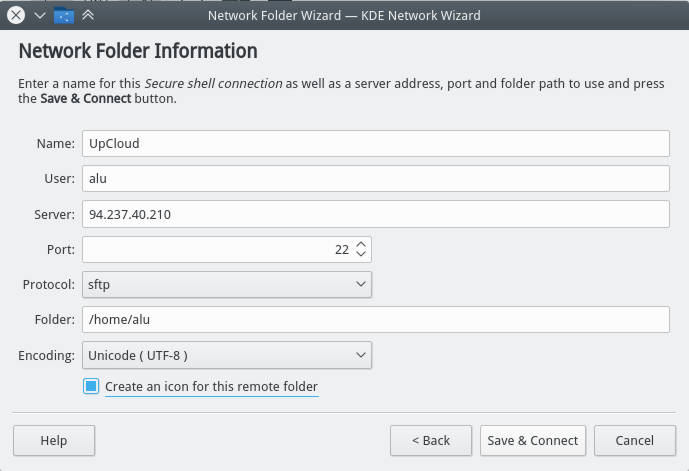
Among these options, select SFTP protocol, give a name to this folder, provide the user name of the remote account, IP address of the remote computer. In the field “remote folder path”, you can use your remote user home folder or any other folder you want to connect to.

As a result, you will see all the folders and files of your remote computer in your file manager.
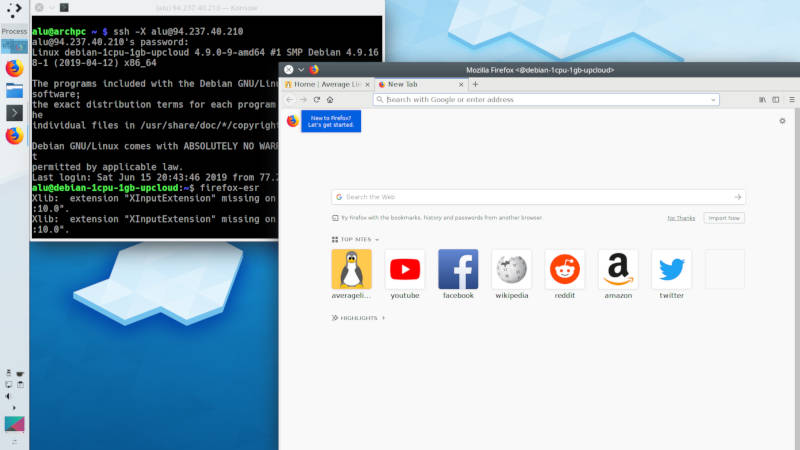
Forward X
You can also forward graphical application from your remote computer to your local computer. To do that, you simply need to add the option -X during the login.
Now, if you start any graphical program in a remote computer, it will open in your local computer, like this Firefox on the screenshot.
Transfer files
To transfer a file to a remote computer in the terminal run:
And to transfer a file from a remote computer to your local computer simply type first the remote address and then local.
You can also use wild cards to transfer many files at the same time. I showed how to use wild cards in this YouTube video.
Final thoughts
As you have seen SSH is a pretty handy program. It is not difficult to install and use. However, there are some more configurations which I did not cover in this post. For example, you can enhance the security of your ssh connection with SSH keys and white-listed IP addresses. I will cover this topic in the next post. So, subscribe to this blog updates and you won’t miss it.
Источник
Is ssh running on linux


Setting Up SSH on UNIX and Linux Systems
Setting up SSH on UNIX and Linux systems involves verifying that the SSH server daemon sshd is running and, if necessary, starting this daemon. Set up SSH on the DAS host and on all hosts where instances in your cluster will reside.
On UNIX and Linux systems, SSH software is typically installed as part of the base operating system. If SSH is not installed, download and install the appropriate OpenSSH SSH package for your operating system.
How to set up SSH on UNIX and Linux systems depends on the flavor of the operating system that you are running, as explained in the following sections:
To Set Up SSH on Oracle Solaris Systems
- Ensure that the following options in the configuration file /etc/ssh/sshd_config are set to yes:
If the daemon is running, no further action is required.
Example 2-2 Determining if the sshd Daemon Is Running on an Oracle Solaris System
This example confirms that the SSH server daemon sshd is running on an Oracle Solaris system.
After you have completed the setup of SSH on a host, test the setup on the host as explained in Testing the SSH Setup on a Host.
To Set Up SSH on MacOS Systems
- Open System Preferences and click Sharing.
The Sharing window opens.
The user that running the DAS or instance
After you have completed the setup of SSH on a host, test the setup on the host as explained in Testing the SSH Setup on a Host.
To Set Up SSH on Linux systems
- Ensure that the following options in the configuration file /etc/ssh/sshd_config are set to yes:
If the daemon is running, no further action is required.
Example 2-3 Determining if the sshd Daemon Is Running on a Linux System
This example confirms that the SSH server daemon sshd is running on a Linux system.
After you have completed the setup of SSH on a host, test the setup on the host as explained in Testing the SSH Setup on a Host.
Источник
How to check if SSH is running on Linux?
Question – I need to check whether SSH (sshd) is running on my Linux machine. I have a Debian Linux distribution. How can I tell if my OpenSSH server is running?
There are several ways to check whether SSH is running. The sshd daemon is the process that runs the OpenSSH ssh server.
First Check if the process sshd is running:
This will output something like the following if it finds the process called sshd:
So sshd is running with process ID 1399! It is indeed running!
Second, check if the process sshd is listening on port 22:
If ssh is listening on port 22, you will get the following:
So the process with ID 1399 (sshd) is listening on port 22! The second test passed!
Third, you can use the lsof command to check if the port 22 TCP file is open:
So sshd (SSH daemon) and httpd (Apache web server daemon) are both running and listening on the ssh and http ports respectively! Third test passed.
Four, try to telnet to port 22:
If the port is open, you will get the following output:
If the port number 22 is not open, you will get the following:
Five, check the status of the sshd service:
If you use CentOS or Red Hat:
If you use Debian or Ubuntu (or CentOS or RedHat):
So these were five interesting methods in which you could check if the SSH OpenSSH server is running and listening on port 22. If the process sshd is misbehaving or not listening on port 22, one of these methods will surely fail and you should start or restart sshd using the following command:
Источник
OpenSSH
OpenSSH (OpenBSD Secure Shell) is a set of computer programs providing encrypted communication sessions over a computer network using the Secure Shell (SSH) protocol. It was created as an open source alternative to the proprietary Secure Shell software suite offered by SSH Communications Security. OpenSSH is developed as part of the OpenBSD project, which is led by Theo de Raadt.
OpenSSH is occasionally confused with the similarly-named OpenSSL; however, the projects have different purposes and are developed by different teams, the similar name is drawn only from similar goals.
Contents
Installation
Client usage
To connect to a server, run:
If the server only allows public-key authentication, follow SSH keys.
Configuration
The client can be configured to store common options and hosts. All options can be declared globally or restricted to specific hosts. For example:
With such a configuration, the following commands are equivalent
See ssh_config(5) for more information.
Some options do not have command line switch equivalents, but you can specify config options on the command line with -o . For example -oKexAlgorithms=+diffie-hellman-group1-sha1 .
Server usage
sshd is the OpenSSH server daemon, configured with /etc/ssh/sshd_config and managed by sshd.service . Whenever changing the configuration, use sshd in test mode before restarting the service to ensure it will be able to start cleanly. Valid configurations produce no output.
Configuration
To allow access only for some users add this line:
To allow access only for some groups:
To add a nice welcome message (e.g. from the /etc/issue file), configure the Banner option:
Public and private host keys are automatically generated in /etc/ssh by the sshdgenkeys service and regenerated if missing even if HostKeyAlgorithms option in sshd_config allows only some. Four key pairs are provided based on the algorithms dsa, rsa, ecdsa and ed25519. To have sshd use a particular key, specify the following option:
If the server is to be exposed to the WAN, it is recommended to change the default port from 22 to a random higher one like this:
Daemon management
Start/enable sshd.service . It will keep the SSH daemon permanently active and fork for each incoming connection.[1].
Protection
Allowing remote log-on through SSH is good for administrative purposes, but can pose a threat to your server’s security. Often the target of brute force attacks, SSH access needs to be limited properly to prevent third parties gaining access to your server.
ssh-audit offers an automated analysis of server and client configuration. Several other good guides and tools are available on the topic, for example:
Force public key authentication
If a client cannot authenticate through a public key, by default the SSH server falls back to password authentication, thus allowing a malicious user to attempt to gain access by brute-forcing the password. One of the most effective ways to protect against this attack is to disable password logins entirely, and force the use of SSH keys. This can be accomplished by setting the following options in the daemon configuration file:
Two-factor authentication and public keys
SSH can be set up to require multiple ways of authentication, you can tell which authentication methods are required using the AuthenticationMethods option. This enables you to use public keys as well as a two-factor authorization.
Authentication providers
See Google Authenticator to set up Google Authenticator.
For Duo, install duo_unix AUR which will supply the pam_duo.so module. Read the Duo Unix documentation for instructions on how to setup the necessary Duo credentials (Integration Key, Secret Key, API Hostname).
PAM setup
To use PAM with OpenSSH, edit the following files:
Then you can log in with either a publickey or the user authentication as required by your PAM setup.
If, on the other hand, you want to authenticate the user on both a publickey and the user authentication as required by your PAM setup, use a comma instead of a space to separate the AuthenticationMethods:
With required pubkey and pam authentication you may wish to disable the password requirement:
Protecting against brute force attacks
Brute forcing is a simple concept: one continuously tries to log in to a webpage or server log-in prompt like SSH with a high number of random username and password combinations.
Alternatively, you can protect yourself from brute force attacks by using an automated script that blocks anybody trying to brute force their way in, for example fail2ban or sshguard.
- Only allow incoming SSH connections from trusted locations
- Use fail2ban or sshguard to automatically block IP addresses that fail password authentication too many times.
- Use pam_shield to block IP addresses that perform too many login attempts within a certain period of time. In contrast to fail2ban or sshguard, this program does not take login success or failure into account.
Limit root login
 This article or section is out of date.
It is generally considered bad practice to allow the root user to log in without restraint over SSH. There are two methods by which SSH root access can be restricted for increased security.
Sudo selectively provides root rights for actions requiring these without requiring authenticating against the root account. This allows locking the root account against access via SSH and potentially functions as a security measure against brute force attacks, since now an attacker must guess the account name in addition to the password.
SSH can be configured to deny remote logins with the root user by editing the «Authentication» section in the daemon configuration file. Simply set PermitRootLogin to no :
Next, restart the SSH daemon.
You will now be unable to log in through SSH under root, but will still be able to log in with your normal user and use su or sudo to do system administration.
Restrict
Some automated tasks such as remote, full-system backup require full root access. To allow these in a secure way, instead of disabling root login via SSH, it is possible to only allow root logins for selected commands. This can be achieved by editing
root/.ssh/authorized_keys , by prefixing the desired key, e.g. as follows:
This will allow any login with this specific key only to execute the command specified between the quotes.
The increased attack surface created by exposing the root user name at login can be compensated by adding the following to sshd_config :
This setting will not only restrict the commands which root may execute via SSH, but it will also disable the use of passwords, forcing use of public key authentication for the root account.
A slightly less restrictive alternative will allow any command for root, but makes brute force attacks infeasible by enforcing public key authentication. For this option, set:
Locking the authorized_keys file
If, for whatever reason, you think that the user in question should not be able to add or change existing keys, you can prevent them from manipulating the file.
On the server, make the authorized_keys file read-only for the user and deny all other permissions:
To prevent the user from simply changing the permissions back, set the immutable bit on the authorized_keys file. To prevent the user from renaming the
/.ssh directory and creating a new
/.ssh directory and authorized_keys file, set the immutable bit on the
/.ssh directory too. To add or remove keys, you will have to remove the immutable bit from authorized_keys and make it writable temporarily.
Tips and tricks
Encrypted SOCKS tunnel
This is highly useful for laptop users connected to various unsafe wireless connections. The only thing you need is an SSH server running at a somewhat secure location, like your home or at work. It might be useful to use a dynamic DNS service like DynDNS so you do not have to remember your IP-address.
Step 1: start the connection
You only have to execute this single command to start the connection:
where user is your username at the SSH server running at the host . It will ask for your password, and then you are connected. The N flag disables the interactive prompt, and the D flag specifies the local port on which to listen on (you can choose any port number if you want). The T flag disables pseudo-tty allocation.
It is nice to add the verbose ( -v ) flag, because then you can verify that it is actually connected from that output.
Step 2 (Variant A): configure your browser (or other programs)
The above step is useful only in combination with a web browser or another program that uses this newly created SOCKS tunnel. Since SSH currently supports both SOCKS v4 and SOCKS v5, you can use either of them.
- For Firefox: At Preferences > General navigates to the bottom of the page and click Settings. , which is to the right of the Network Settings title. Next, within the new semi window, check the Manual proxy configuration option and enter localhost in the SOCKS host text field, and the port number in the Port text field ( 4711 in the example above) next to it.
Firefox does not automatically make DNS requests through the socks tunnel. This potential privacy concern can be mitigated by scrolling further down, checking in the Proxy DNS when using SOCKS v5. Obviously, this will only work if you chooses SOCKS v5 rather then v4. Restart Firefox to activate these settings.
- For Chromium: You can set the SOCKS settings as environment variables or as command line options. I recommend to add one of the following functions to your .bashrc :
Now open a terminal and just do:
Enjoy your secure tunnel!
Step 2 (Variant B): set up a local TUN interface
This variant is slightly more involved upfront but results in you not having to manually configure every single application one by one to use the SOCKS proxy. It involves setting up a local TUN interface and routing traffic through it.
X11 forwarding
X11 forwarding is a mechanism that allows graphical interfaces of X11 programs running on a remote system to be displayed on a local client machine. For X11 forwarding the remote host does not need to have a full X11 system installed, however it needs at least to have xauth installed. xauth is a utility that maintains Xauthority configurations used by server and client for authentication of X11 session (source).
Setup
Remote
- install the xorg-xauth and xorg-xhost packages
- in /etc/ssh/sshd_config :
- set X11Forwarding to yes
- verify that AllowTcpForwarding and X11UseLocalhost options are set to yes, and that X11DisplayOffset is set to 10 (those are the default values if nothing has been changed, see sshd_config(5) )
- then restart the sshd daemon.
Client
- install the xorg-xauth package
- enable the ForwardX11 option by either specifying the -X switch on the command line for opportunistic connections, or by setting ForwardX11 to yes in the client’s configuration.
Usage
 The factual accuracy of this article or section is disputed.
Log on to the remote machine normally, specifying the -X switch if ForwardX11 was not enabled in the client’s configuration file:
If you receive errors trying to run graphical applications, try ForwardX11Trusted instead:
You can now start any X program on the remote server, the output will be forwarded to your local session:
If you get «Cannot open display» errors try the following command as the non root user:
The above command will allow anybody to forward X11 applications. To restrict forwarding to a particular host type:
where hostname is the name of the particular host you want to forward to. See xhost(1) for more details.
Be careful with some applications as they check for a running instance on the local machine. Firefox is an example: either close the running Firefox instance or use the following start parameter to start a remote instance on the local machine:
If you get «X11 forwarding request failed on channel 0» when you connect (and the server /var/log/errors.log shows «Failed to allocate internet-domain X11 display socket»), make sure package xorg-xauth is installed. If its installation is not working, try to either:
- enable the AddressFamily any option in sshd_config on the server, or
- set the AddressFamily option in sshd_config on the server to inet.
Setting it to inet may fix problems with Ubuntu clients on IPv4.
For running X applications as other user on the SSH server you need to xauth add the authentication line taken from xauth list of the SSH logged in user.
Forwarding other ports
In addition to SSH’s built-in support for X11, it can also be used to securely tunnel any TCP connection, by use of local forwarding or remote forwarding.
Local forwarding opens a port on the local machine, connections to which will be forwarded to the remote host and from there on to a given destination. Very often, the forwarding destination will be the same as the remote host, thus providing a secure shell and, e.g. a secure VNC connection, to the same machine. Local forwarding is accomplished by means of the -L switch and it is accompanying forwarding specification in the form of : : .
will use SSH to login to and open a shell on 192.168.0.100 , and will also create a tunnel from the local machine’s TCP port 1000 to mail.google.com on port 25. Once established, connections to localhost:1000 will connect to the Gmail SMTP port. To Google, it will appear that any such connection (though not necessarily the data conveyed over the connection) originated from 192.168.0.100 , and such data will be secure between the local machine and 192.168.0.100, but not between 192.168.0.100 and Google, unless other measures are taken.
will allow connections to localhost:2000 which will be transparently sent to the remote host on port 6001. The preceding example is useful for VNC connections using the vncserver utility—part of the tightvnc package—which, though very useful, is explicit about its lack of security.
Remote forwarding allows the remote host to connect to an arbitrary host via the SSH tunnel and the local machine, providing a functional reversal of local forwarding, and is useful for situations where, e.g., the remote host has limited connectivity due to firewalling. It is enabled with the -R switch and a forwarding specification in the form of : : .
will bring up a shell on 192.168.0.200 , and connections from 192.168.0.200 to itself on port 3000 (the remote host’s localhost:3000 ) will be sent over the tunnel to the local machine and then on to irc.freenode.net on port 6667, thus, in this example, allowing the use of IRC programs on the remote host to be used, even if port 6667 would normally be blocked to it.
Both local and remote forwarding can be used to provide a secure «gateway», allowing other computers to take advantage of an SSH tunnel, without actually running SSH or the SSH daemon by providing a bind-address for the start of the tunnel as part of the forwarding specification, e.g. : : : . The can be any address on the machine at the start of the tunnel. The address localhost allows connections via the localhost or loopback interface, and an empty address or * allow connections via any interface. By default, forwarding is limited to connections from the machine at the «beginning» of the tunnel, i.e. the is set to localhost . Local forwarding requires no additional configuration, however remote forwarding is limited by the remote server’s SSH daemon configuration. See the GatewayPorts option in sshd_config(5) and -L address option in ssh(1) for more information about remote forwarding and local forwarding, respectively.
Jump hosts
In certain scenarios, there might not be a direct connection to your target SSH daemon, and the use of a jump server (or bastion server) is required. Thus, we attempt to connect together two or more SSH tunnels, and assuming your local keys are authorized against each server in the chain. This is possible using SSH agent forwarding ( -A ) and pseudo-terminal allocation ( -t ) which forwards your local key with the following syntax:
An easier way to do this is using the -J flag:
Multiple hosts in the -J directive can be separted with a comma, they will be connected to in the order listed. The user. @ part is not required, but can be used. The host specifications for -J use the ssh configuration file, so specific per-host options can be set there, if needed.
An equivalent of the -J flag in the configuration file is the ProxyJump option, see ssh_config(5) for details.
Reverse SSH through a relay
![]() This article or section needs language, wiki syntax or style improvements. See Help:Style for reference.
This article or section needs language, wiki syntax or style improvements. See Help:Style for reference.![]()
The idea is that client connects to the server via another relay, while the server is connected to the same relay using a reverse SSH tunnel. This is for example useful when the server is behind a NAT and relay is a publicly accessible SSH server used as a proxy to which the user has access. So the prerequisite is that client’s keys are authorized against both the relay and the server and server’s need to be authorized against the relay as well for the reverse SSH connection.
The following configuration example assumes that user1 is the user account used on client, user2 on relay and user3 on server. First the server needs to establish the reverse tunnel with:
Which can also be automated with a startup script, systemd service or autossh.
 This article or section needs expansion.
At the client side the connection is established with:
The remote command to establish the connection to reverse tunnel can also be defined in relay’s
/.ssh/authorized_keys by including the command field as follows:
In this case the connection is established with:
Note that SCP’s autocomplete function in client’s terminal is not working and even the SCP transfers themselves are not working under some configurations.
Multiplexing
The SSH daemon usually listens on port 22. However, it is common practice for many public internet hotspots to block all traffic that is not on the regular HTTP/S ports (80 and 443, respectively), thus effectively blocking SSH connections. The immediate solution for this is to have sshd listen additionally on one of the whitelisted ports:
However, it is likely that port 443 is already in use by a web server serving HTTPS content, in which case it is possible to use a multiplexer, such as sslh , which listens on the multiplexed port and can intelligently forward packets to many services.
Speeding up SSH
There are several client configuration options which can speed up connections either globally or for specific hosts. See ssh_config(5) for full descriptions of these options.
- Use a faster cipher: on modern CPUs with AESNI instructions, aes128-gcm@openssh.com and aes256-gcm@openssh.com should offer significantly better performance over openssh’s default preferred cipher, usually chacha20-poly1305@openssh.com . Cipher can be selected -c flag. For a permanent effect, put Ciphers option in your
/.ssh/config with ciphers in new preferred order, e.g.:
- Enable or disable compression: compression can increase speed on slow connections, it is enabled with the Compression yes option or the -C flag. However the compression algorithm used is the relatively slow gzip(1) which becomes the bottleneck on fast networks. In order to speed up the connection one should use the Compression no option on local or fast networks.
- Connection sharing: you can make all sessions to the same host share a single connection using these options:
where
/.ssh/sockets can be any directory not writable by other users.
- ControlPersist specifies how long the master should wait in the background for new clients after the initial client connection has been closed. Possible values are either:
- no to close the connection immediately after the last client disconnects,
- a time in seconds,
- yes to wait forever, the connection will never be closed automatically.
- Login time can be shortened by bypassing IPv6 lookup using the AddressFamily inet option or -4 flag.
- Last, if you intend to use SSH for SFTP or SCP, High Performance SSH/SCP can significantly increase throughput by dynamically raising the SSH buffer sizes. Install the package openssh-hpn-gitAUR to use a patched version of OpenSSH with this enhancement.
Mounting a remote filesystem with SSHFS
Please refer to the SSHFS article to mount a SSH-accessible remote system to a local folder, so you will be able to do any operation on the mounted files with any tool (copy, rename, edit with vim, etc.). sshfs is generally preferred over shfs, the latter has not been updated since 2004.
Keep alive
By default, the SSH session automatically logs out if it has been idle for a certain time. To keep the session up, the client can send a keep-alive signal to the server if no data has been received for some time, or symmetrically the server can send messages at regular intervals if it has not heard from the client.
- On the server side, ClientAliveInterval sets the timeout in seconds after which if no data has been received from the client, sshd will send a request for response. The default is 0, no message is sent. For example to request a response every 60 seconds from the client, set the ClientAliveInterval 60 option in your server configuration. See also the ClientAliveCountMax and TCPKeepAlive options.
- On the client side, ServerAliveInterval controls the interval between the requests for response sent from the client to the server. For example to request a response every 120 seconds from the server, add the ServerAliveInterval 120 option to your client configuration. See also the ServerAliveCountMax and TCPKeepAlive options.
Automatically restart SSH tunnels with systemd
systemd can automatically start SSH connections on boot/login and restart them when they fail. This makes it a useful tool for maintaining SSH tunnels.
The following service can start an SSH tunnel on login using the connection settings in your ssh configuration. If the connection closes for any reason, it waits 10 seconds before restarting it:
Then enable and start the Systemd/User service. See #Keep alive for how to prevent the tunnel from timing out. If you wish to start the tunnel on boot, you might want to rewrite the unit as a system service.
Autossh — automatically restarts SSH sessions and tunnels
When a session or tunnel cannot be kept alive, for example due to bad network conditions causing client disconnections, you can use autossh to automatically restart them.
Connecting through a SOCKS-proxy set by Proxy settings:
With the -f option autossh can be made to run as a background process. Running it this way however means the passphrase cannot be entered interactively.
The session will end once you type exit in the session, or the autossh process receives a SIGTERM, SIGINT of SIGKILL signal.
Run autossh automatically at boot via systemd
If you want to automatically start autossh, you can create a systemd unit file:
Here AUTOSSH_GATETIME=0 is an environment variable specifying how long ssh must be up before autossh considers it a successful connection, setting it to 0 autossh also ignores the first run failure of ssh. This may be useful when running autossh at boot. Other environment variables are available at autossh(1) . Of course, you can make this unit more complex if necessary (see the systemd documentation for details), and obviously you can use your own options for autossh, but note that the -f implying AUTOSSH_GATETIME=0 does not work with systemd.
Remember to start and/or enable the service afterwards.
You may also need to disable ControlMaster e.g.
Alternative service should SSH daemon fail
For remote or headless servers which rely exclusively on SSH, a failure to start the SSH daemon (e.g., after a system upgrade) may prevent administration access. systemd offers a simple solution via OnFailure option.
Let us suppose the server runs sshd and telnet is the fail-safe alternative of choice. Create a file as follows. Do not enable telnet.socket!
That’s it. Telnet is not available when sshd is running. Should sshd fail to start, a telnet session can be opened for recovery.
Terminal background color based on host
To better distinguish when you are on different hosts, you can set a different background color based on the kind of host.
This solution works, but is not universal (ZSH only).
Network specific configuration
You can use host configuration specific to the network you are connected to using a Match exec .
For example, when using nmcli, and the connection is configured (manually or through DHCP) to use a search-domain:
Private networks hostkeys verification
Because different servers on different networks are likely to share a common private IP address, you might want to handle them differently.
The factual accuracy of this article or section is disputed.
The best solution is to use the #Network specific configuration to use a different UserKnownHostsFile depending on the network you are on. The second solution, best used as default when you are working on new/prototype networks, would be to simply ignore hostkeys for private networks:
The factual accuracy of this article or section is disputed.
Run command at login
If you are using an interactive session, there are multiple ways to execute a command on login:
- use the authorized_keys file on the remote host (see AUTHORIZED_KEYS FILE FORMAT in sshd(8) )
- use
/.ssh/rc on the remote host if the server has enabled the PermitUserRC option
Agent forwarding
SSH agent forwarding allows you to use your local keys when connected to a server. It is recommended to only enable agent forwarding for selected hosts.
Next, configure an SSH agent and add your local key with ssh-add.
If you now connect to a remote server you will be able to connect to other services using your local keys.
Troubleshooting
Checklist
Check these simple issues before you look any further.
- The config directory
/.ssh , its contents should be accessible only by the user (check this on both the client and the server), and the user’s home folder should only be writable by the user:
Check that the client’s public key (e.g. id_rsa.pub ) is in
/.ssh/authorized_keys on the server.
Connection refused or timeout problem
Port forwarding
If you are behind a NAT mode/router (which is likely unless you are on a VPS or publicly addressed host), make sure that your router is forwarding incoming ssh connections to your machine. Find the server’s internal IP address with $ ip addr and set up your router to forward TCP on your SSH port to that IP. portforward.com can help with that.
Is SSH running and listening?
The ss utility shows all the processes listening to a TCP port with the following command line:
If the above command do not show the system is listening to the port ssh , then SSH is not running: check the journal for errors etc.
Are there firewall rules blocking the connection?
Iptables may be blocking connections on port 22 . Check this with:
and look for rules that might be dropping packets on the INPUT chain. Then, if necessary, unblock the port with a command like:
For more help configuring firewalls, see firewalls.
Is the traffic even getting to your computer?
Start a traffic dump on the computer you are having problems with:
This should show some basic information, then wait for any matching traffic to happen before displaying it. Try your connection now. If you do not see any output when you attempt to connect, then something outside of your computer is blocking the traffic (e. g., hardware firewall, NAT router etc.).
Your ISP or a third party blocking default port?
In some cases, your ISP might block the default port (SSH port 22) so whatever you try (opening ports, hardening the stack, defending against flood attacks, et al) ends up useless. To confirm this, create a server on all interfaces (0.0.0.0) and connect remotely.
If you get an error message comparable to this:
That means the port is not being blocked by the ISP, but the server does not run SSH on that port (See security through obscurity).
However, if you get an error message comparable to this:
That means that something is rejecting your TCP traffic on port 22. Basically that port is stealth, either by your firewall or 3rd party intervention (like an ISP blocking and/or rejecting incoming traffic on port 22). If you know you are not running any firewall on your computer, and you know that Gremlins are not growing in your routers and switches, then your ISP is blocking the traffic.
To double check, you can run Wireshark on your server and listen to traffic on port 22. Since Wireshark is a Layer 2 Packet Sniffing utility, and TCP/UDP are Layer 3 and above (see IP Network stack), if you do not receive anything while connecting remotely, a third party is most likely to be blocking the traffic on that port to your server.
Diagnosis
Install either tcpdump or Wireshark with the wireshark-cli package.
where interface is the network interface for a WAN connection (see ip a to check). If you are not receiving any packets while trying to connect remotely, you can be very sure that your ISP is blocking the incoming traffic on port 22.
Possible solution
The solution is just to use some other port that the ISP is not blocking. Open the /etc/ssh/sshd_config and configure the file to use different ports. For example, add:
Also make sure that other «Port» configuration lines in the file are commented out. Just commenting «Port 22» and putting «Port 1234» will not solve the issue because then sshd will only listen on port 1234. Use both lines to run the SSH server on both ports.
Restart the server sshd.service and you are almost done. You still have to configure your client(s) to use the other port instead of the default port. There are numerous solutions to that problem, but let us cover two of them here.
Read from socket failed: connection reset by peer
Recent versions of openssh sometimes fail with the above error message when connecting to older ssh servers. This can be worked around by setting various client options for that host. See ssh_config(5) for more information about the following options.
The problem could be the ecdsa-sha2-nistp*-cert-v01@openssh elliptical host key algorithms. These can be disabled by setting HostKeyAlgorithms to a list excluding those algorithms.
If that does not work, it could be that the list of ciphers is too long. Set the Ciphers option to a shorter list (fewer than 80 characters should be enough). Similarly, you can also try shortening the list of MACs .
See also the discussion on the openssh bug forum.
«[your shell]: No such file or directory» / ssh_exchange_identification problem
One possible cause for this is the need of certain SSH clients to find an absolute path (one returned by whereis -b [your shell] , for instance) in $SHELL , even if the shell’s binary is located in one of the $PATH entries.
«Terminal unknown» or «Error opening terminal» error message
If you receive the above errors upon logging in, this means the server does not recognize your terminal. Ncurses applications like nano may fail with the message «Error opening terminal».
The correct solution is to install the client terminal’s terminfo file on the server. This tells console programs on the server how to correctly interact with your terminal. You can get info about current terminfo using $ infocmp and then find out which package owns it.
If you cannot install it normally, you can copy your terminfo to your home directory on the server:
After logging in and out from the server the problem should be fixed.
TERM hack
Alternatively, you can simply set TERM=xterm in your environment on the server (e.g. in .bash_profile ). This will silence the error and allow ncurses applications to run again, but you may experience strange behavior and graphical glitches unless your terminal’s control sequences exactly match xterm’s.
Connection closed by x.x.x.x [preauth]
If you are seeing this error in your sshd logs, make sure you have set a valid HostKey
id_dsa refused by OpenSSH 7.0
OpenSSH 7.0 deprecated DSA public keys for security reasons. If you absolutely must enable them, set the config option PubkeyAcceptedKeyTypes +ssh-dss (https://www.openssh.com/legacy.html does not mention this).
No matching key exchange method found by OpenSSH 7.0
OpenSSH 7.0 deprecated the diffie-hellman-group1-sha1 key algorithm because it is weak and within theoretical range of the so-called Logjam attack (see https://www.openssh.com/legacy.html). If the key algorithm is needed for a particular host, ssh will produce an error message like this:
The best resolution for these failures is to upgrade/configure the server to not use deprecated algorithms. If that is not possible, you can force the client to reenable the algorithm with the client option KexAlgorithms +diffie-hellman-group1-sha1 .
tmux/screen session killed when disconnecting from SSH
If your processes get killed at the end of the session, it is possible that you are using socket activation and it gets killed by systemd when it notices that the SSH session process exited. In that case there are two solutions. One is to avoid using socket activation by using ssh.service instead of ssh.socket . The other is to set KillMode=process in the Service section of ssh@.service .
The KillMode=process setting may also be useful with the classic ssh.service , as it avoids killing the SSH session process or the screen or tmux processes when the server gets stopped or restarted.
SSH session stops responding
SSH responds to flow control commands XON and XOFF . It will freeze/hang/stop responding when you hit Ctrl+s . Use Ctrl+q to resume your session.
Broken pipe
If you attempt to create a connection which results in a Broken pipe response for packet_write_wait , you should reattempt the connection in debug mode and see if the output ends in error:
The send packet line above indicates that the reply packet was never received. So, it follows that this is a QoS issue. To decrease the likely-hood of a packet being dropped, set IPQoS :
The reliability ( 0x04 ) type-of-service should resolve the issue, as well as 0x00 and throughput ( 0x08 ).
Slow daemon startup after reboot
If you are experiencing excessively long daemon startup times after reboots (e.g. several minutes before the daemon starts accepting connections), especially on headless or virtualized servers, it may be due to a lack of entropy.[3] This can be remedied by installing either Rng-tools or Haveged, as appropriate for your system. However, take note of the associated security implications discussed in each package’s respective wiki page.
Terminate unresponsive SSH connection
If a client session is no longer responding and cannot be terminated by instructing the running program (e.g. shell), you can still terminate the session by pressing Enter ,
and . one after another in that order.
is a pseudo-terminal escape character (see ssh(1) § ESCAPE CHARACTERS ), which can be added multiple times depending on the client session to terminate. For example, if you connected from A to B and then from B to C and the session from B to C freezes, you can terminate it by pressing Enter and typing
. , which will leave you in a working session on B.
WARNING: REMOTE HOST IDENTIFICATION HAS CHANGED!
If the client warns that the key of an ssh server has changed, you should verify that the newly offered key really belongs to the server operator. Then remove the old key from the known_hosts file with ssh-keygen -R $SSH_HOST and accept the new key as if it was a new server.
Connecting to a remote without the appropriate terminfo entry
When connecting to hosts that do not have a terminfo entry for your terminal, for example, when using a terminal emulator whose terminfo entry is not shipped with ncurses (e.g. kitty and rxvt-unicode), or when connecting to hosts with a limited terminfo database (e.g. systems running OpenWrt), various issues will occur with software that relies on terminfo(5) .
A proper solution is to place the appropriate terminfo entry on the host. If that is not feasible, an alternative is to set TERM to a value that is both supported by the remote host and compatible with the terminal.
Since OpenSSH 8.7, a custom TERM environment variable can be passed to remote hosts with a simple configuration snippet:
Источник


