- How to Convert an IMG File to ISO File in Linux
- What Is IMG Format?
- Converting IMG to ISO
- A GUI Tool to Convert IMG to ISO
- Different Tool, Same Process
- 3 Ways to Extract and Copy Files from ISO Image in Linux
- Mount or Extract ISO File in Linux
- Extract ISO Content Using 7zip Command
- Extract ISO Content Using isoinfo Command
- If You Appreciate What We Do Here On TecMint, You Should Consider:
- How to Create an ISO File in Ubuntu 18.04 LTS
- Using Mkisofs utility
- Using dd command in Terminal to build an ISO file
- Using Brasero utility to make an ISO file
- Karim Buzdar
- How To Create, Mount, And Burn An ISO File In Linux
- Creating An ISO File On Linux
- Mounting An ISO File on Linux
- Burning ISO Files To USB On Linux
- Terminal Instructions
- GUI Instructions
- Burning ISO files To DVD And CD On Linux
How to Convert an IMG File to ISO File in Linux

In Linux, you will frequently come across a file in the .ISO format. Most Linux distributions provide their LiveCD downloads in ISO format, as it is easier to work with in Linux. However, there are times when you come across an IMG file and have no idea how to deal with it. In this article we will show you how you can easily convert an IMG file to ISO format.
What Is IMG Format?
An IMG file can be many things, but usually, the format refers to image copies of CDs and DVDs. Even then, the format has (at least) two different variants (that we know of): the “generic” IMG type of CD and DVD copies and the CloneCD version, which is usually accompanied by two more files with extra info about the optical disc.
Converting IMG to ISO
The primary tool for converting both those types of CD images to ISO format is ccd2iso. Although it’s a command-line tool, it’s pretty straightforward to use. To install ccd2iso on any Ubuntu-based distribution, use:

Afterward, to convert any IMG file to ISO format, use:

Yes, it is as simple as that.

After a short time, you will find the converted ISO file next to your original IMG file.
A GUI Tool to Convert IMG to ISO
If you prefer a GUI, you should try acetoneiso. Install it with:
Continue by launching it and accepting the suggested settings. Don’t try to convert your IMG file to an ISO with it yet – it won’t work, and the program will suggest you visit PowerISO‘s site and Download the “PowerISO Command Line Utility for Linux.”
We downloaded the file to our default Downloads folder. If you save it elsewhere, remember to swap the path.
Open a terminal and move to the acetoneiso folder with:
Extract PowerISO from the file you downloaded with your equivalent of:
Return to AcetoneISO and from the “Image Conversion” menu, select “Convert Image to ISO.” Choose your original IMG file, enter a path and name for the converted file in the next step, and, after a short wait, your ISO will be available.

Different Tool, Same Process
A newer and more versatile tool, iat , can read IMG files and many more CD image formats and either convert them to ISO files or directly “burn” them to disk.
We left it for last, though, because it failed in one case while testing it.
To install it, use:

To initiate a conversion, use the following command:

Finally, if everything we saw here failed, maybe you should consider the possibility of your IMG file not being a CD or DVD image. As we said at the very beginning, “an IMG file can be many things,” such as a hard disk and partition backups.
A good hint you’re dealing with “that type of IMG file” would be its size: if it’s much larger than 4.5GBs, it’s probably not an optical disc backup. Dual-layer DVDs that can hold double the amount of data of a standard DVD remains relatively rare for the whole optical media era. Hence, files close to or over that size are probably partition backups. And those are a wholly different story.
Related:
OK’s real life started at around 10, when he got his first computer — a Commodore 128. Since then, he’s been melting keycaps by typing 24/7, trying to spread The Word Of Tech to anyone interested enough to listen. Or, rather, read.
Источник
3 Ways to Extract and Copy Files from ISO Image in Linux
Let’s say you have a large ISO file on your Linux server and you wanted to access, extract or copy one single file from it. How do you do it? Well in Linux there are couple ways do it.
For example, you can use standard mount command to mount an ISO image in read-only mode using the loop device and then copy the files to another directory.
Mount or Extract ISO File in Linux
To do so, you must have an ISO file (I used ubuntu-16.10-server-amd64.iso ISO image) and mount point directory to mount or extract ISO files.
First create an mount point directory, where you will going to mount the image as shown:
Once directory has been created, you can easily mount ubuntu-16.10-server-amd64.iso file and verify its content by running following command.
![]() Mount ISO File in Linux
Mount ISO File in Linux
Now you can go inside the mounted directory (/mnt/iso) and access the files or copy the files to /tmp directory using cp command.
![]() Copy Files From ISO File in Linux
Copy Files From ISO File in Linux
Note: The -r option used to copy directories recursively, if you want you can also monitor progress of copy command.
Extract ISO Content Using 7zip Command
If you don’t want to mount ISO file, you can simply install 7zip, is an open source archive program used to pack or unpack different number of formats including TAR, XZ, GZIP, ZIP, BZIP2, etc..
Once 7zip program has been installed, you can use 7z command to extract ISO file contents.
![]() 7zip – Extract ISO File Content in Linux
7zip – Extract ISO File Content in Linux
Note: As compared to Linux mount command, 7zip seems much faster and smart enough to pack or unpack any archive formats.
Extract ISO Content Using isoinfo Command
The isoinfo command is used for directory listings of iso9660 images, but you can also use this program to extract files.
As I said isoinfo program perform directory listing, so first list the content of ISO file.
![]() List ISO Content in Linux
List ISO Content in Linux
Now you can extract a single file from an ISO image like so:
Note: The redirection is needed as -x option extracts to stdout.
![]() Extract Single File from ISO in Linux
Extract Single File from ISO in Linux
Well, there are many ways to do, if you know any useful command or program to extract or copy files from ISO file do share us via comment section.
If You Appreciate What We Do Here On TecMint, You Should Consider:
TecMint is the fastest growing and most trusted community site for any kind of Linux Articles, Guides and Books on the web. Millions of people visit TecMint! to search or browse the thousands of published articles available FREELY to all.
If you like what you are reading, please consider buying us a coffee ( or 2 ) as a token of appreciation.

We are thankful for your never ending support.
Источник
How to Create an ISO File in Ubuntu 18.04 LTS
Most operating system and programs especially large one comes in an ISO format containing all required installation files. An ISO file or an ISO image is a perfect representation of all file and folders contained in a CD /DVD. Alternatively, you can say that it is a package all installation files and folder in one single file in an ISO format.
You can easily back up or archive the files and folders into an ISO file. You can make that ISO file to act it as an external drive, make bootable USBs or CD/DVD to later use for installation, save as a backup or distributing it over to someone.
With ISO files, you can:
- Create an installation disc by Burning to USB or CD/DVD.
- Mount as a virtual drive.
- Use for installation of OS or software programs.
In this article, I will describe some ways to create an ISO file in Ubuntu 18.04 LTS.
Using Mkisofs utility
Under Linux, you can create an ISO image from a folder using a command line argument with the Mkisofs utility. You can use Mkisofs to automatically backup the data with the option to exclude some individual files if necessary. It supports wildcards as well.
The basic syntax of the command is:
$ mkisofs -o [filename.iso] [ directory_path]
-o defines the file name of the ISO you want to create followed by the directory you want to backup or store an ISO file.
For instance, I want to create an ISO file from the directory /home/tin/Documents/backup and save it as backup.iso file:

It will create the backup.iso file and save it in the current directory.
Using dd command in Terminal to build an ISO file
Basically using dd command, we can create copies of data whether they are file or folders, partitions, or CD/DVDs. We can also make use of dd command to create ISO files.
The basic syntax of dd command is: Advertisement
$ dd if=[source] of=[target.iso]
If= Tells command from where to input the source data.
Of= Tells command where to define the output.
For instance, I will type the following command to copy and save the contents of the drive as an ISO file named diskimage.iso:

The ISO image named diskimage.iso will be created in the current directory.
Using Brasero utility to make an ISO file
You can use Linux disk burning utility Brasero to create an ISO file. Older versions of Ubuntu include built-in Brasero utility. However, in 16.04 and the newer version, you have to manually install this utility.
To install Brasero, press Ctrl+Alt+T to launch Terminal.
Enter the following command in Terminal:

Once you have done with the installation, open the application.
To open the Brasero application, Press windows key or click on dash icon in the bottom left corner of the desktop to open Dash menu.

Then search for Brasero application by typing its name in the search bar. When the application appears, click on it to open it.

In the Brasero application window, click on the Data project option.

Then click on the + icon to start adding files to the new project.

From the window that appears, select the individual files or directories then click on Add.

You will notice that files are added in the application. Click on Burn.

Choose the location to save the ISO file. Specify the name for the ISO file with .iso extension and click on Create Image.

Once finished, you will be notified that the image has been successfully created.

Hence all above were the different ways using which you can create ISO files. Once you have ISO file, you can save it as a backup, use it as virtual CD/DVD, burn it on USB or CD/DVD and share it with someone.
Karim Buzdar
About the Author: Karim Buzdar holds a degree in telecommunication engineering and holds several sysadmin certifications. As an IT engineer and technical author, he writes for various web sites. You can reach Karim on LinkedIn
Источник
How To Create, Mount, And Burn An ISO File In Linux
Dec 12, 2017
Comment
ISO files are how users commonly install an operating system that doesn’t come in disc form. They’re a format that can be read easily on both Windows and Linux though most users only know how to work with an ISO file if they already have it. Most users have no idea how to make an ISO, burn them, how they work, etc. It is because of this, we’re going to dig deep and explain everything there is to know about ISO images. We’ll go over how to make them, how to burn them to USB sticks, as well as CDs and DVDs. We’ll also go over how to mount an ISO file in Linux to access the files inside.
Creating An ISO File On Linux
To create an ISO file on Linux, open up a terminal and use the mkdir command to create a directory. This directory is important, as it will be the basis of the ISO file. Everything you want to add to the ISO file goes into this folder. In this example, we’ll be making the folder directly in the home directory.
From here, use the MV command to put individual files and folders into the iso-files directory.
With all the files and directories inside of the source folder, we can make the ISO file. This is done with the mkisofs tool.
Running mkisofs may take some time. When it’s done, a burnable (and flashable) ISO image will be on your Linux PC.
Mounting An ISO File on Linux
ISO files are widely used because it’s an easy way to transfer a lot of data from an image to a bootable USB drive, CD or DVD. Trouble is, due to how these files are made, users can’t just “double-click” them and access the files inside. Instead, if you want to access data from an ISO, you’ll need to “mount” them, similar to how you’d mount a hard drive, or USB stick. To mount an ISO file, open a terminal, and follow these steps.
Step 1: create a folder for the ISO file to mount to. This is important, because if the ISO has nowhere to go, the contents of the file will be everywhere. For example, if you mount testiso.iso to /home/username/, the contents of the files would be everywhere in your home folder.
Instead, use the mkdir command to make a new folder to mount to.
Step 2: With the folder made, all that’s left to do is to mount the file as a loop device.
Please keep in mind that due to the nature of how ISO files work, some may refuse to mount to Linux as “read/write” and go into “read-only mode”. This is because certain ISO files do not allow users to tamper with the files on it.
To unmount the ISO from the folder, do:
Burning ISO Files To USB On Linux
Linux users are exposed to a lot of disk image files. This is because virtually every single Linux operating system distributes their product as an ISO image file. To make use of this image, you’ll need to “burn it”. If you’re looking to load it up from a USB stick, you’ll need to “flash it” to a USB. Flashing means that a program scans the contents of the image and moves it to the USB.
Accomplishing this on Linux is easy and there are many ways to do it. In this guide, we’ll cover two methods. The terminal way, and a GUI way.
Terminal Instructions
Plug in a USB stick, and open up a terminal. Inside of the terminal, run the lsblk command. This command will list all of the installed storage devices. Look for /dev/sdX (replace the X with the letter the command gives it). Then pipe it into this command to flash the ISO image to your USB stick:
You’ll know the flashing process is complete when the terminal window lets you type again.
GUI Instructions
The best way currently to flash an ISO file is to use Etcher. It’s an electron-based app. Download and extract it, then right-click on the AppImage file to run it. It’ll ask to make a shortcut. Click “yes”.
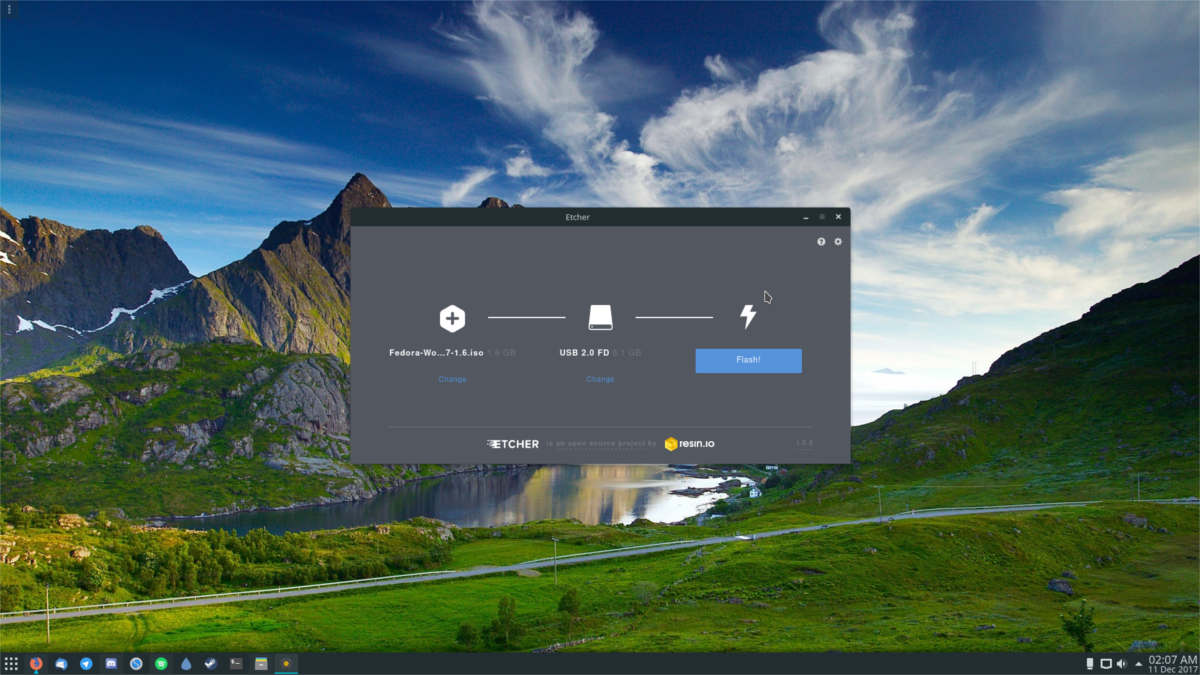
When Etcher opens, insert your USB stick into the PC. Then, move on to step 2 and browse for the ISO file you want to flash, and click “Flash!” to start.
Burning ISO files To DVD And CD On Linux
Most desktop environments still come with a DVD burner too — but not all. If you’re using KDE Plasma, you’ve got K3B. Use Gnome? Brasero is the tool to use. XFCE? Try XfBurn. On anything else? You may not have a burning tool. If this is the case, install either Brasero, K3b or Xfburn as they all work pretty well.
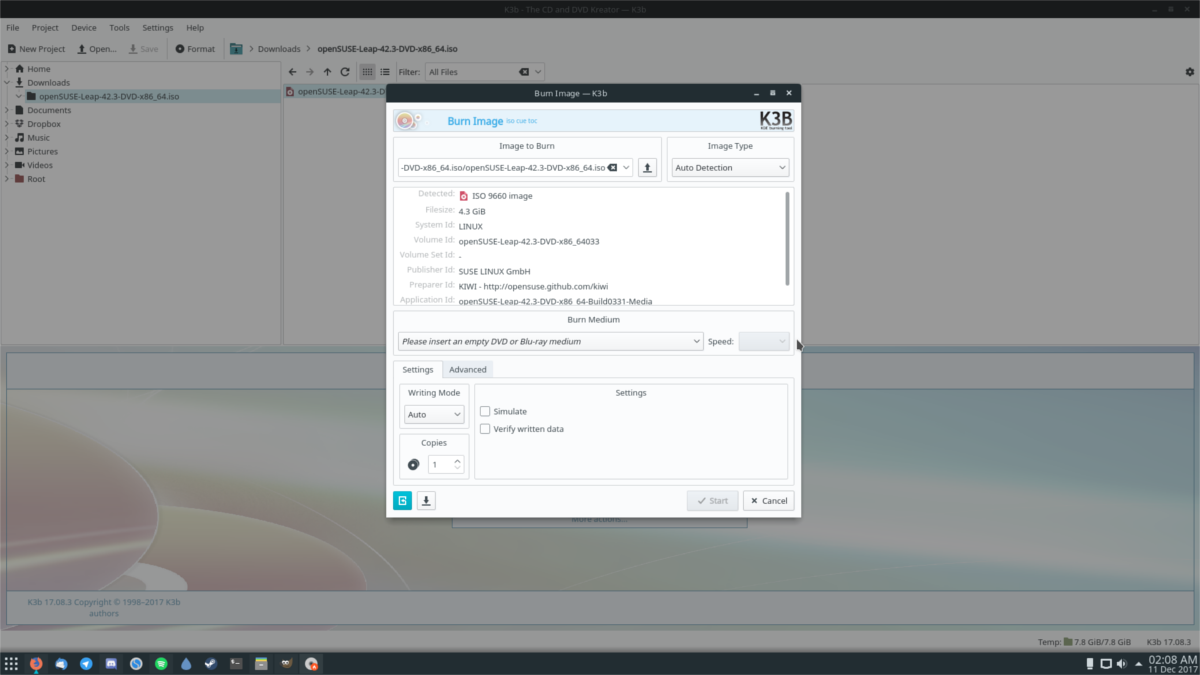
To burn a CD or DVD on Linux, follow these steps.
Step 1: Insert your blank disc in the disc drive and close it.
Step 2: Open the disk burning software.
Step 3: Use the burning tool to locate the ISO file you’d like to burn. Alternatively, find the ISO in your file manager, right-click on it and select the option to open it with the burning tool.
Step 4: Click the “burn” button and wait for the program to burn the data to the disc.
Источник


