- Input Japanese using uim
- Contents
- Installation
- Japanese fonts
- Sans-serif
- Serif and Sans-serif
- Input method
- Anthy
- Modified Anthy (anthy-ut)
- Google CGI API for Japanese input
- Settings
- Environment variables
- Toolbar utilities
- uim-toolbar-gtk/qt
- uim-toolbar-gtk-systray
- Using systemd
- uim preferences
- Input Japanese on Emacs
- LEIM or minor-mode
- Preferred character encoding
- Enable inline candidates displaying mode by default
- Set Hiragana input mode by default
- Ignoring C-SPC on uim.el
- Disabling XIM on Emacs
- Troubleshooting
- Set the GTK_IM_MODULE variable, but uim still does not work with GTK 2 applications
- Cannot input Japanese on Opera
- Cannot type a consonant in Zenkaku mode
- uim-toolbar-gtk-systray: tray icon is crushed
- I use darker theme, I cannot read the uim mode icons
- Japanese input on linux
- Japanese Input on Ubuntu Linux 14.04 LTS Trusty Tahr
- Setup Procedure
- Japanese input on linux
- Japanese Input on Ubuntu Linux 13.10 Saucy Salamander
- Setup Procedure
Input Japanese using uim
 This article or section is a candidate for moving to uim.
This page explains how to get the Japanese input to work using uim.
If you use IBus, see IBus.
Contents
Installation
You need the following packages to input Japanese.
- Japanese fonts
- Japanese input method (Kana to Kanji conversion engine)
- Input method framework: uim
Japanese fonts
see also Fonts and Font configuration for configuration or more detail.
Recommended Japanese fonts are as follows.
Sans-serif
- adobe-source-han-sans || adobe-source-han-sans-jp-fonts or adobe-source-han-sans-otc-fonts
Open-source OTF fonts developed by Adobe.
Serif and Sans-serif
- IPA fonts || otf-ipafont
An open source OTF font set including sans-serif (Gothic) and serif (Mincho) glyphs provided by Information-technology Promotion Agency, Japan (IPA).
If you want to show 2channel Shift JIS art properly, use the following fonts:
Input method
Anthy
Anthy is one of the most popular Japanese input methods in the open source world. However, it has not been maintained for a long time. Debian succeeds it from May 2010.
Install anthy from the official repositories.
Extra dictionary
Anthy’s default dictionary does not include several characters which are not specified on EUC-JP (JIS X 0208) such as «①», «♥», etc. alt-cannadic provides extra dictionaries including those characters.
Get alt-cannadic dictionary and put them under your
Please see official wiki for more detail (Japanese).
Modified Anthy (anthy-ut)
Modified Anthy is a set of patches and huge extended dictionaries which aims to improve the Kana to Kanji conversion quality of original Anthy.
Modified Anthy consists two different upstreams:
- Patched source of Anthy by G-HAL
- Huge extended dictionalies by UTSUMI
Mozc is a Japanese Input Method Editor (IME) designed for multi-platform such as Chromium OS, Windows, Mac and Linux which originates from Google Japanese Input.
Though Mozc AUR adapts to only ibus input method framework, macuim provides uim-mozc plugin.
Mozc (Vanilla)
You can install this from the unofficial pnsft-pur user repository.
You can choose to install all packages in the mozc-im group by specifying the group name.
Or, specify the individual package names directly. For example install uim-mozc AUR .
mozc-ut
To build uim-mozc, edit PKGBUILD like follow, i,e. uncomment _uim_mozc= line:
Registering Mozc
Google CGI API for Japanese input
Google CGI API for Japanese Input (Google-CGIAPI-Jp) is CGI service to provide Japanese conversion on the Internet by Google. It can be used on web browser. Its conversion engine seems to be equivalent to Google Japanese Input, so conversion quality is probably better than Mozc.
You can use it via uim. Choose «Google-CGIAPI-Jp» on uim-im-switcher-gtk/gtk3/qt4 or uim-pref-gtk/gtk3/qt4.
Settings
Environment variables
Add the following to
Toolbar utilities
If you want to use UimToolbar utilities which shows and controls uim mode, add one of the followings, too.
uim-toolbar-gtk/qt
Using toolbar appears as a window.
uim-toolbar-gtk-systray
Using toolbar for system tray.
Using systemd
If you are using systemd to manage your X session, you will need to set the environment variables in your systemd session rather than an init script.
Lastly, you will need to enable the services:
uim preferences
Configure uim preferences by running :
which brings forth a GUI.
Choose your preferring input method as ‘Default input method’.
You can run uim-xim or restart X to test your settings.
Provided everything went well you should be able to input Japanese in X.
Input Japanese on Emacs
uim provides uim.el the bridge software between Emacs and uim. Here is a sample to use uim on Emacs with utf-8 encoding.
Please see Official wiki for more detail.
LEIM or minor-mode
You can call uim.el from Emacs in two ways; directly or with the LEIM (Library of Emacs Input Method) framework. Though settings of them are different, basic functions are same. If you want to switch between uim.el and other Emacs IMs frequently, you should use LEIM framework.
Settings for the minor-mode
If you will be using on minor-mode, write the following settings into your .emacs.d/init.el or some other file for Emacs customizing.
Settings for the LEIM
If you will be using via LEIM, write the following settings into your .emacs.d/init.el or some other file for Emacs customizing and choose default input method.
Preferred character encoding
uim.el uses euc-jp character encoding by default. To set UTF-8 as preferred encodings, add the followings into your .emacs.d/init.el or some other file for Emacs customizing.
Enable inline candidates displaying mode by default
The inline candidates displaying mode displays conversion candidates just below (or above) preedit text vertically instead of echo area. If you want to enable inline candidates displaying mode by default, write as follows.
Set Hiragana input mode by default
To set Hiragana input mode at activting uim, add the settings like follows:
Ignoring C-SPC on uim.el
When you are assigning activation/deactivation of input method to C-SPC, C-SPC is stolen to switch input mode by uim.el while it is activated. To prevent the stealing and use for set-mark-command, add the followings into your .emacs.d/init.el or some other file for Emacs customizing.
Disabling XIM on Emacs
When you are using input method on your desktop and assigning activation/deactivation of input method to C-SPC, you will be not able to use C-SPC/C-@ as set-mark-command on Emacs. To avoid this problem, add the following into your
/.Xdefaults . xim will be disabled on Emacs.
Troubleshooting
Set the GTK_IM_MODULE variable, but uim still does not work with GTK 2 applications
In case you already set the GTK_IM_MODULE environmental variable, but uim still does not work with GTK 2 applications, you need to specify the location of gtk.immodules, which is created by and can be generated with gtk-query-immodules-2.0 .
The default location is /etc/gtk-2.0/gtk.immodules for GTK 2.
You can do this with either the GTK_IM_MODULE_FILE variable (not recommended, it causes GTK 3 applications to see incompatible modules) or the im_module_file setting (recommended).
Add the following to /etc/gtk-2.0/gtkrc or
Cannot input Japanese on Opera
If you use Opera and cannot input Japanese with uim, try to edit environment variable as follows: Make sure to add the following to the beginning of /usr/bin/opera.
Cannot type a consonant in Zenkaku mode
If you cannot type a consonant in Zenkaku mode, add the following to your config file.
uim-toolbar-gtk-systray: tray icon is crushed
Though some of DE, WM or panel application may provide only one icon space per application on system-tray/notification-area, uim-toolbar-gtk-systray displays some icons on it by default so those icons are crushed. Choose just one of them to solve it. The steps to display only ‘Input mode’ icon for example as follows:
- Run uim-pref-gtk .
- Click ‘Toolbar’ on ‘Group’ list.
- Take the all checkmarks off.
- Click ‘Anthy’, ‘Anthy (UTF-8)’ or ‘Mozc’ which you are using on ‘Group’ list.
- Click Edit button in ‘Toolbar’ box > ‘Enable toolbar buttons’ line.
- Enable only ‘Input mode’ and click ‘Close’ button.
- Click ‘OK’ button to close uim-pref-gtk.
The tray icon will be displayed «あ» (Hiragana mode) or «ー» (Direct mode).
I use darker theme, I cannot read the uim mode icons
You can choose icons for darker background (uim 1.6.0 or later).
- Run uim-perf-gtk
- Click ‘Toolbar’ on ‘Group’ list.
- Check ‘Use icon for dark background’.
Источник
Japanese input on linux

Japanese Input on Ubuntu Linux 14.04 LTS Trusty Tahr
This tutorial will show you how to set up Japanese input IME (日本語入力方法) on Ubuntu Linux 14.04 from the Unity interface so you can type in Japanese in all your favorite Ubuntu applications.
Setup Procedure
To start, select Dash home from the Unity Launcher.

From the Dash home, search for Language Support.

Select Language Support.
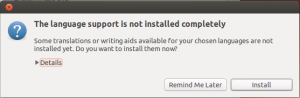
Note: If you get the language support is not installed completely dialog box at this point, press Install to install them now.
On the Language tab of the Language Support screen, press Install / Remove Languages…

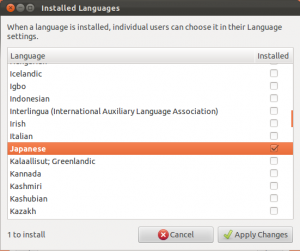
On the Installed Languages screen, scroll down to Japanese and check Installed, and then press Apply Changes.
Enter your password on the Authenticate screen.
It will take a few moments to download and install the Japanese IME packages.

Back on the Language Support screen, select IBus for the Keyboard input method system, and then press Close.

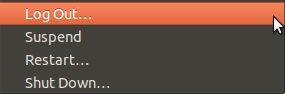
For these settings to go into effect, you must log out and log back in.
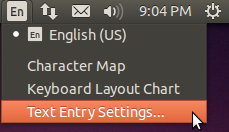
After logging back in, click the language icon from the top panel and select Text Entry Settings…
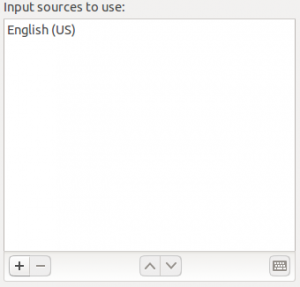
On the Text Entry screen, click the + icon on the button left of the Input sources to use area.
On the Choose an input source screen, scroll down and select Japanese (Anthy).
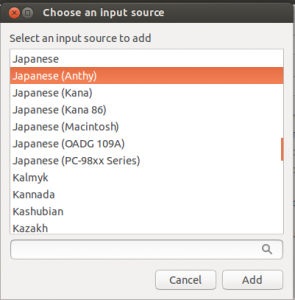
Press Add.
The Japanese Anthy input method will now be available from the language icon in the top panel.
Open up any application with a text box such as gedit and place the cursor in the text box.
Press the language icon on the tap panel and select Anthy.
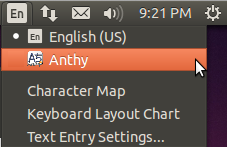
The language icon will now change to the Anthy Aち icon.

That’s it. You can now type in Japanese in Ubuntu 14.04. お疲れさまでした。
Источник
Japanese input on linux
Japanese Input on Ubuntu Linux 13.10 Saucy Salamander
This tutorial will show you how to set up Japanese input IME (日本語入力方法) on Ubuntu Linux 13.10 from the Unity interface so you can type in Japanese in all your favorite Ubuntu applications. The installation procedure is a bit different from the previous Ubuntu 13.04 release.
Setup Procedure
To start, select Dash home from the Unity Launcher.
From the Dash home, search for Language Support.
Select Language Support.
Note: If you get the language support is not installed completely dialog box at this point, press Install to install them now.
On the Language tab of the Language Support screen, press Install / Remove Languages…
On the Installed Languages screen, scroll down to Japanese and check Installed, and then press Apply Changes.
Enter your password on the Authenticate screen.
It will take a few moments to download and install the Japanese IME packages.
Back on the Language Support screen, select IBus for the Keyboard input method system, and then press Close.
For these settings to go into effect, you must log out and log back in.
After logging back in, click the language icon from the top panel and select Text Entry Settings…
On the Text Entry screen, click the + icon on the button left of the Input sources to use area.
On the Choose an input source screen, scroll down and select Japanese (Anthy).
Press Add.
The Japanese Anthy input method will now be available from the language icon in the top panel.
Open up any application with a text box such as gedit and place the cursor in the text box.
Press the language icon on the tap panel and select Anthy.
The language icon will now change to the Anthy Aち icon.
That’s it. You can now type in Japanese in Ubuntu 13.10. お疲れさまでした。
Источник


