Technical Article
By Daniel H. Steinberg
October 2003
In the past two articles you have seen how to customize your Java application so that it looks and feels more like a native Macintosh application when running on Mac OS X without changing the end user experience on other platforms. A combination of runtime properties and coding changes that targeted Mac OS X specific APIs made a big difference to that audience.
Recall that Mac OS X is a melding of two worlds. Hard core UNIX programmers can pop open a Terminal window and write their Java code using vi and compile and run it from the command line. There is, however, the more traditional Mac audience that interacts with their computer through a friendly UI that follows Apple Human Interface guidelines.
In this article, we look at deploying your Java application. The technical geek audience might be happy with running a class with a main() method from the command line but the wider audience expects a double-clickable icon that looks and acts like every other native application. In this article, we travel from one end of the spectrum to the other to broaden your potential user base.
Although you should «test everywhere», your build machine may not be a Mac. Fortunately, as you will see, a double-clickable Macintosh application is just a directory with some special contents and a name that ends with .app . Even on a Windows machine you should be able to modify your build script to package up a Mac-specific version of your application.
Primitive Distributions
Because Mac OS X ships with J2SE 1.4.1 and J2SE 1.3.1, you can distribute your application as class files or jar files and — in theory — your customer could run your application from the Terminal application. We start with these models and quickly move to double-clickable jar files and shell scripts.
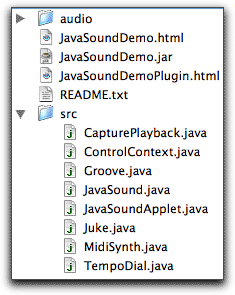
For this article, use the Java Sound Demo as the running example. Download and unzip the zip file. Inside the JavaSoundDemo directory you will find the source files inside of the src subdirectory, a jar file, audio files, and html files that we will not use.
Raw Class Files
As a developer, you don’t think twice about compiling the source files and running the application using the command line. Compiling the eight files in the src directory generates fifty class files. You can then run the sample application from the command line like this.
The Java Sound Demo starts up. We haven’t customized the application in any way so the menu appears at the top of the JFrame and not where Macintosh users expect. The application looks like this out of the box.
You have done this compile and run step so many times that you hardly think twice about it. Think of the least technical person you know and ask whether they would be likely to follow these steps to run your application if a competing application were easier to install and run.
This example demonstrates two separate areas of usability. Once we got the application up and running it looked good and ran fine. You would not, however, want to distribute an application to an end user this way. You would have to somehow bundle up the fifty class files for easy download and installation. You would then have to provide instructions for running the application using, in the case of Mac OS X, the Terminal application.
Jar Files
If you are going to have to package up the class files for distribution anyways, you may as well produce a jar file. And, if you are going to produce a jar file, it ought to be executable. In the case of the Java Sound Demo, the file JavaSoundDemo.jar is executable. Because Mac OS X ships with the Jar Launcher application, the end user needs only double click on the jar file and the application will launch.
To make the jar file executable, the manifest must include the name of the Main class file. Unjar JavaSoundDemo.jar with the command jar xvj JavaSoundDemo.jar . Here’s the file META-INF/MANIFEST.MF .
Shell Scripts and Helper Applications
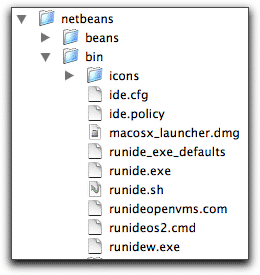
For larger or more complicated applications you are likely to have more than one jar file along with resource files. A common strategy for targeting multiple platforms is to include a batch file and a shell script. Choose the non-platform specific download from the NetBeans homepage. Inside of the bin subdirectory you will find applications for running NetBeans on a variety of platforms.
The shell script runide.sh can be run from the command line like this.
sh runide.sh -jdkhome /Library/Java/Home
The NetBeans IDE starts up with this decidedly non-Mac OS X look and feel.
You could, of course, modify the shell script to modify this look and feel, but the NetBeans developers decided on a different approach. Even though the typical NetBeans audience member is technically competent, there should be a friendlier way to start the IDE. They have created a native Mac OS X application called NetBeansLauncher .
The version of NetBeansLauncher that is included in the generic NetBeans download is a good next step. You will see how the team took it farther in the next section. On a Mac OS X computer you can double click on the macosx_launcher.dmg file inside of the bin directory. This is a disk image. Drag the NetBeansLauncher from the expanded disk image back into the bin directory. Now double click on the NetBeansLauncher . The ReadMe file that was also in the disk image provides the following information about usage.
When launched for the first time, NetBeansLauncher needs to find NetBeans root directory. First it looks into NetBeansLauncher.app itself. If it does not find NetBeans root directory there user must specify NetBeans root directory manually.
For this download, the first time the user starts up the NetBeansLauncher , they need to navigate to the netbeans directory. After that, double clicking on the NetBeansLauncher starts up the NetBeans IDE as if it were any other native Mac OS X application.
First Class Mac OS X Applications
If you download the Mac OS X disk image from the NetBeans distribution and mount it you may be surprised at the simplicity of what you find. Unlike the complex structure visible in the other distributions, you will see five files with documentation and a single application. To install, you can move this NetBeansLauncher application anywhere on your hard drive. Double click on it and the NetBeans IDE starts right up.
This is the experience that is expected on Mac OS X. The package structure and complexity is hidden from the user and they can’t accidentally move a file that renders the IDE unusable. In this section we’ll look more closely at the package structure and how to create a Mac OS X application whether or not our build machine is a Mac.
Packages in Mac OS X
Consider again the sentence from the NetBeansLauncher instructions that says in order to locate the NetBeans root directory, «First it looks into NetBeansLauncher.app itself.» This implies that NetBeansLauncher is a directory with the name «NetBeansLauncher.app». In the mounted disk image, either right click or Ctrl-click on the NetBeansLauncher icon and choose to «Show Package Contents».
The structure is the same for all Mac OS X applications. There is a Contents directory with an XML file named info.plist , a text file named PkgInfo, a MacOS directory, and a Resources directory. If you don’t have a creator code registered with Apple the PkgInfo text file should contain only the following.
If you have a creator code, use it in place of the question marks. Ordinarily the MacOS folder contains a small stub file that launches the Java VM. In this case the NetBeans team has written their own application. We will look more closely at a property list file in the next section. For now, take a look at the contents of the Resources directory.
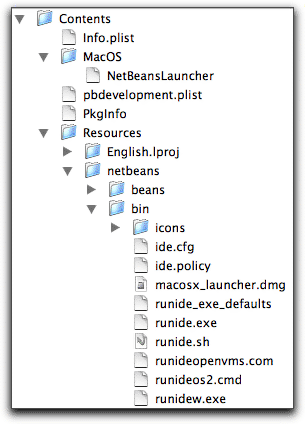
You can see the contents of the same netbeans package inside of the Resources subdirectory. This is your key to deploying on Mac OS X. Add in the necessary pieces and then just bundle up your ordinary distribution in the appropriate location. If you have a more flexible build process you should also strip out those pieces that aren’t needed for the Mac OS X application such as the Windows executables.
If you are interested in digging deeper into the structure of a Mac OS X application, you will find more information in the Apple publication Anatomy of a Bundle.
Creating «Native» Java Applications on Mac OS X
If you develop on Mac OS X you can use the Jar Bundler application to turn jar files into Mac OS X applications. Jar Bundler is distributed with the other developer tools and is located in Developer/Applications/ . Start it, select the «Classpath and Files» tab and add the file JavaSoundDemo.jar .
Select the «Build Information» tab. For «Main Class», navigate to the JavaSoundDemo.jar file again and select JavaSound from the drop down list. This list is populated by any classes in the jar file containing a main() method. Accept all of the default settings for the options. You can use the default Java application icon or you can create your own. The icon you see below started as a screen shot of the running Java Sound Demo and was transformed into an icon using the IconComposer application that is also distributed as part of the developer tools.
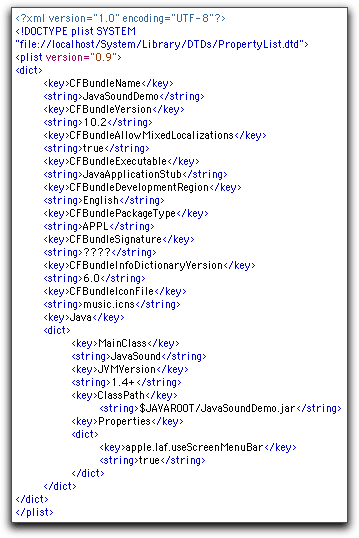
Press «Create Application» and enter the name «JavaSoundDemo». A Mac OS X application is created for you. You can show the package contents of the generated application as before. You can view the property list with Apple’s Property List Editor or with any text editor. It is just an XML file with properties stored as name — value pairs.
The Java properties indicate the location of the jar file, the name of the Main class, and the version of the JRE to be used. The other properties include a pointer to the icon file and to the Java application stub file that is the native executable.
Creating Mac OS X Java Applications on Other Platforms
Take a look at the contents of the package that was generated by Jar Bundler on Mac OS X.
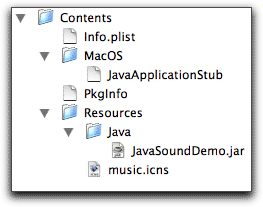
On another platform you need to duplicate this structure. To create an application named «JavaSoundDemo» on, say, a Windows machine, start by creating a directory and naming it JavaSoundDemo.app . Next, create a subdirectory named Contents . Inside of Contents you will need a MacOS directory with the JavaAPplicationStub . You can create the PkgInfo text file and your Info.plist can also be generated by hand and should contain the following XML.
You will need a Resources directory with a Java subdirectory into which you put the JavaSoundDemo.jar file. In other words, with the exception of the JavaApplicationStub and the music.icns file, everything else can be created on another platform.
If you use Ant you can easily add a target that takes your jar files, images, and other resources and bundles it up as a Mac OS X application bundle that includes the plist file and Java application stub in the appropriate locations. Every time you create a new build you will automatically have your Mac OS X version. You can also find a growing number of Ant tasks that automate some of the steps outlined in this article.
Summary
When it comes time to deploy your Java application, consider the ease of use of your target audience. Even developers appreciate the double clickable version of the NetBeans IDE. Creating a Java application that looks and feels like a native application does not require a lot of extra work and can easily be integrated into your build process even if your build machine runs a different operating system.
Источник
Jar файлы mac os
jar2app is a Python 2/3 script that can easily convert any jar file into a Mac OS X app file. It seeks simplicity, and in fact can be run just like
creating input.App in the process. No third-party libraries. No cruft.
Though simple and easy to use, there are loads of configurable options, such as setting icons, bundle names or bundling your own JRE/JDK.
Install instructions can be found here. Example usage can be found here.
It should run in any operating system (Windows, Mac OS X, Linux), but of course you’ll only test the results in a Mac OS X system.
Table of Contents
(TOC created with the help of gh-md-toc)
Aren’t there other tools that do this? Why another one?
There are other tools that do this. I acknowledge them and even have several links to them.
However, this project was born out of the need to do something easily and without much cruft. Most solutions out there require a gazillion arguments, or installing ant and memorizing lots of conventions. jar2app, however, tries to keep the power of those utilities while providing high simplicity in the process. Really, isn’t it wonderful to have such an easy-to-use interface?
If you’re also considering why these contributions weren’t just sent to one of the other projects, it is because this could not be done easily. Packr uses a custom launcher and is meant to pack things for Mac OS X, Windows and Linux. Most of the other alternatives require third-party tools that embed other functionality and which simply cannot be stripped. The solution I was left with was just rolling out my own. If you think that’s just a strong case of NIH, feel free to grab what you want from me and send a patch to the other projects 🙂 Just follow the GPL!
Can I submit bundles created with jar2app to the Appstore?
jar2app may bundle your jar, but there are several steps you further need to take to submit your application to the Appstore. This is not a limitation of jar2app, it’s just how the Appstore requires you to do things. For more information on how to submit bundles to the appstore, see here and here.
How do I install/uninstall it?
Just clone the repository and run install.sh , or uninstall.sh to remove it. It will install to /usr/bin, but you can change this by passing your desired prefix to install.sh, as an argument. This will install the jar2app application/script and make it available for you to run.
Install to /usr/local/bin prefix
Uninstall from /usr/local/bin prefix
How does it work?
jar2app relies on JavaAppLauncher (although you don’t need to install anything). This application, officially provided by Oracle (previously Apple), acts as wrapper that starts a JVM with a set of options. The JVM can be bundled with the App file, or the system-wide-one can be used. Essentially, all that jar2app has to do is create a directory structure (app files are just directories), pack JavaAppLauncher and your application in it and set appropriate values in an Info.plist file. Additionally, if you so wish, your own JDK or JRE can be bundled and the Info.plist file will be updated to reflect this.
I know that there are other solutions that write their own wrapper, but the provided wrapper seems to work great (it’s also bundled by Weka). The other wrapper I saw out there was from the Packr project and it really depended on their way of doing this.
What exactly can I change?
You can change many things, but more specifically, you can change the icon, the display name (the one that appears on the menu bar), the version and copyright information, the bundled JDK/JRE and the JVM options. For a full list of options, see here
Does jar2app bundle its own JRE/JDK? Can I bundle my own?
By default, jar2app doesn’t bundle any JRE or JDK, and the default will be used on each system. You can, however, pass it a JRE/JDK with the -r , —runtime option. It can be supplied as a folder or as a zipfile. This JRE/JDK should match the directory structure found in Oracle’s JDK (i.e. the first folder should be named Contents, etc).
Does jar2app figure the main class of my jar automatically? Can I change it?
Yes it does. It looks inside your jar file for the MANIFEST.MF file and extracts the name of the main class. You can change this behavior, and pass in another main class with the -m , —main-class option.
Apple defines several keys for its App format. How does jar2app figure them out?
There are several keys that Apple defines, and you might want to check them out. jar2app assigns values to the following keys:
- CFBundleDevelopmentRegion: This is fixed at English
- CFBundleExecutable: This is internally defined to JavaAppLauncher (from oracle)
- CFBundleIconFile: This is set to whichever icon you passed in, and ignored if no icon is used
- CFBundleIdentifier: This is chosen from the following, in order:
- What you supplied ( -b , —bundle-identifier )
- The default: com.jar2app.example. application name
- CFBundleDisplayName: This is chosen from the following, in order:
- What you supplied as display name ( -d , —display-name )
- What you supplied as bundle name ( -n , —name )
- The name of the app (passed as outputfile argument)
- The name of the jar (excluding extension)
- CFBundleName: This is chosen from the following, in order:
- What you supplied as bundle name ( -n , —name )
- What you supplied as display name ( -d , —display-name )
- The name of the app (passed as outputfile argument)
- The name of the jar (excluding extension)
- CFBundleVersion: This is chosen from the following, in order:
- What you supplied as version ( -v , —version )
- What you supplied as short version ( -s , —short-version )
- The default: 1.0.0
- CFBundleShortVersionString: This is chosen from the following, in order:
- What you supplied as short version ( -s , —short-version )
- What you supplied as version ( -v , —version )
- The default: 1.0.0
- CFBundleSignature: This is chosen from what you supply or the string «. «.
- NSHumanReadableCopyright: This is set to what you supply or the empty string
The info.plist file will contain additional keys, but there are used to pass information to JavaAppLauncher (JVM arguments, JDK/JRE, etc)
If I only pass the jar and no other options, what are the defaults used by jar2app?
jar2app assumes that you want to create an app file with the same basename as your jar file and in your current working directory. It assumes no JRE/JDK is to be bundled, and that no special arguments have to be passed to the JVM. The remaining options, such as the Icon, display name and others, are figured out as described in here. The short version is that all names get set to the basename of your jar, and that versions are set to 1.0.0.
How is the App name determined?
You are probably also interested in this question and this question. The app name is determined as so:
- What you supplied as app name (it is the last unnamed argument, e.g. jar2app in.jar outname ). You don’t need to append .App , as jar2app does it for you.
- What you supplied as bundle name ( -n , —name )
- What you supplied as display name ( -d , —display-name )
- The name of the jar (excluding extension)
Where did this idea come from?
Well, you should probably check this FAQ entry first. I originally went looking for an application like jar2app because I noticed that spotlight didn’t like showing me .jar files. This meant that whenever I wanted to launch applications bundled as jars (and that happens very often), I’d have to break my workflow and wait while spotlight figured itself out. To fix this, I decided to just package the jar in an app. «It must be easy, right»? Turns out it wasn’t so easy and most tools weren’t straightforward, so, here’s jar2app. Have fun, report bugs and add features as you wish!
This tool is so simple to use that it seems pointless to add a GUI. Nevertheless, for all your command line aversion needs, I might implement a really simple optional GUI in the future (probably using PyQt).
Does it work on retina screens?
Yes it does. It adds specific entries in the Info.plist file to ensure that retina screen is enabled by default. You can change that by passing -l , —low-res-mode .
Should I use jar2app for my commercial application?
You can, but don’t expect a one-liner to do the trick. There are several parameters that you have to configure, including special unique keys and signatures. jar2app has many defaults that should not be used if you intend to distribute your application in very serious fashion. Use it with the default values for simple, easy and straightforward redistribution.
jar2app doesn’t do what I want. Are there other alternatives?
jar2app tries to do most of what the other tools do. It’s lacking mostly in JRE/JDK minimizing support, and it hasn’t really been thoroughly tested when bundling things for the app store.
If it’s not your cup of tea, don’t worry! There are other alternatives, such as the wonderful Packr, the official Oracle documentation, the official Apple documentation and the AppBundler project, part of which is used in jar2app. You can also read more about the cumbersome nature of packaging jars in app files here.
Even if jar2app didn’t help, come back and open an issue, or send your own patches!
Here are a couple of examples on how to change the settings of jar2app. For a full list of options, see here.
Easiest way to bundle
You should now have a test.App in your directory.
Changing App file output name
This can be done in several ways. The most straightforward one is just:
You should now have a out.App in your directory. Note how jar2app automatically appends the .App extension (this can be disabled with -a , —no-append-app-to-name ). You can also do
Lastly, You can also do
And jar2app will create the test subdirectory for you. It only creates the parent directory of the target .app file, though!
Also note that the app output name is pre-determined based on other options. For instance, if you pass in a bundle name, that will be used. See this question for more details.
Bundle with an icon
You should now have a test.App in your directory with the provided icon. -i can be a full path, e.g.
Changing the name that appears in menu bars (Bundle Display Name)
The name that appears in menu bars will be given by the Bundle Display Name. You can se this with -d , —display-name , but I’d really recommend that you change the bundle name itself with -n , —name (the Bundle Display Name will assume this value). This can be done with
Note that since in the above example, no output .App name is given, the .App file will also be named «Amazing Application» (see here). You can change this by doing any of:
Any of those commands will have the same effect: the app file will be out.app , but the display name (shown in menus) will be «Amazing Application».
Bundling your own JDK/JRE
Say you want to bundle your own JDK/JRE. For instance, assume you want to bundle the one located at /Library/Java/JavaVirtualMachines/jdk1.8.0_40.jdk . This is trivial to do ( -r , —runtime ), just run:
Источник


