- How to Set $JAVA_HOME environment variable on macOS
- 1. macOS release history, bash or zsh?
- 2. What is /usr/libexec/java_home
- 3. $JAVA_HOME and macOS 11 Big Sur
- 4. $JAVA_HOME and Mac OS X 10.5 Leopard
- 5. $JAVA_HOME and older Mac OS X
- 6. Switch between different JDK versions
- Установка JDK (комплект разработчика Java): инструкция для Mac
- Запуск командной строки
- Используем терминал для поиска информации
- Инсталляция
- Узнайте, как кодировать в Java на Mac
- Узнайте, как кодировать в Java на Mac: установка Java в Mac OS X
- Узнайте, как программировать на Java на Mac: создайте HelloWorld на Java с помощью NetBeans
- Узнайте, как кодировать в Java на Mac: Компиляция программ Java из Терминала в OS X
- Узнайте, как программировать на Java на Mac: где учить Java
- Technical Article
- Primitive Distributions
- Raw Class Files
- Jar Files
- Shell Scripts and Helper Applications
- First Class Mac OS X Applications
- Packages in Mac OS X
- Creating «Native» Java Applications on Mac OS X
- Creating Mac OS X Java Applications on Other Platforms
- Summary
How to Set $JAVA_HOME environment variable on macOS
By mkyong | Last updated: January 19, 2021
Viewed: 1,252,476 (+8,076 pv/w)
This article shows how to set the $JAVA_HOME environment variable on older Mac OS X and the latest macOS 11.
Solution
Steps to set the $JAVA_HOME environment variable on macOS.
- Find out your macOS version.
- Find out which shell you are using, bash or zsh?
- For zsh shell, export $JAVA_HOME at
/.zshrc .
For bash shell, export $JAVA_HOME at
/.bashrc .
1. macOS release history, bash or zsh?
1.1 Review the macOS release history, source Wikipedia – macOS.
- Mac OS X Public Beta
- Mac OS X 10.0 (Cheetah)
- Mac OS X 10.1 (Puma)
- Mac OS X 10.2 Jaguar
- Mac OS X 10.3 Panther
- Mac OS X 10.4 Tiger
- Mac OS X 10.5 Leopard
- Mac OS X 10.6 Snow Leopard
- Mac OS X 10.7 Lion
- OS X 10.8 Mountain Lion
- OS X 10.9 Mavericks
- OS X 10.10 Yosemite
- OS X 10.11 El Capitan
- macOS 10.12 Sierra
- macOS 10.13 High Sierra
- macOS 10.14 Mojave
- macOS 10.15 Catalina (zsh)
- macOS 11 Big Sur (zsh)
1.2 bash or zsh?
On macOS 10.15 Catalina and later, the default Terminal shell switch from the bash (Bourne-again shell) to zsh (Z shell).
- For bash shell, we can put the environment variables at
/.bashrc .
For zsh shell, we can put the environment variables at
We can print the $SHELL environment variable to determine the current shell you are using.
Further Reading
2. What is /usr/libexec/java_home
2.1 On Mac OS X 10.5 or later, we can use /usr/libexec/java_home to return the location of the default JDK.
2.2 Also, find all installed JDKs.
2.3 Also, run a specified JDK command.
3. $JAVA_HOME and macOS 11 Big Sur
On macOS 10.15 Catalina and later, the zsh is the default Terminal shell, and we can set the $JAVA_HOME environment variable in either
3.2 Add the following content
3.3 Source the file and print the $JAVA_HOME , done.
4. $JAVA_HOME and Mac OS X 10.5 Leopard
For older Mac OS X, the bash is the default Terminal shell, and we can set the $JAVA_HOME environment variable in either
4.2 Add the following content
4.3 Source the file and print the $JAVA_HOME
5. $JAVA_HOME and older Mac OS X
On older Mac OS X, the tool /usr/libexec/java_home doesn’t exists, and we need to set the $JAVA_HOME to the real path.
5.2 Add the following content
5.3 Source the file and print the $JAVA_HOME
6. Switch between different JDK versions
For example, this macOS contains four JDK: 1.8, 14, 15, and 16, and the default JDK is 16.
6.1 For zsh shell, edit the
6.2 /usr/libexec/java_home -v»<$Version>» to activate a specified JDK version.
Add the following content to activate the JDK 1.8
If we want JDK 14.
If we want JDK 15.
6.3 Source the file and print the $JAVA_HOME , done.
Источник
Установка JDK (комплект разработчика Java): инструкция для Mac
Прежде, чем установить Android Studio, сделаем несколько подготовительных шагов. Некоторые из них покажутся вам технически сложными, не пугайтесь, если Вы плохо знакомы с терминологией.
Постарайтесь строго следовать инструкциям, а если увязнете, ищите подсказки на форуме.
- Убедитесь, что у вас установлена Java.
Запуск командной строки
Прежде всего, нужно открыть так называемый терминал. Для этого нажмите на иконку поиска (увеличительное стекло) справа вверху экрана и введите с клавиатуры “terminal”.
Терминал можно также запустить из папки Программы > Утилиты
Используем терминал для поиска информации
Теперь можно проверить, установлена ли на вашем компьютере JDK версии 7 или выше. Для этого, наберите в открывшемся окне терминала команду:
и нажмите Enter
В примере ниже указана версия Java 8.0_45 — номер версии идет после “1.”

Если у вас установлена версия 7 или выше, переходите к следующему этапу — установке Android Studio.
Если JDK не установлен или его версия ниже седьмой, переходите ко второму шагу, который описан далее.
Устанавливаем JDK (комплект разработчика Java).
Загрузите комплект разработчика Java, он же JDK, с этого сайта.
У Oracle — компании, которая занимается поддержкой Java — очень много вариантов и сокращений. Но нам нужен старый добрый JDK. Это набор инструментов, необходимых для разработки приложений на Java.
Начиная с мая 2015 года иконка для скачивания JDK выглядит так:

Перейдя по этой ссылке, вы получите список доступных версий. Выберите из них Java SE Development Kit. Вам не нужен раздел Demos and Samples (его меню визуально похоже, так что внимательно читайте заголовки)
Инсталляция
Выберите JDK для своей операционной системы (Mac OSX). Если вашему компьютеру менее четырех лет, скорее всего, нужно выбрать версию 64-bit (она выделена ниже). Если компьютер постарше или вы сомневаетесь, какая версия нужна, поищите инструкции в интернете.

Подтвердите согласие с лицензионным соглашением и скачайте JDK. Кликните дважды, чтобы его инсталлировать.
Убеждаемся, что Java установлена.
Возвращаемся к шагу 1 и снова запускаем терминал, чтоб проверить, что установлена Java версии 7 или выше.
Не приступайте к инсталляции Android Studio до того, как установите JDK. Пока у Вас нет рабочей версии Java на компьютере, этот процесс не заработает. Если возникли проблемы со скачиванием, проверьте сообщение об ошибке и поищите решение в Google.
Источник
Узнайте, как кодировать в Java на Mac
Я хочу научиться программировать на Java на моем Mac. Какой лучший способ начать?
Программирование на Java — отличная вещь для изучения, а ваш Mac — идеальное место для начала работы. Java — безусловно самый популярный язык программирования в мире, а OS X — фантастическая среда программирования. Программирование — это очень ценный навык в современном мире, и мы думаем, что это очень весело — учиться.
В этой функции мы рассмотрим следующее:
- Установка и настройка Java в OS X
- Написание вашей первой Java-программы в NetBeans
- Написание Java-программ из Терминала
- Лучшие онлайн-ресурсы для изучения Java
Не беспокойся Мы научим вас писать код на вашем Mac в кратчайшие сроки.
Хотите узнать больше о кодировании Mac? Научитесь кодировать, используя C на Mac | Научитесь кодировать в C # на Mac | Выучить HTML веб-дизайн на Mac | Изучите кодирование Python на Mac | Научитесь кодировать в SQL на Mac
Узнайте, как кодировать в Java на Mac: установка Java в Mac OS X
Первое, что вам нужно сделать, это загрузить Java SE (Standard Edition) из Oracle. Возможно, на вашем Mac уже установлена Java в той или иной форме (возможно, в версии для потребителя), но стоит приобрести Java SE для разработчиков (известный как Java SDK).
Вам также понадобится интегрированная среда разработки (IDE), а у Oracle есть замечательная среда NetBeans. Мы установим Java SKD и NetBeans одновременно.
- Откройте Safari и перейдите на страницу загрузок Oracle. Нажмите на Java SE.
- Нажмите на иконку Download под NetBeans с JDK 8. Вам понадобится среда программирования, и Netbeans — хорошая. JDK 8 придет рядом с ним и будет выполнять установку за вас.
- Нажмите «Принять лицензионное соглашение» и нажмите ссылку «Загрузить» рядом с Mac OS X. Файл DMG будет сохранен в папке «Загрузки».
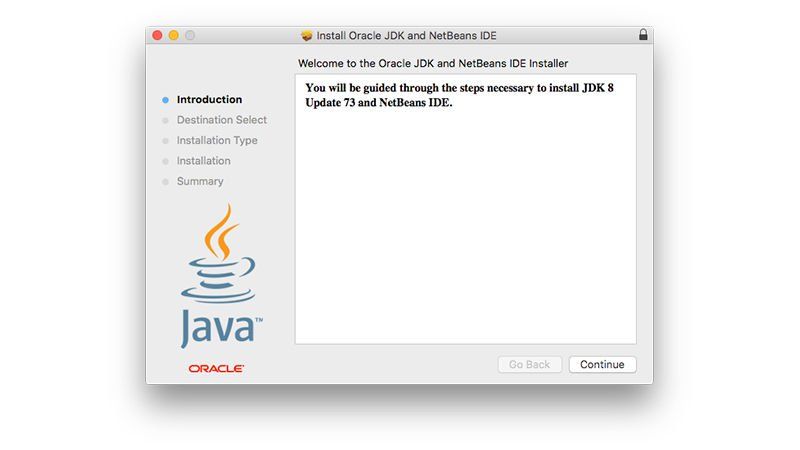
- Откройте файл загрузки («NetBeans 8.1 с JDK 9, обновление 73») и следуйте инструкциям по установке.
- Откройте «Системные настройки» и нажмите «Java», затем «О программе». Проверьте, установлено ли обновление 8 версии 74 (или новее). В качестве альтернативы откройте Терминал и введите «Java-версию».
Теперь у вас должна быть установлена Java и NetBeans в OS X. NetBeans — это то место, где вы будете создавать большинство своих программ, поэтому давайте посмотрим на это.
Узнайте, как программировать на Java на Mac: создайте HelloWorld на Java с помощью NetBeans
Следующим шагом является открытие NetBeans в OS X и создание вашей первой программы. Традиция гласит, что первая программа, которую вы создаете на любом языке, должна напечатать «Hello World!» на экране. Вот как создать HelloWorld в NetBeans:
- Откройте папку «Приложения» и запустите NetBeans 8.1.
- Выберите «Файл»> «Новый проект».
- Убедитесь, что Java выбрана в категориях и Java-приложения в проектах. Нажмите кнопку «Далее.
- Введите «HelloWorld» в поле «Имя проекта». Убедитесь, что «Создать основной класс» выделен и нажмите «Готово».
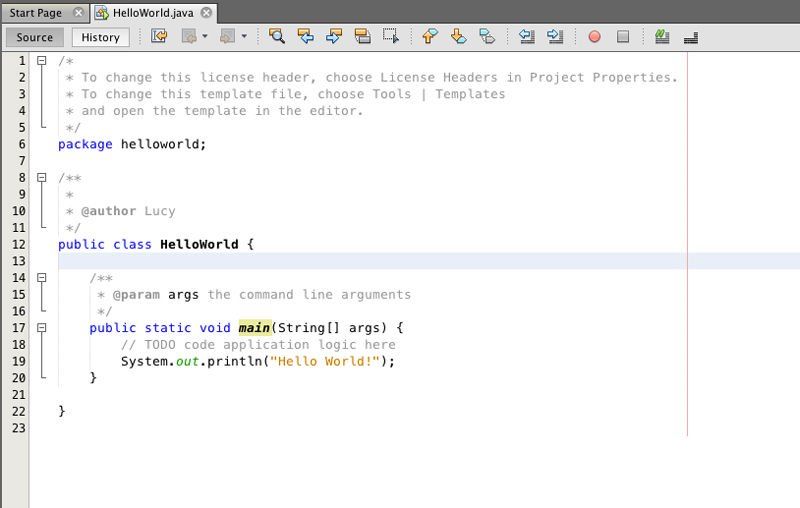
- Вы должны увидеть содержимое HelloWorld.java в главном окне. Если нет, используйте окно Projects слева и найдите HelloWorld.java (в разделе «Пакеты с исходным кодом»).
- Найдите код с пометкой «// здесь логика приложения кода TODO». Под этим добавьте строку, которая говорит «System.out.println (» Hello World! «);». Убедитесь, что эта строка кода выровнена с строкой «// TODO …» выше. Смотрите изображение для точного позиционирования.
- Выберите «Файл»> «Сохранить».
- Нажмите зеленый значок «Выполнить проект» на панели инструментов.
В окне «Вывод» внизу вы должны увидеть следующее:
СТРОИТЬ УСПЕШНО (общее время: 0 секунд)
Если вы видите что-то еще, вернитесь и проверьте код.
Узнайте, как кодировать в Java на Mac: Компиляция программ Java из Терминала в OS X
Кроме того, некоторые люди предпочитают создавать код непосредственно в Терминале (а не использовать SDK). Вот как скомпилировать и запустить Java из терминала в OS X.
- Откройте Терминал.
- Войти mkdir HelloWorld создать новый каталог и CD HelloWorld двигаться в это.
- Войти коснитесь HelloWorld.java создать пустой файл Java.
- Теперь введите nano HelloWorld.java отредактировать файл.
- В редакторе Nano введите следующий код:
открытый класс HelloWorld <
public static void main (String [] args) <
System.out.println («Привет, мир!»);
- Нажмите Control-X, затем y и Return, чтобы сохранить файл и выйти из Nano.
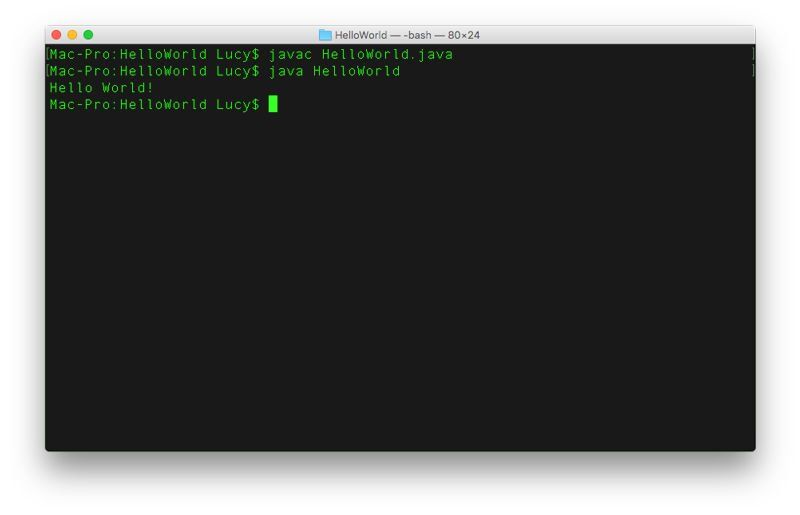
- Теперь скомпилируйте программу, введя javac HelloWorld.java в терминале.
- Войти Java HelloWorld запустить его.
Вы должны увидеть Hello World, выведенный в Терминал.
Узнайте, как программировать на Java на Mac: где учить Java
Теперь вы полностью настроены на изучение Java на вашем Mac. Очевидно, вам нужно продвинуться дальше, чем просто написать «Hello World» на экране.
Хорошей новостью является то, что нет абсолютно никаких мест для изучения Java. Вот некоторые из лучших курсов Java, о которых мы знаем:
- Codecademy Java: этот бесплатный учебный веб-курс обучает вас Java (и другим языкам) в веб-браузере.
- Udemy: Java Essential Training с использованием Java 8. Это классический курс с более чем 12-часовым видео для изучения. Может быть дорогим (£ 259), но почти всегда в продаже. (Это в настоящее время идет за £ 17.)
- Oracle Java Документация и Java Developer Учебники и обучение.
- Учите Java трудный путь. Один из лучших курсов, если вы действительно хотите получить подробное представление о том, как работает Java.
- Treehouse Learn Java. Это 25 долларов в месяц, но TreeHouse предлагает одни из самых профессиональных учебных пособий.
Источник
Technical Article
By Daniel H. Steinberg
October 2003
In the past two articles you have seen how to customize your Java application so that it looks and feels more like a native Macintosh application when running on Mac OS X without changing the end user experience on other platforms. A combination of runtime properties and coding changes that targeted Mac OS X specific APIs made a big difference to that audience.
Recall that Mac OS X is a melding of two worlds. Hard core UNIX programmers can pop open a Terminal window and write their Java code using vi and compile and run it from the command line. There is, however, the more traditional Mac audience that interacts with their computer through a friendly UI that follows Apple Human Interface guidelines.
In this article, we look at deploying your Java application. The technical geek audience might be happy with running a class with a main() method from the command line but the wider audience expects a double-clickable icon that looks and acts like every other native application. In this article, we travel from one end of the spectrum to the other to broaden your potential user base.
Although you should «test everywhere», your build machine may not be a Mac. Fortunately, as you will see, a double-clickable Macintosh application is just a directory with some special contents and a name that ends with .app . Even on a Windows machine you should be able to modify your build script to package up a Mac-specific version of your application.
Primitive Distributions
Because Mac OS X ships with J2SE 1.4.1 and J2SE 1.3.1, you can distribute your application as class files or jar files and — in theory — your customer could run your application from the Terminal application. We start with these models and quickly move to double-clickable jar files and shell scripts.
For this article, use the Java Sound Demo as the running example. Download and unzip the zip file. Inside the JavaSoundDemo directory you will find the source files inside of the src subdirectory, a jar file, audio files, and html files that we will not use.
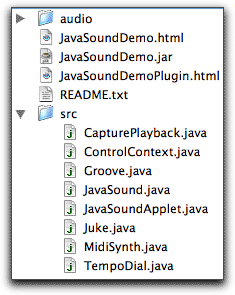
Raw Class Files
As a developer, you don’t think twice about compiling the source files and running the application using the command line. Compiling the eight files in the src directory generates fifty class files. You can then run the sample application from the command line like this.
The Java Sound Demo starts up. We haven’t customized the application in any way so the menu appears at the top of the JFrame and not where Macintosh users expect. The application looks like this out of the box.
You have done this compile and run step so many times that you hardly think twice about it. Think of the least technical person you know and ask whether they would be likely to follow these steps to run your application if a competing application were easier to install and run.
This example demonstrates two separate areas of usability. Once we got the application up and running it looked good and ran fine. You would not, however, want to distribute an application to an end user this way. You would have to somehow bundle up the fifty class files for easy download and installation. You would then have to provide instructions for running the application using, in the case of Mac OS X, the Terminal application.
Jar Files
If you are going to have to package up the class files for distribution anyways, you may as well produce a jar file. And, if you are going to produce a jar file, it ought to be executable. In the case of the Java Sound Demo, the file JavaSoundDemo.jar is executable. Because Mac OS X ships with the Jar Launcher application, the end user needs only double click on the jar file and the application will launch.
To make the jar file executable, the manifest must include the name of the Main class file. Unjar JavaSoundDemo.jar with the command jar xvj JavaSoundDemo.jar . Here’s the file META-INF/MANIFEST.MF .
Shell Scripts and Helper Applications
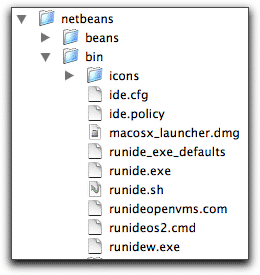
For larger or more complicated applications you are likely to have more than one jar file along with resource files. A common strategy for targeting multiple platforms is to include a batch file and a shell script. Choose the non-platform specific download from the NetBeans homepage. Inside of the bin subdirectory you will find applications for running NetBeans on a variety of platforms.
The shell script runide.sh can be run from the command line like this.
sh runide.sh -jdkhome /Library/Java/Home
The NetBeans IDE starts up with this decidedly non-Mac OS X look and feel.
You could, of course, modify the shell script to modify this look and feel, but the NetBeans developers decided on a different approach. Even though the typical NetBeans audience member is technically competent, there should be a friendlier way to start the IDE. They have created a native Mac OS X application called NetBeansLauncher .
The version of NetBeansLauncher that is included in the generic NetBeans download is a good next step. You will see how the team took it farther in the next section. On a Mac OS X computer you can double click on the macosx_launcher.dmg file inside of the bin directory. This is a disk image. Drag the NetBeansLauncher from the expanded disk image back into the bin directory. Now double click on the NetBeansLauncher . The ReadMe file that was also in the disk image provides the following information about usage.
When launched for the first time, NetBeansLauncher needs to find NetBeans root directory. First it looks into NetBeansLauncher.app itself. If it does not find NetBeans root directory there user must specify NetBeans root directory manually.
For this download, the first time the user starts up the NetBeansLauncher , they need to navigate to the netbeans directory. After that, double clicking on the NetBeansLauncher starts up the NetBeans IDE as if it were any other native Mac OS X application.
First Class Mac OS X Applications
If you download the Mac OS X disk image from the NetBeans distribution and mount it you may be surprised at the simplicity of what you find. Unlike the complex structure visible in the other distributions, you will see five files with documentation and a single application. To install, you can move this NetBeansLauncher application anywhere on your hard drive. Double click on it and the NetBeans IDE starts right up.
This is the experience that is expected on Mac OS X. The package structure and complexity is hidden from the user and they can’t accidentally move a file that renders the IDE unusable. In this section we’ll look more closely at the package structure and how to create a Mac OS X application whether or not our build machine is a Mac.
Packages in Mac OS X
Consider again the sentence from the NetBeansLauncher instructions that says in order to locate the NetBeans root directory, «First it looks into NetBeansLauncher.app itself.» This implies that NetBeansLauncher is a directory with the name «NetBeansLauncher.app». In the mounted disk image, either right click or Ctrl-click on the NetBeansLauncher icon and choose to «Show Package Contents».
The structure is the same for all Mac OS X applications. There is a Contents directory with an XML file named info.plist , a text file named PkgInfo, a MacOS directory, and a Resources directory. If you don’t have a creator code registered with Apple the PkgInfo text file should contain only the following.
If you have a creator code, use it in place of the question marks. Ordinarily the MacOS folder contains a small stub file that launches the Java VM. In this case the NetBeans team has written their own application. We will look more closely at a property list file in the next section. For now, take a look at the contents of the Resources directory.
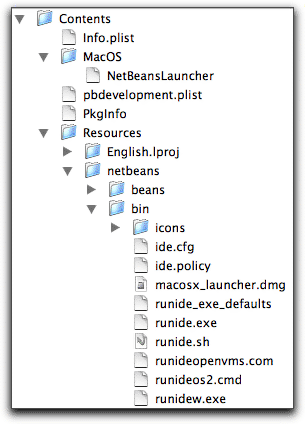
You can see the contents of the same netbeans package inside of the Resources subdirectory. This is your key to deploying on Mac OS X. Add in the necessary pieces and then just bundle up your ordinary distribution in the appropriate location. If you have a more flexible build process you should also strip out those pieces that aren’t needed for the Mac OS X application such as the Windows executables.
If you are interested in digging deeper into the structure of a Mac OS X application, you will find more information in the Apple publication Anatomy of a Bundle.
Creating «Native» Java Applications on Mac OS X
If you develop on Mac OS X you can use the Jar Bundler application to turn jar files into Mac OS X applications. Jar Bundler is distributed with the other developer tools and is located in Developer/Applications/ . Start it, select the «Classpath and Files» tab and add the file JavaSoundDemo.jar .
Select the «Build Information» tab. For «Main Class», navigate to the JavaSoundDemo.jar file again and select JavaSound from the drop down list. This list is populated by any classes in the jar file containing a main() method. Accept all of the default settings for the options. You can use the default Java application icon or you can create your own. The icon you see below started as a screen shot of the running Java Sound Demo and was transformed into an icon using the IconComposer application that is also distributed as part of the developer tools.
Press «Create Application» and enter the name «JavaSoundDemo». A Mac OS X application is created for you. You can show the package contents of the generated application as before. You can view the property list with Apple’s Property List Editor or with any text editor. It is just an XML file with properties stored as name — value pairs.
The Java properties indicate the location of the jar file, the name of the Main class, and the version of the JRE to be used. The other properties include a pointer to the icon file and to the Java application stub file that is the native executable.
Creating Mac OS X Java Applications on Other Platforms
Take a look at the contents of the package that was generated by Jar Bundler on Mac OS X.
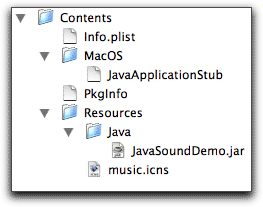
On another platform you need to duplicate this structure. To create an application named «JavaSoundDemo» on, say, a Windows machine, start by creating a directory and naming it JavaSoundDemo.app . Next, create a subdirectory named Contents . Inside of Contents you will need a MacOS directory with the JavaAPplicationStub . You can create the PkgInfo text file and your Info.plist can also be generated by hand and should contain the following XML.
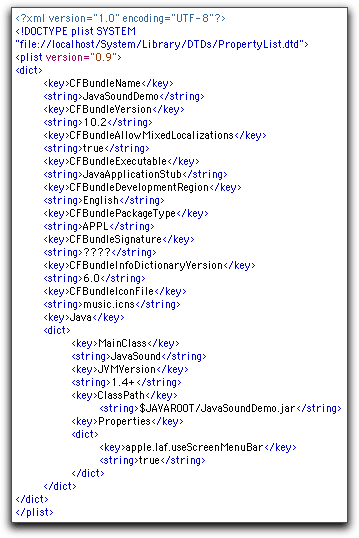
You will need a Resources directory with a Java subdirectory into which you put the JavaSoundDemo.jar file. In other words, with the exception of the JavaApplicationStub and the music.icns file, everything else can be created on another platform.
If you use Ant you can easily add a target that takes your jar files, images, and other resources and bundles it up as a Mac OS X application bundle that includes the plist file and Java application stub in the appropriate locations. Every time you create a new build you will automatically have your Mac OS X version. You can also find a growing number of Ant tasks that automate some of the steps outlined in this article.
Summary
When it comes time to deploy your Java application, consider the ease of use of your target audience. Even developers appreciate the double clickable version of the NetBeans IDE. Creating a Java application that looks and feels like a native application does not require a lot of extra work and can easily be integrated into your build process even if your build machine runs a different operating system.
Источник


