- Как отправить команду по COM/Serial port с помощю nodejs?
- Javascript com port windows
- About
- Работа с COM портом в web-проекте
- Пролог
- Chrome Application
- Создание расширения
- Принимаем сообщение
- Эпилог
- SerialPort
- Quick Links
- Serialport
- Bindings
- Interfaces
- Parsers
- Developing
- Developing node serialport projects
- Developing Docs
- License
- Code of Conduct
- Governance and Community
Как отправить команду по COM/Serial port с помощю nodejs?
Всем доброго! Вот решил поигратся с железом с помощю nodejs
Нашел популярный модуль node-serialport, и вот сейчас пытаюсь с его помощю отправить что то железяке, но все безполезно.
В описании протокола сказано: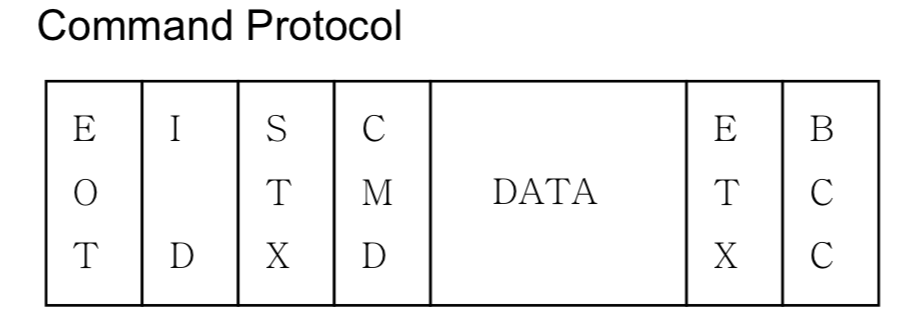
BCC of command protocol is determined by “XOR” for the values from EOT to ETX.
Assignment of Value SOH — 01H
ETX — 03H ACK — 06H ID — 50H
STX — 02H EOT — 04H NCK — 15H
и собствено пример команды (тест) что я пытаюсь отправить:
Test Command (0x76H)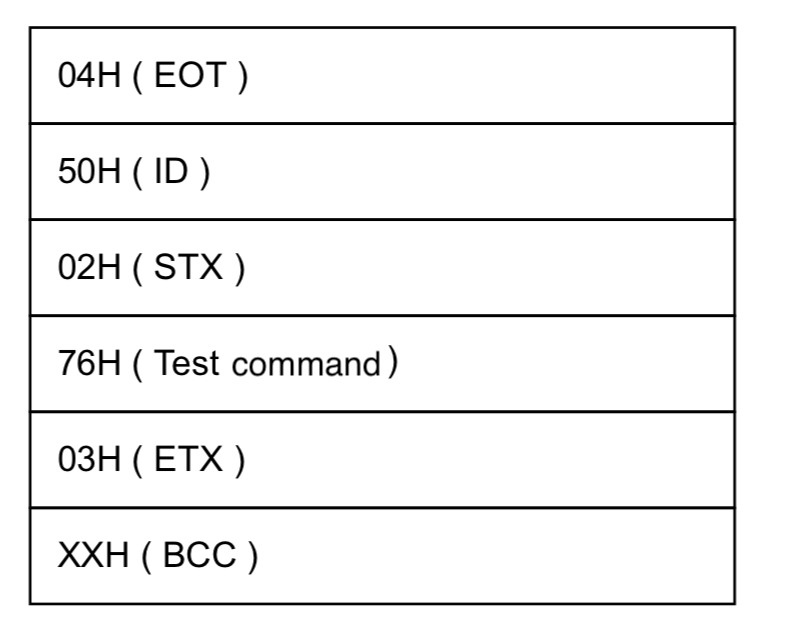
после запуска которого ничего не происходит
- Вопрос задан более трёх лет назад
- 2840 просмотров

Rsa97, Еще раз огромное спасибо!
Все как бы работает, разобрался с полученными данными. но у меня осталось два мелениких вопроса 🙂
Первый:
насчет выдать ACK подтверждая получение что то в описании я этого не нашел или не понял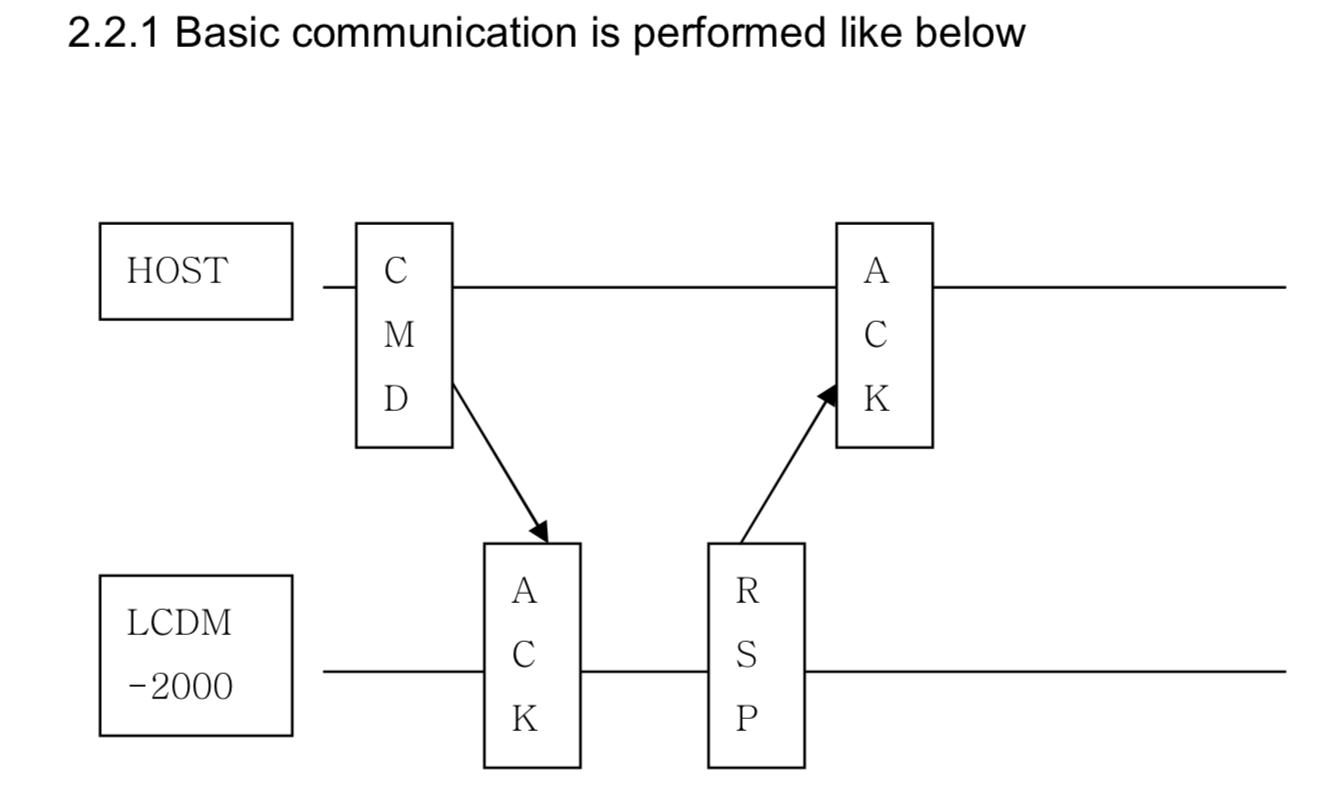
Я понимаю это как : отправить команду (cmd) -> железо произвело действия (ACK) — железо отправило ответ (RESP) -> я делаю какие то действия на основании результат
И зачем мне считаете контрольную сумму, сверяете её ведь если будет ошибка в работе в ответе будет ее код
И второй:
После того как я отправляю запрос железу на выдачу 03шт
В обработчике собития на получения данных
я получаю одни и тежы денные несколько раз (10 раз):
так и должно быть или же это какойто глюк (возможно самого модуля node-serialport )?
P.S. и что обозначает первый ответ ? он всегда присутсвует в ответе
Виталий, Первый ответ (06) — это как раз ACK.
Если посмотрите раздел 2.3 документации, то там описаны тайминги обмена.
1. Программа отправляет диспенсеру команду.
2. Диспенсер проверяет контрольную сумму, если она в порядке, то команда принята правильно, диспенсер возвращает ACK. Если контрольная сумма не совпала, то диспенсер возвращает NCK.
3. Если программа получила NCK или не получила ответа в течение 500 миллисекунд, то программа перепосылает команду снова (на шаг 1).
4. Если пришёл ACK, то программа в течение 60 секунд ждёт ответа. Если ответ не пришёл, то снова идёт перепосылка команды (на шаг 1).
5. Если ответ получен, то проверяется его корректность (сверка SOH, ID, STX, CMD, ETX, расчёт и сравнение BCC). На это программе даётся 500 миллисекунд. Если ответ корректный, ошибок передачи не было, то программа посылает ACK, иначе NCK.
6. Если диспенсер получил ACK, то ответ принят, на этом всё.
7. Если диспенсер получил NCK или не получил ответа в в течение 500 миллисекунд, то он перепосылает ответ ещё раз (на шаг 5).
Вы не отправляете ACK, вот диспенсер и считает, что ответ не дошёл. А ответ вроде правильный
01 — SOH
50 — ID
02 — STX
45 — CMD (Upper Dispense)
30 33 — 3 bills requested (CHK1,2 Sensor)
30 33 — 3 bills requested (EXIT Sensor)
31 — ERROR CAUSE (Normal stop)
31 — Status of cash cassette (Near end)
30 30 — 0 bills rejected
03 — ETX
15 — BCC
Javascript com port windows
![]()
![]()
![]()
![]()


Access serial ports with JavaScript. Linux, OSX and Windows. Welcome your robotic JavaScript overlords. Better yet, program them!
Go to https://serialport.io/ to learn more, find guides and api documentation.
- serialport Chances are you’re looking for the serialport package which provides a good set of defaults for most projects. However it is quite easy to mix and match the parts of serialport you need.
The Bindings provide a low level interface to work with your serialport. It is possible to use them alone but it’s usually easier to use them with an interface.
- @serialport/bindings bindings for Linux, Mac and Windows
- @serialport/binding-abstract as an abstract class to use if you’re making your own bindings
- @serialport/binding-mock for a mock binding package for testing
Interfaces take a binding object and provide a different API on top of it. Currently we only ship a Node Stream Interface.
Parsers are used to take raw binary data and transform them into usable messages. This may include tasks such as converting the data to text, emitting useful chunks of data when they have been fully received, or even validating protocols.
Parsers are traditionally Transform streams, but Duplex streams and other non stream interfaces are acceptable.
Developing node serialport projects
- Clone this repo git clone git@github.com:serialport/node-serialport.git
- Run npm install to setup local package dependencies (run this any time you depend on a package local to this repo)
- Run npm test to ensure everything is working properly
- Run npm run generate to generate a new project
- Add dev dependencies to the root package.json and package dependencies to the package’s one.
SerialPort packages are all MIT licensed and all it’s dependencies are MIT licensed.
Code of Conduct
SerialPort follows the Nodebots Code of Conduct. While the code is MIT licensed participation in the community has some rules to make this a good place to work and learn.
- Be respectful.
- Abusive behavior is never tolerated.
- Data published to NodeBots is hosted at the discretion of the service administrators, and may be removed.
- Don’t build evil robots.
- Violations of this code may result in swift and permanent expulsion from the NodeBots community.
Governance and Community
SerialPort is currently employees a governance with a group of maintainers, committers and contributors, all fixing bugs and adding features and improving documentation. You need not apply to work on SerialPort, all are welcome to join, build, and maintain this project.
- A Contributor is any individual creating or commenting on an issue or pull request. By participating, this is you.
- Committers are contributors who have been given write access to the repository. They can review and merge pull requests.
- Maintainers are committers representing the required technical expertise to resolve rare disputes.
If you have a PR that improves the project people in any or all of the above people will help you land it.
Maintainers
This project exists thanks to all the people who contribute. [Contribute]. 
Thank you to all our backers! 🙏 [Become a backer]

Support this project by becoming a sponsor. Your logo will show up here with a link to your website. [Become a sponsor]
About
Access serial ports with JavaScript. Linux, OSX and Windows. Welcome your robotic JavaScript overlords. Better yet, program them!
Работа с COM портом в web-проекте
Пролог
Один из клиентов нашего web-проекта захотел использовать для поиска заказов в системе сканер штрихкодов. Но, к сожалению, полностью отказался от идеи работы с ними в режиме имитации клавиатуры — только эмуляция COM-порта.
Вариантов решения было не особенно много:
- отдельное нативное приложение, которое бы отправляло запрос на наш сервер, а сервер бы отдавал команду в браузер
- работа с COM портом непосредственно из браузера
К счастью, есть способ решения проблемы вторым путём.
Chrome Application
Если кто не знает, Chrome Application — это приложения для браузера Chrome, написанные на JavaScript. В этих приложениях доступно API для работы с последовательными портами. Этот вариант практически идеальный для нас.
Основная проблема состоит в том, что хоть у Chrome Application и есть подходящие инструменты, оно не может напрямую работать с открытыми страницами. Тут нам на помощь приходят расширения, которые такую возможность имеют.
Далее я постараюсь подробнее описать как всё это связать вместе, что бы это работало.
К сожалению у меня не было возможности работать с реальным сканером, поэтому мне пришлось его эмулирвать.
Для этого я использовал socat:
- Запускаем:
Получаем ответ вида:
В другом окне терминала выполняем:
вместо /dev/ttys001 указываем тот путь, что вернул socat
И пишем любые сообщения.
Для проверки, в третьем окне:
/dev/ttys002 — второй путь из socat.
Написав сообщение во втором окне — получим его в третьем, если пришло — можно идти дальше.
Создание приложения
В документации достаточно хорошо расписан сам процесс, стоит только обратить внимание на то, что нам необходим доступ к работе с последовательными портами. Для этого в файле manifest.json указываем:
Файл background.js содержит код самого приложения:
Разберём его подробнее.
chrome.app.runtime.onLaunched.addListener — добавляет функцию в список, который выполняется при старте приложения.
chrome.serial.connect(«/dev/ttys001»,
chrome.serial.onReceive.addListener(onReceiveCallback) — при получении сообщения — вызовется onReceiveCallback
chrome.runtime.sendMessage — функция, которая отправляет сообщение в другое приложение/расширение. Первый аргумент — уникальный ID расширения в которое мы отправляем сообщение — можно увидеть в списке установленных расширений (chrome://extensions/ — парсер ломает ссылку), второй аргумент — сами данные.
Создание расширения
Здесь тоже всё несложно и подробно описано в документации
Ключевые настройки из файла манифеста:
permissions — указывает, что нам необходим доступ к вкладкам, далее указываем к каким (для тестов — указаны все локальные файлы file)
content_scripts — описывает какие дополнительные скрипты запускать на страницах
background — описывает скрипт расширения, который работает в фоне
В background.js содержится код, который отвечает за приём сообщения и отправку его в определённый таб
chrome.tabs.query — делает выборку табов по критерию, в нашем случае это url = «file:///*»
Есть 2 способа выполнить js код на странице из расширения
- chrome.tabs.executeScript — напрямую вызвать js код на странице, на мой взгляд не самый лучший вариант с точки зрения архитектуры
- добавить через манифест content_scripts — то есть скрит, который добавится на все вкладки удовлетворяющие условиям, описанным в matches
Я выбрал второй вариант. Стоит заметить что любой код, выполняемый во вкладке из расширения, выполняется в специальном окружении. Это значит что он будет иметь полный доступ к DOM элементам, но не будет иметь доступа к любым переменным созданным во вкладке. Подробнее.
Оптимальный способ передать данные из расширения в код вкладки — воспользваться CustomEvent
В файле action.js мы просто получаем сообщение из backgroud.js и создаём событие для document.
Принимаем сообщение
Эпилог
В целом я был приятно удивлён тем, что chrome предоставляет API для работы с железом, в том числе не только для чтения, но и для записи.
К сожалению, после того как было сделано практически всё, клиент сообщил, что всё таки переведёт сканеры в режим имитации клавиатуры. Хоть нам в конечном счёте это не пригодилось — надеюсь этот материал будет кому-нибудь полезен.
SerialPort
Access serial ports with JavaScript. Linux, OSX and Windows. Welcome your robotic JavaScript overlords. Better yet, program them!
Go to https://serialport.io/ to learn more, find guides and api documentation.
Quick Links
Serialport
- serialport Chances are you’re looking for the serialport package which provides a good set of defaults for most projects. However it is quite easy to mix and match the parts of serialport you need.
Bindings
The Bindings provide a low level interface to work with your serialport. It is possible to use them alone but it’s usually easier to use them with an interface.
- @serialport/bindings bindings for Linux, Mac and Windows
- @serialport/binding-abstract as an abstract class to use if you’re making your own bindings
- @serialport/binding-mock for a mock binding package for testing
Interfaces
Interfaces take a binding object and provide a different API on top of it. Currently we only ship a Node Stream Interface.
Parsers
Parsers are used to take raw binary data and transform them into usable messages. This may include tasks such as converting the data to text, emitting useful chunks of data when they have been fully received, or even validating protocols.
Parsers are traditionally Transform streams, but Duplex streams and other non stream interfaces are acceptable.
Developing
Developing node serialport projects
- Clone this repo git clone git@github.com:serialport/node-serialport.git
- Run npm install to setup local package dependencies (run this any time you depend on a package local to this repo)
- Run npm test to ensure everything is working properly
- Run npm run generate to generate a new project
- Add dev dependencies to the root package.json and package dependencies to the package’s one.
Developing Docs
You can develop the docs by running
And build them by running
Docs are automatically built with netlify including previews on branches. The master branch is deployed to https://serialport.io
License
SerialPort packages are all MIT licensed and all it’s dependencies are MIT licensed.
Code of Conduct
SerialPort follows the Nodebots Code of Conduct. While the code is MIT licensed participation in the community has some rules to make this a good place to work and learn.
- Be respectful.
- Abusive behavior is never tolerated.
- Data published to NodeBots is hosted at the discretion of the service administrators, and may be removed.
- Don’t build evil robots.
- Violations of this code may result in swift and permanent expulsion from the NodeBots community.
Governance and Community
SerialPort is currently employees a governance with a group of maintainers, committers and contributors, all fixing bugs and adding features and improving documentation. You need not apply to work on SerialPort, all are welcome to join, build, and maintain this project.
- A Contributor is any individual creating or commenting on an issue or pull request. By participating, this is you.
- Committers are contributors who have been given write access to the repository. They can review and merge pull requests.
- Maintainers are committers representing the required technical expertise to resolve rare disputes.
If you have a PR that improves the project people in any or all of the above people will help you land it.


