- Linux
- Prerequisites
- Debian/Ubuntu
- Long Term Support release
- Weekly release
- Installation of Java
- Fedora
- Long Term Support release
- Weekly release
- Start Jenkins
- Red Hat / CentOS
- Long Term Support release
- Weekly release
- Start Jenkins
- Post-installation setup wizard
- Unlocking Jenkins
- Customizing Jenkins with plugins
- Creating the first administrator user
- Установка Jenkins на Ubuntu
- Подготовка системы
- Обновление списка пакетов в репозиториях
- Настройка времени
- Настройка брандмауэра
- Инсталляция Jenkins
- 1. Установка openjdk
- 2. Установка Jenkins
- 3. Завершение установки
- Другие способы установки
- 1. Docker
- 2. Установка из файла WAR
- Работа с Jenkins в CLI
- Установка плагинов
- Веб-интерфейс
- Возможные ошибки
- Error: Unable to access jarfile jenkins-cli.jar
- failed to start lsb: start jenkins at boot time
Linux
Jenkins installers are available for several Linux distributions.
Prerequisites
Minimum hardware requirements:
1 GB of drive space (although 10 GB is a recommended minimum if running Jenkins as a Docker container)
Recommended hardware configuration for a small team:
50 GB+ of drive space
Comprehensive hardware recommendations:
For Windows operating system: Windows Support Policy
Debian/Ubuntu
On Debian and Debian-based distributions like Ubuntu you can install Jenkins through apt .
Long Term Support release
A LTS (Long-Term Support) release is chosen every 12 weeks from the stream of regular releases as the stable release for that time period. It can be installed from the debian-stable apt repository.
Weekly release
A new release is produced weekly to deliver bug fixes and features to users and plugin developers. It can be installed from the debian apt repository.
If an error is reported, “jenkins : Depends: daemon but it is not installable”, add the «universe» apt repository of community maintained free and open source software for Ubuntu by executing this command after sudo apt-get update :
This package installation will:
Setup Jenkins as a daemon launched on start. See /etc/init.d/jenkins for more details.
Create a ‘jenkins’ user to run this service.
Direct console log output to the file /var/log/jenkins/jenkins.log . Check this file if you are troubleshooting Jenkins.
Populate /etc/default/jenkins with configuration parameters for the launch, e.g JENKINS_HOME
Set Jenkins to listen on port 8080. Access this port with your browser to start configuration.
If your /etc/init.d/jenkins file fails to start Jenkins, edit the /etc/default/jenkins to replace the line —-HTTP_PORT=8080—- with —-HTTP_PORT=8081—- Here, «8081» was chosen but you can put another port available.
Installation of Java
Jenkins requires Java in order to run, yet certain distributions don’t include this by default and some Java versions are incompatible with Jenkins.
There are multiple Java implementations which you can use. OpenJDK is the most popular one at the moment, we will use it in this guide.
To install the Open Java Development Kit (OpenJDK) run the following:
Update the repositories
search of all available packages:
Pick one option and install it:
the result must be something like:
Why use apt and not apt-get or another command? The apt command has been available since 2014. It has a command structure that is similar to apt-get but was created to be a more pleasant experience for typical users. Simple software management tasks like install, search and remove are easier with apt .
Fedora
You can install Jenkins through dnf . You need to add the Jenkins repository from the Jenkins website to the package manager first.
Long Term Support release
A LTS (Long-Term Support) release is chosen every 12 weeks from the stream of regular releases as the stable release for that time period. It can be installed from the redhat-stable yum repository.
Weekly release
A new release is produced weekly to deliver bug fixes and features to users and plugin developers. It can be installed from the redhat yum repository.
Start Jenkins
Register the Jenkins service with the command:
You can start the Jenkins service with the command:
You can check the status of the Jenkins service using the command:
If everything has been set up correctly, you should see an output like this:
If you have a firewall installed, you must add Jenkins as an exception. You must change YOURPORT in the script below to the port you want to use. Port 8080 is the most common.
Red Hat / CentOS
You can install Jenkins through yum on Red Hat Enterprise Linux, CentOS, and other Red Hat based distributions. You need to choose either the Jenkins Long Term Support release or the Jenkins weekly release.
Long Term Support release
A LTS (Long-Term Support) release is chosen every 12 weeks from the stream of regular releases as the stable release for that time period. It can be installed from the redhat-stable yum repository.
Weekly release
A new release is produced weekly to deliver bug fixes and features to users and plugin developers. It can be installed from the redhat yum repository.
Start Jenkins
You can start the Jenkins service with the command:
You can check the status of the Jenkins service using the command:
If everything has been set up correctly, you should see an output like this:
If you have a firewall installed, you must add Jenkins as an exception. You must change YOURPORT in the script below to the port you want to use. Port 8080 is the most common.
Post-installation setup wizard
After downloading, installing and running Jenkins using one of the procedures above, the post-installation setup wizard begins.
This setup wizard takes you through a few quick «one-off» steps to unlock Jenkins, customize it with plugins and create the first administrator user through which you can continue accessing Jenkins.
Unlocking Jenkins
When you first access a new Jenkins instance, you are asked to unlock it using an automatically-generated password.
Browse to http://localhost:8080 (or whichever port you configured for Jenkins when installing it) and wait until the Unlock Jenkins page appears.
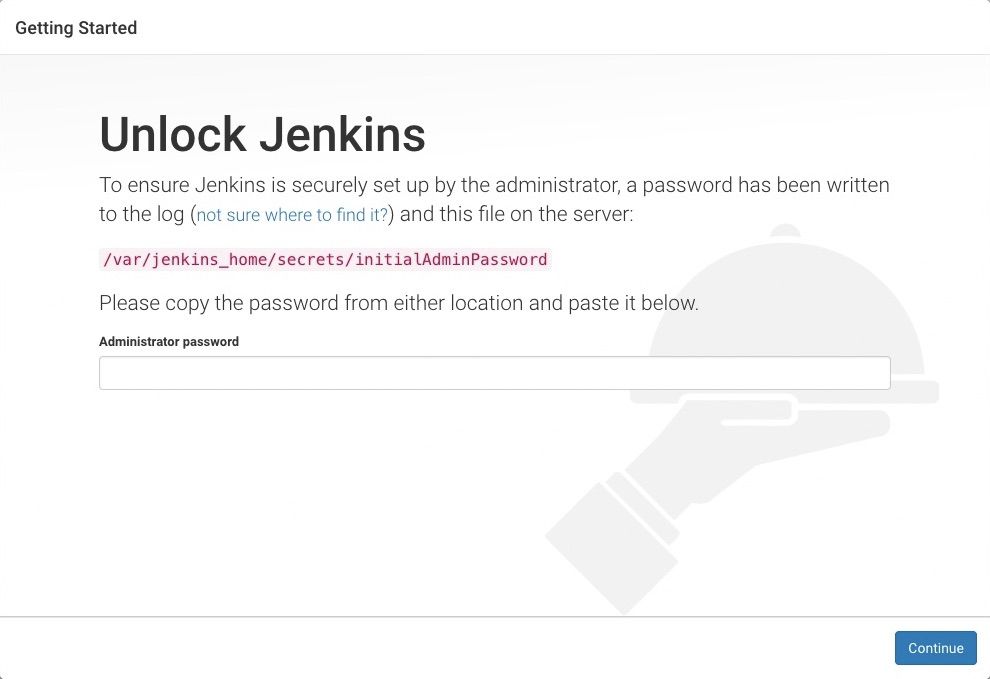
From the Jenkins console log output, copy the automatically-generated alphanumeric password (between the 2 sets of asterisks).
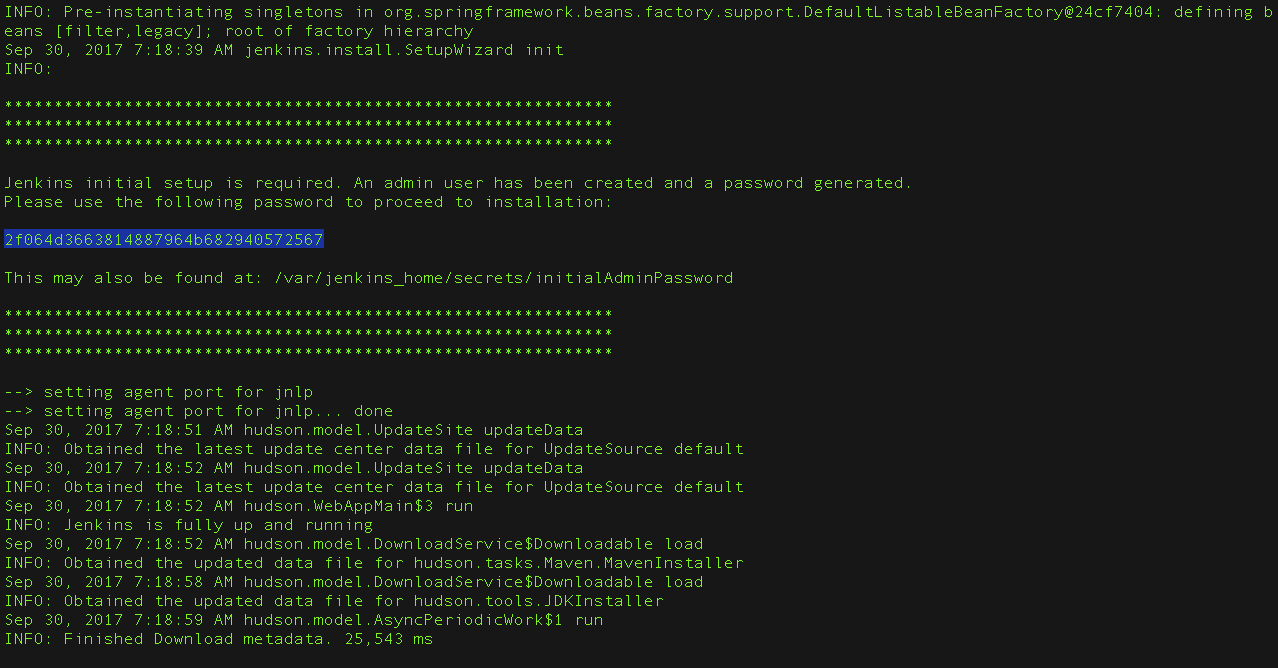
Note:
The command: sudo cat /var/lib/jenkins/secrets/initialAdminPassword will print the password at console.
If you are running Jenkins in Docker using the official jenkins/jenkins image you can use sudo docker exec $
On the Unlock Jenkins page, paste this password into the Administrator password field and click Continue.
Notes:
You can always access the Jenkins console log from the Docker logs (above).
The Jenkins console log indicates the location (in the Jenkins home directory) where this password can also be obtained. This password must be entered in the setup wizard on new Jenkins installations before you can access Jenkins’s main UI. This password also serves as the default admininstrator account’s password (with username «admin») if you happen to skip the subsequent user-creation step in the setup wizard.
Customizing Jenkins with plugins
After unlocking Jenkins, the Customize Jenkins page appears. Here you can install any number of useful plugins as part of your initial setup.
Click one of the two options shown:
Install suggested plugins — to install the recommended set of plugins, which are based on most common use cases.
Select plugins to install — to choose which set of plugins to initially install. When you first access the plugin selection page, the suggested plugins are selected by default.
| If you are not sure what plugins you need, choose Install suggested plugins. You can install (or remove) additional Jenkins plugins at a later point in time via the Manage Jenkins > Manage Plugins page in Jenkins. |
The setup wizard shows the progression of Jenkins being configured and your chosen set of Jenkins plugins being installed. This process may take a few minutes.
Creating the first administrator user
Finally, after customizing Jenkins with plugins, Jenkins asks you to create your first administrator user.
When the Create First Admin User page appears, specify the details for your administrator user in the respective fields and click Save and Finish.
When the Jenkins is ready page appears, click Start using Jenkins.
Notes:
This page may indicate Jenkins is almost ready! instead and if so, click Restart.
If the page does not automatically refresh after a minute, use your web browser to refresh the page manually.
If required, log in to Jenkins with the credentials of the user you just created and you are ready to start using Jenkins!
Источник
Установка Jenkins на Ubuntu
Веб-приложение Jenkins написано на java и для его работы мы дополнительно установим пакет openjdk. Данная инструкция написана на примере Ubuntu Server 20.04.
Подготовка системы
В качестве предварительной настройки обновим список пакетов, зададим корректное время сервера и настроим брандмауэр.
Обновление списка пакетов в репозиториях
Для возможности установки свежих пакетов, выполняем команду:
Настройка времени
Для настройки времени зададим часовой пояс:
timedatectl set-timezone Europe/Moscow
* в данном примере московское время.
Установим службу для синхронизации времени:
apt-get install chrony
Разрешим ее автозапуск:
systemctl enable chrony
Настройка брандмауэра
По умолчанию в Ubuntu настроены разрешающие правила и конфигурирование брандмауэра не требуется. Однако, если в нашей системе применяются правила, необходимо открыть порт 8080, на котором работает Jenkins:
iptables -A INPUT -p tcp —dport 8080 -j ACCEPT
И сохраняем правило:
apt-get install iptables-persistent
Инсталляция Jenkins
Как было сказано выше, мы установим openjava, сервис Jenkins и завершим развертывания на портале. Итого, 3 этапа.
1. Установка openjdk
apt-get install default-jdk
Выбираем реализацию java по умолчанию с помощью утилиты update-alternatives:
update-alternatives —config java
Скорее всего, мы увидим сообщение:
There is only one alternative in link group java (providing /usr/bin/java): /usr/lib/jvm/java-11-openjdk-amd64/bin/java
Nothing to configure.
Это значит, что в системе установлена только одна реализация java. Но если их несколько, на запрос:
Selection Command
————————————————
*+ 1 java-11-openjdk.x86_64 (/usr/lib/jvm/java-11-openjdk-11.0.9.11-0.el8_2.x86_64/bin/java)
. выбираем вариант с подходящей версией, например, последней:
Enter to keep the current selection[+], or type selection number: 1
Готово. Смотрим версию установленной java:
Мы должны увидеть что-то на подобие:
openjdk version «11.0.10» 2021-01-19
OpenJDK Runtime Environment (build 11.0.10+9-Ubuntu-0ubuntu1.20.04)
OpenJDK 64-Bit Server VM (build 11.0.10+9-Ubuntu-0ubuntu1.20.04, mixed mode, sharing)
2. Установка Jenkins
Для установки сервиса Jenkins добавляем репозиторий:
deb https://pkg.jenkins.io/debian-stable binary/
Импортируем публичный ключ для подключения к репозиторию:
wget -q -O — https://pkg.jenkins.io/debian-stable/jenkins.io.key | sudo apt-key add —
Обновляем список пакетов:
apt-get install jenkins
Разрешаем автозапуск сервиса:
systemctl enable jenkins
3. Завершение установки
Открываем браузер и переходим по адресу http:// :8080 — откроется окно «Unlock Jenkins». В нем будет путь до файла, в котором нужно взять парольную фразу для разблокировки портала:

И так, на сервере вводим команду:
* где /var/lib/jenkins/secrets/initialAdminPassword — полный путь до файла, который отображен на стартовой странице установки.
Мы должны увидеть что-то на подобие:
# cat /var/lib/jenkins/secrets/initialAdminPassword
35635dce8b014707a2ec90937763cfe3
Используем данный пароль и вставляем его в поле Administrator password:

В следующем окне выбираем вариант установки плагинов — рекомендованные или по выбору:

* если мы не слишком хорошо знакомы с продуктом, выбираем рекомендованные плагины.
Начнется процесс развертывания Jenkins:

После создаем учетную запись для администратора:

На последней странице мы можем задать URL-адрес для нашего портала (или оставить IP-адрес):

Другие способы установки
Кратко, рассмотрим другие методы установки Jenkins.
1. Docker
После загружаем контейнеры для Jenkins:
docker pull jenkins/jenkins
docker run -p 8080:8080 —name=jenkins-master jenkins/jenkins:latest
На экране мы должны увидеть код для разблокировки Jenkins. Копируем его, открываем в браузере страницу http:// :8080 и выполняем установку в веб, как это делали выше.
После выполнения установки прерываем работу контейнера в интерактивном режиме комбинацией Ctrl + С и запускаем его в бэкграунде:
docker start jenkins-master
2. Установка из файла WAR
Загружаем последнюю версию war-файла:
wget -P /usr/local/bin/ http://mirrors.jenkins-ci.org/war/latest/jenkins.war
* на странице загрузки jenkins можно найти ссылку для скачивания LTS-версии файла war. Обратите внимание, что мы сразу размещаем файл в каталоге /usr/local/bin.
Запускаем war с помощью java:
java -jar /usr/local/bin/jenkins.war
На экране мы должны увидеть код для разблокировки Jenkins. Копируем его, открываем в браузере страницу http:// :8080 и выполняем установку в веб, как это делали выше.
После выполнения установки прерываем работу war в интерактивном режиме комбинацией Ctrl + С.
Создаем юнит в systemd:
[Unit]
Description=Jenkins Service
After=network.target
[Service]
Type=simple
User=root
ExecStart=/usr/bin/java -jar /usr/local/bin/jenkins.war
Restart=on-abort
ExecReload=/bin/kill -HUP $MAINPID
Перечитываем юниты в systemcd:
Разрешаем автозапуск сервиса jenkins и стартуем его:
systemctl enable jenkins —now
Можно проверить состояние запущенной службы командой:
systemctl status jenkins
Работа с Jenkins в CLI
По умолчанию, необходимый для работы с Jenkins из командной строки файл jenkins-cli.jar не копируется в систему.
Его нужно скачать. Выполняем:
wget http://127.0.0.1:8080/jnlpJars/jenkins-cli.jar -P /usr/local/bin/
* таким образом, мы скачаем файл с собственного сервера и разместим его в папке /usr/local/bin/.
Теперь можно выполнять команды с синтаксисом:
java -jar /usr/local/bin/jenkins-cli.jar -auth : -s http://127.0.0.1:8080/
Например, получить список команд можно так:
java -jar /usr/local/bin/jenkins-cli.jar -auth admin:admin -s http://127.0.0.1:8080/ -webSocket help
* где admin:admin — логин и пароль от административной учетной записи.
Установка плагинов
Список плагинов мы можем найти на официальном сайте. Мы рассмотрим 2 способа их установки — из веб-интерфейса и командной строки.
Веб-интерфейс
Переходим в раздел Настроить Jenkins:

Затем в Управление плагинами:

Переходим к вкладке Доступные, по фильтру находим нужный нам плагин, отмечаем галочкой его установку:

Кликаем по кнопке Загрузить и установить после перезагрузки:

Будет выполнена установке плагина, после чего, портал перезапустит сервис.
В командной строке для установки плагина выполняем:
java -jar /usr/local/bin/jenkins-cli.jar -auth admin:admin -s http://127.0.0.1:8080/ install-plugin docker-workflow
* в данном примере мы установим плагин Docker Pipeline. Обратите внимание, что его идентификатор для установки docker-workflow — посмотреть данный идентификатор можно на сайте с плагинами.
После перезапускаем сервис jenkins:
systemctl restart jenkins
Возможные ошибки
Error: Unable to access jarfile jenkins-cli.jar
Ошибка появляется при попытке выполнить команду в jenkins-cli.
Причина: для работы команды необходим файл jenkins-cli.jar, который не устанавливается в системе.
Решение: выполняем действия по настройке системы для работы с jenkins-cli.
failed to start lsb: start jenkins at boot time
Ошибка возникаем при попытке запустить сервис jenkins.
Причина: как правило, отсутствие в системе установленного java.
Решение: устанавливаем java по инструкции выше.
Источник


