- linux-notes.org
- Установка Jenkins в Unix/Linux
- Установка Jenkins-Slave в Unix/Linux
- Первый билд (джоба) на Jenkins-е
- How to Setup Jenkins Agent/Slave Using Password and ssh Keys
- Setup Jenkins Agents/Slaves on Jenkins
- Jenkins Agent/Slave Prerequisites
- Create a Jenkins User
- Setting up Jenkins Agents/Slaves using username and password
- Setting up Jenkins slaves using ssh keys
- Add the SSH Private Key to Jenkins Credentials
- Connect SSH Jenkins Agent to Master Node
- Test Jenkins Agent/Slave Nodes
- Conclusion
linux-notes.org
Я ранее рассказывал как можно установить Jenkins на сервер. Сейчас, я хотел бы поделится своей заметкой по установке Jenkins-а и Jenkins-slave. Я для своего примера, буду использовать Docker + docker-compose чтобы поднять все необходимое. Конечно, это не самый хороший способ сделать отказоустойчевый сервер. Но тем не менее — у меня на маке все работает. Тем более, я настроил данное чудо не для ПРОД-а, а для локальной лабы. Чтобы более поробно изучить дженкинс. Хотелось бы сказать, ребят, если вы будете выбирать между CI/CD — не берите дженкинс (ИМХО). Есть ума других крутых тулов. Я хочу многие из них попробовать и конечно же — написать статейку в виде заметки.
Установка Jenkins в Unix/Linux
Как я говорил ранее, я буду использовать докер для установки дженкинса. ОС которую я использую — Mac OS X. Многие скажует, да какая разница, ты же запускаешь в докере. Но на самом деле — докер немного по разному работает на разных Unix/Linux ОС. Немного пришлось поплясать с бубном, чтобы зависти все это чудо на маке.
Мой docker-compose.yml файл выглядит следующим образом:
Кто работает с докер-компос, тот сможет прочитать данный файл и понять в чем дело. Но если кто-то не знает, я немного расскажу на что стоит заострить внимание. И так:
Я данным сервисом запускаю 3 контейнера, — gitlab, jenkins (master) и socat. Gitlab — система управления репозиториями кода для Git. данные конфиг делался универсальным и чтобы он работал в любом месте и на Unix/Linux системах. Если что-то не будет работать, то стоит рассмотреть поле DNS (в данном поле прописаны ДНС-ы которые служат резолвом в самих докер-контейнера. Иногда это уместно, когда на работе или дома используются свои ДНС, а остальные блокируются).
Можно заюзать статью чтобы проверить, какие ДНС-ы используются:
PS: Для данного поля стоит использовать, ТОЛЬКО 3 DNS ЗАПИСИ, не более! Иначе, они просто не будут работать и моугт сломать контейнер(ы).
Многие посмотрет на «socat» конейнер и спросят, а зачем он тут вообще упал? Так вот, он тут служит перенаправлением данных с порта (2375) на Unix сокет (/var/run/docker.sock). И сново могут полететь вопросы, а зачем?
Да дело в том, что докер-прогеры «не смогли» запилить «docker_opts»/»hosts» переменную в докер под Mac OS X. Данная переменная выполняет собственно аналогичные действия, но нативным спообом. Выглядит это вот так (на стороне Linux):
Т.е данную команду нужно прописать в конфиг докера, или можно запустить демон следующим образом:
Мне не совсем понятно почему нельзя было добавить такое в поддержку мака, но воркераунд найден и он работает. Вообще, такое чудо должно работать и на линуксе, но я не проверял. Если кому-то будет интересно, проверьте и напишите в комментариях результат.
На все это дело, я потратил около 7 часов времени и мне не очень было понятно почему не работает. Но в интернете нашелся пример моего бедствия. Я взял идею и опробовал ее — костыльненько, но а что поделать!
Самое интересно, то, что я в своей реализации заюзал «Docker in Docker», т.е пробросил Docker с Mac OS X на Docker хост с jenkins. Иначе , я хз как это должно работать. Если кто-то знает — расскажите 🙂
Собственно, gitlab + jenkins — готовы к использованию. Перейдем к настройке jenkins-slave.
Установка Jenkins-Slave в Unix/Linux
Стоит поставить: Docker Plugin плагин. Я еще ставил — Docker Slaves Plugin плагин, но не понял как он работает. Я покажу какие плагины у меня имеются в дженкинсе, возможно кому-то пригодится, но для начала, скачаем CLI для Jenkins:
Мои установленные плагины:
После того как плагины поставились, открываем дженкинс и переходим:
«Manage Jenkins» -> «Configure System» и ищем поле «Cloud»:
Кликаем по «Docker Cloud Details» чтобы ввести необходимые данные:

Задаем имя, у меня это — Docker. В поле «Docker Host URI» прописываем хост и порт который юзает докер. У меня — «tcp://172.6.6.2:2375». Почему-то, не прокатило использование хостнейма от соката в этом случае. Может исправлю попозже или на крайний случай — можно оставить как есть, т.к эта лаба служит в качестве примера. Стоит отметить, если у вас используется авторизация к докер хосту, то стоит заполнить «Server credentials». Если нажать на «Advanced», то выпадет список дополнительных параметров которые можно заполить тоже:
Нажмите на «Test connection» чтобы получить тестовое подключение (чтобы убедится что коннекшен работает как нужно).
Идем дальше, клацаем по «DOCKER AGENT TEMPLATES…» Я привел к виду:
Заполнил поле и лейблу как мне угодно. В поле «Docker image» я прописал Jenkins-Slave образ, который я взял с официального докер-регистра — «jenkinsci/slave». Так же, по необходимости заполните все необходимые поля (креденшелы, дополнительные опции).
Первый билд (джоба) на Jenkins-е
Создаем проект под свои нужды. Потом, создаем «Pipeline» проект, например:
Тестовый pipeline projec для Java
Нажимаем на «OK» и сейчас создадим все необходимое.
Находим «Run the build inside Docker containers» и ставим чекбокс. В поле «Docker Image» ставим наш образ, у меня — «jenkinsci/jnlp-slave:latest». Так же, можно прописать «Advanced settings» опции и выставить использовании по памяти. У меня все имеет вид:
Идем дальше, находим «Pipeline» вкладку и заполняем ее под свои нужды. У меня все приведено и имеет вид:
Т.е я заюзал свой гитлаб сервер. В нем есть репозиторий с проектом. Так же, добавил подключение к гитлабу. Собственно, все готово, можно нажимать на «SAVE»!
Слева вверху, нажимаем на «Build Now» и смотрим что получилось!
Если открыть «Manage Jenkins» -> «Manage Nodes», то появится jenkins-slave:
Видно что поднялся слейв и запустил джобу. Можно открыть ее и поглядеть статус выполнения:
Я думаю что на этом пока все, статья «Установка Jenkins и Jenkins-slave в Unix/Linux» завершена.
Источник
How to Setup Jenkins Agent/Slave Using Password and ssh Keys

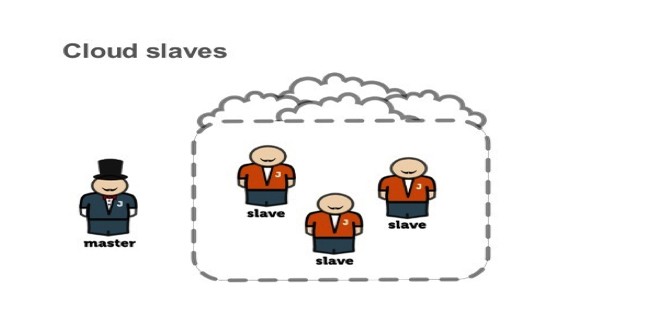
One of the best features of Jenkins is its distributed nature. You can configure multiple build slaves for better segregation and scalability.
For example, you might want to test a cross-platform code base with a different operating system. In this case, you can set up different Jenkins agents or slaves and run the job against them.
Also, a Jenkins distributed architecture will reduce the load on the master server.
Setup Jenkins Agents/Slaves on Jenkins
In this guide, I will walk you through the steps for setting up the Jenkins agent node using password and ssh keys.
There are two ways of authentication for setting up the Linux Jenkins slave agents.
- Using username and password
- Using ssh keys.
Also, do check out my Jenkins Docker Based Agent. You can scale and manage your Jenkins agent using Docker containers.
Jenkins Agent/Slave Prerequisites
For Jenkins agent configuration, you need to have the following in the slave machines before adding it to the master.
- Java should be installed on your agent server.
- A valid Linux user account that can perform the required tasks on the agent server. ( preferably a sudo user if your job requires elevated privileges)
- Git should be installed as most build job requires git specific actions.
Lets get started with the Jenkins agent node configuration.
Create a Jenkins User
It is recommended to execute all Jenkins jobs as a Jenkins user on the Jenkins agent nodes.
Note: I am using Ubuntu machine as a slave. The steps will be same for other Linux flavours as well
Step 1: Create a jenkins user and a password using the following command.
Type a password when prompted. The above commands should create a user and a home directory named jenkins under “/home”.
Step 2: Now, login as jenkins user.
Step 3: Create a “ jenkins_slave ” directory under /home/jenkins.
Note: You can read more about adding Linux sudo users from here -> Adding sudo users and permissions on Linux
Setting up Jenkins Agents/Slaves using username and password
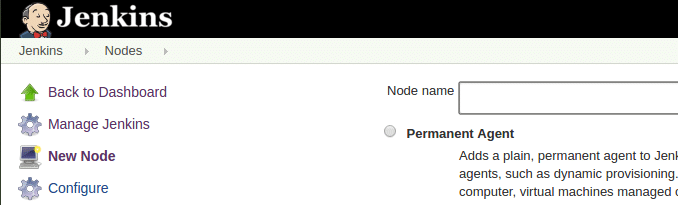
Step 1: Head over to Jenkins dashboard –> Manage Jenkins –> Manage Nodes
Step 2: Select new node option.
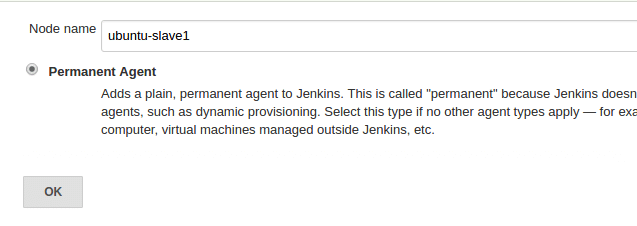
Step 3: Give it a name, select the “ permanent agent ” option and click ok.
Step 4: Enter the details as shown in the image below and save them. For the credential box, click the add button and enter the slaves Jenkins username and password (For logging into the slave machine) that you created during the slave configuration. To know more about each option, click the question mark on the right side of each text box.

Step 4: Once you click save, Jenkins will automatically connect to the slave machine and configure it as an agent.
By following the same steps, you can add multiple servers as jenkins agent nodes.
Setting up Jenkins slaves using ssh keys
Step 1: Login to the slave server as a jenkins user.
Step 2: Create a .ssh directory and cd into the directory.
Step 3: Create an ssh key pair using the following command. Press enter for all the defaults when prompted.
Step 4: Add the public to authorized_keys file using the following command.
Step 5: Now, copy the contents of the private key to the clipboard.
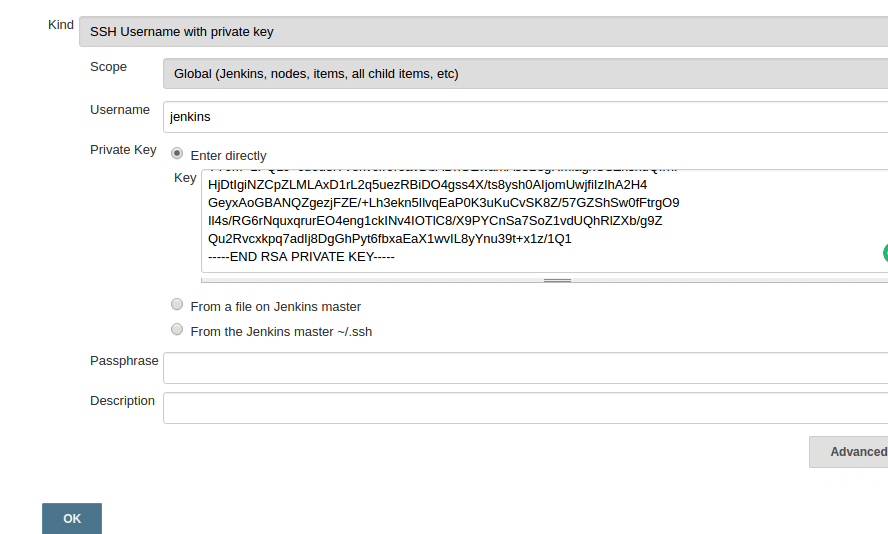
Add the SSH Private Key to Jenkins Credentials
Step 1: Go to jenkins dashboard –> credentials –> Global credentials –> add credentials , select and enter all the credentials as shown below and click ok.
Connect SSH Jenkins Agent to Master Node
Step 1: F ollow the first 3 steps we did for slave configuration using username and password.
Step 2: Follow all the configurations in the 4th step as well. But this time, for the launch method, select the credential you created with the ssh key.
Test Jenkins Agent/Slave Nodes
To test the Jenkins agent node or slave, create a sample project and select the option as shown below.
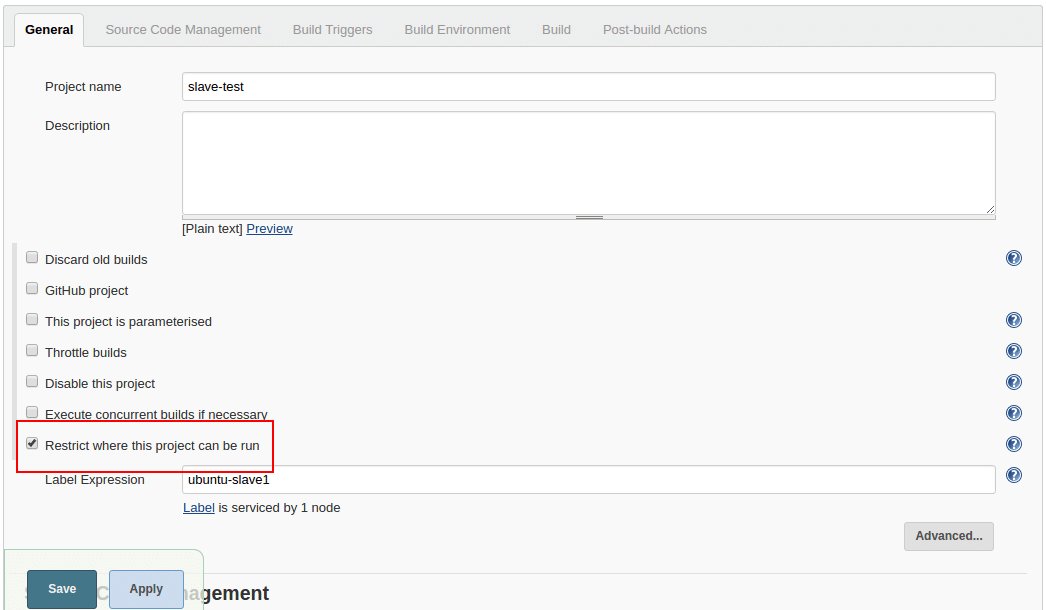
You need to select the node using the label option. If you start to type the letter the node list will show up.
You can then run a simple, shell script operation to check if the Jenkins agent is executing the job.
Conclusion
In this tutorial, we learned how to set up slaves for Jenkins. There is no complex step involved in this configuration.
When it comes to automating the process, you will need scripts and Jenkins CLI to this. I will cover that in future posts.
Share if you like it and leave a comment if you have queries!!

Bibin Wilson
An author, blogger, and DevOps practitioner. In his spare time, he loves to try out the latest open source technologies. He works as an Associate Technical Architect. Also, the opinions expressed here are solely his own and do not express the views or opinions of his previous or current employer.
23 comments
May I create the private-public key on the master node and later update the credentials with the master´s private key? I think this approach is more correct as the master node is always going to reach the slave node.

Bibin Wilson says:
You are correct peter. Ideally, we should not keep the Keys in the instances. Once the setup is done, it is better to remove the private key from the instance and save it some secret management utilities like Vault.
Hi Bibin
Nice Blog, helped me a lot, can you plz help me with the below error, it was working fine and suddenly something happened and started to throw below error:
Not sure what went wrong suddenly, plz help me on this as i have spent more than 3 to fix this, as a workaround i have created some shell scripts to call thru jenkins using plink.
Bibin Wilson says:
Looks like Git is not installed.
make sure you have git installed on the agent node.
Hi Bibin,
thankyou for your swift response. Git is installed on agent node which is Linux server here, everything was working fine few hours ago but suddenly with all the same settings intact, this error started to appear.
Git is installed at this location /usr/bin/git. When i manually run “git pull” on Linux machine, it works fine. But same throws this error when run via jenkins job.
Please suggest what else can i do to fix this.
Bibin Wilson says:
Try giving Git path /usr/bin/git in the Jenkins Git global configuration.
I have tried that, it says “There’s no such file: usr\bin\git” although i have added windows path for git “C:\Program Files\Git\bin\git.exe” as well (Since Jenkins is installed on windows server and target deployment machine is linux). This is also not working.
Default path for git (git.exe) was already there under Global Tool Config.
Earlier everything was working, nothing seems to have changed.
Is there anything else i can try.
Bibin Wilson says:
You have mentioned that it is a Linux server. So you need to add the Linux git path, not the windows git path with backward slashes. /usr/bin/git
getting same error how to resolve
Thanks
Nice Blog…when can we expect the next on automating the process, using scripts and jenkins CLI.
Just an aside, but it might be worth noting in your instructions that you must have Java also installed on the slave. I didn’t realise this, and it caught me!
Is possible just copy the Master’s public key to Slave simply by ‘ssh-copy-id’? You mentioned that create the ssh key on slave then copy the private key to master. Thanks
Yes Robert, that will also work.
Nice blog !! Is there any way to configure the emails from the slave node? I meant , if I have jobs running in the slave node with editable email plugin. Whenever, I trigger the email it should be sending emails uopn slave email config but not Master.
I tried to connect via “Setting Up Slaves Using Ssh Keys” I got below error log and Node still offline. Do you have any idea for this ?
[06/05/17 16:48:03] [SSH] Opening SSH connection to 191.11.11.111:22.
Key exchange was not finished, connection is closed.
java.io.IOException: There was a problem while connecting to 191.11.11.111:22
at com.trilead.ssh2.Connection.connect(Connection.java:834)
at com.trilead.ssh2.Connection.connect(Connection.java:703)
at com.trilead.ssh2.Connection.connect(Connection.java:617)
at hudson.plugins.sshslaves.SSHLauncher.openConnection(SSHLauncher.java:1265)
at hudson.plugins.sshslaves.SSHLauncher$2.call(SSHLauncher.java:790)
at hudson.plugins.sshslaves.SSHLauncher$2.call(SSHLauncher.java:785)
at java.util.concurrent.FutureTask.run(FutureTask.java:266)
at java.util.concurrent.ThreadPoolExecutor.runWorker(ThreadPoolExecutor.java:1142)
at java.util.concurrent.ThreadPoolExecutor$Worker.run(ThreadPoolExecutor.java:617)
at java.lang.Thread.run(Thread.java:745)
Caused by: java.io.IOException: Key exchange was not finished, connection is closed.
at com.trilead.ssh2.transport.KexManager.getOrWaitForConnectionInfo(KexManager.java:95)
at com.trilead.ssh2.transport.TransportManager.getConnectionInfo(TransportManager.java:237)
at com.trilead.ssh2.Connection.connect(Connection.java:786)
… 9 more
Caused by: java.io.IOException: Cannot read full block, EOF reached.
at com.trilead.ssh2.crypto.cipher.CipherInputStream.getBlock(CipherInputStream.java:81)
at com.trilead.ssh2.crypto.cipher.CipherInputStream.read(CipherInputStream.java:108)
at com.trilead.ssh2.transport.TransportConnection.receiveMessage(TransportConnection.java:232)
at com.trilead.ssh2.transport.TransportManager.receiveLoop(TransportManager.java:706)
at com.trilead.ssh2.transport.TransportManager$1.run(TransportManager.java:502)
… 1 more
[06/05/17 16:48:03] Launch failed – cleaning up connection
[06/05/17 16:48:03] [SSH] Connection closed.
Can you please provide the steps to automate the process.
Источник


