4) Интеграция Jenkins GitHub
Из предыдущих уроков по Guru99 вы узнали, что такое Jenkins и как установить его в систему Windows. Предполагая, что вы выполнили эти основные шаги, теперь мы перейдем к управлению плагином.
Дженкинс имеет выдающуюся поддержку плагинов. На их сайте доступны тысячи сторонних плагинов для приложений. Чтобы узнать, поддерживает ли Jenkins сторонние приложения, которые вы имеете в виду, проверьте каталог их плагинов по адресу https://wiki.jenkins-ci.org/display/JENKINS/Plugins .

В этом уроке вы узнаете:
Установка плагинов в Jenkins
Jenkins поставляется с довольно простой настройкой, поэтому вам нужно будет установить необходимые плагины, чтобы включить поддержку сторонних приложений.
GitHub — это веб-хранилище кода, которое играет важную роль в DevOps. Он предоставляет общую платформу для нескольких разработчиков, работающих над одним и тем же кодом / проектом, для загрузки и извлечения обновленного кода, тем самым облегчая непрерывную интеграцию.
Дженкинс должен иметь установленный плагин GitHub, чтобы иметь возможность извлекать код из репозитория GitHub.
Вам не нужно устанавливать плагин GitHub, если вы уже установили плагин Git в ответ на приглашение во время установки установки Jenkins. Но если нет, то вот как вы устанавливаете плагины GitHub в Jenkins и извлекаете код из репозитория GitHub.
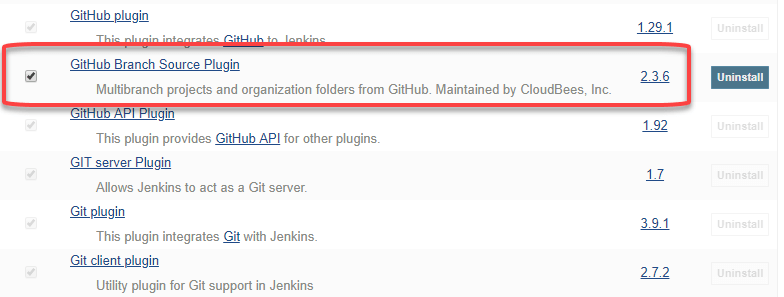
Установите плагин GIT
Шаг 1. Нажмите кнопку « Управление Jenkins» на панели инструментов Jenkins:

Шаг 2: Нажмите на Управление плагинами :

Шаг 3: На странице плагинов
- Выберите плагин GIT
- Нажмите Установить без перезагрузки. Плагин займет несколько минут, чтобы завершить загрузку в зависимости от вашего интернет-соединения, и будет установлен автоматически.
- Вы также можете выбрать опцию Загрузить сейчас и Установить после перезагрузки . В какой плагин установлен после перезагрузки
- Вам будет показано сообщение «Нет доступных обновлений», если у вас уже установлен плагин Git.

Шаг 4: После установки плагинов перейдите в раздел «Управление Jenkins» на панели инструментов Jenkins. Вы увидите ваши плагины в списке среди остальных.
Интеграция Jenkins с GitHub
Теперь мы обсудим процесс интеграции GitHub в Jenkins в системе Windows.
Шаг 1) Создайте новую работу в Jenkins, откройте панель управления Jenkins с вашим URL-адресом Jenkins. Например, http: // localhost: 8080 /
Нажмите на создание новых рабочих мест :

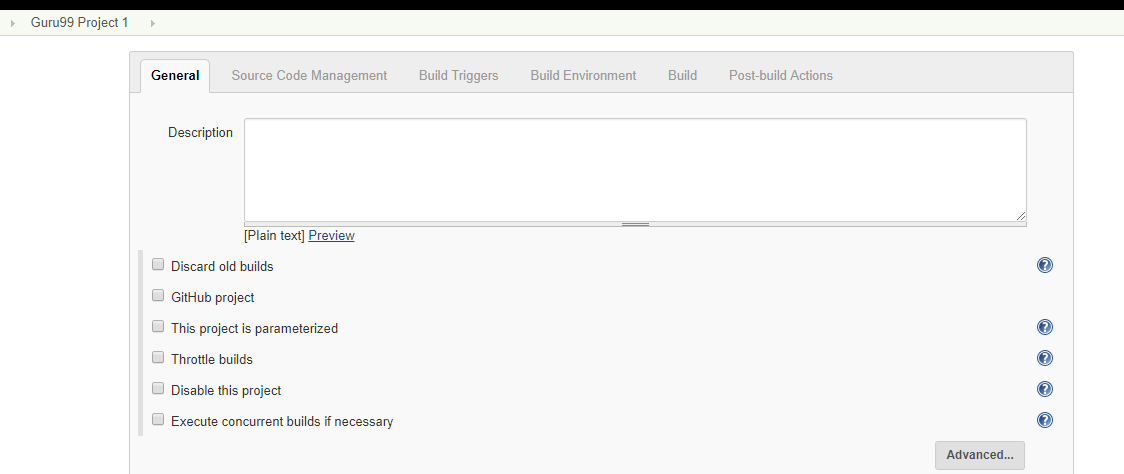
Шаг 2) Введите имя элемента, выберите тип работы и нажмите OK . Мы создадим проект Freestyle в качестве примера.

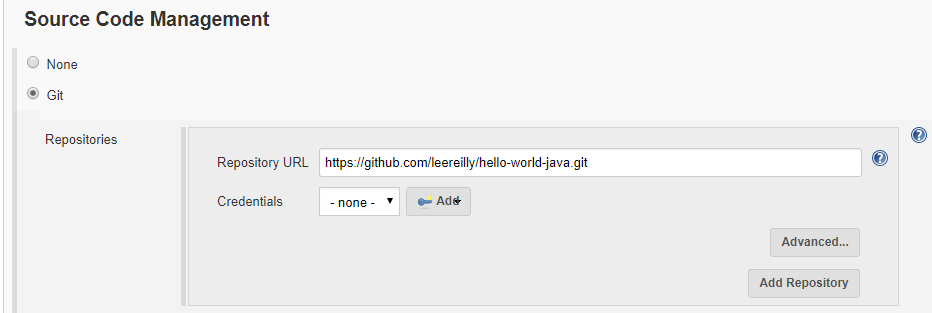
Шаг 3) Как только вы нажмете ОК, страница будет перенаправлена в форму проекта. Здесь вам нужно будет ввести информацию о проекте:
Шаг 4) Вы увидите опцию Git в разделе « Управление исходным кодом», если ваш плагин Git был установлен в Jenkins:
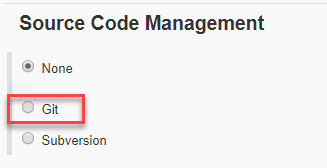
ПРИМЕЧАНИЕ. Если опция Git не отображается, попробуйте переустановить плагины, а затем перезапустите и повторно войдите в свою панель управления Jenkins. Теперь вы сможете увидеть опцию Git, как указано выше.
Шаг 5) Введите URL-адрес хранилища Git, чтобы получить код из GitHub.

Шаг 6) При первом вводе URL-адреса хранилища может появиться сообщение об ошибке. Например:
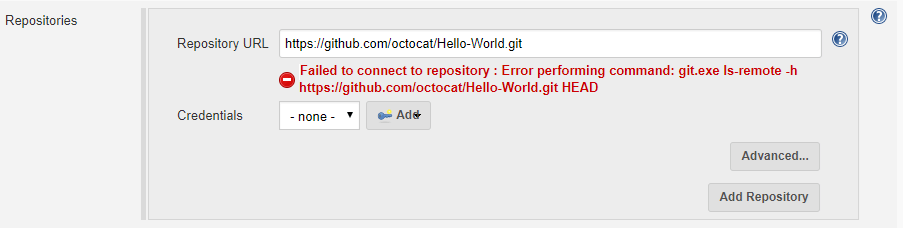
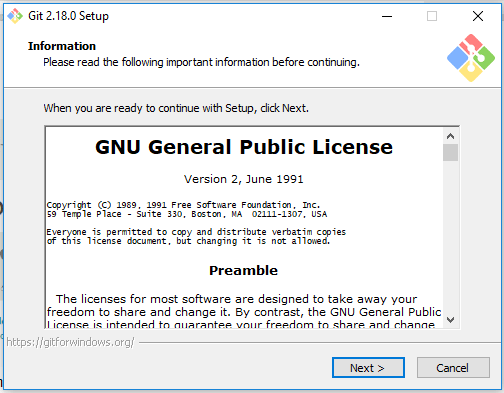
Это происходит, если у вас не установлен Git на вашем локальном компьютере. Чтобы установить Git на свой локальный компьютер, перейдите по ссылке https://git-scm.com/downloads.

Загрузите соответствующий файл Git для вашей операционной системы, в данном случае для Windows, и установите его на свой локальный компьютер под управлением Jenkins. Заполните инструкции на экране для установки GIT.
Шаг 7) После запуска Git на вашем компьютере вы можете запускать Git-репозитории в вашем Jenkins. Чтобы проверить, была ли она успешно установлена в вашей системе, откройте командную строку, введите «Git» и нажмите ввод. Вы должны увидеть различные варианты Git:

Это означает, что Git был установлен в вашей системе.
Примечание. Если в вашей системе уже установлен GIT, просто добавьте путь git.exe в Global Tool Configuration.
Шаг 8) Когда у вас все будет на месте, попробуйте добавить URL-адрес Git в Jenkins. Вы не увидите никаких сообщений об ошибках:
Git теперь правильно настроен в вашей системе.
How do I setup Git version control on Jenkins (on Windows)
I’ve been going round in circles for the past day attempting to get this working. I have found numerous instructions on how I might set this up but haven’t progressed that far.
- I have no previous experience with Git and I think many of these guides make an assumption that you have some basic understanding of Git
- Many Windows specific guides talk about Jenkins running as the system user — that isn’t the case for me, I just dropped the WAR into Tomcat and started it up
What I have done:
- I have installed the Git Jenkins plugin (and upgraded some of its plugin dependencies).
- I have started following the ‘instructions’ on the plugin’s page (and got highly confused and feel that possibly some steps are irrelevant for me)
- Started following the steps described here — I fall over fairly soon when it asks me to set my Jenkins path to cmd/git.cmd (I only have a cmd/git.exe in that directory). Nevertheless I struggle on, until it starts talking about SSH keys and the system user, well I don’t have an issue with users I don’t think.
- I did take a look at Git password caching (described here), but the cached credentials still timeout which isn’t ideal for the Jenkins user.
- I tried to get up to speed with Git and it’s access protocols using this guide.
Current errors:
Given that I have no username or password yet configured, it comes as no surprise that with my Git configured Jenkins job throws the following error:
What I want to achieve:
I have a Git repository in Stash using a https protocol. I don’t believe it is currently setup for SSH. I had assumed I could just enter the username and password in the Jenkins’ job configuration and be done with it, just like other SCM configuraiton sections, but no.
Git client

The git client plugin provides git application programming interfaces (APIs) for Jenkins plugins. It can fetch, checkout, branch, list, merge, and tag repositories. Refer to the API documentation for specific API details.
The GitClient interface provides the primary entry points for git access. It supports username / password credentials for git repository access with HTTP and HTTPS protocols (for example, https://github.com/jenkinsci/git-client-plugin or http://git.example.com/your-repo.git ). It supports private key credentials for git repository access with SSH protocol (for example, git@github.com:jenkinsci/git-client-plugin.git or ssh://git@github.com/jenkinsci/git-client-plugin.git ). Credential support is provided by the Jenkins credentials plugin.
Release notes have been recorded in GitHub since git client plugin 2.8.1. Prior release notes are recorded in the git client plugin repository change log.
The git client plugin default implementation requires that command line git is installed on the controller and on every agent that will use git. Command line git implementations working with large files should also install git LFS. The command line git implementation is the canonical implementation of the git interfaces provided by the git client plugin.
Command line git is enabled by default when the git client plugin is installed.
The git client plugin also includes two optional implementations («jgit» and «jgitapache») that use Eclipse JGit, a pure Java implementation of git. The JGit implementation in the git client plugin provides most of the functionality of the command line git implementation. When the JGit implementation is incomplete, the gap is noted in console logs.
JGit is disabled by default when the git client plugin is installed.
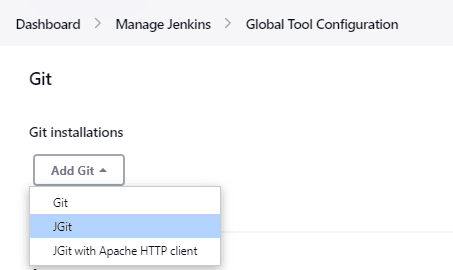
Click the «Add Git» button in the «Global Tool Configuration» section under «Manage Jenkins» to add JGit or JGit with Apache HTTP Client as a git implementation.
JGit with Apache HTTP Client
The original JGit implementation inside the git client plugin had issues with active directory authentication. A workaround was implemented to provide JGit but use Apache HTTP client for authentication. The issue in JGit has now been resolved and delivered in git client plugin releases. JGit with Apache HTTP Client continues to delivered to assure compatibility.
Installing PortableGit Automatically
The git client plugin can install Git for Windows Portable automatically from a zip file.

Download and install Git for Windows Portable from its 7z.exe file.
Create a zip file of the installation as PortableGit-a.bb.c.zip .
Upload that zip file to an HTTP server.
Set the Download URL for binary archive as the URL of the uploaded zip file.
Leave Path to Git executable as git .
Specify PortableGit-a.bb.c\bin\git.exe for the Subdirectory of extracted archive . This points to the git.exe in the archive relative to the root of the archive.
Git for Windows Portable will be installed on each agent in tools\git\PortableGit-a.bb.c . The path to the git executable will be tools\git\PortableGit-a.bb.c\bin\git.exe .
Windows Credentials Manager
Git for Windows is able to integrate with the Windows Credentials Manager for secure storage of credentials. Windows Credentials Manager works very well for interactive users on the Windows desktop. Windows Credentials Manager does not work as well for batch processing in the git client plugin. It is best to disable Windows Credentials Manager when installing Git on Jenkins agents running Windows.
Report issues and enhancements with the Jenkins issue tracker. Please use the «How to Report an Issue» guidelines when reporting issues.
Contributing to the Plugin
Refer to contributing to the plugin for contribution guidelines.
Some plugin settings are controlled by Java system properties. The properties are often used to override a standard behavior or to revert to previous behavior. Refer to Jenkins Features Controlled with System Properties for more details on system properties and how to set them.
When org.jenkinsci.plugins.gitclient.CliGitAPIImpl.checkRemoteURL is set to false it disables the safety checking of repository URLs.
Default is true so that repository URL’s are rejected if they start with — or contain space characters.
When org.jenkinsci.plugins.gitclient.CliGitAPIImpl.forceFetch is set to false it allows command line git versions 2.20 and later to not update tags which have already been fetched into the workspace.
Command line git 2.20 and later have changed behavior when fetching remote tags that already exist in the repository. Command line git before 2.20 silently updates an existing tag if the remote tag points to a different SHA1 than the local tag. Command line git 2.20 and later do not update an existing tag if the remote tag points to a different SHA1 than the local tag unless the —force option is passed to git fetch .
Default is true so that newer command line git versions behave the same as older versions.
When org.jenkinsci.plugins.gitclient.CliGitAPIImpl.promptForAuthentication is set to true it allows command line git versions 2.3 and later to prompt the user for authentication. Command line git prompting for authentication should be rare, since Jenkins credentials should be managed through the credentials plugin.
Credential prompting could happen on multiple platforms, but is more common on Windows computers because many Windows agents run from the desktop environment. Agents running on the desktop are much less common in Unix environments.
Default is false so that command line git does not prompt for interactive authentication.
When org.jenkinsci.plugins.gitclient.CliGitAPIImpl.useCLI is set to false , it will use JGit as the default implementation instead of command line git.
Default is true so that command line git is chosen as the default implementation.
When org.jenkinsci.plugins.gitclient.CliGitAPIImpl.user.name.file.encoding is set to a non-empty value (like IBM-1047 ) and the agent is running on IBM zOS, the username credentials file is written using that character set. The character sets of other credential files are not changed. The character sets on other operating systems are not changed.
Default is empty so that zOS file encoding behaves as it did previously.
When org.jenkinsci.plugins.gitclient.CliGitAPIImpl.user.passphrase.file.encoding is set to a non-empty value (like IBM-1047 ) and the agent is running on IBM zOS, the ssh passphrase file is written using that character set. The character sets of other credential files are not changed. The character sets on other operating systems are not changed.
Default is empty so that zOS file encoding behaves as it did previously.
When org.jenkinsci.plugins.gitclient.CliGitAPIImpl.user.password.file.encoding is set to a non-empty value (like IBM-1047 ) and the agent is running on IBM zOS, the password file is written using that character set. The character sets of other credential files are not changed. The character sets on other operating systems are not changed.
Default is empty so that zOS file encoding behaves as it did previously.
When org.jenkinsci.plugins.gitclient.CliGitAPIImpl.useSETSID is set to true and the setsid command is available, the git client process on non-Windows computers will be started with the setsid command so that they are detached from any controlling terminal. Most agents are run without a controlling terminal and the useSETSID setting is not needed. Enable useSETSID only in those rare cases where the agent is running with a controlling terminal. If it is not used in those cases, the agent may block on some authenticated git operations.
This setting can be helpful with Jenkins swarm agents and inbound agents started from a terminal emulator.
Default is false so that setsid is not used.


