- Install JetBrains Rider
- Prerequisites
- Install using the Toolbox App
- Install the Toolbox App
- Install the Toolbox App
- Install the Toolbox App
- Standalone installation
- Installation with dotUltimate installer
- Silent installation on Windows
- Silent configuration file
- Install as a snap package on Linux
- JetBrains Rider 2020.1 + activation code
- Оставьте комментарий Отменить ответ
- Jetbrains rider activation code linux
- Активация на бесконечный период
- Нерабочие способы
Install JetBrains Rider
JetBrains Rider is a cross-platform IDE that provides consistent experience on the Windows, macOS, and Linux operating systems.
Prerequisites
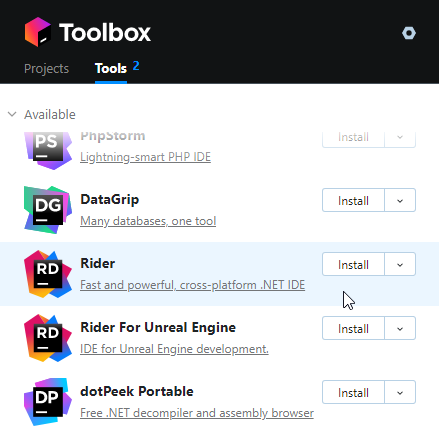
Install using the Toolbox App
The JetBrains Toolbox App is the recommended tool to install JetBrains products. Use it to install and manage different products or several versions of the same product, including Early Access Program (EAP) and Nightly releases, update and roll back when necessary, and easily remove any tool. The Toolbox App maintains a list of all your projects to quickly open any project in the right IDE and version.
Install the Toolbox App
Download the installer .exe from the Toolbox App web page.
Run the installer and follow the wizard steps.
After you run the Toolbox App, click its icon in the notification area and select which product and version you want to install.
Log in to your JetBrains Account from the Toolbox App and it will automatically activate the available licenses for any IDE that you install.
Install the Toolbox App
Download the disk image .dmg from the Toolbox App web page.
There are separate disk images for Intel and Apple Silicon processors.
Mount the image and drag the JetBrains Toolbox app to the Applications folder.
After you run the Toolbox App, click its icon in the main menu and select which product and version you want to install.
Log in to your JetBrains Account from the Toolbox App and it will automatically activate the available licenses for any IDE that you install.
Install the Toolbox App
Download the tarball .tar.gz from the Toolbox App web page.
Extract the tarball to a directory that supports file execution.
For example, if the downloaded version is 1.17.7391, you can extract it to the recommended /opt directory using the following command:
Execute the jetbrains-toolbox binary from the extracted directory to run the Toolbox App and select which product and version you want to install. After you run the Toolbox App for the first time, it will automatically add the Toolbox App icon to the main menu.
Log in to your JetBrains Account from the Toolbox App and it will automatically activate the available licenses for any IDE that you install.
You can use this shell script that automatically downloads the tarball with the latest version of the Toolbox App, extracts it to the recommended /opt directory, and creates a symbolic link in the /usr/local/bin directory.
Standalone installation
Install JetBrains Rider manually to manage the location of every instance and all the configuration files. For example, if you have a policy that requires specific install locations.
Run the installer and follow the wizard steps.
On the Installation Options step, you can configure the following:
Create a desktop shortcut for launching JetBrains Rider.
Add the directory with JetBrains Rider command-line launchers to the PATH environment variable to be able to run them from any working directory in the Command Prompt.
Add the Open Folder as Project action to the system context menu (when you right-click a folder).
Associate specific file extensions with JetBrains Rider to open them with a double-click.
To run JetBrains Rider, find it in the Windows Start menu or use the desktop shortcut. You can also run the launcher batch script or executable in the installation directory under bin .
There are separate disk images for Intel and Apple Silicon processors.
Mount the image and drag the JetBrains Rider app to the Applications folder.
Run the JetBrains Rider app from the Applications directory, Launchpad, or Spotlight.
Extract the tarball to a directory that supports file execution.
For example, to extract it to the recommended /opt directory, run the following command:
Do not extract the tarball over an existing installation to avoid conflicts. Always extract it to a clean directory.
Execute the Rider.sh script from the extracted directory to run JetBrains Rider.
To create a desktop entry, do one of the following:
On the Welcome screen, click Configure | Create Desktop Entry
From the main menu, click Tools | Create Desktop Entry
When you run JetBrains Rider for the first time, some steps are required to complete the installation, customize your instance, and start working with the IDE.
For information about the location of the default IDE directories with user-specific files, see Directories used by the IDE.
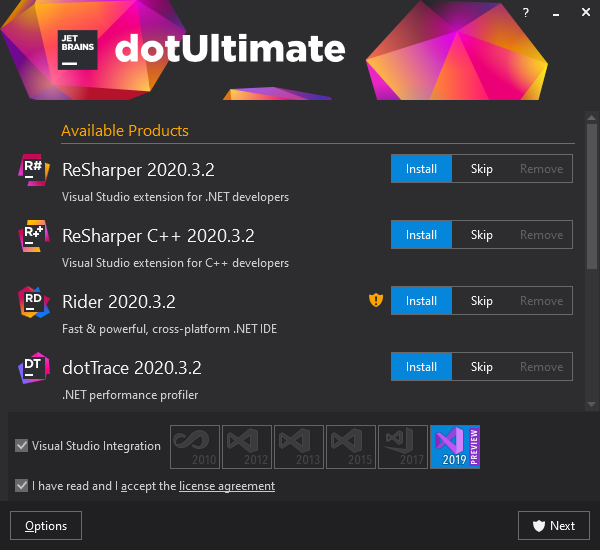
Installation with dotUltimate installer
If you have the dotUltimate license, which includes all JetBrains tools for .NET development, such as ReSharper, dotTrace, dotMemory, and dotCover, you can download the dotUltimate installer and use it to set up Rider as well as all other .NET tools.
Silent installation on Windows
Silent installation is performed without any user interface. It can be used by network administrators to install JetBrains Rider on a number of machines and avoid interrupting other users.
To perform silent install, run the installer with the following switches:
/S : Enable silent install
/CONFIG : Specify the path to the silent configuration file
/D : Specify the path to the installation directory
This parameter must be the last in the command line and it should not contain any quotes even if the path contains blank spaces.
To check for issues during the installation process, add the /LOG switch with the log file path and name between the /S and /D parameters. The installer will generate the specified log file. For example:
Silent configuration file
You can download the default silent configuration file for JetBrains Rider at https://download.jetbrains.com/rider/silent.config
The silent configuration file defines the options for installing JetBrains Rider. With the default options, silent installation is performed only for the current user: mode=user . If you want to install JetBrains Rider for all users, change the value of the installation mode option to mode=admin and run the installer as an administrator.
The default silent configuration file is unique for each JetBrains product. You can modify it to enable or disable various installation options as necessary.
It is possible to perform silent installation without the configuration file. In this case, omit the /CONFIG switch and run the installer as an administrator. Without the silent configuration file, the installer will ignore all additional options: it will not create desktop shortcuts, add associations, or update the PATH variable. However, it will still create a shortcut in the Start menu under JetBrains .
Install as a snap package on Linux
You can install JetBrains Rider as a self-contained snap package. Since snaps update automatically, your JetBrains Rider installation will always be up to date.
To use snaps, install and run the snapd service as described in the installation guide.
On Ubuntu 16.04 LTS and later, this service is pre-installed.
JetBrains Rider is distributed via two channels:
The stable channel includes only stable versions. To install the latest stable release of JetBrains Rider, run the following command:
The —classic option is required because the JetBrains Rider snap requires full access to the system, like a traditionally packaged application.
The edge channel includes EAP builds. To install the latest EAP build of JetBrains Rider, run the following command:
When the snap is installed, you can launch it by running the rider command.
To list all installed snaps, you can run sudo snap list . For information about other snap commands, see the Snapcraft documentation.
Источник
JetBrains Rider 2020.1 + activation code

JetBrains Rider представляет собой очень сложного профессионального программное обеспечение для операционной системы Windows, которое необходимо для разработки и создания новых приложений, использующихся на базе NET Framework, NET Core или Mono. Благодаря высоким функциональным возможностям этого приложения, работа производится максимально быстро и качественно.

Единственный недостаток данной программы – это необходимость в покупке, так как лишь лицензионная версия предлагает полный набор функций. Но у нас вы можете скачать данный клиент совершенно бесплатно, так как в него уже автоматически встроена технология — activation code.
Пароль к архиву : 1progs

13.06.2021 в 09:29
Не активируется Делал все по инструкции Все равно требует ключ либо использовать триал
26.04.2021 в 18:07
12.03.2021 в 18:32
Подтверждаю. Всё по инструкции работает.
18.11.2020 в 15:52
Все хорошо, жаль что без интернета не работает.
09.11.2020 в 19:13
дайте activation code
19.06.2020 в 17:19
21.07.2020 в 12:13
Все работает даун, по инструкциям надо все делать
18.09.2020 в 22:39
А может это ты даун ? без обдирательств можно помочь ?
Оставьте комментарий Отменить ответ
Этот сайт использует Akismet для борьбы со спамом. Узнайте, как обрабатываются ваши данные комментариев.
Источник
Jetbrains rider activation code linux
1. Скачать архив по ссылке >
2. Распаковать архив
3. Закрыть все JetBrains программы
4. Откройте терминал
5. Напишите » chmod +x » без кавычек и перетащите в окно терминала файл reset_jetbrains_eval_mac_linux.sh и нажмите Enter
6. В окно терминала введите перетащите файл reset_jetbrains_eval_mac_linux.sh и нажмите Enter (он сбросит триальный период у ВСЕХ JetBrains IDE в вашей ОС)
7. По окончанию работы скрипта запустить нужную вам JetBrains IDE
8. Появится стартовое окно для активации, в нем выберите триальную версию на 30 дней
9. После сброса пробного периода с помощью скрипта нужно заблокировать доступ в интернет для программы, иначе через время пробный период сбросится на 0 дней.
Для блокировки IDE доступ в интернет, достаточно в файл hosts добавить эти строки:
0.0.0.0 www.jetbrains.com
0.0.0.0 account.jetbrains.com
0.0.0.0 account.jetbrains.com:443
0.0.0.0 plugins.jetbrains.com
0.0.0.0 entry.prod-eu.w3jbcom.aws.intellij.net
0.0.0.0 jrebel.npegeek.com
0.0.0.0 bs.studycoder.com
Также вы можете воспользоваться альтернативным скриптом для сброса пробного периода с github >
P.S. Эти скрипты вы можете найти внутри архивов с плагином jetbrains-agent, но эти плагины больше не работают в новых версиях JetBrains IDEs
1. Откройте JetBrains IDE, в которой нужно сбросить триальный период
2. Установите плагин одним из способов
2.2.1 Скачать образ по ссылке > и смонтировать его
2.2.2 Распаковать архив «ide-eval-resetter-2.2.4-4959c6.zip» и достать из него .jar файл
2.2.3 Перейти в Preferences -> Plugins нужной вам JetBrains IDE
2.2.4 Нажать на иконку шестеренки и в выпадающем списке нажать на «Install Plugin from Disk. »
2.2.5 Выбрать файл ide-eval-resetter-2.2.4.jar
2.2.6 Перезапустить IDE
2.3.1 Скачать образ по ссылке > и смонтировать его
2.3.2 Архив «ide-eval-resetter-2.2.4-4959c6.zip» перетянуть в любое открытое окно IDE
2.3.3 Перезапустить IDE
3. Открыть существующий или создать новый проект
4. Перейти в меню Help и нажать на пункт «Eval Reset»
5. В появившейся снизу панели нажать кнопку «Reset»
6. После перезапуска IDE активировать Trial период на 30 дней
Активация на бесконечный период
1. Скачать архив по ссылке >
2. Распаковать архив
3. Сделать .jar файл javaagent’ом для выбранной IDE
3.4.1 Открыть любой проект в вашей IDE или создать новый
3.4.2 Открыть Help -> Custom VM Options.
// Или перейдите в папку с вашей IDE, например в /Users/your_user/Library/Application Support/JetBrains/AppCode2020.3 и откройте там файл appcode.vmoptions. Если его нет, то лучше создайте с помощью Help -> Custom VM Options.
3.4.3 Если в тексте есть строчки, начинающиеся с «-javaagent», то нужно или удалить их или закомментировать, добавив знак решетки «#» в самом начале строки
3.4.4 В конце файла на новой строке вставить текст » -javaagent:
» указать полный или относительный путь к файлу JetbrainsIdesCrack_5_3_1_KeepMyLic.jar.
// Путь к файлу можно легко скопировать, нажав на нем ПКМ и зажав клавишу Alt и в выпадающем меню вместо слова «Скопировать файл» появится «Скопировать путь до . «. Нажмите на этот пункт и путь скопируется в буфер обмена.
3.4.5 Сохранить .vmoptions файл
3.4.6 Перезапустить IDE
4. Откройте папку KeepLicense_keys из распакованного архива
5. Переместить соответствующий файл-ключ с расширением .key в папку с соответствующей IDE. Она находится в /Users/your_user/Library/Application Support/JetBrains/
6. Перезапустить IDE
7. Откройте окно About и увидите, что в нем нет информации о дате окончания лицензии, значит все сработало правильно
P.S.
Будьте осторожны, при такой активации, если откроете окно Help -> Register, то кнопка Close в нем будет отключена и вы сможете нажать только на кнопку Exit, что приведет к закрытию IDE. Лицензия не слетит, но вы потеряете несохраненные изменения.
1. Скачать архив по ссылке >
2. Распаковать архив
3. Сделать .jar файл javaagent’ом для выбранной IDE
3.4.1 Открыть любой проект в вашей IDE или создать новый
3.4.2 Открыть Help -> Custom VM Options.
// Или перейдите в папку с вашей IDE, например в /Users/your_user/Library/Application Support/JetBrains/AppCode2020.3 и откройте там файл appcode.vmoptions. Если его нет, то лучше создайте с помощью Help -> Custom VM Options.
3.4.3 Если в тексте есть строчки, начинающиеся с «-javaagent», то нужно или удалить их или закомментировать, добавив знак решетки «#» в самом начале строки
3.4.4 В конце файла на новой строке вставить текст » -javaagent:
» указать полный или относительный путь к файлу JetbrainsIdesCrack_5_3_1_KeepMyLic.jar.
// Путь к файлу можно легко скопировать, нажав на нем ПКМ и зажав клавишу Alt и в выпадающем меню вместо слова «Скопировать файл» появится «Скопировать путь до . «. Нажмите на этот пункт и путь скопируется в буфер обмена.
3.4.5 Сохранить .vmoptions файл
3.4.6 Перезапустить IDE
4. Откройте папку Codes из распакованного архива
5. Открыть пункт Help -> Register. В открывшемся окне открыть подпункт Activation Code, вставить любой из валидных кодов и нажать кнопку Activate
6. Перезапустить IDE
7. Откройте окно About и увидите, что в нем дата окончания действия лицензии уже истекла, тем не менее IDE запускается, не говорит что срок действия лицензии истек и не закрывается сама как при нерабочей лицензии
P.S.
Будьте осторожны, при такой активации, если откроете окно Help -> Register, то кнопка Close в нем будет отключена и вы сможете нажать только на кнопку Exit, что приведет к закрытию IDE. Лицензия не слетит, но вы потеряете несохраненные изменения.
. ДАННЫЙ СПОСОБ НЕ РЕКОМЕНДУЕТСЯ .
Все чаще встречаются сообщения, что этот плагин является вирусом keylogger, который как минимум может передавать данные, которые вы печатаете.
Даже если это не так, у некоторых пользователей этот плагин использует подозрительно много ОЗУ для своей работы.
1. Откройте JetBrains IDE, которую нужно активировать
2. Установите плагин одним из способов
2.1.1 Перейти в Preferences -> Plugins
2.1.2 Нажать на шестеренку и в выпадающем списке нажать на «Manage Plugin Repositories. »
2.1.3 Добавить в список адрес https://repo.idechajian.com и нажать ОК
2.1.4 Во вкладке Marketplace в поиске ввести «BetterIntelliJ» без кавычек и установить соответствующий плагин
// Плагин установится в /Users/your_user/.BetterIntelliJ и скорее всего пропишет -javaagent в VM Options на себя
2.1.5 Перезапустить IDE
2.3.1 Скачать образ по ссылке > и смонтировать его
2.3.2 Перейти в Preferences -> Plugins нужной вам JetBrains IDE
2.3.3 Нажать на иконку шестеренки и в выпадающем списке нажать на «Install Plugin from Disk. »
2.3.4 Выбрать файл BetterIntelliJ с расширением .jar и нужной версии
// Плагин установится в /Users/your_user/.BetterIntelliJ и скорее всего пропишет -javaagent в VM Options на себя
2.3.5 Если выбрали плагин версии 1.20 — BetterIntelliJ-1.20.jar, то нужно вашей IDE заблокировать доступ в интернет. Это можно сделать например добавив в файл hosts эти строки
0.0.0.0 www.jetbrains.com
0.0.0.0 account.jetbrains.com
0.0.0.0 account.jetbrains.com:443
0.0.0.0 plugins.jetbrains.com
0.0.0.0 entry.prod-eu.w3jbcom.aws.intellij.net
0.0.0.0 jrebel.npegeek.com
0.0.0.0 bs.studycoder.com
2.3.5 Перезапустить IDE
3. Открыть пункт Help -> Register. В открывшемся окне открыть подпункт Activation Code, вставить код из файла code.txt и нажать кнопку Activate
4. Открыть окно About и убедиться, что активирована лицензия до 2100 года.
Нерабочие способы
Если вы будете самостоятельно искать и тестировать другие способы активации в интернете, то мы это уже сделали и некоторые из этих способов на данный момент не работают. Эти способы представлены здесь, чтобы если вы натыкались на них на других сайтах, то не думали, что они являются чем-то кардинально новым и не тратили время на эти способы.
Я протестировал способ активации с этим плагином версии 3.2.2 на всех ключевых версиях WebStorm начиная с версии 2018.3.6 и ни на одной из версий он не заработал. Возможно когда-то этот способ и был действующим, но на сентябрь 2021 года мне не удалось активировать с его помощью ни одну Jetbrains IDE.
Если вы все же хотите попытать удачу, jetbrains agent v3.2.2 можно скачать по ссылке >
Источник


