- JetBrains Rider 2020.1 + MacOSX + Linux — программа с ключом
- Rider
- A fast & powerful cross-platform .NET IDE
- Details for Rider
- Share this snap
- Share embeddable card
- Install JetBrains Rider
- Prerequisites
- Install using the Toolbox App
- Install the Toolbox App
- Install the Toolbox App
- Install the Toolbox App
- Standalone installation
- Installation with dotUltimate installer
- Silent installation on Windows
- Silent configuration file
- Install as a snap package on Linux
- Jetbrains rider linux download
- Easy start with Unity
- Control Unity editor
- Coding hints
- Debug Unity with ease
- Run Unity tests
- Unity console logs
- Performance highlightings
- Find Usages inside Unity files
- Shader support
- Explore Unity docs
JetBrains Rider 2020.1 + MacOSX + Linux — программа с ключом

JetBrains Rider — это программа представляет из себя новый кросс-платформенный редактор .NET IDE — построенный на базе платформы IntelliJ и ReSharper. Поддерживает большинство типов проектов .NET. Софт прекрасно взаимодействует с .NET Framework, распознает новые кросс-платформы .NET Core и Mono. Таким образом он позволяет вам разрабатывать широкий спектр приложений, включая настольные приложения .NET, сервисы и библиотеки, игры на движке Unity, приложения типа Xamarin, веб-приложения ASP.NET и ASP.NET Core. Программа JetBrains Rider многофункциональна и быстра в работе, обеспечивает 2500+ проверок в реальном времени, сотни контекстных действий и рефакторингов, созданных ReSharper, и объединяет их с прочными функциями IDE платформы IntelliJ.
По ссылке ниже вы сможете скачать JetBrains Rider с лекарством, в архиве идет генератор ключей от DVT с помощью которого можно вылечить программу от жадности, все это бесплатно без торрент раздач, только последняя версия по прямой ссылке, удачи!
Лицензия: ShareWare у нас вы можете скачать бесплатно
Язык: English — Русская версия и Русификатор отсутствуют
Размер: 652 + 578 + 585 MB
ОС: Windows 7+ / x64
Версия: 2020.1
Скачать: JetBrains Rider последняя версия с генератором ключей / 2019.2.2 MacOSX / 2019.2.2 Linux


 [/not-group]
 —>
—> 
Источник
Rider
Install latest/stable of Rider
Ubuntu 16.04 or later?
View in Desktop store
Make sure snap support is enabled in your Desktop store.
Install using the command line


A fast & powerful cross-platform .NET IDE
JetBrains Rider helps you develop .NET, ASP.NET, .NET Core, Xamarin or Unity applications on Windows, Mac, or Linux. It provides rich editing support and code insight for languages used in .NET development, from C#, VB.NET and F# to ASP.NET Razor syntax, JavaScript, TypeScript, XAML, XML, HTML, CSS, SCSS, JSON, and SQL.
Rider provides 2500+ live code inspections, hundreds of context actions and refactorings brought by ReSharper, and combines them with the IntelliJ platform’s solid IDE features. Despite a heavy feature set, Rider is designed to be fast and responsive.
Rider is available for a free 30-day evaluation. Monthly and yearly subscription options are available for companies and individual users. Find out more on https://www.jetbrains.com/rider/buy/
Details for Rider
Share this snap
Generate an embeddable card to be shared on external websites.
Create embeddable card
Share embeddable card
Customise your embeddable card using the options below.
Источник
Install JetBrains Rider
JetBrains Rider is a cross-platform IDE that provides consistent experience on the Windows, macOS, and Linux operating systems.
Prerequisites
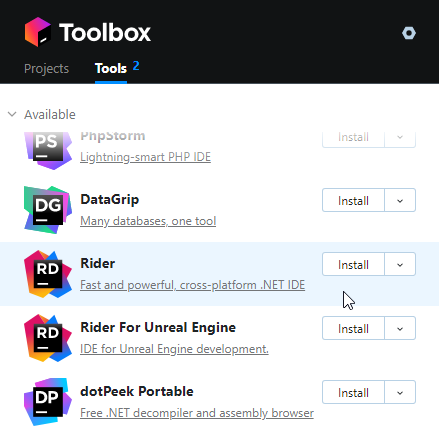
Install using the Toolbox App
The JetBrains Toolbox App is the recommended tool to install JetBrains products. Use it to install and manage different products or several versions of the same product, including Early Access Program (EAP) and Nightly releases, update and roll back when necessary, and easily remove any tool. The Toolbox App maintains a list of all your projects to quickly open any project in the right IDE and version.
Install the Toolbox App
Download the installer .exe from the Toolbox App web page.
Run the installer and follow the wizard steps.
After you run the Toolbox App, click its icon in the notification area and select which product and version you want to install.
Log in to your JetBrains Account from the Toolbox App and it will automatically activate the available licenses for any IDE that you install.
Install the Toolbox App
Download the disk image .dmg from the Toolbox App web page.
There are separate disk images for Intel and Apple Silicon processors.
Mount the image and drag the JetBrains Toolbox app to the Applications folder.
After you run the Toolbox App, click its icon in the main menu and select which product and version you want to install.
Log in to your JetBrains Account from the Toolbox App and it will automatically activate the available licenses for any IDE that you install.
Install the Toolbox App
Download the tarball .tar.gz from the Toolbox App web page.
Extract the tarball to a directory that supports file execution.
For example, if the downloaded version is 1.17.7391, you can extract it to the recommended /opt directory using the following command:
Execute the jetbrains-toolbox binary from the extracted directory to run the Toolbox App and select which product and version you want to install. After you run the Toolbox App for the first time, it will automatically add the Toolbox App icon to the main menu.
Log in to your JetBrains Account from the Toolbox App and it will automatically activate the available licenses for any IDE that you install.
You can use this shell script that automatically downloads the tarball with the latest version of the Toolbox App, extracts it to the recommended /opt directory, and creates a symbolic link in the /usr/local/bin directory.
Standalone installation
Install JetBrains Rider manually to manage the location of every instance and all the configuration files. For example, if you have a policy that requires specific install locations.
Run the installer and follow the wizard steps.
On the Installation Options step, you can configure the following:
Create a desktop shortcut for launching JetBrains Rider.
Add the directory with JetBrains Rider command-line launchers to the PATH environment variable to be able to run them from any working directory in the Command Prompt.
Add the Open Folder as Project action to the system context menu (when you right-click a folder).
Associate specific file extensions with JetBrains Rider to open them with a double-click.
To run JetBrains Rider, find it in the Windows Start menu or use the desktop shortcut. You can also run the launcher batch script or executable in the installation directory under bin .
There are separate disk images for Intel and Apple Silicon processors.
Mount the image and drag the JetBrains Rider app to the Applications folder.
Run the JetBrains Rider app from the Applications directory, Launchpad, or Spotlight.
Extract the tarball to a directory that supports file execution.
For example, to extract it to the recommended /opt directory, run the following command:
Do not extract the tarball over an existing installation to avoid conflicts. Always extract it to a clean directory.
Execute the Rider.sh script from the extracted directory to run JetBrains Rider.
To create a desktop entry, do one of the following:
On the Welcome screen, click Configure | Create Desktop Entry
From the main menu, click Tools | Create Desktop Entry
When you run JetBrains Rider for the first time, some steps are required to complete the installation, customize your instance, and start working with the IDE.
For information about the location of the default IDE directories with user-specific files, see Directories used by the IDE.
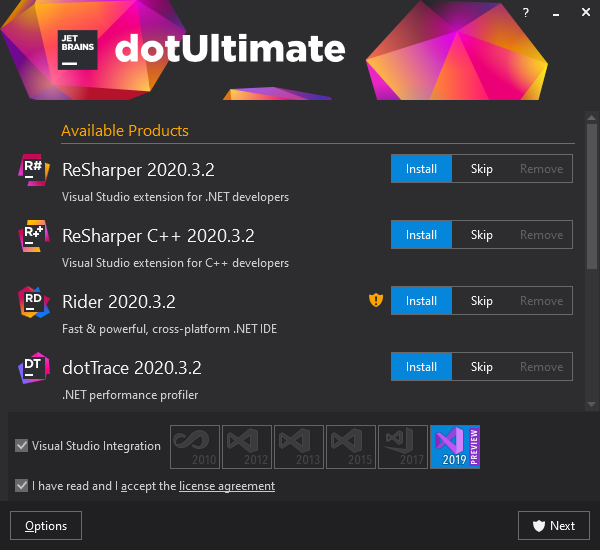
Installation with dotUltimate installer
If you have the dotUltimate license, which includes all JetBrains tools for .NET development, such as ReSharper, dotTrace, dotMemory, and dotCover, you can download the dotUltimate installer and use it to set up Rider as well as all other .NET tools.
Silent installation on Windows
Silent installation is performed without any user interface. It can be used by network administrators to install JetBrains Rider on a number of machines and avoid interrupting other users.
To perform silent install, run the installer with the following switches:
/S : Enable silent install
/CONFIG : Specify the path to the silent configuration file
/D : Specify the path to the installation directory
This parameter must be the last in the command line and it should not contain any quotes even if the path contains blank spaces.
To check for issues during the installation process, add the /LOG switch with the log file path and name between the /S and /D parameters. The installer will generate the specified log file. For example:
Silent configuration file
You can download the default silent configuration file for JetBrains Rider at https://download.jetbrains.com/rider/silent.config
The silent configuration file defines the options for installing JetBrains Rider. With the default options, silent installation is performed only for the current user: mode=user . If you want to install JetBrains Rider for all users, change the value of the installation mode option to mode=admin and run the installer as an administrator.
The default silent configuration file is unique for each JetBrains product. You can modify it to enable or disable various installation options as necessary.
It is possible to perform silent installation without the configuration file. In this case, omit the /CONFIG switch and run the installer as an administrator. Without the silent configuration file, the installer will ignore all additional options: it will not create desktop shortcuts, add associations, or update the PATH variable. However, it will still create a shortcut in the Start menu under JetBrains .
Install as a snap package on Linux
You can install JetBrains Rider as a self-contained snap package. Since snaps update automatically, your JetBrains Rider installation will always be up to date.
To use snaps, install and run the snapd service as described in the installation guide.
On Ubuntu 16.04 LTS and later, this service is pre-installed.
JetBrains Rider is distributed via two channels:
The stable channel includes only stable versions. To install the latest stable release of JetBrains Rider, run the following command:
The —classic option is required because the JetBrains Rider snap requires full access to the system, like a traditionally packaged application.
The edge channel includes EAP builds. To install the latest EAP build of JetBrains Rider, run the following command:
When the snap is installed, you can launch it by running the rider command.
To list all installed snaps, you can run sudo snap list . For information about other snap commands, see the Snapcraft documentation.
Источник
Jetbrains rider linux download
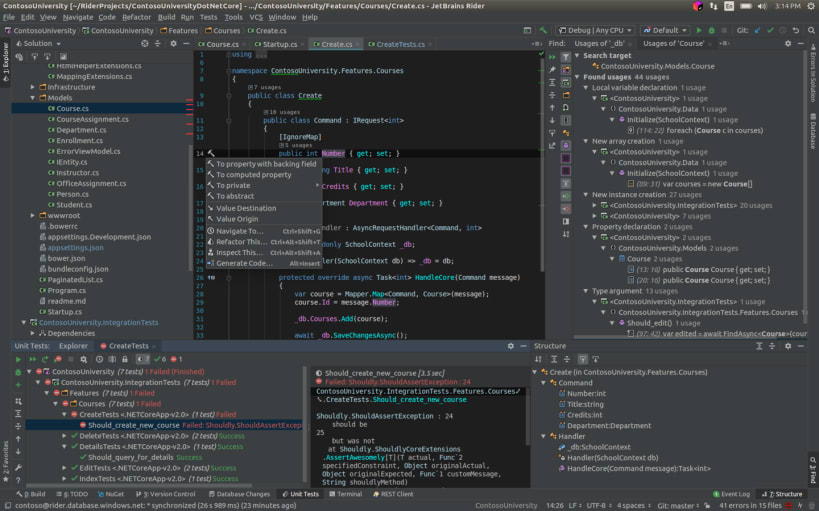
JetBrains Rider is a fast and powerful C# editor for Unity that runs on Windows, Mac, and Linux. With the unbeatable 2500+ smart code inspections and refactorings, Rider enhances your C# experience, letting you write error-proof code much faster.
Easy start with Unity
Rider has Unity support built in, and the very first time you open a Unity solution it will automatically configure Unity to use Rider as the default editor for C# scripts and shader files. Once done, double-clicking a C# script or shader asset will open the solution in Rider.
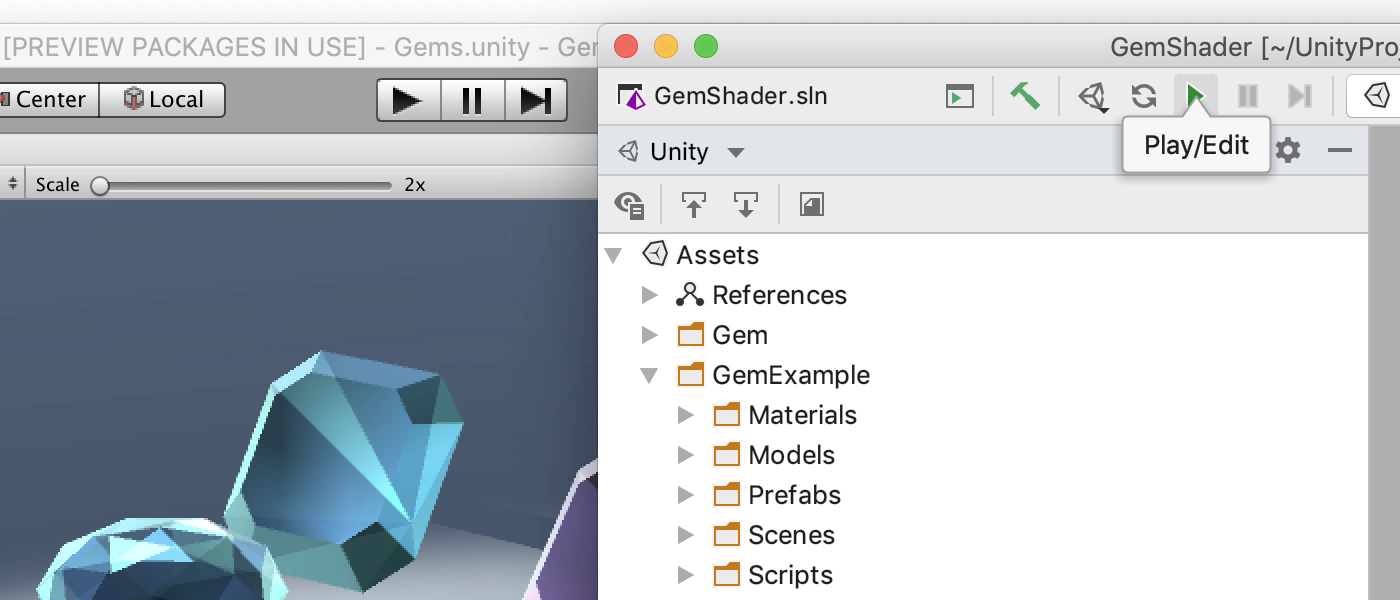
Control Unity editor
Thanks to the integrated two-way communication, you can switch into and out of Play mode, and pause and step a single frame without ever leaving Rider! The toolbar includes game view buttons Play, Pause, and Step, which correspond to the same buttons in Unity Editor and control the same behavior as Unity Editor does. A small Unity icon in the status bar will indicate whether Unity Editor is connected, refreshing, or in Play mode. Any changes applied in Rider in Edit mode will be instantly delivered to Unity Editor.
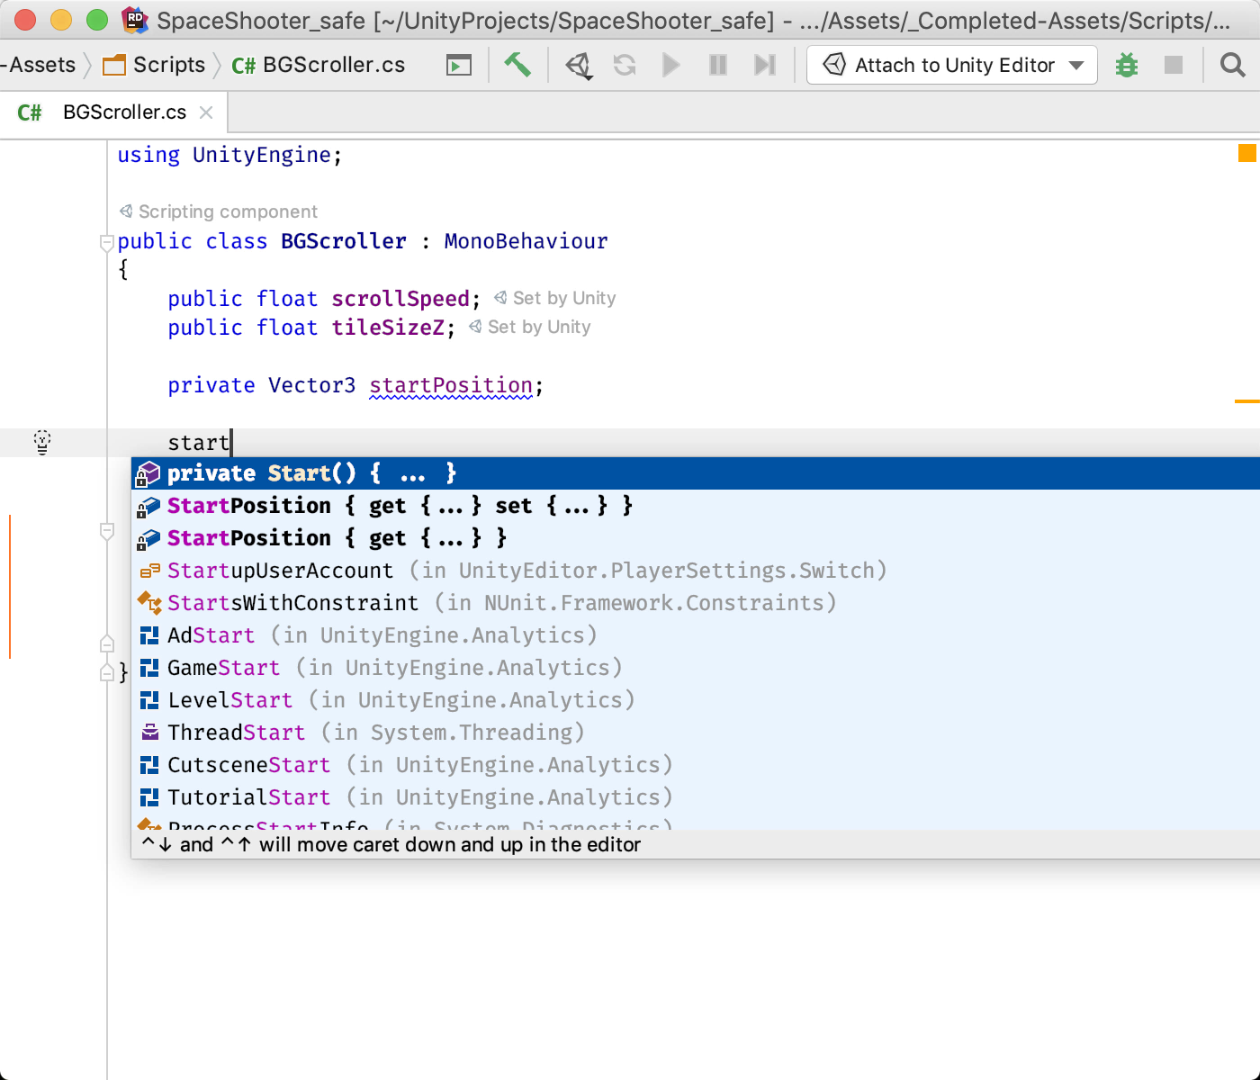
Coding hints
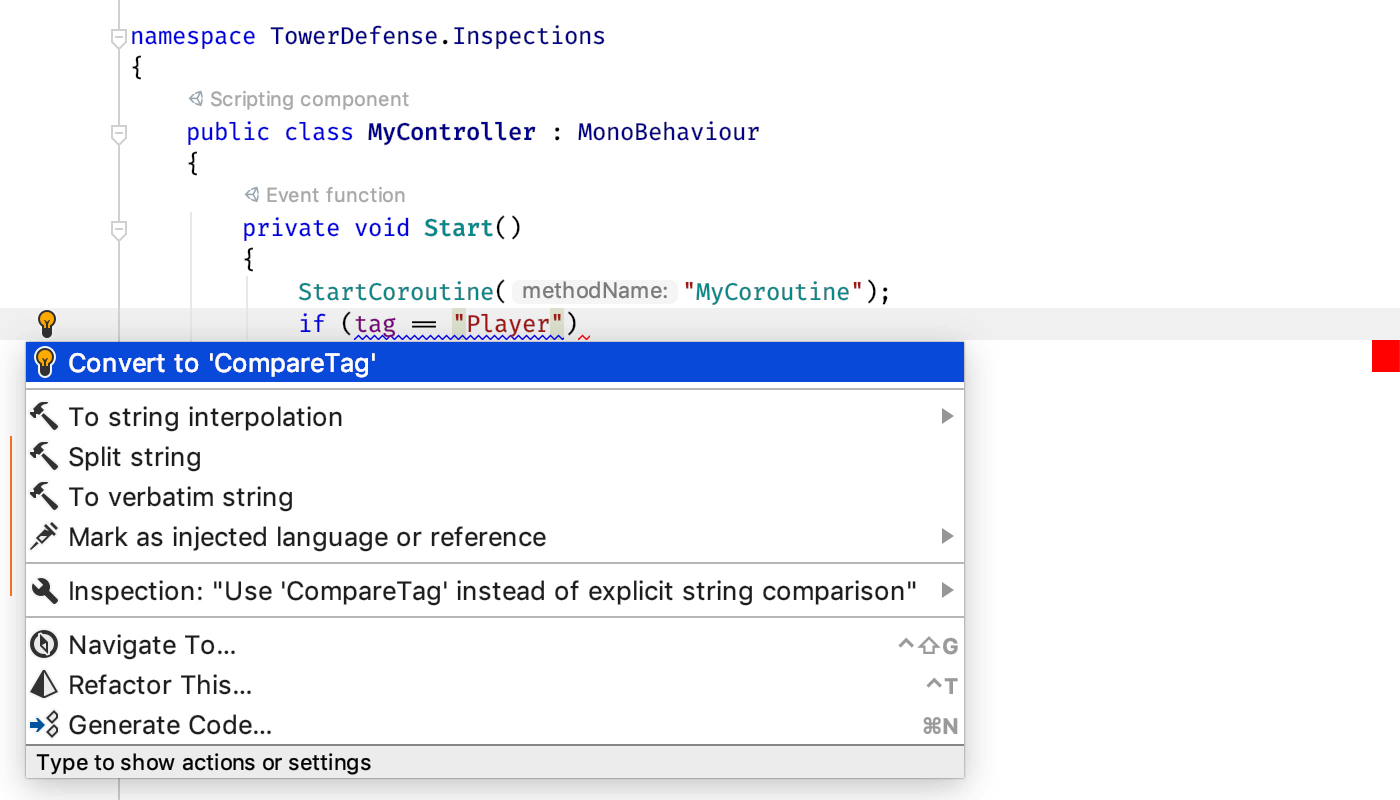
Rider provides top-notch code analysis for C#, and that includes Unity-specific code inspections and quick-fixes for them.
For example, Rider will warn you against using inefficient string literal comparison with the tag property, and will provide a quick-fix to rewrite this as a call to CompareTag .
Similarly, Rider will warn you if you try to use the new keyword to create a new instance of a class deriving from MonoBehaviour or ScriptableObject . Just press Alt Enter to have Rider fix the problem for you.
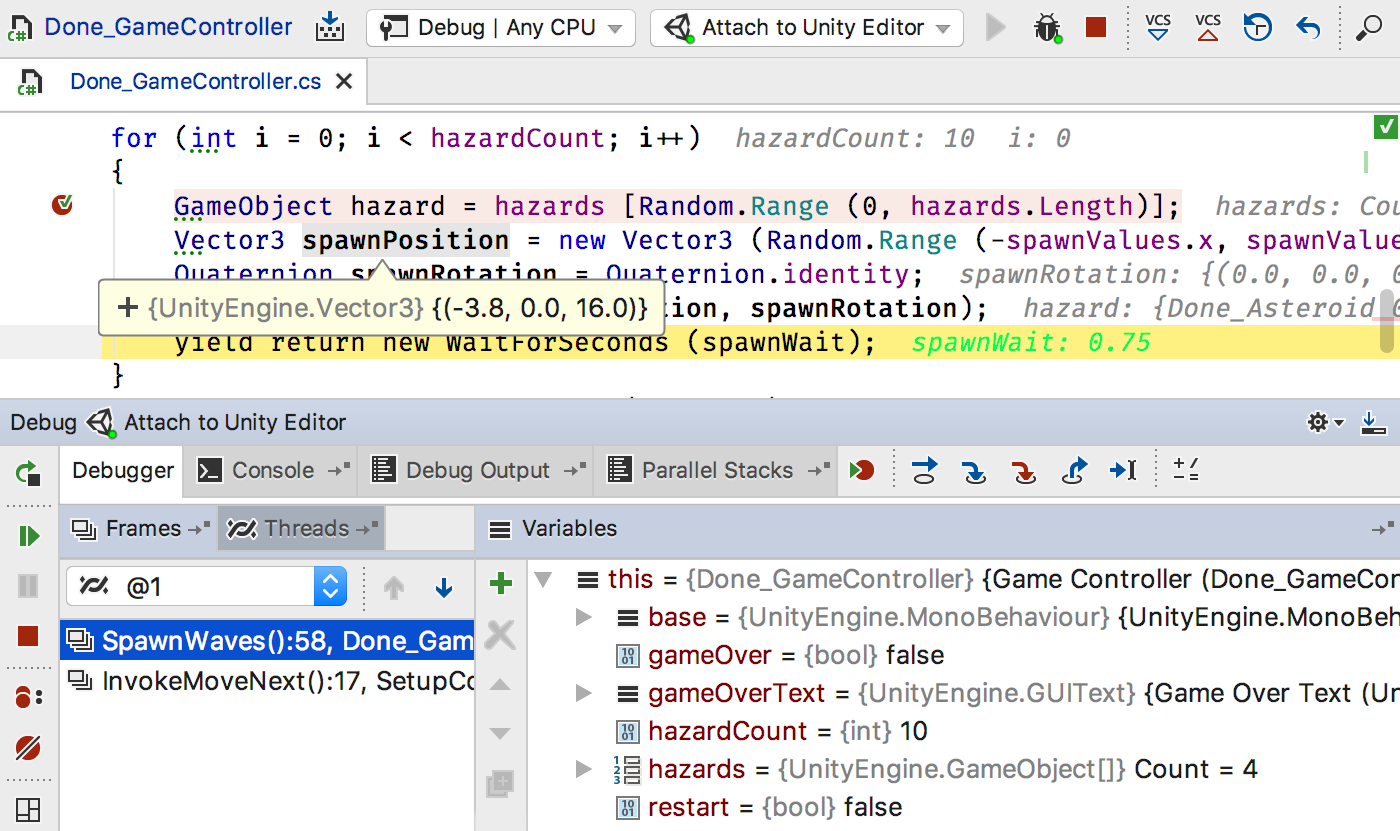
Debug Unity with ease
Rider makes it very easy to debug your C# scripts as they run in the Unity editor. Everything is already configured, and you just need to hit the Debug toolbar button, menu item or keyboard shortcut to attach the debugger to the running Unity editor. You can set breakpoints in the editor, step through your code, look at locals and watch values, and evaluate expressions.
With Rider, you can even debug the code that you don’t have debugging information for. Rider automatically decompiles external libraries on-the-fly, allowing you to debug the decompiled code, step into functions, set breakpoints, view and set locals and variables.
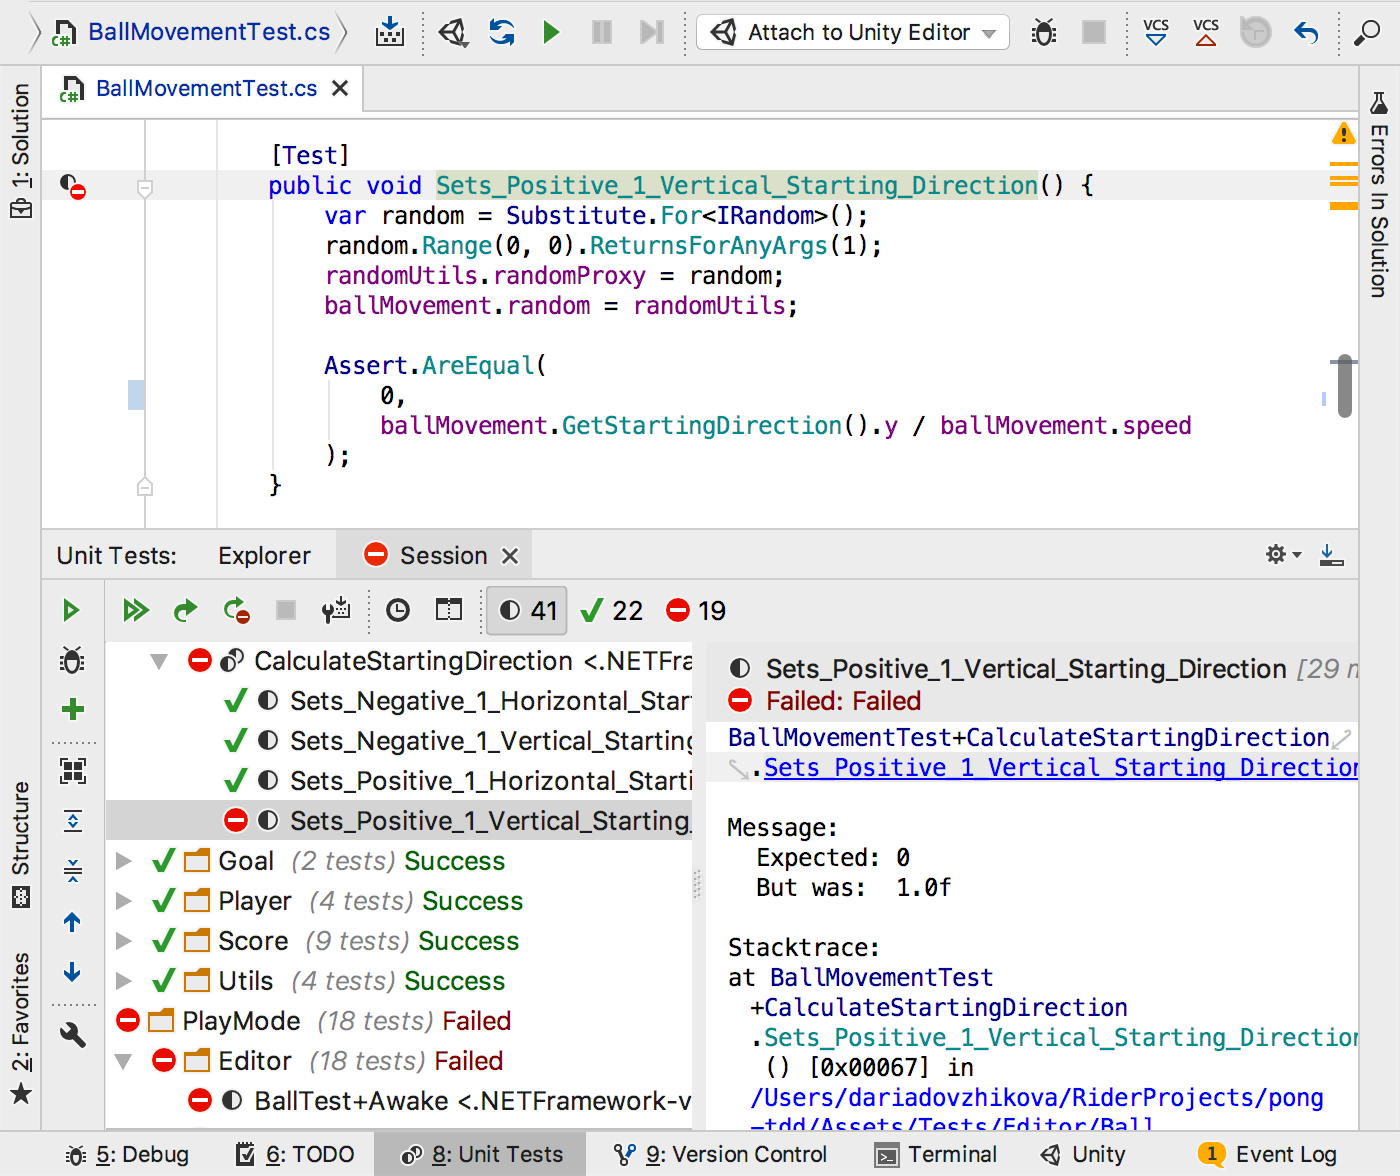
Run Unity tests
Rider allows you to run tests that interact with Unity’s API, and which can step through single frames, all from within Rider. And of course, you can explore the results of your Unity-specific tests, just like you would normal tests – you can filter by result, and click on stack traces to navigate to your code.
Unity console logs
The Unity Logs tool window with hyperlinked stack traces lets you explore the same events that are logged in the Unity editor console. It allows filtering by category (error, warning, or message), hides events based on when they were logged (in Play or Edit mode), and lets you easily navigate to any source file, class, method, or property mentioned in the log entry. Unity Logs clears its output automatically after every switch to Play mode.
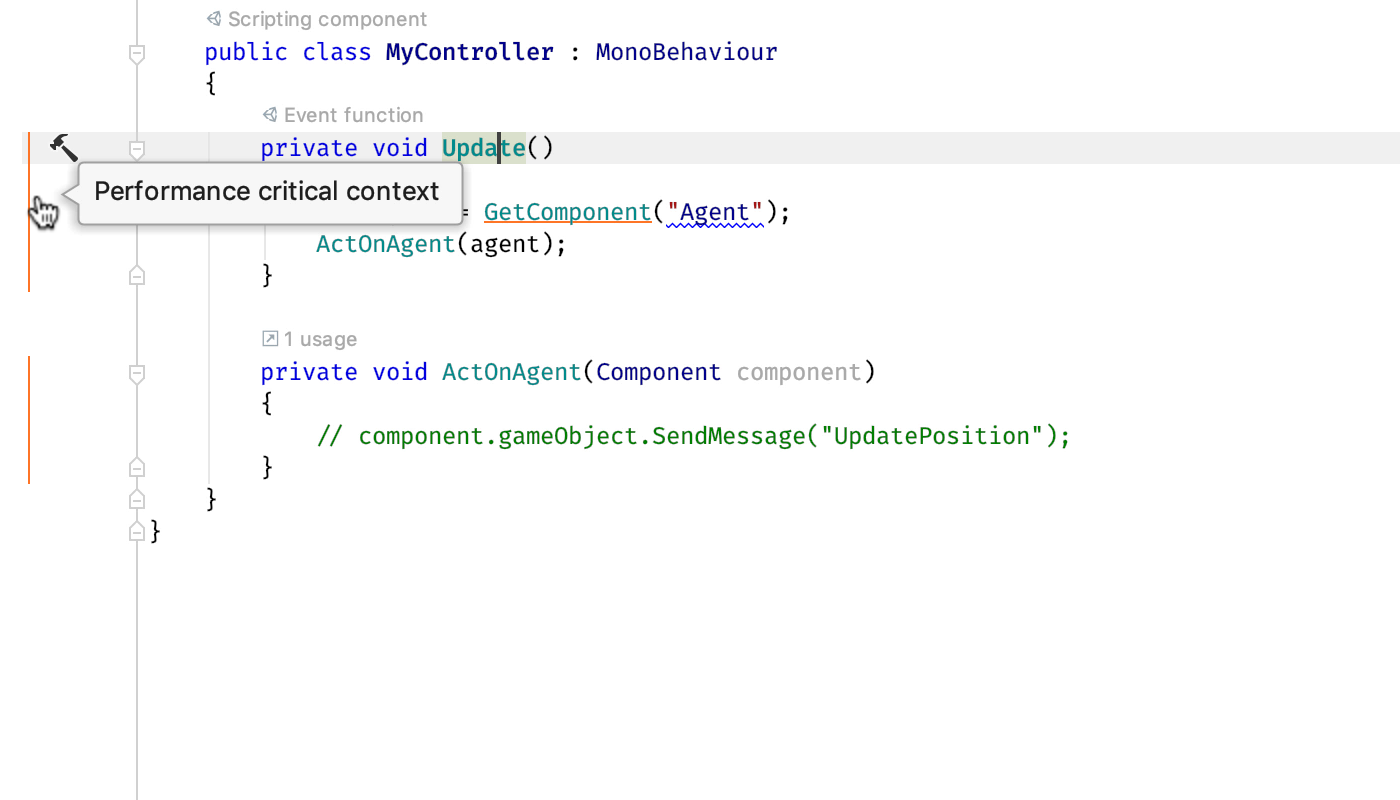
Performance highlightings
Rider helps you write better-performing Unity C# code. To do this, it highlights expensive Unity APIs inside methods that get called every frame, like Update and coroutines. Rider even highlights calls to methods that indirectly use expensive Unity APIs!
Besides that, Rider has many Unity-specific performance inspections and appropriate quick-fixes. It is aware of code patterns that are poor performance and can suggest automatic fixes for them, such as using a different API or overload, or caching values.
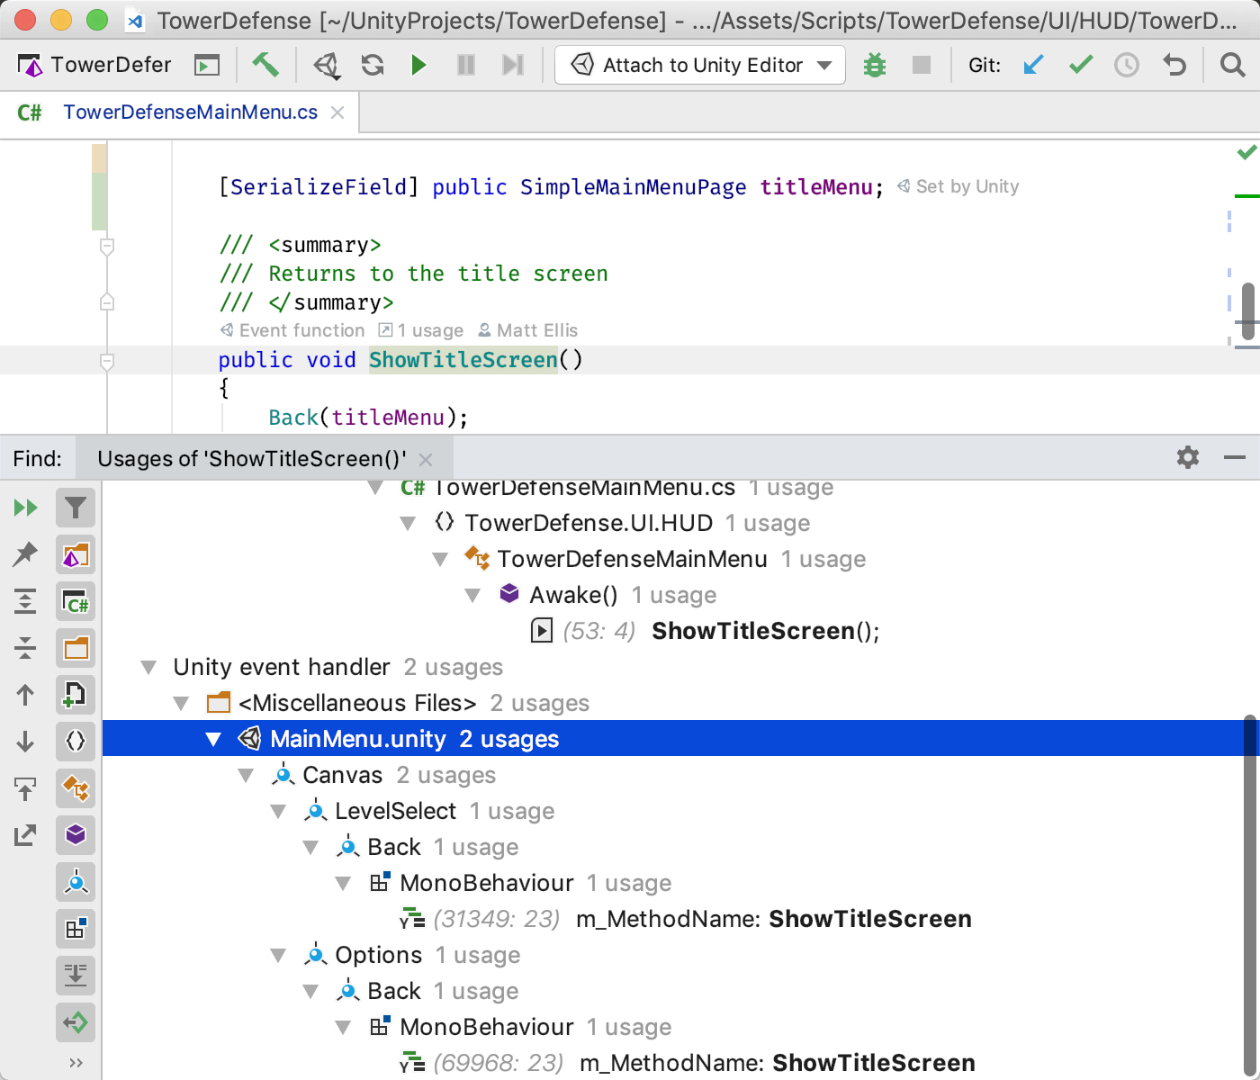
Find Usages inside Unity files
Find Usages now includes Unity scenes, assets, and prefabs. If you search for a class or method used as an event handler, Rider shows where it’s used in your Unity files, grouped by type, component name, and parent game objects. Even better, double-clicking the item highlights the usage directly in the Unity Editor.
Pulling this information from Unity files also means that Rider highlights event handler methods as being implicitly used. The implicit usage highlights are turned into Code Vision links, so you can see at a glance what classes, methods, and fields are implicitly used by Unity. And clicking the link will find those usages, even inside Unity files.
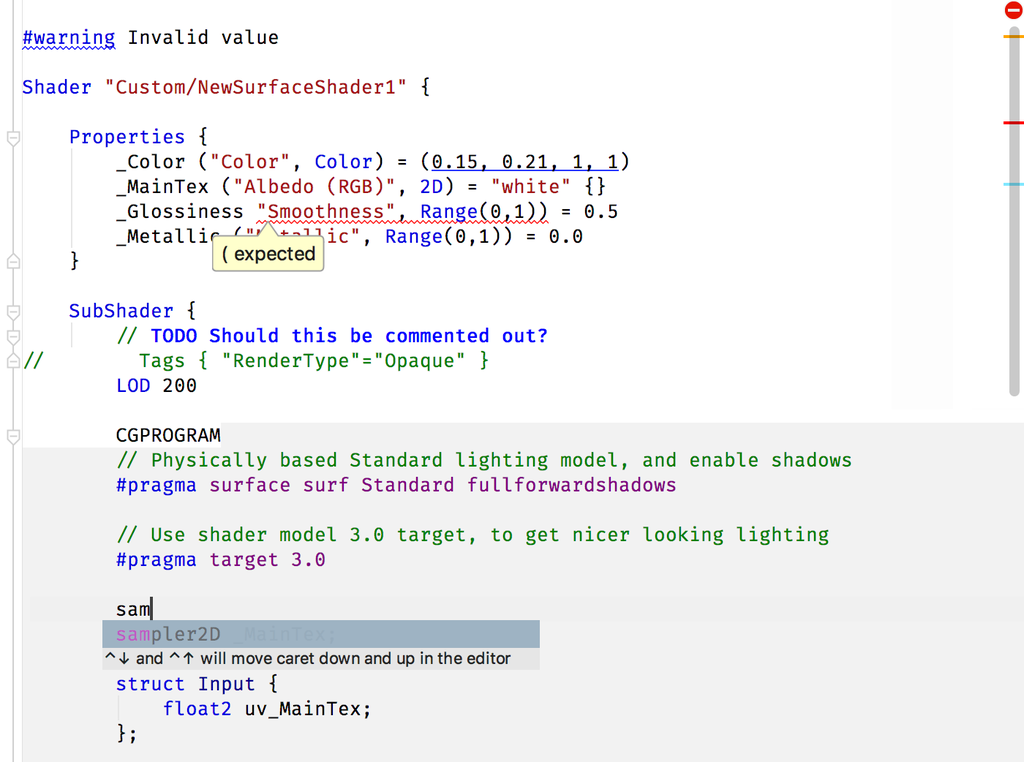
Shader support
Rider also adds support for .shader files, with syntax highlighting, code folding, brace matching and more. Syntax errors in the ShaderLab sections are highlighted, todo comments are pulled into the To Do Explorer and color properties are highlighted, with a color picker for editing. Simple word completion is available throughout the file, including in Cg/HLSL blocks.
Explore Unity docs
Rider displays external documentation for Unity symbols. You can either click the icon from the Quick Documentation pop-up ( Ctrl Shift F1 if using the Visual Studio keymap) or use the View External Documentation action ( Shift F1 ) directly, to navigate to locally installed documentation, or to Unity’s hosted docs if they are not available locally.
Источник


