- Ethical hacking and penetration testing
- InfoSec, IT, Kali Linux, BlackArch
- Comprehensive Guide to John the Ripper. Part 1: Introducing and Installing John the Ripper
- Table of contents
- What is John the Ripper
- How John the Ripper and Hashcat differ
- How to install video card drivers for John the Ripper
- Installing video drivers in Windows
- Installing video drivers on Linux
- How to compile John the Ripper on Linux from source code
- How to install John the Ripper on Windows
- John the Ripper check
- How to use a graphics card to brute-force in John the Ripper
- How to use video CPU core in JtR
- How to run John the Ripper benchmark
- How to set up John the Ripper
- Compilation difference with AVX2 and AVX for John the Ripper
- Result for the first part
Ethical hacking and penetration testing
InfoSec, IT, Kali Linux, BlackArch
Comprehensive Guide to John the Ripper. Part 1: Introducing and Installing John the Ripper
Table of contents
What is John the Ripper
John the Ripper is a popular password cracker that is capable of brute-force using both the CPU and the video card and supports many algorithms. To be more precise, this is an offline brute-forcer (online brute-forcers perform the attack by connecting to network services, and offline crackers work with captured hashes (files) to which they guess a password).
Even if you are already familiar with Hashcat (and even more so if you are NOT familiar with Hashcat), you need to learn how John the Ripper works, since they are different.
How John the Ripper and Hashcat differ
Hashcat can use a video card, CPU, or both for brute-force.
John the Ripper can use one thing: either the video card, or the video core of the CPU, or only the CPU.
Hashcat can use the graphics card to crack any supported algorithms.
John the Ripper for GPU Cracking supports only certain kinds of algorithms.
If you have several video cards, Hashcat out of the box supports working with multiple devices at once and by default splits the task into the required number of threads and the size of each task is tied to the performance of the video card.
John the Ripper can work with multiple graphics cards, but by default, splitting a task across multiple graphics cards is only supported for one algorithm.
It doesn’t matter to Hashcat how you installed it: built from source or downloaded a binary file.
It is very important for John the Ripper to compile the binary himself, as the compilation takes into account the specifics of your system. As a result, during compilation, the instruction sets supported by the processor will be indicated, for example, AVX2 instead of the default AVX, which will have a very significant impact on performance – for some algorithms, this will speed up brute-forcing by 2 times! Alternatively, John’s binaries compiled on newer hardware may not work on some computers.
For Hashcat, you must specify the hash type.
John the Ripper determines the hash itself, or you can explicitly specify the hash format.
The syntax for commands and options varies greatly.
About cracking a password in John the Ripper on a video card, you need to know that brute-force on a graphics card takes a long time to launch – this is noticeable even in the benchmark. Therefore, if you need to execute many short sessions, then sometimes it is more rational to use the CPU, on which the brute-force is launched immediately.
Advantages of John the Ripper:
- John the Ripper work with hashes more flexible – even if the file with hashes contains hashes of other types, John does not exit with an error, but simply uses the hashes of the type specified in the start command. In addition, hash computation utilities often add strings that can cause an “invalid hash” error in Hashcat. John the Ripper works fine with this form of notation.
- More flexible Rule-based attack. John the Ripper and Hashcat have an implementation of Rule-based attack and the syntax for writing the rules has a lot in common. But in John the Ripper, this attack is more powerful because it has more rules and also allows character sets to be used in the rule entry.
- Support for non-standard hashes. Hashcat can only work with hashes provided by the developers of this program. And John the Ripper has a Dynamic mode that allows you to specify the formula by which the hash was calculated. That is, arbitrary types of hashes can be cracked.
How to install video card drivers for John the Ripper
If you want to use the GPU to crack passwords (which is many times faster than on the central processor), then you need to install the video driver.
For brute-force can be used:
You need to choose one of these – the fastest option is a video card.
Of course, the specific configurations of computers may vary: some do not have a discrete graphics card, some do not have a video core on a CPU – I hope you can check this yourself.
Installing video drivers in Windows
In this OS, everything is simple – most likely, the video drivers for your graphics card are already installed. If not, go to the manufacturer’s website, download and install the driver.
If you suddenly want to use the video core of the CPU (this is pointless if you have at least some kind of discrete video card, nevertheless – perhaps you just do not have a dedicated graphics card), then you need to install “OpenCL Runtime for Intel Core and Intel Xeon Processors”. If you really need it, you can find the links you need in this article on Hashcat, which also uses this driver.
Installing video drivers on Linux
On Kali Linux
Upgrade and reboot your Kali installation:
Installing video drivers for NVIDIA on Linux
Enabling OpenCL for Intel
If your CPU supports OpenCL, then install the following packages:
On Arch Linux, BlackArch
Enabling OpenCL for NVIDIA
Remove xf86-video-nouveau there it is:
Install proprietary NVIDIA driver, CUDA and other required packages:
Enabling OpenCL for Intel
Friends, I need your help – if you have a different distribution kit or AMD video card, write in the comments how you installed the video driver – I will add this information here.
How to compile John the Ripper on Linux from source code
As already mentioned, it is important to build John the Ripper yourself so that it uses all the features of your processor. Another advantage of this approach is that we get the most recent version of John the Ripper.
Installing the required dependencies in Kali Linux:
Installing required dependencies on Arch Linux, BlackArch:
The following is the same in any distribution:
Please note that in the last command you can use the -j option after which specify the number of (logical) cores of your processor, for example, I have 12 logical cores, then I use:
Now go to the run folder:
And run the test:
You don’t need to install John the Ripper at the system level – move the run folder to a location convenient to you and run John from there. In addition to the John the Ripper executable, the run folder contains many scripts for extracting hashes – we will talk about them later.
Remember that if you type in the terminal
then the version preinstalled on the system will run, not the one you compiled.
Installing John the Ripper on Debian, Linux Mint, Ubuntu
The installation should be performed exactly the same as in Kali Linux. So refer to the Installing John the Ripper on Kali Linux section. If something did not work out for you, then write here in the comments indicating your distribution kit and error.
How to install John the Ripper on Windows
We’ll look at compiling John the Ripper from source on Windows sometime later. Let’s use the official binary file.
Install Cygwin first – just go to the official website https://www.cygwin.com/, download the setup-x86_64.exe file and install.
Unzip the contents of this archive into the C:\cygwin64\home\ folder, for example, my username is MiAl, so I unpack it to C:\cygwin64\home\MiAl\.
It is actually possible to run John the Ripper on Windows even without Cygwin, but in this case it will not be able to use OpenCL (video cores) for brute-force.
Now in the folder C:\cygwin64\home\ \JtR\run\ find cygOpenCL-1.dll file and rename it to cygOpenCL-1.dll.bac.
Then in the c:\Windows\System32 folder find the OpenCL.dll file and copy it to the C:\cygwin64\home\ \JtR\run\ folder.
Then, in the C:\cygwin64\home\ \JtR\run\ folder, rename the OpenCL.dll file to cygOpenCL-1.dll.
The file swap trick may not work for all systems – but either way, you can use the CPU or integrated graphics to hack.
Open Cygwin console to execute commands.
Run your system benchmark:
Still, JtR is one of those programs that primarily targets Linux. Further you will see that we will run scripts to generate (extract) hashes from files and, for example, some of the auxiliary programs/scripts need, for example, an installed Python environment, which is present in Linux by default.
John the Ripper check
In this section, we will check what devices John the Ripper sees for use during brute force.
The options are the same on any system, but remember that on Windows, to run John the Ripper, you need to open Cygwin and specify
/JtR/run/john as the executable file.
If you run a file installed from the standard repositories in Linux, then it is enough to write simply
If you run a file compiled from the source code, then go to the directory with the executable file (in the program folder this is the run directory) and specify as the executable file

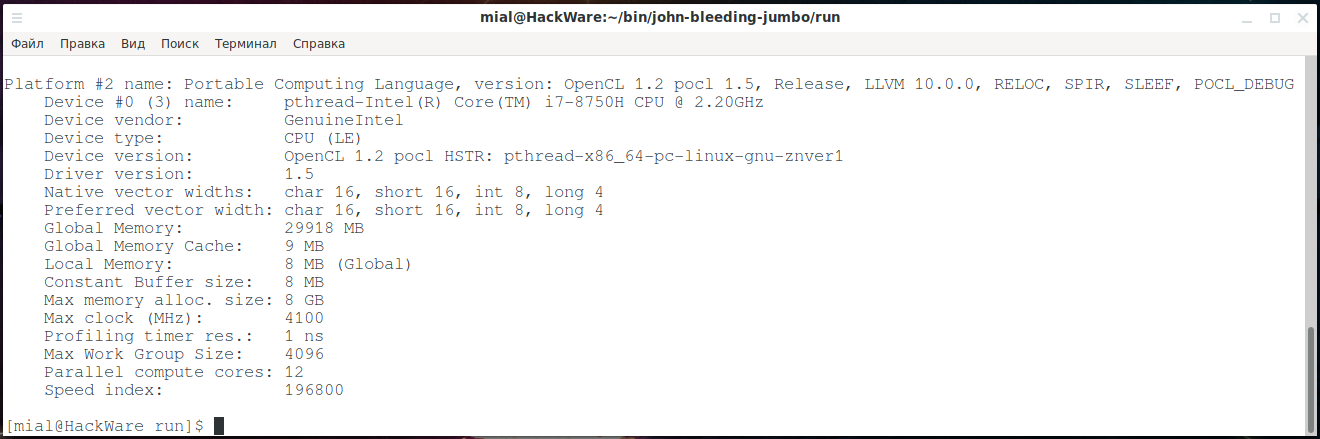
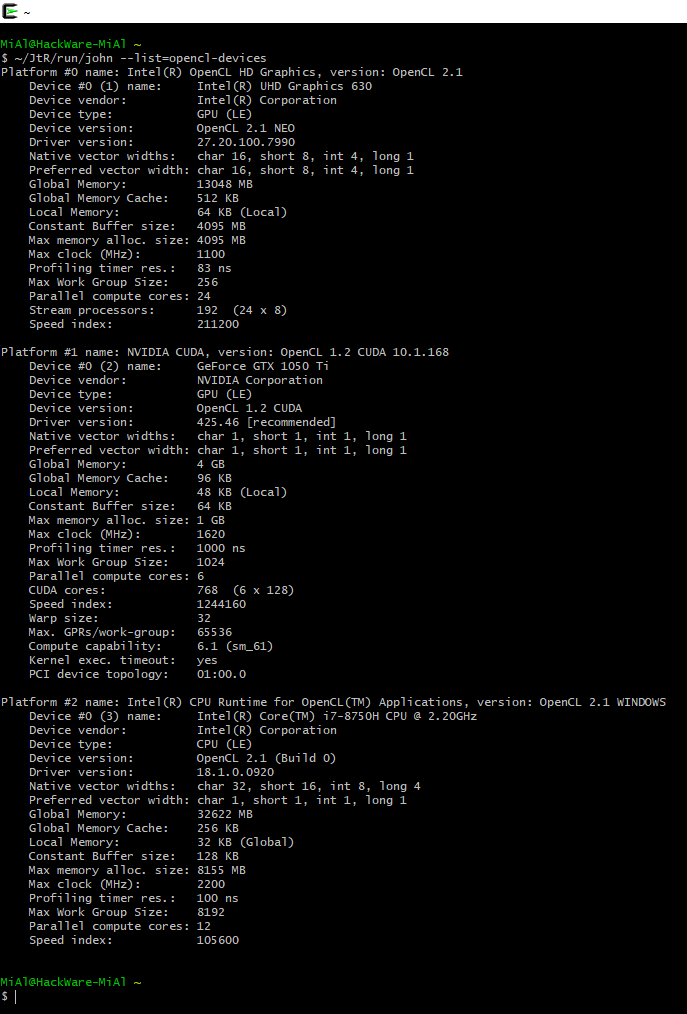
As you can see, I have three devices:
1 – video core of the central processor:
2 – discrete video card
Likewise on Windows:
As already mentioned, John the Ripper cannot just work with any supported algorithms using OpenCL – a module must be created for them. Therefore, some algorithms can only be cracked on a CPU, while some algorithms can be cracked on a GPU or on a CPU.
The list of algorithms may vary by OS and by installed dependencies.
To see the list of supported algorithms:
The list is too big for one screen:
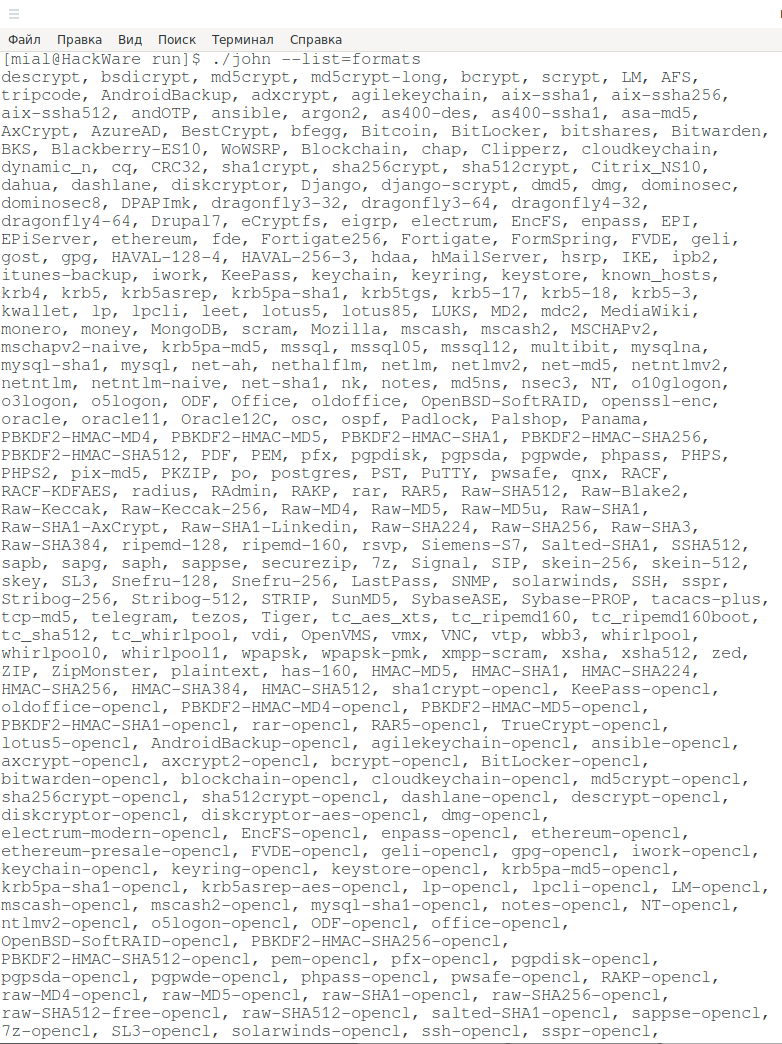
To see a list of algorithms for cracking on OpenCL:

Much smaller, but Wi-Fi is there.
How to use a graphics card to brute-force in John the Ripper
By default, JtR uses the CPU even if all the required OpenCL drivers are installed.
To enable the graphics card, you need to use the –format option and explicitly specify the algorithm that OpenCL supports.
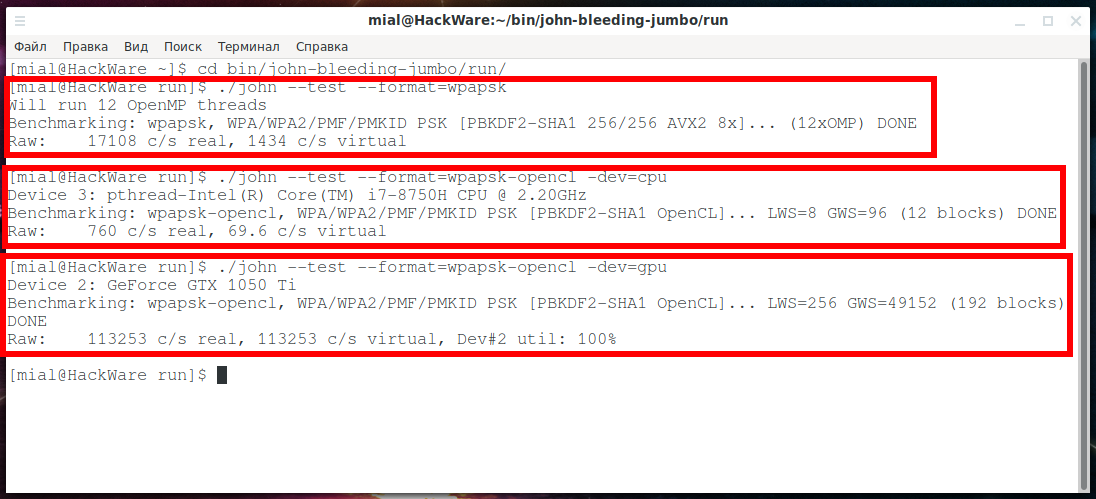
For example, to benchmark the wpapsk algorithm on a video card:
To hack wpapsk on the central processor, you need to run something like this:
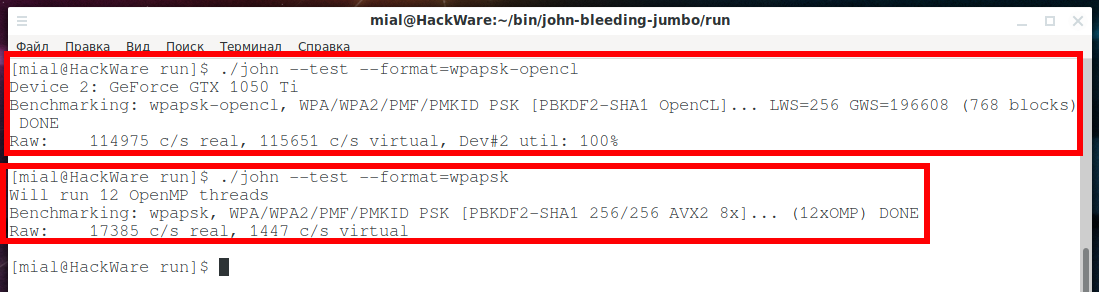
As you can see in the screenshots: 114975/17385 = 6.61, that is, the speed of brute-forcing passwords has increased more than 6 times.
How to use video CPU core in JtR
As you already know, OpenCL devices are discrete graphics and integrated graphics (video core of the CPU). By default, brute-force is launched on a discrete video card.
With the -dev option, you can explicitly specify the device to do the computation: gpu (discrete graphics) or cpu (integrated graphics).
Running a speed test on the video processor core:
Running a speed test on the video core of a dedicated video card (default):
How to run John the Ripper benchmark
To check the speed of brute-force passwords in JtR, use the –test option.
This option can be used with a number – the number of seconds that the test will run.
If you want to check the speed of only a certain algorithm, then use the –format option.
An example of a test of the speed of cracking a Wi-Fi password by a central processor:
An example of a test of the speed of cracking a Wi-Fi password with a discrete video card:
If you only need to check the operation of cracking of various algorithms without running a benchmark, then specify 0 as the value of the –test option:
How to set up John the Ripper
John the Ripper has a settings file with a lot of options. This file is called john.conf and is located in the same folder as the john executable.
Provide good cooling; watch the temperature. If the OpenCL runtime supports this, the GPU temperature will be monitored and displayed in the status bars, and there is a user-configurable limit in john.conf that will shutdown at 95 ° C.
This setting is set by the directive:
The temperature is indicated in degrees Celsius – °C.
Instead of interrupting, you can stop the program for this number of seconds to cool down the GPU when the temperature reaches the AbortTemperature value, then the program will re-check the temperature and either continue or pause. Set to 0 to just quit.
If SleepOnTemperature = 1 (one second) is specified, then no pause/resume messages will be displayed, since such a short value is interpreted as a desire to keep the temperature of the video card near the extreme value. Default directive value:
Compilation difference with AVX2 and AVX for John the Ripper
To view build parameters use the –list=build-info option:

Benchmark of two versions of programs:
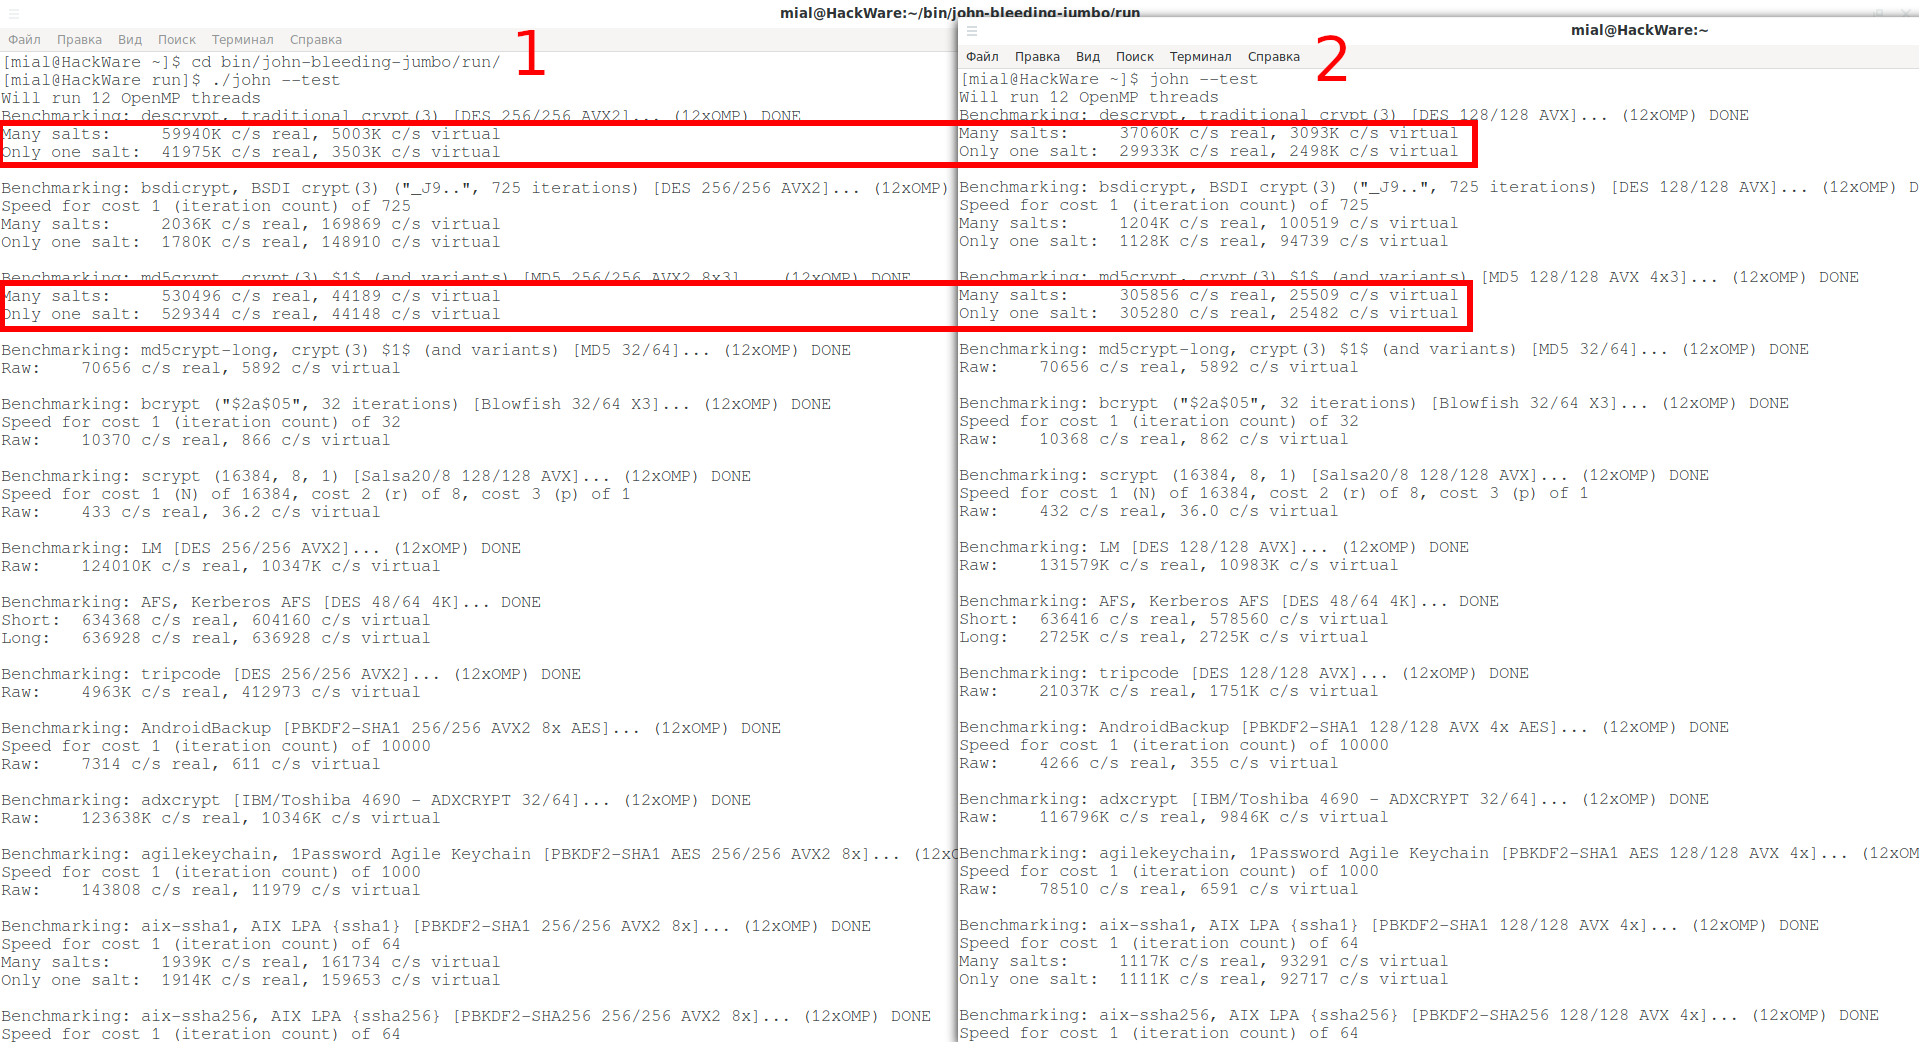
1 . This half of the screenshot is a benchmark for the latest version of JtR that I compiled from source. Since my CPU supports AVX2, John the Ripper supports that as well.
2 . And I installed this one from the standard repository of my distribution – it is compiled with AVX.
The difference is significant.
Result for the first part
So, this is the first part on John the Ripper – a popular offline brute force. In it, we learned the tricks for installing JtR, and also learned how to test the speed of brute-forcing passwords, turn on the video card for use and control actions when overheating.
When running such programs (John the Ripper and Hashcat), you need to take care of proper cooling. If your computer/laptop overheats, then the brute-force speed will drop very significantly.
The next parts will be even more interesting! We’ll learn how to extract password hashes and launch dictionary and mask attacks, and much more!


