- Взлом паролей с помощью John the Ripper на Linux
- Взлом паролей с помощью John the Ripper на Linux
- Установка Джона
- Дистрибутив Debian
- Fedora
- Arch Linux
- OpenSuse Linux
- Gentoo
- Slackware
- Использование Джона Потрошителя
- Инструменты Kali Linux
- Список инструментов для тестирования на проникновение и их описание
- Johnny
- Описание Johnny
- Справка по Johnny
- Ethical hacking and penetration testing
- InfoSec, IT, Kali Linux, BlackArch
- Comprehensive Guide to John the Ripper. Part 1: Introducing and Installing John the Ripper
- Table of contents
- What is John the Ripper
- How John the Ripper and Hashcat differ
- How to install video card drivers for John the Ripper
- Installing video drivers in Windows
- Installing video drivers on Linux
- How to compile John the Ripper on Linux from source code
- How to install John the Ripper on Windows
- John the Ripper check
- How to use a graphics card to brute-force in John the Ripper
- How to use a video CPU core in JtR
- How to run John the Ripper benchmark
- How to set up John the Ripper
- Compilation difference with AVX2 and AVX for John the Ripper
- Result for the first part
Взлом паролей с помощью John the Ripper на Linux

Для тех из вас, кто еще не слышал о John the Ripper (здесь для краткости его называют John), это бесплатный инструмент для взлома паролей, написанный в основном на языке C.
Прежде чем идти дальше, мы должны сказать вам, что, хотя мы доверяем нашим читателям, мы не поощряем и не потворствуем любым вредоносным действиям, которые могут быть выполнены с помощью этого инструмента или любых других инструментов, о которых мы говорили в прошлом.
Инструменты, связанные с безопасностью, часто похожи на обоюдоострый меч, поскольку их можно использовать как для хороших, так и для плохих вещей. Поэтому, хотя это может показаться заманчивым, мы рекомендуем вам воздержаться от любых разрушительных действий, хотя бы потому, что у вас есть большие шансы попасть в тюремную камеру.
Взлом паролей с помощью John the Ripper на Linux
Эта статья будет посвящена Джону с точки зрения системного администратора, поэтому мы ожидаем, что у вас есть промежуточные знания о вашей системе Linux, независимо от того, какой дистрибутив это может быть, и что Вы являетесь человеком, заботящимся о безопасности, с базовыми знаниями о безопасности. Тем не менее, эта статья может понравиться вам также, если Вы являетесь домашним пользователем, желающим узнать о таких вещах, но имейте в виду: некоторые из представленных ниже команд потребуют много вашего процессорного времени, поэтому, возможно, было бы лучше, если бы у вас была тестовая машина и/или много времени и терпения, потому что попытки взлома паролей могут занять несколько дней, даже на относительно новой машине.
Установка Джона
Хотя, по крайней мере, в тех дистрибутивах, которые мы пробовали, пакет в названии просто “john” с Gentoo, делающим исключение и называющим его “johntheripper”, мы упростим его для вас и покажем, как установить его на несколько известных дистрибутивов.
Дистрибутив Debian
Debian отличается от других дистрибутивов, которые предлагают John в своих репозиториях, тем, что он предлагает хорошую страницу руководства, хотя у upstream ее нет. Для установки просто введите
# aptitude install john
Fedora
На Fedora, тоже легко установить.
Arch Linux
OpenSuse Linux
# zypper install john
Gentoo
Как мы уже говорили, пакет Gentoo назван иначе, чем другие предложения.
# emerge Johntheripper
Slackware
Хотя в официальных репозиториях, похоже, нет пакета john, есть slackbuild, который устанавливает John в вашу систему (это было протестировано на Slackware 13.37).
Хотя мы дали вам всего несколько примеров того, как Вы можете получить John в своей системе Linux, многие из представленных примеров будут работать, если у вас установлена другая ОС: помимо исходного кода, проект предлагает программу для BeOS, Microsoft Windows, Solaris или MacOS X. Но для нашей статьи, как говорится в названии, мы протестировали примеры на Linux.
Использование Джона Потрошителя
Вам не нужно беспокоиться о зашифрованных конфигурационных файлах, так как Джон готов к использованию с соответствующими флагами командной строки без каких-либо других усилий с вашей стороны. Однако одно предупреждение: как Вы уже заметили, мы сообщаем нашим читателям, когда они должны использовать привилегии root, а когда нет. За исключением отмеченных случаев, вам настоятельно рекомендуется использовать вашего обычного повседневного пользователя (или другого, если Вы предпочитаете, но он не должен иметь прав суперпользователя). В моей системе Debian John доступен как /usr/sbin/john, поэтому, если Вы его не нашли, мы рекомендуем вам использовать whereis и ввести весь путь при запуске john unprivileged (или Вы можете просто создать псевдоним).
Теперь давайте создадим текстовый файл в формате пароля ( : ) с допустимым хэшем, конечно, и заставим Джона работать. Вы можете просто скопировать пользователя из /etc/shadow, но мы рекомендуем что-то более простое, потому что мы предполагаем, что Вы хотите увидеть результаты как можно быстрее. Итак, создайте файл с именем password.txt где-нибудь внутри вашего /home и положите это в него:
Сохраните файл, а затем просто скормите его Джону без каких-либо аргументов (на данный момент):
$ /usr/sbin/john password.txt
Мы должны повторить наше предупреждение: взлом паролей-это трудоемкий и длительный процесс, поэтому в зависимости от вашей системы это может занять довольно много времени. Однако это также зависит от того, чего Вы хотите достичь, потому что если ваш мощный процессор не может подобрать пароль(и) в течение нескольких дней без результата, можно только с уверенностью сказать, что это хороший пароль. Но если пароль действительно критичен, оставьте систему до тех пор, пока Джон не закончит свою работу, чтобы убедиться, что все в порядке. Как мы уже говорили, это может занять много дней.
Один из способов-использовать /etc/shadow напрямую, но мы рекомендуем вам выбрать несколько иной курс. Обратите внимание, что это относится к системам, использующим теневые пароли, и все современные дистрибутивы Linux делают это. Джон предлагает отличную утилиту под названием unshadow, которую мы будем использовать для создания файла из наших файлов passwd и shadow:
# unshadow /etc/passwd /etc/shadow > mypasswd.txt
Теперь убедитесь, что mypasswd.txt доступен для вашего обычного пользователя и делать
$ /usr/sbin/john mypasswd.txt
Джон сначала попробует режим одиночного взлома, затем режим списка слов, а затем инкрементный. С точки зрения Джона, режим-это метод, который он использует для взлома паролей. Как Вы знаете, существует много видов атак: словарные атаки, атаки грубой силы и так далее. Как некоторые из вас, возможно, поняли, режим списка слов-это в основном атака словаря. Помимо этих трех режимов, перечисленных выше, Джон также поддерживает еще один, называемый внешним режимом. Вы можете выбрать, какой режим использовать, например, –single, –external и так далее. Мы рекомендуем вам ознакомиться с документацией по адресу openwall.com для хорошего, но краткого описания каждого режима. Но, конечно, мы расскажем вам, вкратце, что делает каждый режим.
Документация John the Ripper рекомендует начинать с режима одиночного взлома, главным образом потому, что это быстрее и даже быстрее, если Вы используете несколько файлов паролей одновременно. Инкрементный режим-самый мощный из доступных режимов, так как он будет пробовать различные комбинации при взломе, и вы можете выбрать, какой режим (режим, применяемый к инкрементальной опции) использовать, в том числе и свой собственный. Внешний режим, как следует из названия, будет использовать пользовательские функции, которые вы пишете сами, в то время как режим списка слов принимает список слов, указанный в качестве аргумента опции (это может быть файл со списком слов, написанных по одному на строку, или stdin), и пытается выполнить простую словарную атаку на пароли.
Если Джон будет успешной в крекинг-один из паролей, он будет писать в
/.john/john.pot. Однако этот файл не читается человеком, поэтому Вы можете читать взломанные пароли с помощью
$ /usr/sbin/john —show mypasswd.txt
Чтобы проверить, не взломан ли пароль root, отфильтруйте его по UID:
$ /usr/sbin/john —show —users=0 mypasswd.txt
Конечно, Джон знает о подстановочных знаках и нескольких файлах:
$ /usr/sbin/john —show —users=0 *passwd*
Точно так же, как Вы можете фильтровать по пользователю, Вы также можете фильтровать по группе, используя флаг –groups, и эта фильтрация доступна также при взломе. Переходя далее к режиму списка слов, вот как Вы можете использовать его с включенными встроенными правилами искажения:
$ /usr/sbin/john —wordlist=passwd.lst —rules passwd.txt
Джон также позволяет создавать несколько именованных сеансов, что практично, потому что, поскольку Джон может занять много времени для выполнения задачи, Вы можете позже просмотреть все запущенные сеансы, чтобы решить, какой из них убить. Вариант для именованных сеансов –сессии=имя задачи, и Вы можете использовать –статус или … статус=название задачи, чтобы увидеть всех или отдельных сессий. Но есть и еще кое-что: Вы можете восстановить сеансы или определенные из них по имени, используя –restore или –restore=task name. Несколько примеров:
$ /usr/sbin/john —session=allrules —wordlist=all.lst —rules mypasswd.txt
$ /usr/sbin/john —status=allrules
$ ps aux | grep john #get the PID of the john session you want to kill
$ kill HUP $PID_of_john_session_to_kill $ /usr/sbin/john —restore=allrules
Вот несколько примеров использования инкрементного режима с Джоном:
$ /usr/sbin/john —incremental mypasswd.txt
$ /usr/sbin/john —incremental=alpha mypasswd.txt
Конечно, это не замена документации Джона. Хотя, как мы уже говорили, он не предлагает страницы руководства, Вы найдете много документации на его странице, а также полезную вики-страницу. Например, Вы заметите, что даже если Вы используете John на многопроцессорной машине, она будет использовать только одно ядро, обычно первое. Вы можете решить эту проблему, прочитав документацию и следуя приведенным там инструкциям.
Источник
Инструменты Kali Linux
Список инструментов для тестирования на проникновение и их описание
Johnny
Описание Johnny
Johnny — это графический интерфейс для John the Ripper.
Johnny — это кроссплатформенный графический интерфейс с открытым исходным кодом для популярного взломщика паролей John the Ripper. Первоначально он был предложен и разработан Шинноком в черновике, реализация версии 1.0 была реализована Алексеем Черепановым в рамках GSoC 2012, а Матье Лаприз продвинул Джонни дальше к версии 2.0 и выше в рамках GSoC 2015.
Цель Johnny — автоматизировать и упростить процедуру взлома паролей с помощью чрезвычайно универсального и надёжного John the Ripper, а также добавить к нему дополнительные функции, характерные для парадигм рабочего стола и графического интерфейса пользователя, такие как улучшенный рабочий процесс с хешами и паролями, множественные атаки и управление сеансами, лёгкое указание сложных правил атак, визуальную обратную связь и статистику, всё это помимо огромных возможностей и функций, предлагаемых как core/prope JtR, так и jumbo.
- Кроссплатформенность, сборка и запуск на всех основных настольных платформах
- Основан на самом мощном и надёжном программном обеспечении для взлома паролей, поддерживает как core/proper John, так и jumbo
- Предоставляет наиболее полезные режимы и параметры атаки JtR в удобном, но мощном интерфейсе.
- Упрощает управление паролями/хешами и результатами атак за счёт сложной фильтрации и выбора
- Простое определение новых атак и практическое управление сеансами множественных атак
- Ручной ввод паролей для угадывания с помощью функции Guess
- Экспорт таблицы паролей в CSV и в файлы паролей в формате с двоеточием
- Может импортировать многие типы зашифрованных или защищённых паролем файлов с помощью функции 2john
- Полностью переводимый интерфейс (на данный момент английский и французский языки)
Авторы: Aleksey Cherepanov, Shinnok, Mathieu Laprise
Лицензия: BSD 2-clause license
Справка по Johnny
Справка отсутствует, всё управление происходит в графическом интерфейсе.
Источник
Ethical hacking and penetration testing
InfoSec, IT, Kali Linux, BlackArch
Comprehensive Guide to John the Ripper. Part 1: Introducing and Installing John the Ripper
Table of contents
What is John the Ripper
John the Ripper is a popular password cracker that is capable of brute-force using both the CPU and the video card and supports many algorithms. To be more precise, this is an offline brute-forcer (online brute-forcers perform the attack by connecting to network services, and offline crackers work with captured hashes (files) to which they guess a password).
Even if you are already familiar with Hashcat (and even more so if you are NOT familiar with Hashcat), you need to learn how John the Ripper works, since they are different.
How John the Ripper and Hashcat differ
Hashcat can use a video card, CPU, or both for brute-force.
John the Ripper can use one thing: either the video card, or the video core of the CPU, or only the CPU.
Hashcat can use the graphics card to crack any supported algorithms.
John the Ripper for GPU Cracking supports only certain kinds of algorithms.
If you have several video cards, Hashcat out of the box supports working with multiple devices at once and by default splits the task into the required number of threads and the size of each task is tied to the performance of the video card.
John the Ripper can work with multiple graphics cards, but by default, splitting a task across multiple graphics cards is only supported for one algorithm.
It doesn’t matter to Hashcat how you installed it: built from source or downloaded a binary file.
It is very important for John the Ripper to compile the binary himself, as the compilation takes into account the specifics of your system. As a result, during compilation, the instruction sets supported by the processor will be indicated, for example, AVX2 instead of the default AVX, which will have a very significant impact on performance – for some algorithms, this will speed up brute-forcing by 2 times! Alternatively, John’s binaries compiled on newer hardware may not work on some computers.
For Hashcat, you must specify the hash type.
John the Ripper determines the hash itself, or you can explicitly specify the hash format.
The syntax for commands and options varies greatly.
About cracking a password in John the Ripper on a video card, you need to know that brute-force on a graphics card takes a long time to launch – this is noticeable even in the benchmark. Therefore, if you need to execute many short sessions, then sometimes it is more rational to use the CPU, on which the brute-force is launched immediately.
Advantages of John the Ripper:
- John the Ripper work with hashes more flexible — even if the file with hashes contains hashes of other types, John does not exit with an error, but simply uses the hashes of the type specified in the start command. In addition, hash computation utilities often add strings that can cause an “invalid hash” error in Hashcat. John the Ripper works fine with this form of notation.
- More flexible Rule-based attack. John the Ripper and Hashcat have an implementation of Rule-based attack and the syntax for writing the rules has a lot in common. But in John the Ripper, this attack is more powerful because it has more rules and also allows character sets to be used in the rule entry.
- Support for non-standard hashes. Hashcat can only work with hashes provided by the developers of this program. And John the Ripper has a Dynamic mode that allows you to specify the formula by which the hash was calculated. That is, arbitrary types of hashes can be cracked.
How to install video card drivers for John the Ripper
If you want to use the GPU to crack passwords (which is many times faster than on the central processor), then you need to install the video driver.
For brute-force can be used:
You need to choose one of these – the fastest option is a video card.
Of course, the specific configurations of computers may vary: some do not have a discrete graphics card, some do not have a video core on a CPU – I hope you can check this yourself.
Installing video drivers in Windows
In this OS, everything is simple – most likely, the video drivers for your graphics card are already installed. If not, go to the manufacturer’s website, download and install the driver.
In order to use the CPU as an OpenCL device, you need to install “OpenCL Runtime for Intel Core and Intel Xeon Processors”. You can find the links in this article on Hashcat, which also uses this software.
Installing video drivers on Linux
On Kali Linux
Upgrade and reboot your Kali installation:
Installing video drivers for NVIDIA on Linux
Enabling OpenCL for Intel
If your CPU supports OpenCL, then install the following packages:
On Arch Linux, BlackArch
Enabling OpenCL for NVIDIA
Remove xf86-video-nouveau there it is:
Install proprietary NVIDIA driver, CUDA and other required packages:
Enabling OpenCL for Intel
Friends, I need your help – if you have a different distribution kit or AMD video card, write in the comments how you installed the video driver – I will add this information here.
How to compile John the Ripper on Linux from source code
As already mentioned, it is important to build John the Ripper yourself so that it uses all the features of your processor. Another advantage of this approach is that we get the most recent version of John the Ripper.
Installing the required dependencies in Kali Linux:
Installing required dependencies on Arch Linux, BlackArch:
The following is the same in any distribution:
Please note that in the last command you can use the -j option after which specify the number of (logical) cores of your processor, for example, I have 12 logical cores, then I use:
Now go to the run folder:
And run the test:
You don’t need to install John the Ripper at the system level – move the run folder to a location convenient to you and run John from there. In addition to the John the Ripper executable, the run folder contains many scripts for extracting hashes – we will talk about them later.
Remember that if you type in the terminal
then the version preinstalled on the system will run, not the one you compiled.
Installing John the Ripper on Debian, Linux Mint, Ubuntu
The installation should be performed exactly the same as in Kali Linux. So refer to the Installing John the Ripper on Kali Linux section. If something did not work out for you, then write here in the comments indicating your distribution kit and error.
How to install John the Ripper on Windows
We’ll look at compiling John the Ripper from source on Windows sometime later. Let’s use the official binary file.
Install Cygwin first – just go to the official website https://www.cygwin.com/, download the setup-x86_64.exe file and install.
Unzip the contents of this archive into the C:\cygwin64\home\ folder, for example, my username is MiAl, so I unpack it to C:\cygwin64\home\MiAl\. Please note that you need to create a folder and copy files into it on behalf of a regular user, because during its work John the Ripper will try to write data to a .pot file in the same folder where the program is running. If you copied the JtR folder in the file manager with elevated rights, then this folder will belong to the Administrator and it is impossible to write anything into it or change the rights to it.
It is actually possible to run John the Ripper on Windows even without Cygwin, but in this case it will not be able to use OpenCL (video cores) for brute-force.
Now in the folder C:\cygwin64\home\ \JtR\run\ find cygOpenCL-1.dll file and rename it to cygOpenCL-1.dll.bac.
Then in the c:\Windows\System32 folder find the OpenCL.dll file and copy it to the C:\cygwin64\home\ \JtR\run\ folder.
Then, in the C:\cygwin64\home\ \JtR\run\ folder, rename the OpenCL.dll file to cygOpenCL-1.dll.
Then the same procedure must be repeated for the file in the C:\cygwin64\bin\ folder. That is, in the C:\cygwin64\bin\ folder, find cygOpenCL-1.dll and rename it to cygOpenCL-1.dll.bac. Then find the OpenCL.dll file in the c:\Windows\System32 folder and copy it to the C:\cygwin64\bin\ folder. Finally, in the C:\cygwin64\bin\ folder, rename the OpenCL.dll file to cygOpenCL-1.dll.
So that you understand why we are doing all this, take a look at the cracking speed on the central processor:

And on the speed of hacking on the video card, which became available thanks to the actions shown above with the substitution of files:

The file swap trick may not work for all systems – but either way, you can use the CPU or integrated graphics to hack.
Open Cygwin console to execute commands.
Run your system benchmark:
Still, JtR is one of those programs that primarily targets Linux. Further you will see that we will run scripts to generate (extract) hashes from files and, for example, some of the auxiliary programs/scripts need, for example, an installed Python environment, which is present in Linux by default.
John the Ripper check
In this section, we will check what devices John the Ripper sees for use during brute force.
The options are the same on any system, but remember that on Windows, to run John the Ripper, you need to open Cygwin and specify
/JtR/run/john as the executable file.
If you run a file installed from the standard repositories in Linux, then it is enough to write simply
If you run a file compiled from the source code, then go to the directory with the executable file (in the program folder this is the run directory) and specify as the executable file

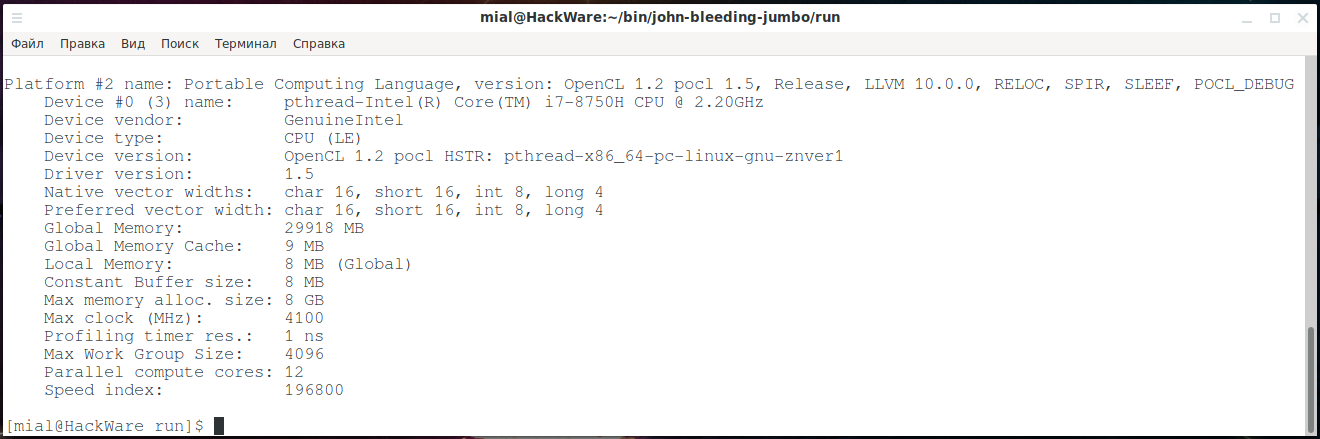
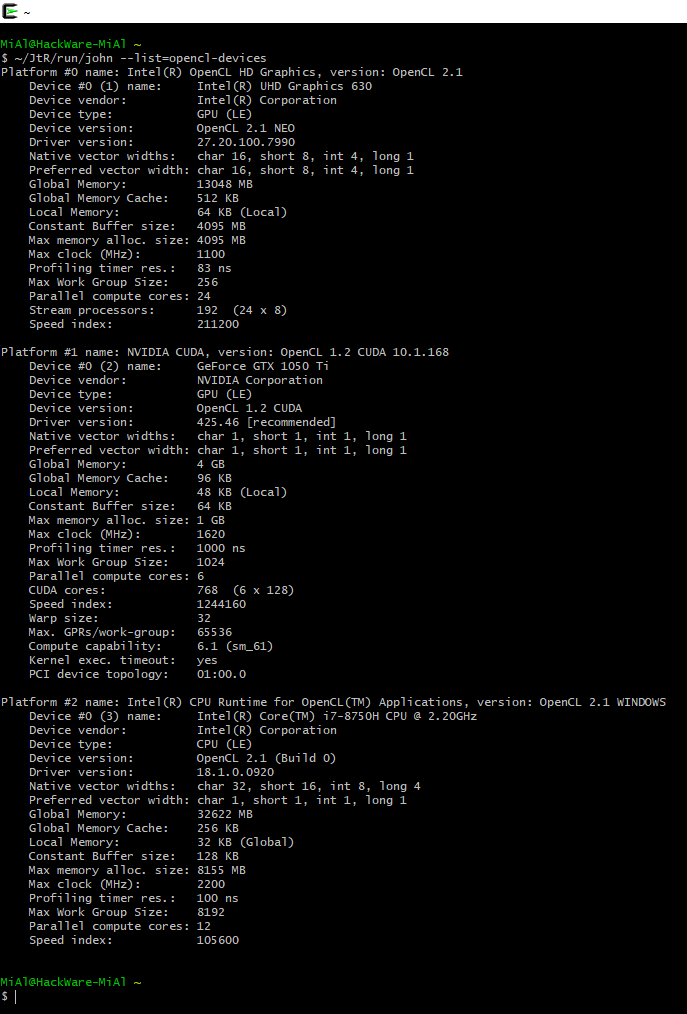
As you can see, I have three devices:
1 – video core of the central processor:
2 – discrete video card
Likewise on Windows:
As already mentioned, John the Ripper cannot just work with any supported algorithms using OpenCL – a module must be created for them. Therefore, some algorithms can only be cracked on a CPU, while some algorithms can be cracked on a GPU or on a CPU.
The list of algorithms may vary by OS and by installed dependencies.
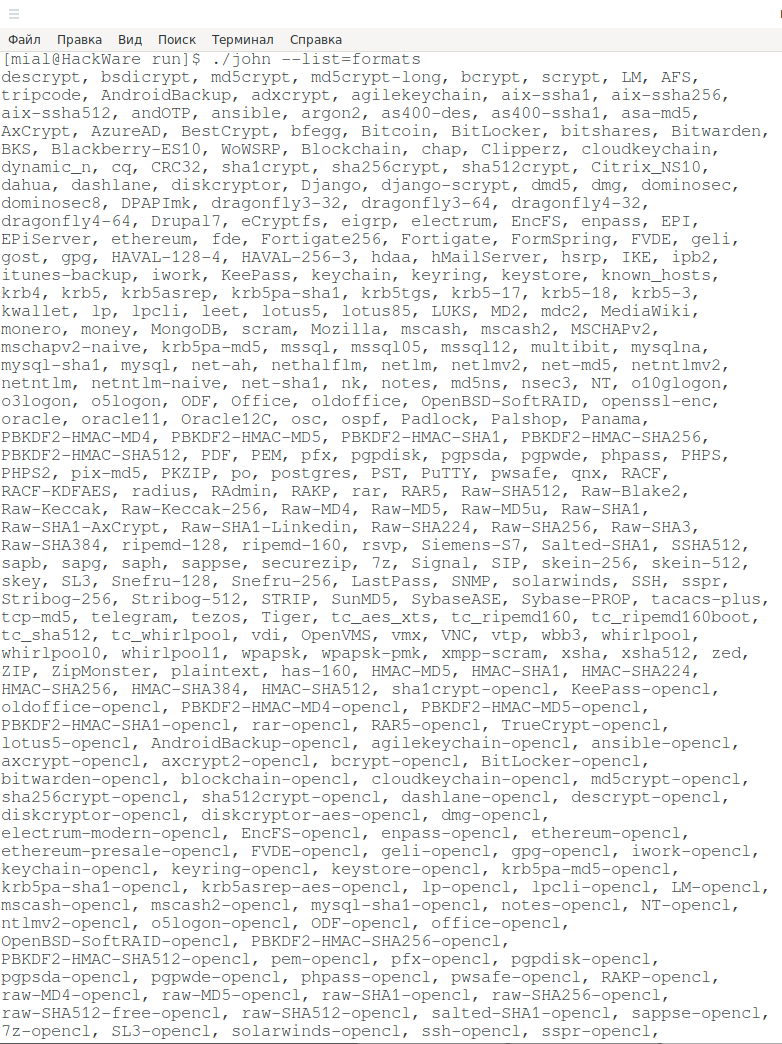
To see the list of supported algorithms:
The list is too big for one screen:
To see a list of algorithms for cracking on OpenCL:

Much smaller, but Wi-Fi is there.
How to use a graphics card to brute-force in John the Ripper
By default, JtR uses the CPU even if all the required OpenCL drivers are installed.
To enable the graphics card, you need to use the —format option and explicitly specify the algorithm that OpenCL supports.
For example, to benchmark the wpapsk algorithm on a video card:
To hack wpapsk on the central processor, you need to run something like this:
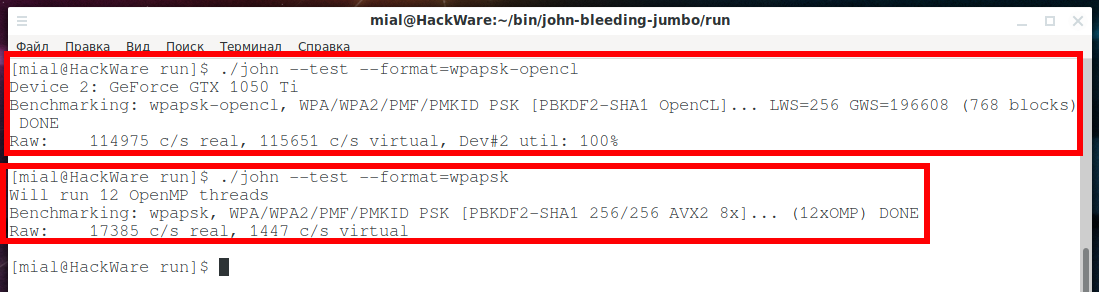
As you can see in the screenshots: 114975/17385 = 6.61, that is, the speed of brute-forcing passwords has increased more than 6 times.
How to use a video CPU core in JtR
In this section, we will dwell in more detail on what devices JtR can use to perform computations and how exactly the program chooses between them when there is an alternative.
JtR can perform computation on:
- regular CPU cores
- OpenCL devices
The list of OpenCL devices may include:
- video card
- integrated CPU graphics
- regular CPU cores
As you can see, even without the OpenCL Runtime and video drivers installed, JtR is capable of cracking passwords.
Algorithms that do not have the “-opencl” string in their names, such as wpapsk, can only be brute forced on regular CPU cores.
Algorithms with the string “-opencl” in the name, for example wpapsk-opencl, can be brute forced on:
- video card
- integrated CPU graphics
- regular CPU cores
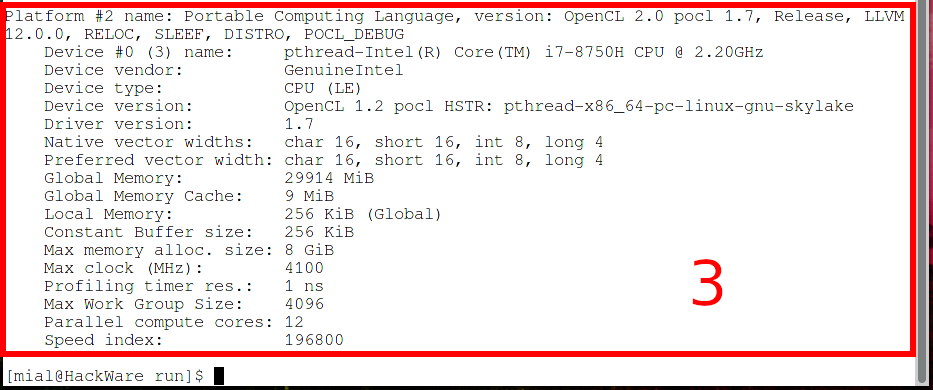
To see a list of available OpenCL devices, run the command:
Take a look at the following screenshots:
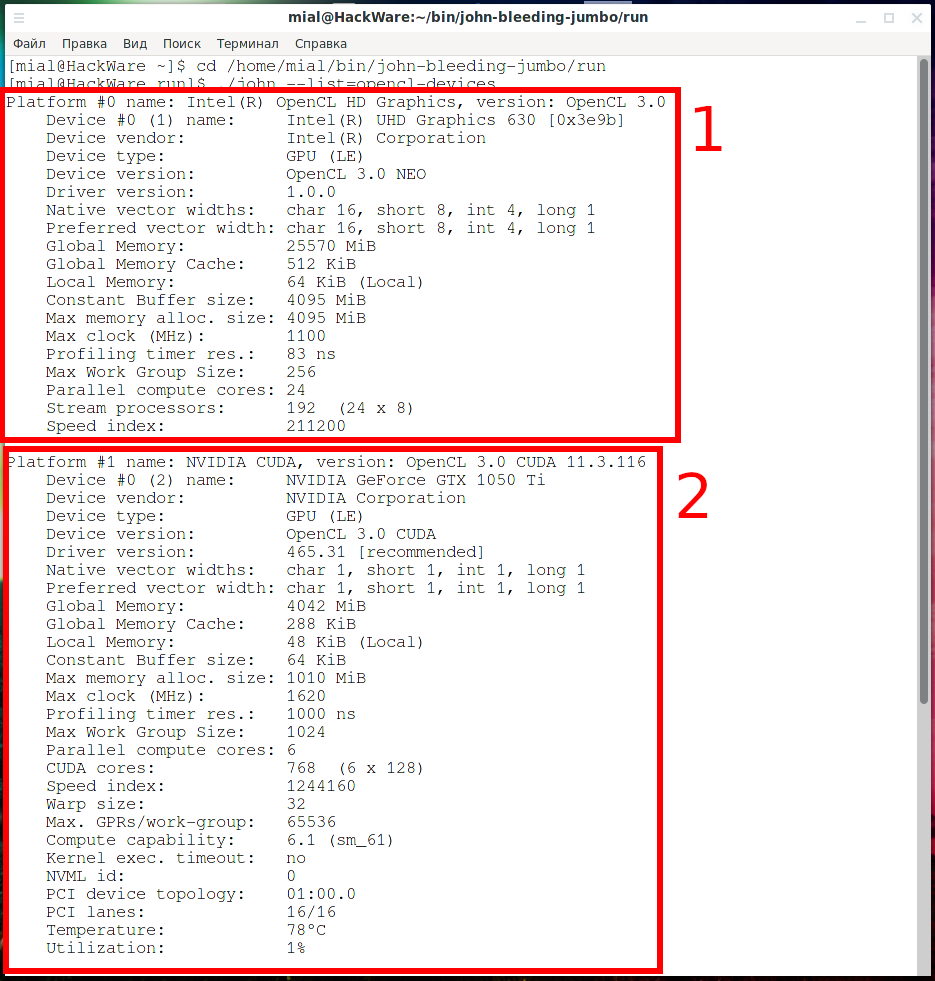
Number one is integrated graphics in the CPU.
Number two is the video card.
Number three are the regular CPU cores that JtR will handle as an OpenCL device.
By default (without a -dev option), JtR uses one OpenCL device that it thinks is likely the fastest.
Using the -dev option, you can select a specific OpenCL device, the device number is in parentheses, on lines starting with “Device #0”, for example:
So, to run JtR on regular CPU cores, use the algorithm name without the “-opencl” string:
To start cracking the password on the first OpenCL device (in my case it is integrated CPU graphics, test failed):
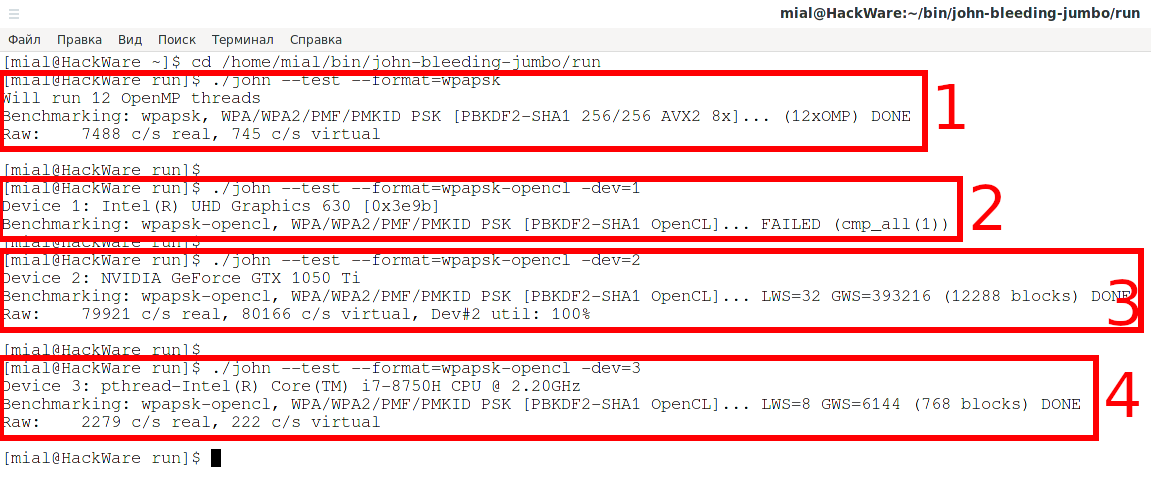
To start cracking the password on a second OpenCL device in my case it is a discrete graphics card):
To start cracking a password on a third OpenCL device (in my case it is regular cores of the central processor):
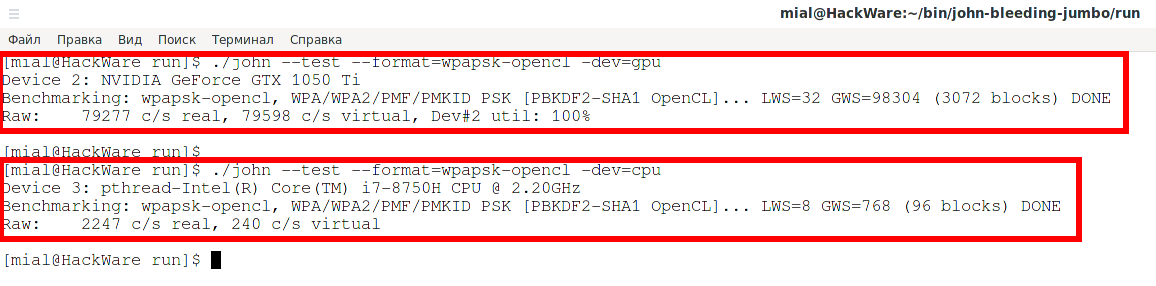
You can also use the -dev option like this:
- -dev=gpu
- -dev=cpu
These tell JtR, when it uses OpenCL, to use only GPU device(s) or only CPU device(s).
How to run John the Ripper benchmark
To check the speed of brute-force passwords in JtR, use the —test option.
This option can be used with a number – the number of seconds that the test will run.
If you want to check the speed of only a certain algorithm, then use the —format option.
An example of a test of the speed of cracking a Wi-Fi password by a central processor:
An example of a test of the speed of cracking a Wi-Fi password with a discrete video card:
If you only need to check the operation of cracking of various algorithms without running a benchmark, then specify 0 as the value of the —test option:
How to set up John the Ripper
John the Ripper has a settings file with a lot of options. This file is called john.conf and is located in the same folder as the john executable.
Provide good cooling; watch the temperature. If the OpenCL runtime supports this, the GPU temperature will be monitored and displayed in the status bars, and there is a user-configurable limit in john.conf that will shutdown at 95 ° C.
This setting is set by the directive:
The temperature is indicated in degrees Celsius — °C.
Instead of interrupting, you can stop the program for this number of seconds to cool down the GPU when the temperature reaches the AbortTemperature value, then the program will re-check the temperature and either continue or pause. Set to 0 to just quit.
If SleepOnTemperature = 1 (one second) is specified, then no pause/resume messages will be displayed, since such a short value is interpreted as a desire to keep the temperature of the video card near the extreme value. Default directive value:
Compilation difference with AVX2 and AVX for John the Ripper
To view build parameters use the —list=build-info option:

Benchmark of two versions of programs:
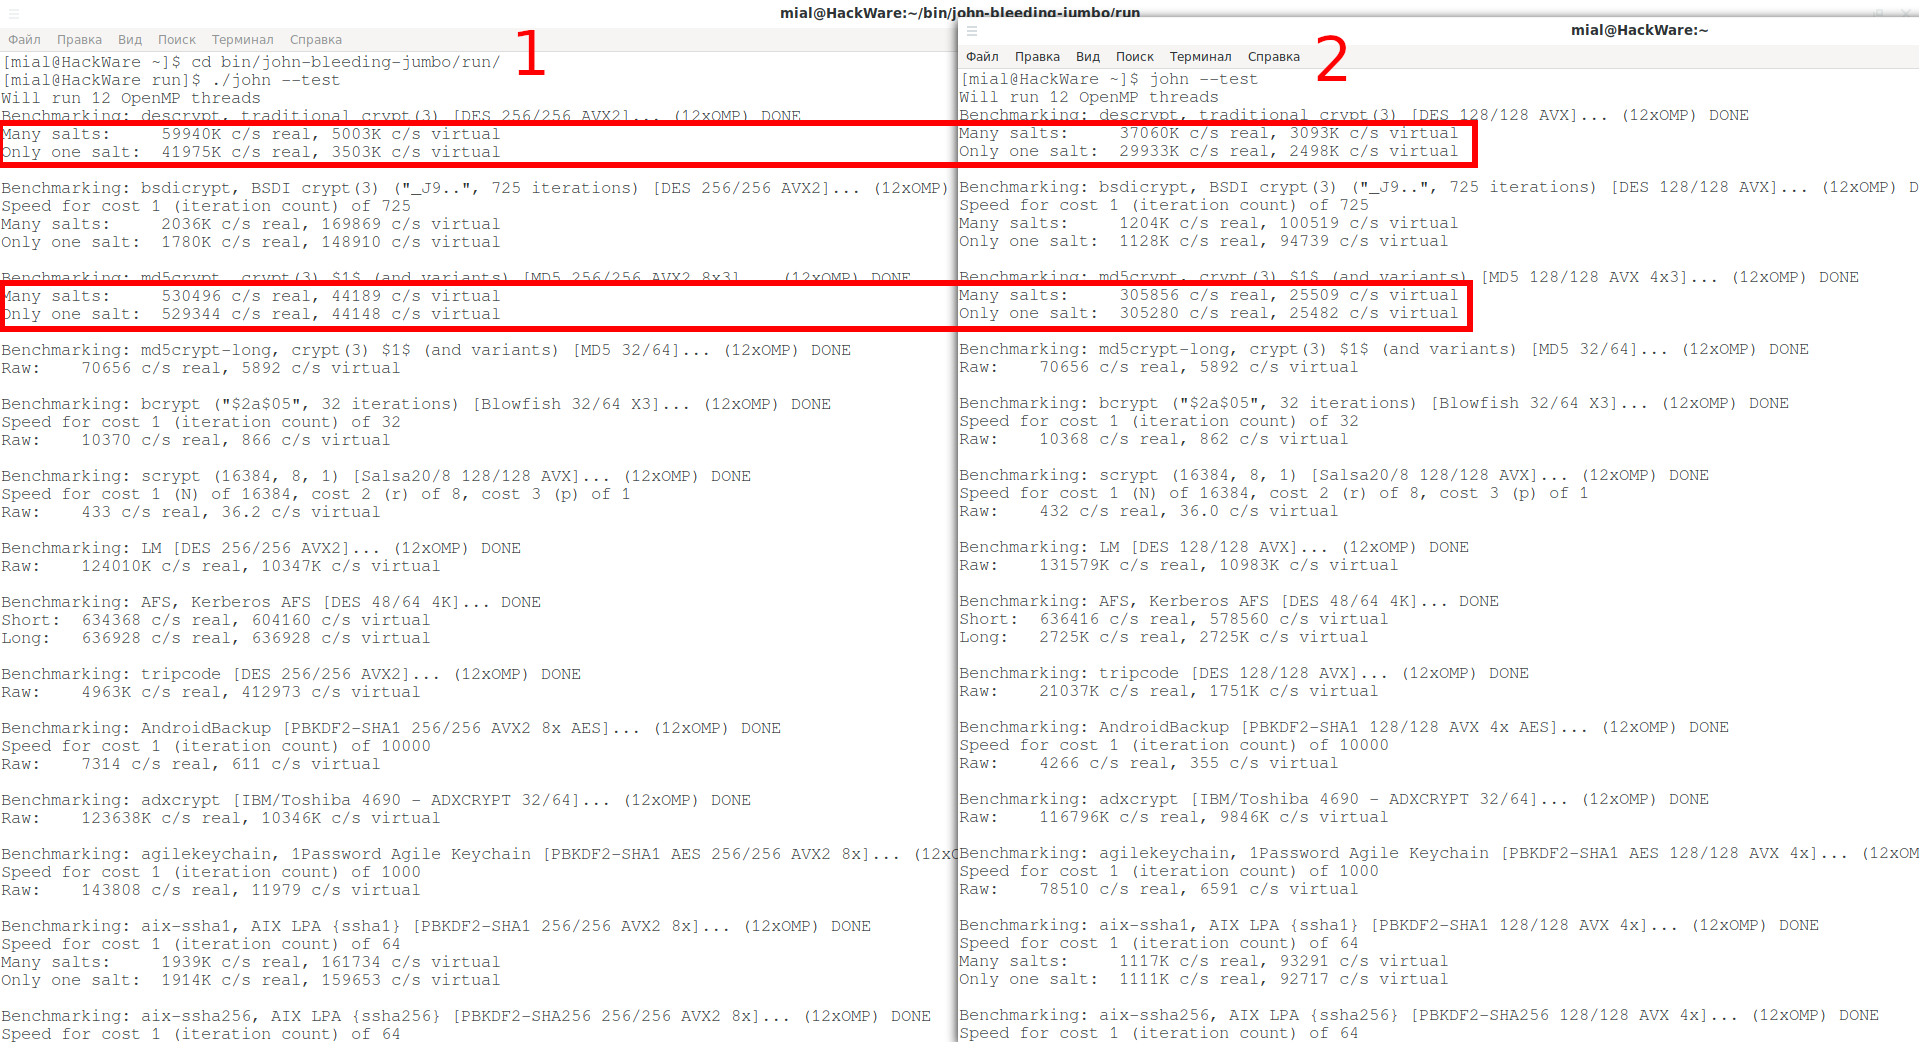
1 . This half of the screenshot is a benchmark for the latest version of JtR that I compiled from source. Since my CPU supports AVX2, John the Ripper supports that as well.
2 . And I installed this one from the standard repository of my distribution – it is compiled with AVX.
The difference is significant.
Result for the first part
So, this is the first part on John the Ripper – a popular offline brute force. In it, we learned the tricks for installing JtR, and also learned how to test the speed of brute-forcing passwords, turn on the video card for use and control actions when overheating.
When running such programs (John the Ripper and Hashcat), you need to take care of proper cooling. If your computer/laptop overheats, then the brute-force speed will drop very significantly.
The next parts will be even more interesting! We’ll learn how to extract password hashes and launch dictionary and mask attacks, and much more!
Источник


