- Как прописать JAVA_HOME?
- Windows:
- Ubuntu:
- JRE_HOME
- 7 JRE Installation for Linux Platforms
- System Requirements
- JRE 8 Installation Instructions
- Installation Instruction Notation and Files
- Installation of the 64-bit JRE on Linux Platforms
- Installation of the 64-bit JRE on RPM-based Linux Platforms
- Installation of the 32-bit JRE on Linux Platforms
- Installation of the 32-bit JRE on RPM-based Linux Platforms
- Installation of Public Key on RPM-based Linux Platforms
- General Installation Notes
- Root Access
- Overwriting Files
- System Preferences
- Установка Java (JDK) в Windows и Linux, переменная PATH и JAVA_HOME
- Установка Java (JDK) в Windows
- Установка Java (JDK) на Linux
Как прописать JAVA_HOME?
Картинка для привлечения внимание. Ноги, кафель, ну вы поняли.
Windows:
Приступим к настройке.
- Давим по значку рабочего стола правой кнопки мыши -> открывается окно «Система».
- На левой панели давим по пункту «Дополнительные параметры системы» -> открывается окно «Свойства системы»
- На вкладке «Дополнительно» нажимает на кнопку «Переменные среды. » -> открывается окно «Переменные среды»
Перед вами 2 списка, в верхнем списке указаны все переменные доступные только вашему пользователю, в нижнем — всей системе. В некоторых случаях может потребоваться установить разные переменные JAVA_HOME для нескольких юзеров одной системы, в этом случае для каждого юзера придется прописать свою переменную в списке «Переменные среды пользователя». Мы пойдем обычным путем и установим одинаковую переменную для всех.
- Необходимо убедиться что переменной JAVA_HOME нет в списке, если есть, давим кнопку изменить и переходим к 6 пункту.
- Давим кнопку «Создать. «.
- Указываем имя переменной «JAVA_HOME», в значении переменной указываем полный путь до папки с JDK, например «C:\java\jdk1.7.0_79\».
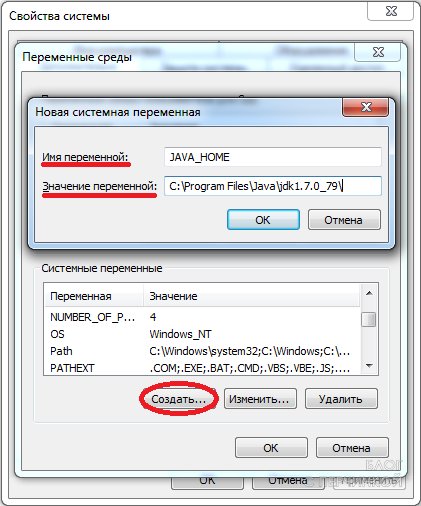
Окно «Свойств системы» в Windows
Не будет лишним так-же указать переменную «JRE_HOME», она пригодится, например, для разработки портлетов для портала Liferay, для этого по аналогии повторите пункт 6. Как правило, JRE находится в папке с JDK, примерный путь «C:\java\jdk1.7.0_79\jre\».
После установки дистрибьютива JDK виртуальная машина «java.exe» будет доступна в консоли повсеместно. Для выполнения некоторых задач, необходимо так-же предоставить доступ к компилятору «javac.exe», для этого отредактируйте переменную Path. Добавьте в значение переменной «;» и путь до папки с компилятором, например «C:\Java\jdk1.7.0_79\bin\».
Ubuntu:
Для начала необходимо понять куда была установлена Java, выполните команды:
Результатом выполнения команды будет список установленных виртуальных машин Java:
Из этого списка нам потребуется столбик Path. Полный путь до виртуальных машин должен быть до «jre/bin/java», например в нашем случае 0-ой пункт будет иметь полный путь до машины «/usr/lib/jvm/java-8-oracle».
Для установки переменной JAVA_HOME, необходимо прописать ее в /etc/environment, используя путь до машины Java.
Изменения вступят в силу автоматически после перезагрузки, либо мы можем перегрузить переменные окружения командой:
Осталось выполнить проверку:
Если в результате команда напечатает путь до машины JAVA, значит настройка завершена успешно.
JRE_HOME
Не будет лишним так-же указать переменную «JRE_HOME», она пригодится, например, для разработки портлетов для портала Liferay. Как правило, JRE находится в папке с JDK, т.е. значение JRE_HOME = путь до виртуальной машины + «/jre».
Источник
7 JRE Installation for Linux Platforms
This page describes JRE for Linux system requirements and gives installation instructions for several JRE-Linux combinations.
This page contains these topics:
See «JDK 8 and JRE 8 Installation Start Here» for general information about installing JDK 8 and JRE 8.
For information on enhancements to JDK 8 that relate to the installer, see «Installer Enhancements in JDK 8».
System Requirements
See http://www.oracle.com/technetwork/java/javase/certconfig-2095354.html for information about supported platforms, operating systems, and browsers.
On a 64-bit system, you can download either the 64-bit or the 32-bit version of the Java platform. However, if you are using a 32-bit browser and you want to use the plugin, then you need to install the 32-bit version of the Java platform. To determine which version of Firefox you are running, launch the application, and select the menu item Help -> About Mozilla Firefox. At the bottom of the window is a version string line that contains either «Linux i686» (32-bit) or «Linux x86_64» (64-bit). To setup the Java plugin, see «Manual Installation and Registration of Java Plugin for Linux».
JRE 8 Installation Instructions
This topic contains these topics:
Installation Instruction Notation and Files
For instructions containing the notation version , substitute the appropriate JRE update version number. For example, if you are installing update JRE 8 update release 2, the following string representing the name of the bundle:
Note that, as in the preceding example, the version number is sometimes preceded with the letter u , for example, 8u2 , and sometimes it is preceded with an underbar, for example, jre1.8.0_02 .
The following table lists the options and instructions for downloading the JRE 8 release for a Linux platform.
| Download File and Instructions | Architecture | Who Can Install |
|---|---|---|
| jre-8u version -linux-x64.tar.gz «Installation of the 64-bit JRE on Linux Platforms» | 64-bit | anyone |
| j re-8u version -linux-i586.tar.gz «Installation of the 32-bit JRE on Linux Platforms» | 32-bit | anyone |
| jre-8u version -linux-x64.rpm «Installation of the 64-bit JRE on RPM-based Linux Platforms» | 64-bit RPM-based Linux | root |
| jre-8u version -linux-i586.rpm «Installation of the 32-bit JRE on RPM-based Linux Platforms» | 32-bit RPM-based Linux | root |
JDK 7u6 and later releases include JavaFX SDK (version 2.2 or later). The JavaFX SDK and Runtime are installed and integrated into the standard JDK directory structure.
Installation of the 64-bit JRE on Linux Platforms
This procedure installs the Java Runtime Environment (JRE) for 64-bit Linux, using an archive binary file ( .tar.gz ).
These instructions use the following file:
Download the file.
Before the file can be downloaded, you must accept the license agreement. The archive binary can be installed by anyone (not only root users), in any location that you can write to. However, only the root user can install the JDK into the system location.
Change directory to the location where you would like the JDK to be installed, then move the .tar.gz archive binary to the current directory.
Unpack the tarball and install the JRE.
The Java Development Kit files are installed in a directory called jdk1.8.0_ version in the current directory.
Delete the .tar.gz file if you want to save disk space.
Installation of the 64-bit JRE on RPM-based Linux Platforms
This procedure installs the Java Runtime Environment (JRE) for 64-bit RPM-based Linux platforms, such as Red Hat and SuSE, using an RPM binary file ( .rpm ) in the system location. You must be root to perform this installation.
These instructions use the following file:
Download the file.
Before the file can be downloaded, you must accept the license agreement.
Become root by running su and entering the super-user password.
Uninstall any earlier installations of the JDK packages.
Install the package.
To upgrade a package:
Delete the .rpm file if you want to save disk space.
Exit the root shell.
There is no need to reboot.
Installation of the 32-bit JRE on Linux Platforms
This procedure installs the Java Runtime Environment (JRE) for 32-bit Linux, using an archive binary file ( .tar.gz ).
These instructions use the following file:
Download the file.
Before the file can be downloaded, you must accept the license agreement. The archive binary can be installed by anyone (not only root users), in any location that you can write to. However, only the root user can install the JRE into the system location.
Change directory to the location where you would like the JRE to be installed, then move the .tar.gz archive binary to the current directory.
Unpack the tarball and install the JRE.
The JRE files are installed in a directory called jre1.8.0_ version in the current directory.
Delete the .tar.gz file if you want to save disk space.
Installation of the 32-bit JRE on RPM-based Linux Platforms
This procedure installs the Java Runtime Environment (JRE) for 32-bit RPM-based Linux platforms, such as Red Hat and SuSE, using an RPM binary file ( .rpm ) in the system location. You must be root to perform this installation.
These instructions use the following file:
Download the file.
Before the file can be downloaded, you must accept the license agreement.
Become root by running su and entering the super-user password.
Uninstall any earlier installations of the JRE packages.
Install the package.
To upgrade a package:
Exit the root shell.
There is no need to reboot.
Delete the .rpm file if you want to save disk space.
Installation of Public Key on RPM-based Linux Platforms
Since JDK version 8, the JRE RPMs are signed with OL keys. Installation of these RPMs on Linux distributions other than OL gives a warning message indicating that security validation of the package fails. This indicates that the public key used to sign this RPM needs to be installed in the system. A sample warning message and the public key installation steps are as follows:
Sample Warning Message
Installation Steps
Download the key file from https://yum.oracle.com/RPM-GPG-KEY-oracle-ol7 using the following command:
Install the key using the following command:
sudo rpm —import RPM-GPG-KEY-oracle-ol7
Public key installation needs to be done only once. The key installation is persistent across reboots.
General Installation Notes
This topic describes general installation topics.
Root Access
Installing the software automatically creates a directory called jre1.8.0_ version . Note that if you choose to install the Java SE Runtime Environment into system-wide location such as /usr/jre , you must first become root to gain the necessary permissions. If you do not have root access, simply install the Java SE Runtime Environment into your home directory, or a subdirectory that you have permission to write to.
Overwriting Files
If you install the software in a directory that contains a subdirectory named jre 1.8.0_ version , the new software overwrites files of the same name in that jre 1.8.0_ version directory. Rename the old directory if it contains files you want to keep.
System Preferences
By default, the installation script configures the system such that the backing store for system preferences is created inside the JRE’s installation directory. If the JRE is installed on a network-mounted drive, it and the system preferences can be exported for sharing with Java runtime environments on other machines.
Источник
Установка Java (JDK) в Windows и Linux, переменная PATH и JAVA_HOME
Java — язык общего назначения, основанных на классах, поддерживающий многопоточность и являющийся объектно-ориентированным. Программы на Java компилируются в так называемый byte-код, который в свою очередь запускается Виртуальной Машиной Java (Java Virtual Machine — JVM), независимо от архитектуры компьютера. На данный момент последняя версия Java двенадцатая.
Ниже мы рассмотрим — как установить Java на Windows и Linux. Для каждой из платформ создана своя версия JDK, JRE и JVM, хотя сами программы на Java и не меняются от платформы к платформе (что логично).
Давайте проясним несколько вещей перед тем, как мы начнем.
- JDK (Java Development Kit) — эта штука нужна для разработчиков на Java (то есть нас) и включает в себя инструменты разработки, документирования, упаковки и так далее (в том числе компилятор Javac, Javadoc, Jar-упаковщик и дебаггер).
- JRE (Java Runtime Environment) — сюда включены библиотеки Java, которые необходимы для запуска Java-программ. Эта штука нужна обычным пользователям и не содержит инструментов для разработки.
- JVM (Java Virtual Machine) — это и есть сама виртуальная машина Java, которая непосредственно и запускает наши Java-программы (байткод). Ее реализация написана для множества железа и платформ.
Установка Java (JDK) в Windows
Первым делом необходимо скачать JDK с официальной страницы Oracle. В нашем случае нужна версия под Windows, в самом низу.
После установки запустите скачанный exe-файл и установите его на ваш компьютер. Как только вы это сделаете, нужно будет настроить окружение.

Перейдите в Панель управления -> Система и безопасность -> Система. На вкладке «Дополнительно» нажмите на «Переменные среды», как показано ниже:

Теперь нужно найти и дополнить переменную PATH так, чтобы она содержала путь до установленной Java. Выберите PATH и нажмите «Изменить»:

Вы увидите список уже установленных переменных. Сейчас необходимо нажать «Новый» и добавить путь, по которому установлена Java (каталог bin!). По умолчанию это обычно «C:\Program Files(x86)\Java\jdk\bin».

Нажмите «Готово» (или «Ок»), сохраните настройки и на этом всё готово! Чтобы проверить, что установка прошла корректно, откройте консоль и введите:
Если вы получили сведения о версии Java, значит всё хорошо.
Установка Java (JDK) на Linux
В Linux есть несколько способов установить Java. Мы опишем самый простой и быстрый, с использование терминала. И в данном случае мы установим OpenJDK. OpenJDK — это бесплатная и свободная реализация виртуальной машины Java, причем очень популярная.
Откройте терминал и напишите команду для установки пакета:
Осталось подтвердить установку и на этом всё, Java установлена! Единственное, что меняется — это прописывание путей до компилятора.
Чтобы прописать JAVA_HOME в окружение, выполните следующую команду (только убедитесь, что такой каталог уже есть):
Чтобы прописать компилятор Java в PATH, выполните другую команду (опять же, ваши пути до Java могут отличаться от моих):
На этом установка закончена. Чтобы проверить, что всё работает правильно, достаточно написать в терминале:
О том, как же всё-таки писать на Java, мы расскажем в следующий раз.
Источник


