Jump cut відноситься до різкий перехід від однієї сцени до одного, створюючи ефект розриву або прискорення. Є багато дуже прекрасно поміщається стрибок скорочень, відео Gangnam стиль є однією з кращих зразків, яка використовується цей метод багато. Якщо ви хочете, щоб найняти jump cut контролювати свої емоції та сприйнять, таким чином, щоб зробити його кращим способом підходять для цієї конкретної історії, це керівництво є правильним для вас.
Зробити стрибок скорочень в ударів кліпу, використовуйте цей зручний інструмент: Wondershare Filmora (спочатку Wondershare Video Editor). Ця програма дає вам право застосовувати стрибок скорочень ваш розшукуваних відеокліп в клік. Крім того, він дозволяє налаштувати її довжині час і грати тривалість зробити так гладко, як це можливо. Нижче йде крок за кроком керівництво, легким для всіх, щоб отримати роботу, навіть ви не маєте досвід роботи у кіно.
1 Імпортуйте відео
Клацніть Імпортувати до додати ваші відео на цей стрибок вирізати відео-редактор. Ви можете додати декілька файлів одночасно. Крім того, ви можете позбутися від непотрібних файлів з «Очистити все» або «Видалити» кнопка. Коли ви завантажуєте файли в бібліотеки мультимедіа, перетягніть їх на шкалі часу відео.
2 Застосувати jump cut в клік
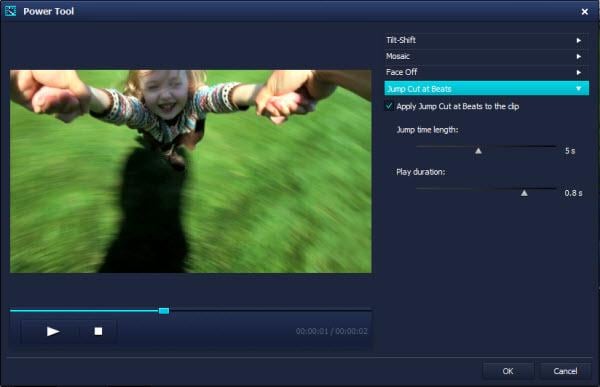
Клацніть правою кнопкою миші відеокліп на шкалі часу та виберіть «Електроінструмент». У вікні, що з’явиться натисніть кнопку «стрибок надрізи ударів» в нижній частині. Потім перевірити «Застосувати стрибок розріз на ударів на кліп».
Грати зараз, ви бачили стрибок? Зверніть увагу на стрибок. І ви можете переміщатися слайд бар «стрибок час довжиною» розділити його трохи більше, або змінити «Грати тривалість» щоб встановити грає тривалість кожної сцени.
Поради:, Перш ніж зробити стрибок вирізати зміни, ви можете розділити ваше відео на невеликий кліпи вперше. Таким чином, ви можете визначити різні порізи стрибок для декілька кліпів, щоб вона краще підходить для цієї історії.
2 Ehance відео зі спецефектами (опціонально)
Після завершення редагування jump cut, може також застосовуватися спеціальні ефекти прийняти ваше відео на наступний рівень. Відкрийте вкладку «Ефект» на панелі інструментів а потім забрати свій улюблений один від 70 + awesome шаблони для застосування.
4 Зберегти ваші творіння
Тепер просто натисніть кнопку «Створити», щоб закінчити роботу. У вікні виводу виберіть формат відео, щоб зберегти на комп’ютері або поділитися ним безпосередньо на YouTube, Facebook тощо.
Скачать бесплатно Ninja Jump — Cut Fruit
Поиск по устройству
Мое устройство
Поиск по категориям
Базы данных
Бизнес & Профессия
Здоровье & Медицина
Игры
Интернет & Коммуникации
Мультимедиа & Графика
Наука & Образование
Программирование & Разработка
Словари & Переводчики
Темы & Обои & Скины
Туризм & Навигация
Управление задачами и временем
Утилиты
Финансы
Хобби & Развлечения
Чтение
Поиск по платформе
Android
Apple iPhone OS
iPad
iPhone
iPod Touch
BlackBerry
Java
Linux
Maemo Nokia Internet Tablet
MeeGO
Sharp Zaurus
Mobile Gaming
Nintendo DS
Playstation 3
Playstation Portable
Wii
Xbox 360
Palm OS
Symbian OS
Series 60
Series 80
Series 90
UIQ
Tablet PC
Windows CE.NET
Windows Mobile Pocket PC
Windows Mobile Smartphone
Дата загрузки: 21 Май 14
Тип распространения: бесплатная
Рейтинг: 2.8/5 (Всего голосов: 4)
Блог режиссера монтажа
Ответы на вопросы
Как научиться монтировать? В какой программе лучше монтировать? Сколько можно зарабатывать монтажом? Как искать заказы? И другие вопросы.
Что почитать про монтаж
Это один из самых популярных вопросов в личку. Поэтому решил составить для вас подборку материалов, которые в своё.
Плюсы и минусы работы на ТВ
До телевидения я работал системным администратором, монтажом увлекался в качестве хобби. В 2015 году по воле случая поменял.
5 способов проверить монтаж
Выключить звук Безусловно, музыка и саунд-дизайн являются мощными инструментами аудиовизуального продукта, но в первую очередь монтаж должен работать.
Влад Якунин. Монтаж — это дебаты, а не кнопки нажимать
Как выработать иммунитет от правок? Как снять кадры под водой без воды? Как красная помада помогла в работе.
Монтажные переходы сериала «Очень странные дела»
Одной из фишек первого и второго сезона «Очень странных дел» были интересные монтажные переходы между сценами. Третий сезон.
Где искать музыку для видео
Как эффективно искать музыку к своему проекту? Где это делать? Сколько это стоит? Какие бывают типы лицензии? Рассказывает.
Режиссерский тритмент и питчинг: советы и лайфхаки
Что такое тритмент? Как его составить, чтобы взять хороший проект? Что говорить на питчинге? Лайфаками и советами делится.
Монтаж проморолика «Конченая»
На таймлайн ко мне попал фильм Terminal. В русском прокате он известен под названием Конченая. Да наши прокатчики.
Монтаж глазами креативного директора
Что такое монтаж. Как не бояться критики. Какие задавать вопросы, чтобы получить ответы. Рассказывает Максим Победин. Максим Победин.
How to Use Jump Cut for Videos — jump cut editing made easy
How to create jump cuts
To place jump cuts in a video, follow these steps:
Open MAGIX Video Pro X and import your video.
Right-click the Mouse Mode button below and select «Split and trim».
Place your mouse over the video in the track. The video preview will display the corresponding position in the video. You can also show the wave form display for the audio track by right-clicking the video. Search your image and audio material for suitable spots to cut out.
Click where you want the jump cut to begin. Hold the mouse button down and drag the mouse to the right to the point where you want the jump cut to end.
Switch back to the standard mouse mode and close the gap created by the cut you made by dragging the object located to the right of the gap to the left until it snaps to the object before it.
Add jump cuts using the professional video production program MAGIX Video Pro X:
Make precise cuts at the frame and sample level
Professional cutting, splitting and trimming tools
Professional editing
Export in the most common and important file formats/burn direct to DVD and Blu-ray/upload direct to online platforms
What are jump cuts?
Jump cuts are a stylistic method used to created a jumping effect in videos. When applied to video material of a person speaking, jumps cuts create the visual impression of sudden and abrupt changes in the posture and facial expressions of the person. At times, the person may even appear to suddenly move from one position to another in the video picture.
Jump cuts go against the traditional editing principle that edits should be as unnoticeable as possible. In fact, they purposefully interrupt the continuity of the movie in a manner which is intentionally visible to the viewer, creating the effect that a piece of the movie (and hence a portion of what is happening) is missing.
In this way, jump cuts are used to accelerate the pacing of the movie. Like time lapses, jump cuts generally accelerate the speed at which an event is shown. Hence, jump cuts make movies appear faster, more streamlined and more dynamic – and sometimes a bit hectic.
How to create jump cuts
Creating your own jump cuts doesn’t take much in terms of equipment or software: All you need is a good video editing program like MAGIX Video Pro X which lets you easily search through your material to find suitable positions to add cuts to. The main difficulty in creating jump cuts is actually identifying the best positions in your material to add cuts to and finding the right timing.
Where should you place cuts, and how often should you place them? This depends heavily on the material you are using, and there’s no one-size-fits-all answer. It takes a certain feeling for what’s essential and what the right dosage is. Add too many cuts, and you’ll end up with a hectic and busy video which most viewers won’t be able to watch for long. Add too few, and the cuts themselves will look like errors. You should always use multiple jump cuts in a single scene to make it clear to the viewer that they are intentional.
To find the right positions to add cuts to, start by looking for parts of your video which appear superfluous. In videos where someone is speaking to an audience or to the camera, these spots can be easily found by looking in the audio track for pauses or parts where the speaker is clearing his or her throat – and then cutting these parts out. But not every scene needs to contain jump cuts. Let your viewers enjoy a bit of continuity too – sometimes less is more.
Below, we show you how to add this kind of motion effect to your video material.
Step 1: Import videos to add jump cuts
Open MAGIX Video Pro X.
Under the «Import» tab in the Media Pool, navigate to the folder which contains your video files.
Place your mouse cursor over a file and click the small Play button in the pop-up window. This will trigger the preview feature. A preview of the video will play in the monitor to the right. You can use this method to easily search for the videos you want to use in your project.
Import all of the videos you want to use into MAGIX Video Pro X by dragging and dropping the videos onto Track 1 one at a time. You can also add sections of a video file by using the Set Range buttons at the bottom of the preview monitor. To import a defined video section (range), click directly on the video picture in the preview monitor and drag and drop in onto the track.
You can also drag and drop videos or video ranges into the project temp folder in the bottom right-hand corner before adding them to a track in your project. The temp folder acts as a sort of clipboard for your projects where you can conveniently compile all of your media for easy access before you starting editing.
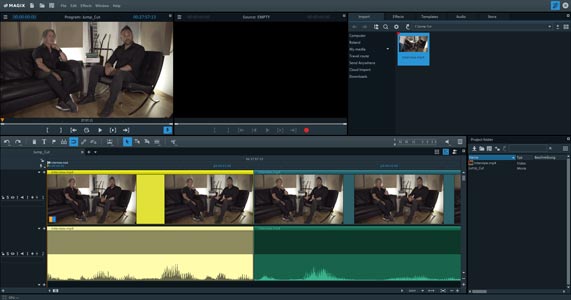
Once you’ve imported your videos, they will appear as objects in the track you added them to. These objects contain both the picture and audio data for the file. It’s often a good idea to have the audio tracks displayed separately to make it easier to use the audio material to navigate through the video for editing.
To show the audio tracks, right-click the video objects and select «Audio functions» > «Create wave form display».
The program will then calculate the wave form for the audio and display it in the lower section of the object.
Orienting yourself in your video material is even easier when the audio and picture are displayed as separate objects on two separate tracks.
Right-click the objects again and select «Audio functions» > «Video/Audio on separate tracks».
Use the zoom buttons (bottom right) to zoom in on both tracks until you can see every detail.
Now that you can see your material well, it’s time to start placing jump cuts.
Step 2: Place jump cuts
Next, you need to cut your material. There are several ways to do this.
1. The standard method
To find suitable positions in the material, play the video. The easiest way to do this is to press the space bar on your keyboard. When you come to a part you want to cut, press the space bar again. Playback will stop, and the playback marker will be located at the current position in the video.
To make a cut at the position of the playback marker, press T.
The object will be cut into two parts.
Zoom in so that you can see the cut in detail.
The easiest way to do this is to press and hold the Ctrl key and scroll with the mouse wheel. The display will zoom at the position of the playback marker.
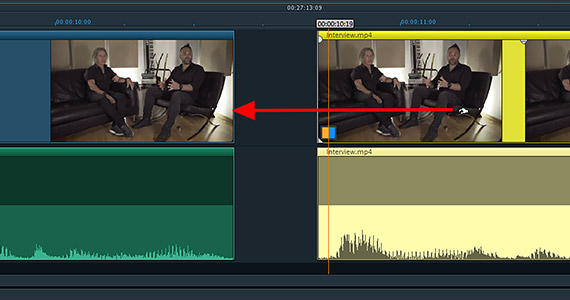
Place your mouse over the position of the cut and move the first video part to the left or the second video part to the right to create a gap.
This will remove video material from the position of the playback marker. Preview the results by playing the video at the position of the cut. You can make the gap as large as you want or you can close it again until you’ve found the right part to remove.
Close the gap on the track by simply dragging the object after the gap to the left until it snaps to the object before it.
Play the current position of the movie to preview the results. You should see a seamless jump cut with a corresponding motion effect in the preview monitor to the left.