- Juniper VPN Instructions (Windows 64-bit)
- Начальная настройка Juniper SRX
- Root Password recover
- Перезагрузка
- Если горит ALARM
- Обновление ОС
- Базовая настройка
- Default Gateway
- Заведение пользователя
- Запрет на root login
- Работа с логами
- Кеширующий DNS Server
- Обновление Junos Software
- Работа с Zones и с Policies
- Проверка Zones
- Проверка Policies
- Restrict Console access
- Source NAT
- Публикование сервера 80 порт
- Проверка NAT
- Ограничение доступа по SSH
- Сохранение Rescue Configuration
- Сохранение конфигурации
- Сохранение конфигурации
- Сохранение конфигурации
- Аварийное восстановление.
- Вопросы
- Определяем на каком интерфейсе находится определенный ip
- What can we help you with?
- Mesa 2 Downloads
Juniper VPN Instructions (Windows 64-bit)
Installation and usage instructions for Juniper Network Connect VPN software on a Windows 64-bit system
If you are using a 64 bit version of the Windows Operating System, you will need to download the Juniper VPN client NCInst64.exe file from the download page.
*Note: Make sure you download the correct version for your computer’s operating system.
Once you have downloaded the Juniper VPN Client file (NCInst64.exe), please follow the instructions below:
1. Once the client has been downloaded, locate the file and double click on the file (NCInst64.exe):

2. As the program extracts, you will see the following window on your screen:
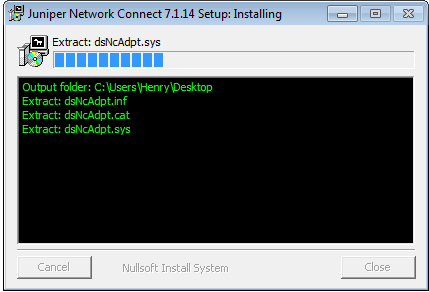
3. Once the extraction is completed, the installation widow will close. The icon named Juniper Network will be saved within your other application.
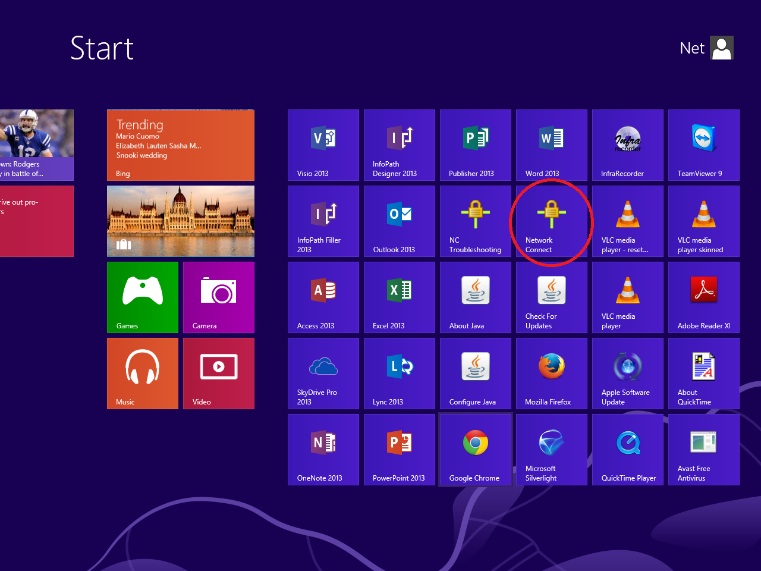
4. It is preferable to pin Network Connect application to the taskbar for quick launching. You will find the application executable file in the folder shown in pictures below:

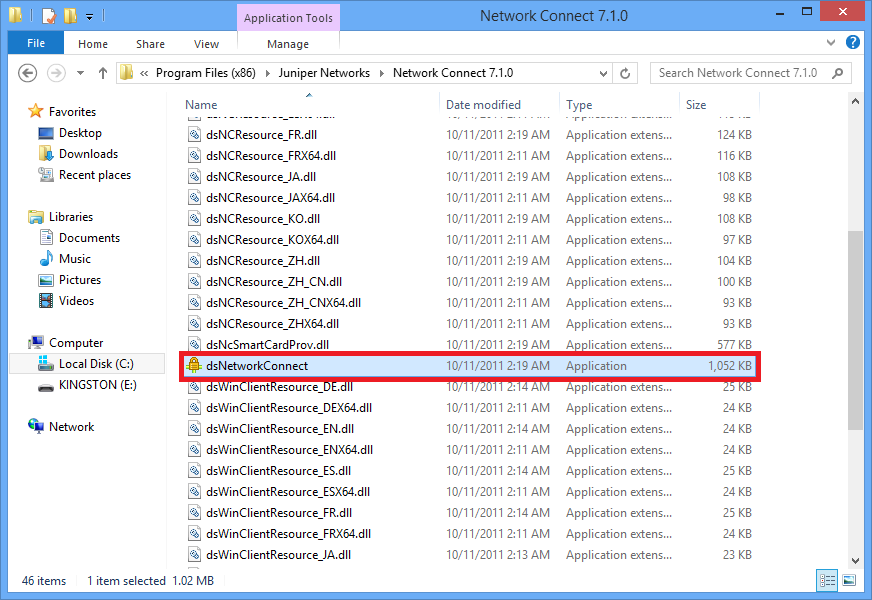
5. Once you have located the Juniper VPN Client application file, just drag and drop it into taskbar. The result should look like the picture below:
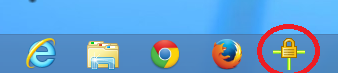
6. Locate the icon called Juniper VPN Client Network Connect from your taskbar and click on it to launch the VPN client.
7. You will see a screen called Network Connect — Sign In.
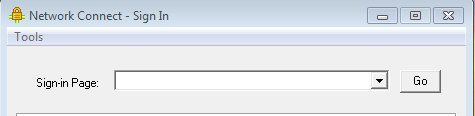
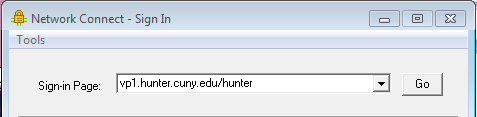
8. You will need to enter the Sign-in Page URL. Please type in vp1.hunter.cuny.edu/hunter in the Sign-in Page: field and click on the Go button. See the screen below:
9. You will then need to enter your Hunter NetID (Username) and Password (Password) assigned to you.
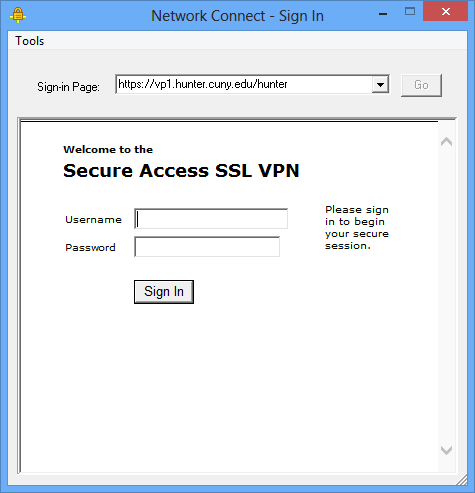
10. Once you enter you credentials, click the Sign In button. The following screen will appear. Click the Continue the session button.

11. Next, click on the Yes or Always button (if you want to aviod the this step in the future).

12. When the downloading and installation is completed, you will be connected and your session starts. To check your session click on the Network Connect icon in taskbar.
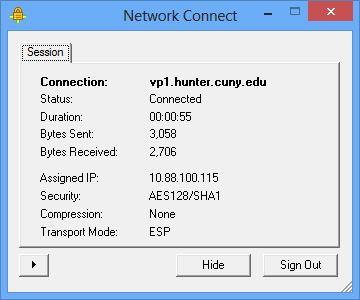
13. To end your VPN session, click again on Network Connect icon on taskbar. When the window opens, click on Sign Out button and you will then sign out to end your VPN session.
Начальная настройка Juniper SRX
Консоль можно подключить как через COM-порт, так и через mini-USB, используя драйвера:
juniper_windows_7_10_64bit.zip
juniper_windows_xp_7_32bit.zip
- Если нажать кнопку Reset config и сразу же её отпустить, то будет загружена rescue configuration
- Если нажать кнопку Reset config и удерживать её в течение 15 секунд, то будет загружена factory-default settings
После этого система будет перезагружена и можно будет зайти под root и пустым паролем.
Root Password recover
Это может пригодиться в случае если забыли пароль рута.
- Подключаемся консолью и ребутаем девайс по питанию
- В процессе загрузки, когда появятся «крутилки» жмем несколько раз на пробел
- Загружаемся в single-user mode
- Когда спросят вводим recovery
- Устанавливаем рутовый пароль:
- Делаем Exit и система попросится ребутнуться.
Перезагрузка
Если горит ALARM
Причину alarm можно посмотреть через команду:
Часто висит ошибка:
Major Host 0 fxp0 : Ethernet Link Down
Ошибка о том, что management interface в дауне.
Она лечится через:
Обновление ОС
Базовая настройка
set system host-name jun100
set system time-zone GMT-3
Default Gateway
set routing-options static route 0.0.0.0/0 next-hop 46.28.95.129
Заведение пользователя
Заведём пользователя с правами администратора.
После последней команды система запросит пароль.
Запрет на root login
Поскольку теперь у нас уже есть пользователь админ, лучше отключить root, т.к. возможен подбор пароля из-вне.
set system ntp boot-server 0.ru.pool.ntp.org
set system ntp server 79.111.152.13
set system ntp server 213.141.154.170
set system ntp server 37.139.41.250
set system ntp server 185.22.60.71
Проверка:
show ntp associations
show ntp status
show system uptime
show log messages | match ntp
snmp <
description JUN100;
location Moscow;
contact Vladimir;
community public <
authorization read-write;
clients <
192.168.2.49/32;
192.168.0.0/16;
>
>
>
Здесь Public = Comunity.
SNMP должно подхватываться через PRTG, SNMP Traffic.
Рассмотрим случай, когда на интерфейсах VLAN у нас будут висеть адреса:
vlan.100 up down inet 10.0.100.1/24
vlan.200 up up inet 10.0.200.1/24
Тогда настройки DHCP для обоих VLAN будут:
Проверка
user@host# set system services dhcp traceoptions file dhcp.dbg
user@host# set system services dhcp traceoptions flag all
Работа с логами
Кеширующий DNS Server
Здесь vlan.0 и vlan.100 — интерфейсы, с которых он принимает запросы.
gw-jsrx240.HOME.local inet 172.16.1.1 — статическая запись.
Проверка:
show system services dns-proxy statistics
show system services dns-proxy cache
clear system services dns-proxy cache
Обновление Junos Software
- Проверяем текущую версию Junos Software
Наш файл обновления имеет вид:
junos-srxsme-12.3X48-D60.2-domestic.tgz
Сохраним текущую конфигурацию:
Проверяем свободное место на Flash и удаляем лишнее:
Check current Flash size:
Проверяем папку tmp и удаляем всё лишнее:
Установка без копирования по FTP:
Для SRX100b подошла только версия: junos-srxsme-12.1X46-D72.2-domestic.tgz
Во время копирования на экране не видно что что-то происходит, проверить это можно через:
monitor traffic interface vlan.0 | match 254.35
Либо установка с копированием по FTP ( не прошла, не хватало места)
Прошло на SRX345 с SCP:
file copy scp://vs@10.253.10.50/junos-srxsme-15.1X49-D130.6-domestic.tgz /var/tmp/junos-srxsme-15.1X49-D130.6-domestic.tgz
file list /var/tmp/
request system software add no-copy /var/tmp/junos-srxsme-15.1X49-D130.6-domestic.tgz
Работа с Zones и с Policies
Каждый интерфейс должен принадлежать зоне.
В одной зоне может находиться более одного интерфейса и значит более одной подсети.
По умолчанию трафик между зонами запрещен и может разрешаться между парами зон.
Если в зоне находятся более одного интерфейса, трафик между ними также необходимо разрешить.
Проверка Zones
С точки зрения зон важно какие интерфейсы прикручены к зонам.
Это нам позволит определить между какими зона ходит наш трафик.
Проверка Policies
Вообще следует настроить дефолтную глобальную политику, запрещающую весь трафик и пишущую логи.
Такая политика срабатывает лишь в случае если ни одно из правил основных политик не сработало.
Далее мы включаем логи:
И можем мониторить или просматривать что получилось:
show log default-log-messages
monitor start default-log-messages
После этого можно посмотреть что творится на данной паре зон:
show security policies from-zone zone-200 to-zone trust
show security flow session
Restrict Console access
самое простое — просто разрешить SSH:
Но в этом случае любой желающий может подключиться к SSH и подбирать пароль.
Тогда можно сделать следующее:
Здесь, в конце добавлено запрещающее правило, иначе всё разрешается.
Интересно, что в этом случае не срабатывает общее запрещающее правило типа:
Source NAT
Публикование сервера 80 порт
Проверка NAT
Show
Дополнительно
В случае, если NAT не работает для данной подсети, правила трансляции будут пусты:
В случае, если NAT не работает для данной подсети, flow session покажет сессии без трансляций. Т.е. ответ снаружи ожидается на адрес источника.
Если NAT нормально работает, ответ от внешних хостов будет адресован на внешний адрес нашего роутера:
Ограничение доступа по SSH
Суть подобного ограничения — поставить его на интерфейс lo0.
Проверка:
clear firewall log
show firewall log
Мы увидим блокированные попытки доступа:
Сохранение Rescue Configuration
Поскольку мы получили рабочий и несложный конфиг, его можно сохранить как Rescue Configuration.
Rescue Configuration — это конфигурация, к которой мы можем вернуться в любое время, это избавляет от необходимости помнить порядковый номер для rollback command.
Сохранение Rescue Configuration
Восстановление до Rescue Configuration
либо нажать кнопку Reset config и сразу же её отпустить, то будет загружена rescue configuration.
Если изначально у нас все индикаторы были зелёными: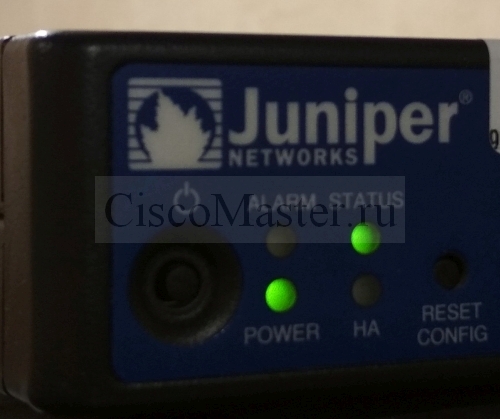
Сразу после нажатия Status станет оранжевым, и начнется применение Rescue Configuration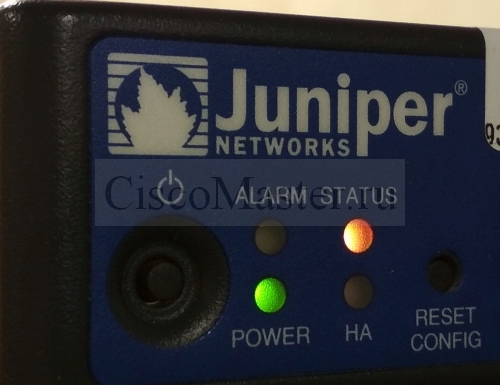
После успешного применения Status опять станет зелёным.
Сохранение конфигурации
Проще всего это сделать через WinSCP
— current and previous 0 to 3 configurations: В папке /config. Тут текущий конфиг будет файл juniper.conf.gz
— 4 to 49 configurations: В папке /var/db/config
Данный файл(ы) можно забрать через WinSCP
Сохранение конфигурации
Проще всего это сделать через WinSCP
— current and previous 0 to 3 configurations: В папке /config. Тут текущий конфиг будет файл juniper.conf.gz
— 4 to 49 configurations: В папке /var/db/config
Сохранение конфигурации
Проще всего это сделать через WinSCP
— current and previous 0 to 3 configurations: В папке /config. Тут текущий конфиг будет файл juniper.conf.gz
— 4 to 49 configurations: В папке /var/db/config
Данный файл(ы) можно забрать через WinSCP
Аварийное восстановление.
Тестировалось на Juniper SRX 345.
Предположим мы полностью потеряли конфигурацию, но у нас есть сохранённый фал конфигурации.
Для аварийного восстановления мы будем использовать ноутбук, куда мы скопируем сохранённый фал конфигурации.
Установим на ноут SCP Server от Solarwinds:
http://ciscomaster.ru/content/juniper-i-server-scp
Помещаем сохранённый фал конфигурации в папку c:\\SFTP_Root
Подключаем ноутбук к management port fxp0.
Даём конфиг на fxp0
На ноут вешаем 192.168.1.2/24
Запускаем SCP Server.
Вопросы
— Для NAT нет трейса
— Почему то не отрабатывает (не видит трафика) monitor traffic interface vlan.100
Определяем на каком интерфейсе находится определенный ip
What can we help you with?
Mesa 2 Downloads
Internal GNSS receiver configuration tool
The Geode Connect 1.2.2 (which replaces 1.2.1) for full Windows utility can be used to connect the Geode, or can be used to apply better optimized settings to the integrated uBlox GNSS receiver in the Mesa 2. Save and then run the below file on your full Microsoft Windows computer such as Mesa 2. This requires the Microsoft .NET Framework 4.5 be installed first (if not already). See the release notes document for further information on this version.
Version 1.2.2 is now compatible with the latest u-Blox drivers. For instructions on how to configure the internal GNSS receiver for pedestrian tracking instead of the previous defaults for vehicle navigation, see the full article. See the release notes document for further information.
Mesa 2 Windows cumulative patch update 20330
Along with running Windows Update from Microsoft, we recommend also installing our latest custom improvements for the Windows 10 Pro 64-bit operating system on the Mesa 2. This can be installed on all partner brands of the Mesa 2 platform as well. For more details, see the full article.
UHF RFID firmware update for Mesa 3 and Mesa 2
A new firmware update is available for both the optional JADAK ThingMagic M6e Nano as well as extended range M6e Micro (with ATA license support) UHF RFID modules in specific Mesa 3 and Mesa 2 units. For details, see the full article.
Internal GNSS driver options for Mesa 3 and Mesa 2 with Windows
The GNSS Driver Options utility for the Mesa 3 and Mesa 2 with Windows can help with making the integrating u-Blox NEO M8 series GNSS receiver work with specific software applications, or resolve other potential issues. To download and for more information, please view the full article.
Barcode Connector and drivers for Mesa 3 and Mesa 2 with Windows
Drivers and connector (wedge) software are available for the integrated barcode scanner on the Mesa 3 and Mesa 2 with Windows. To download the files and for more information, please view the full article.
Custom firmware updates for Mesa 2 Windows
Custom firmware (UEFI and ULPMC) updates are available for the Mesa 2. For details, please view the full article.
Intel HD Graphics driver update for Atom Z3700 processor
The latest graphics drivers should install automatically through the default Windows Update service on the Mesa 2.
If needing to install manually, the latest Intel HD Graphics driver update for Atom Z3700 processor are available to download from the following web page.
RS-232 expansion control panel for Mesa 3 and Mesa 2 with Windows
The RS-232 utility is for configuration of the optional integrated serial port on the back of some Mesa 3 and Mesa 2 units. To download and for more information, please view the full article.
RFID Connector utility for Mesa 3 and Mesa 2
The RFID Connector utility for Windows allows you to wedge RFID scan data as text into any app running on the Mesa 3 or Mesa 2 with Windows. This utility supports all integrated RFID options such as the Jadak (formerly ThingMagic) Nano or Micro modules. To download and for information, please view the full article.
Microsoft Windows 10 Pro operating system updates
Updates for the full Microsoft Windows 10 Pro operating system on the Mesa 2 are installed automatically by default, as can be viewed under Start > Settings > Update & Security > Windows Update > Advanced options. Our manufacturing team and certified repair centers also incorporate cumulative updates from Microsoft every 90 days on new units and system boards. See our Support News web page for further information. For units in the field, along with running Windows Update, the latest custom updates from Juniper can be installed using the separate cumulative patch update installer.
Language and regional settings of the operating system can be downloaded and applied under Start > Settings > Time & Language > Region & language menu.
M2 Dock Ethernet driver update
An Ethernet (LAN) driver update is available to install on the Mesa 2 for use with the M2 Dock accessory. This update is available at the following web page.
Cell Modem driver update for Mesa 2
WARNING: If using Verizon Wireless, you must insert the SIM card and activate before updating the driver. Otherwise you will need to downgrade the driver to activate. For more info, see the full article.
To update the driver, download and extract the file below, and then tap and hold on the extracted «install_cell.bat» file to «Run as administrator» on your Mesa 2 unit for updating the driver of the built-in 4G LTE cellular modem. Both extracted files must be located in the same folder before running the file.
For further information, see the full article.
Mesa 2 Android OS update 18061
Click on the file below to download update 18061 of the Android 5.1.1 AOSP operating system for specific Mesa 2 units. This update can only be installed on units which already have Android. This update mainly fixes an intermittent issue with camera initialization on first boot. For further details on changes in the update, please see the release notes document.
Installing this update can be fairly technical. For full instructions, please view the full article.
TeamViewer remote control
Wifi 802.11 and Bluetooth driver update for Mesa 2
The latest version 5.93.102.22 drivers for the Broadcom BCM4324 Wireless LAN (Wifi) and Bluetooth module in the Mesa 2 are available to install automatically through Windows Update.
If wanting to manually re-install the previous 5.93.102.19 driver on the Mesa 2 (and then update again if desired), tap on the file link below to download and run the installer. It has been reported that this updated version has improved tethering to some mobile hotspots.
If needing the actual raw driver files, click on the ZIP archive below.
Microsoft Office or Office Mobile apps for Mesa 2
You can subscribe to or purchase the full Microsoft Office for use on the Mesa 2. This is available from the following website.
If your Mesa 2 is for personal use, the Microsoft Office Mobile apps such as Word, Excel, PowerPoint, and OneNote can be installed for free from the built-in Windows Store.
System security software
For information regarding what system security features and software (such as virus scan and firewall) are provided on or are compatible with the Mesa 2, please review the following web page.
Developer and test tools
Developer and test tools such as for the integrated GNSS receiver, barcode scanner, and RFID reader are provided starting at the following web page.


