- Сброс тестового периода Phpstorm на Linux и Windows
- Как сбросить тестовый период Phpstorm на Linux Ubuntu и Windows-10 и восстановить проекты и подключения
- Сброс на Linux Ubuntu
- Версии для проверки
- Сброс тестового периода
- Восстановление проектов и подключений
- Сброс на Windows-10
- Версии для проверки
- Сброс тестового периода
- Восстановление проектов и подключений
- Выводы:
- RootHat
- IT Новости
- How to activation PHPStorm 2017 — 2018 License Server
- Install PhpStorm
- System requirements
- Install using the Toolbox App
- Install the Toolbox App
- Install the Toolbox App
- Install the Toolbox App
- Standalone installation
- Silent installation on Windows
- Silent configuration file
- Install as a snap package on Linux
- PHPStorm 2019.1 License server key + 2016.2 — 2017.3
- Активация PHPStorm 2016.2 — 2017.3 при помощи Интернета
- Еще вариант активации шторма
Сброс тестового периода Phpstorm на Linux и Windows
Как сбросить тестовый период Phpstorm на Linux Ubuntu и Windows-10 и восстановить проекты и подключения

Сброс на Linux Ubuntu
Версии для проверки
- PhpStorm 2019.2.2 Build#PS-192.6603.42, built on September 12, 2019
- Linux w651 3.13.0-32-generic #57-Ubuntu SMP
Сброс тестового периода
Сбросить тестовый период можно из консоли, выполнив следующие команды:
/.PhpStorm[version]
rm config/eval/PhpStorm[version].evaluation.key
rm config/options
cd
/.java/.userPrefs/jetbrains
rm -rf phpstorm
Для перехода к директории .PhpStorm[version] наберите в консоле cd
Это решение скопировано с интернет и оно работает. Таким образом тестовый период 30 дней будет сброшен и можно начать новый.
Для перемещения файлов лучше воспользоваться файл-менеджером Dolphin или каким-либо другим. Если вы собираетесь восстановить рабочее пространство, сохраните файлы из config/options отдельно для последующего использования
Восстановление проектов и подключений
Списки проектов и подключений находятся в двух файлах webServers.xml и recentProjectDirectories.xml
Файл recentProjectDirectories.xml имеет примерно следующий вид:
Для каждого, описанного в файле проекта, существуют свои projectOpenTimestamp и buildTimestamp которые необходимо заменить на актуальные. Например, после сброса тестового периода, создайте новый пустой проект и скопируйте актуальные значения параметров из нового файла
После этого осталось только переместить обратно в config/options/ старый webServers.xml и обновленный recentProjectDirectories.xml. Восстановить цветовую схему и другие опци можно используя другие файлы каталога config/options/
Сброс на Windows-10
Версии для проверки
- PhpStorm 2020.1
- Windows-10 Pro Сборка 19041
Сброс тестового периода
На Windows, после истечения пробного периода, phpStorm показывает надоедливое окно с предупреждением, что время работы с программой ограничено 30 мин. Чтобы сбросить тестовый период необходимо выполнить следующие действия:
Откройте редактор реестра и удалите ветку
Перейдите в папку Пользователи системы (CurrentUser — ваше имя пользователя). Удалите папку
Скопируйте файлы отдельно из
После этих действий тестовый период будет сброшен и можно начать новый.
Восстановление проектов и подключений
PhpStorm хранит списки проектов в файле recentProjects.xml
Как и на Linux, вам необходимо обновить параметры projectOpenTimestamp и buildTimestamp для каждого проекта, описанного в файле
Теперь осталость только заменить новый recentProjects.xml на обновленный.
Выводы:
Php Storm хорошая среда для разработки, конечно она стоит своих денег, потому что бестплатный netBeans настроить на работу по sftp так и не удалось. Но на сброс тестового периода уйдет всего минут пять.
Источник
RootHat
IT Новости
How to activation PHPStorm 2017 — 2018 License Server
В интернете достаточно много инструкций как активировать продукты от JetBrains, в том числе и PHPStorm. Но большая часть статей уже устаревшая, и указанные сервера для активации продуктов уже не доступны. Здесь я буду дополнять и постоянно обновлять сервера, для активации приложения PHPStorm.
Способ достаточно простой, и безопасный. Для параноиков так же имеется, версия для локальной активации PHPStorm.

Активация PHPStorm 2017.3 and 2018 с помощью интернет серверов:
- http://66.42.52.162:8000
- http://www.activejetbrains.gq/ (2018.1.x)
- http://nodde.ru:1027
- http://80.211.190.88:1027
- http://jetbrains.tools
- https://idea.qmanga.com/
- http://jetbrains.license.laucyun.com/
- http://144.202.4.96 (PhpStorm 2018.1.3)
- http://80.211.190.88:1027
Локальная активация(без доступа к интернету):
- Загрузите себе на компьютер файл LocalServer.zip (Пароль на архив : 1234)
- Распаковать архив, и запустить файл который подходит по названию к вашей операционной системе.

- Запускаем ReSharper и на вкладке License server добавляем наш локальный адрес для активации http://127.0.0.1:1017/
- Нажимаем ОК.

Источник
Install PhpStorm
PhpStorm is a cross-platform IDE that provides consistent experience on the Windows, macOS, and Linux operating systems.
System requirements
| Requirement | Minimum | Recommended |
|---|---|---|
| RAM | 2 GB of free RAM | 8 GB of total system RAM |
| CPU | Any modern CPU | Multi-core CPU. PhpStorm supports multithreading for different operations and processes making it faster the more CPU cores it can use. |
| Disk space | 2.5 GB and another 1 GB for caches | SSD drive with at least 5 GB of free space |
| Monitor resolution | 1024×768 | 1920×1080 |
| Operating system | Latest 64-bit version of Windows, macOS, or Linux (for example, Debian, Ubuntu, or RHEL) |
You do not need to install Java to run PhpStorm because JetBrains Runtime is bundled with the IDE (based on JRE 11).
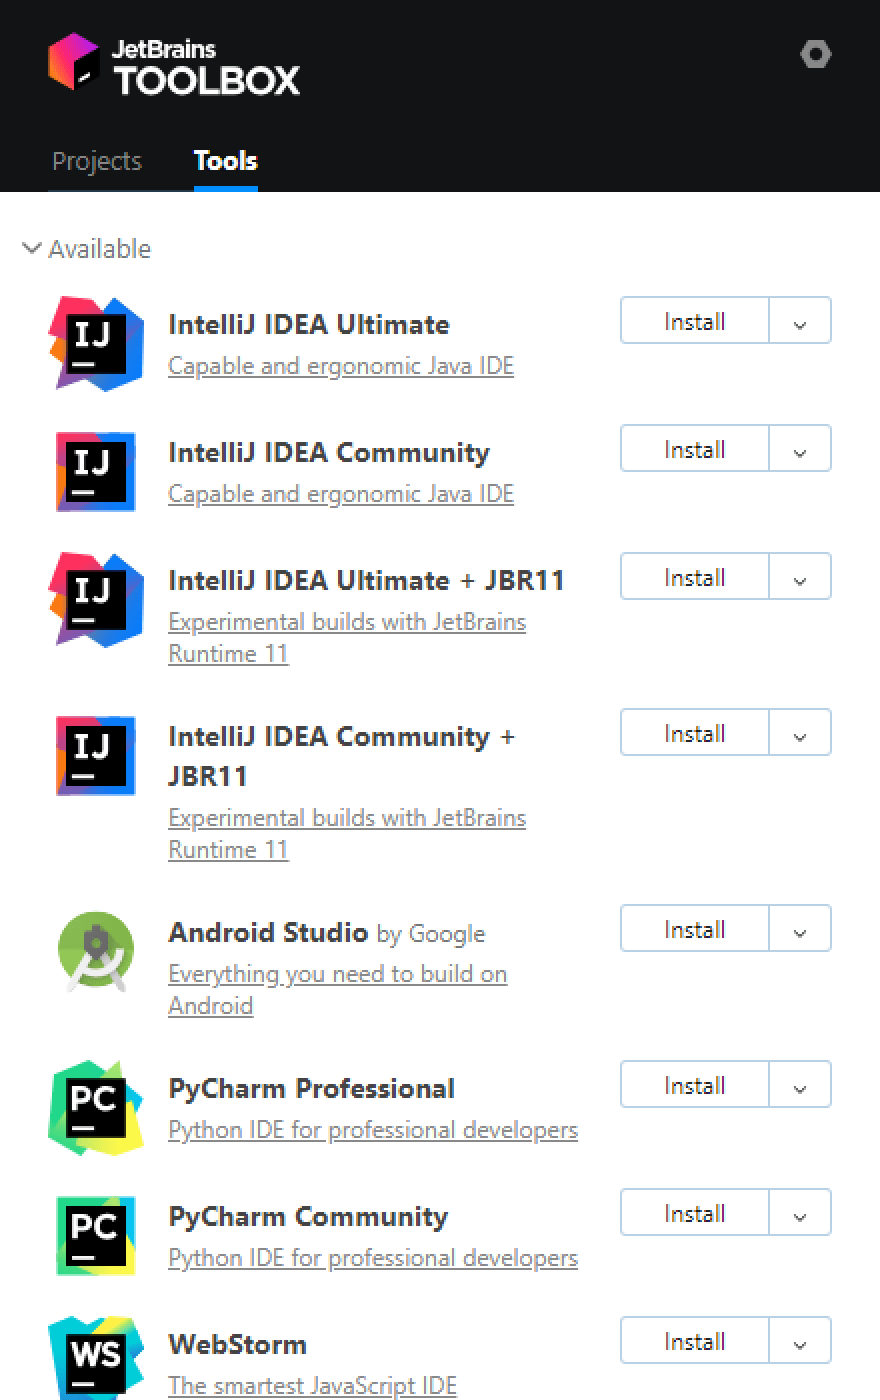
Install using the Toolbox App
The JetBrains Toolbox App is the recommended tool to install JetBrains products. Use it to install and manage different products or several versions of the same product, including Early Access Program (EAP) and Nightly releases, update and roll back when necessary, and easily remove any tool. The Toolbox App maintains a list of all your projects to quickly open any project in the right IDE and version.
Install the Toolbox App
Download the installer .exe from the Toolbox App web page.
Run the installer and follow the wizard steps.
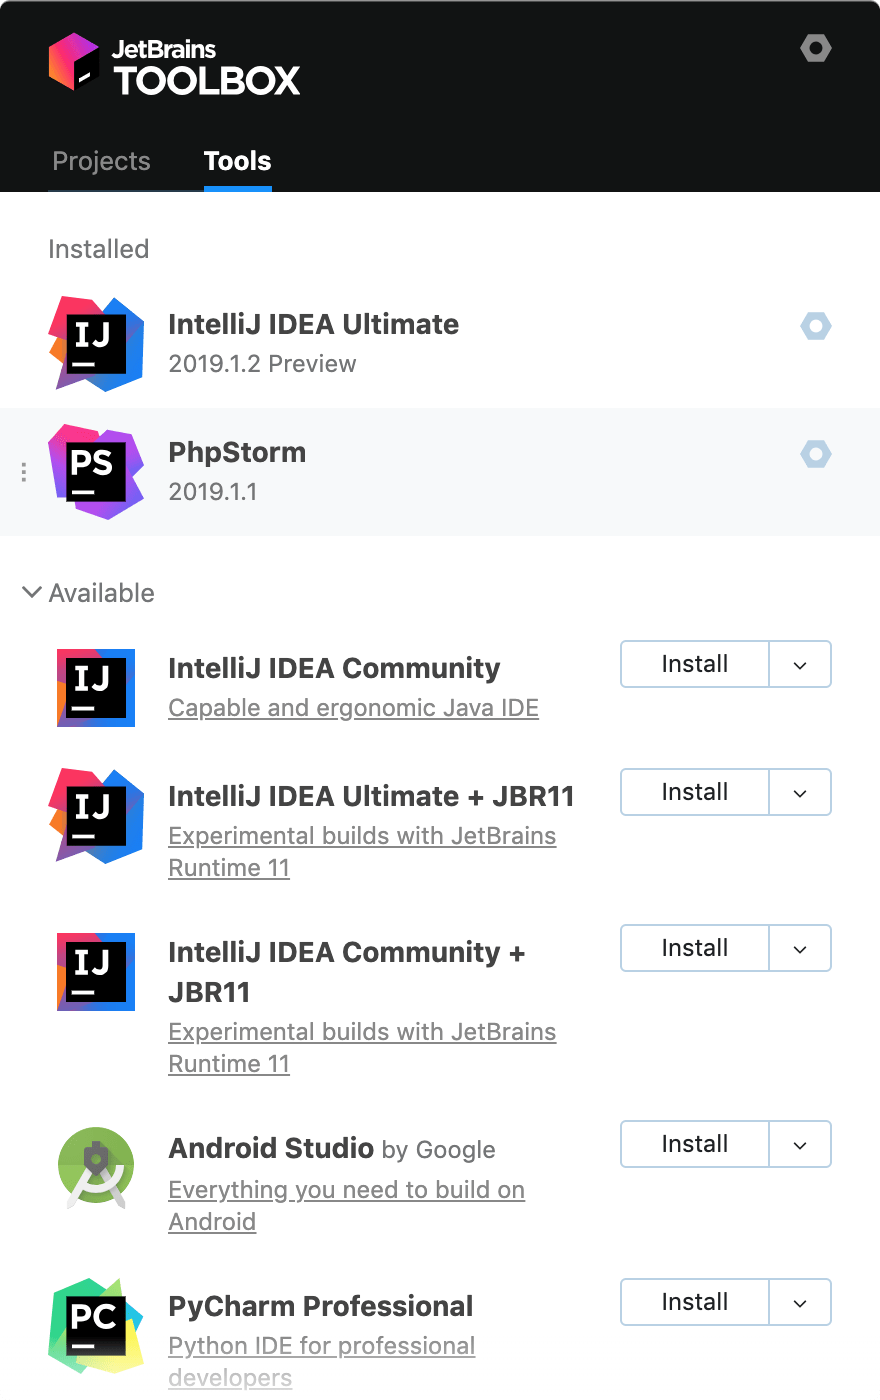
After you run the Toolbox App, click its icon in the notification area and select which product and version you want to install.
Log in to your JetBrains Account from the Toolbox App and it will automatically activate the available licenses for any IDE that you install.
Install the Toolbox App
Download the disk image .dmg from the Toolbox App web page.
There are separate disk images for Intel and Apple Silicon processors.
Mount the image and drag the JetBrains Toolbox app to the Applications folder.
After you run the Toolbox App, click its icon in the main menu and select which product and version you want to install.
Log in to your JetBrains Account from the Toolbox App and it will automatically activate the available licenses for any IDE that you install.
Install the Toolbox App
Download the tarball .tar.gz from the Toolbox App web page.
Extract the tarball to a directory that supports file execution.
For example, if the downloaded version is 1.17.7391, you can extract it to the recommended /opt directory using the following command:
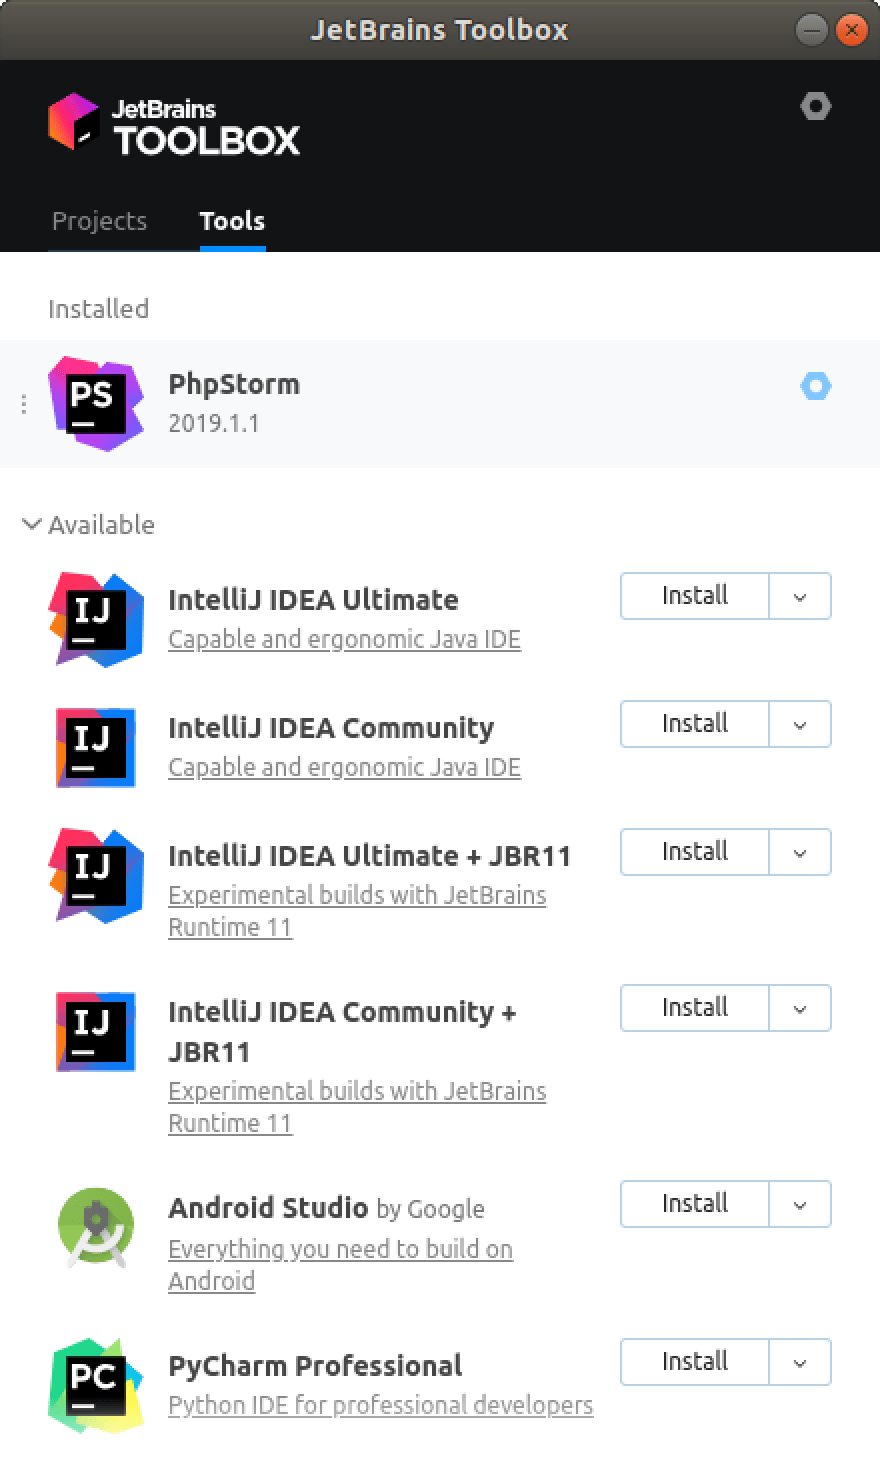
Execute the jetbrains-toolbox binary from the extracted directory to run the Toolbox App and select which product and version you want to install. After you run the Toolbox App for the first time, it will automatically add the Toolbox App icon to the main menu.
Log in to your JetBrains Account from the Toolbox App and it will automatically activate the available licenses for any IDE that you install.
You can use this shell script that automatically downloads the tarball with the latest version of the Toolbox App, extracts it to the recommended /opt directory, and creates a symbolic link in the /usr/local/bin directory.
Standalone installation
Install PhpStorm manually to manage the location of every instance and all the configuration files. For example, if you have a policy that requires specific install locations.
Run the installer and follow the wizard steps.
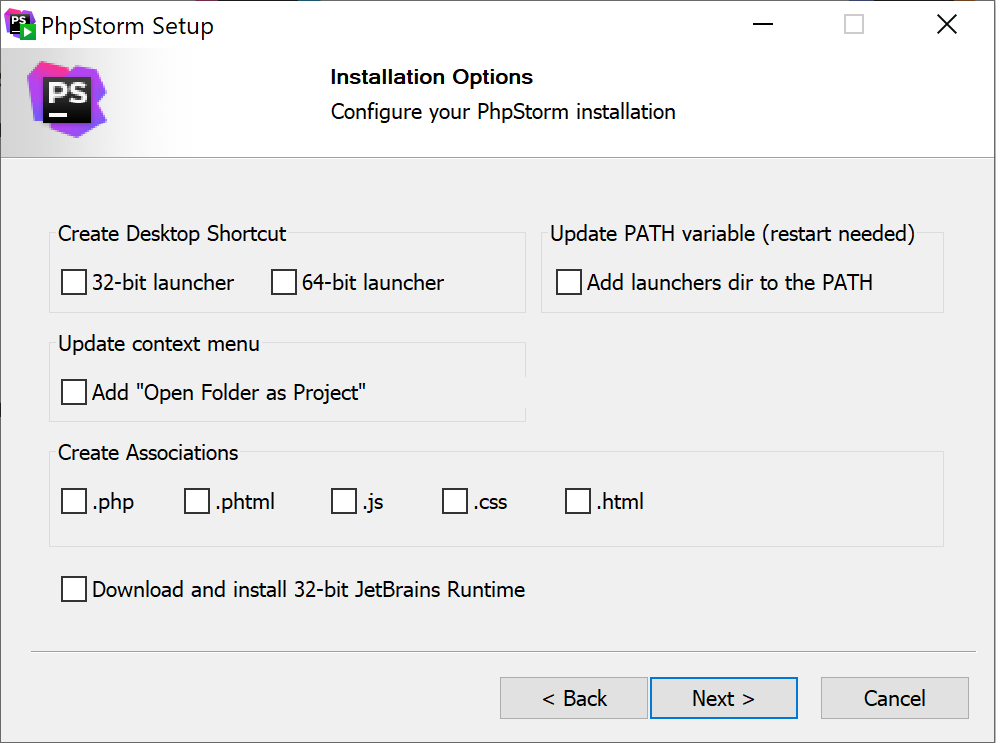
On the Installation Options step, you can configure the following:
Create a desktop shortcut for launching PhpStorm.
Add the directory with PhpStorm command-line launchers to the PATH environment variable to be able to run them from any working directory in the Command Prompt.
Add the Open Folder as Project action to the system context menu (when you right-click a folder).
Associate specific file extensions with PhpStorm to open them with a double-click.
To run PhpStorm, find it in the Windows Start menu or use the desktop shortcut. You can also run the launcher batch script or executable in the installation directory under bin .
There are separate disk images for Intel and Apple Silicon processors.
Mount the image and drag the PhpStorm app to the Applications folder.
Run the PhpStorm app from the Applications directory, Launchpad, or Spotlight.
Extract the tarball to a directory that supports file execution.
For example, to extract it to the recommended /opt directory, run the following command:
Do not extract the tarball over an existing installation to avoid conflicts. Always extract it to a clean directory.
Execute the PhpStorm.sh script from the extracted directory to run PhpStorm.
To create a desktop entry, do one of the following:
On the Welcome screen, click Configure | Create Desktop Entry
From the main menu, click Tools | Create Desktop Entry
When you run PhpStorm for the first time, some steps are required to complete the installation, customize your instance, and start working with the IDE.
For information about the location of the default IDE directories with user-specific files, see Directories used by the IDE.
Silent installation on Windows
Silent installation is performed without any user interface. It can be used by network administrators to install PhpStorm on a number of machines and avoid interrupting other users.
To perform silent install, run the installer with the following switches:
/S : Enable silent install
/CONFIG : Specify the path to the silent configuration file
/D : Specify the path to the installation directory
This parameter must be the last in the command line and it should not contain any quotes even if the path contains blank spaces.
To check for issues during the installation process, add the /LOG switch with the log file path and name between the /S and /D parameters. The installer will generate the specified log file. For example:
Silent configuration file
You can download the default silent configuration file for PhpStorm at https://download.jetbrains.com/webide/silent.config
The silent configuration file defines the options for installing PhpStorm. With the default options, silent installation is performed only for the current user: mode=user . If you want to install PhpStorm for all users, change the value of the installation mode option to mode=admin and run the installer as an administrator.
The default silent configuration file is unique for each JetBrains product. You can modify it to enable or disable various installation options as necessary.
It is possible to perform silent installation without the configuration file. In this case, omit the /CONFIG switch and run the installer as an administrator. Without the silent configuration file, the installer will ignore all additional options: it will not create desktop shortcuts, add associations, or update the PATH variable. However, it will still create a shortcut in the Start menu under JetBrains .
Install as a snap package on Linux
You can install PhpStorm as a self-contained snap package. Since snaps update automatically, your PhpStorm installation will always be up to date.
To use snaps, install and run the snapd service as described in the installation guide.
On Ubuntu 16.04 LTS and later, this service is pre-installed.
PhpStorm is distributed via two channels:
The stable channel includes only stable versions. To install the latest stable release of PhpStorm, run the following command:
The —classic option is required because the PhpStorm snap requires full access to the system, like a traditionally packaged application.
The edge channel includes EAP builds. To install the latest EAP build of PhpStorm, run the following command:
When the snap is installed, you can launch it by running the phpstorm command.
To list all installed snaps, you can run sudo snap list . For information about other snap commands, see the Snapcraft documentation.
Источник
PHPStorm 2019.1 License server key + 2016.2 — 2017.3

Для тех кто ищет безопасный способ активировать PHPStorm 2016.2 — 2017.3 нужно прописать сервер активации. И все произойдет в автоматическом режиме. В данный момент выкладываю список серверов, которые работают в настоящее время. Если какой-то сервак перестал работать — пишите в каментах.
Активация PHPStorm 2016.2 — 2017.3 при помощи Интернета
- http://roothat.ru:1017
- http://jetbrains.tencent.click
- http://idea.imsxm.com/
Еще вариант активации шторма
Делаем следующие действия:
- Открываем PHPStorm
- Заходим Help — Registrer…
- В окне выбираем Activation code
- Вставляем код и нажимаем ОК
- Готово
Апдейт от 04 августа 2019 г.
Активация PHPStorm 2017.3 и 2018.1.5 онлайн:
1) Загрузите себе на компьютер файл LocalServer.zip (залил на депозитфайлс, на вирусы проверил касперским)
2) Распаковать архив, и запустить файл который подходит по названию к вашей операционной системе.
3) Запускаем ReSharper и на вкладке License server добавляем наш локальный адрес для активации http://127.0.0.1:1017/
Нажимаем ОК.
И еще вот что нашел на гитхабе для License key PhpStorm 8:
User Name : EMBRACE
===== LICENSE BEGIN =====
43136-12042010
00002UsvSON704l»dILe1PVx3y4″B3
49AU6oSDJrsjE8nMOQh»8HTDJHIUUh
gd1BebYc5U»6OxDbVsALB4Eb10PW8″
===== LICENSE END =====
User Name : TorReviver
===== LICENSE BEGIN =====
09574-12042010
00000N7tVkjChpCjDvLjvELNOsgIeH
1POKglQCIddVHUwb6RDtMpzpzeXi0Z
RGN7yqI340MhKOu1odUVLb40g5HUF4
===== LICENSE END =====
User Name : Learn Programming
===== LICENSE BEGIN =====
63758-12042010
00000Ryqh0NCC73lpRm!XVcxFChJ2g
TUR2lZtlLXrPLbQ66Gs8MHs51RvF2y
agoDlzne08Zm8VXbts1UMKE!EW4v8G
===== LICENSE END =====
Код действует до конца 2018 года! Юзайте убунту!
Источник


