- Как настроить tiny core linux
- 1. Start the installation
- 2. Browse to the install files
- 3. Formatting
- 4. Bootcodes
- 5. CorePlus installation options
- 6. Tiny Core installation options
- 7. Install
- 8. Testing
- Как настроить tiny core linux
- 1. Obtaining cfdisk and GRUB via Appbrowser
- 2. Open a root shell
- 3. Partitioning
- 4. Formatting
- 5. Copy over TC system files and prepare for PPR mode.
- 6. Installing GRUB
- 7. Testing
- Официальные инструкции
- Темы 9
- 1 Загрузочные коды (boot codes)
- 2 Установка средств разработки и сборка собственных пакетов
- 3 Запуск WiFi
- 4 Русификация: установка шрифтов и переключение языка ввода
- 5 установка core-current
- 6 Установка программ / Использование App Browser
- 7 Официальный FAQ
- 8 Пароли в Tiny Core
- 9 Бережная установка Tiny Core Linux
- Темы 9
- Вводный курс
- Сообщений 1
- 1 Тема от monstr 2011-09-25 21:11:02
- Тема: Вводный курс
Как настроить tiny core linux
The first step before you install any operating system such as Tiny Core is to back up everything on your computer before starting.
Before making the commitment to perform a frugal install you should consider our Quick and Easy Overview. It covers the basics of running Tiny Core from CDROM and/or USB pendrive. Most will find learning Tiny Core the quick and easy way a better starting point.
But for those who are ready to take the plunge to frugal, this guide shows step by step information on how to install TC via the installer. The older instructions for a manual install are still available, but using the installer is recommended.
The guide assumes you’ve either booted the CorePlus CD, or have installed the tc-install extension (tc-install.tcz)
Keep in mind that this guide is basic and that the user may choose to adapt, remove and/or add parts as desired.
The installer is also applicable to USB sticks and other external media.
Note: If you already have a Linux System booting, then you do not need to make a partition for Tiny Core! Tiny Core can run in a single directory in your existing Linux installation. To do so, at step 1, uncheck the option to «Install boot loader». At step 2, select an existing partition, and at Step 3, do not format it. Upon completion you will need to manually configure your existing boot loader.
1. Start the installation
Open the installer:

It can also be started via the shell or Run icon by typing «tc-install».
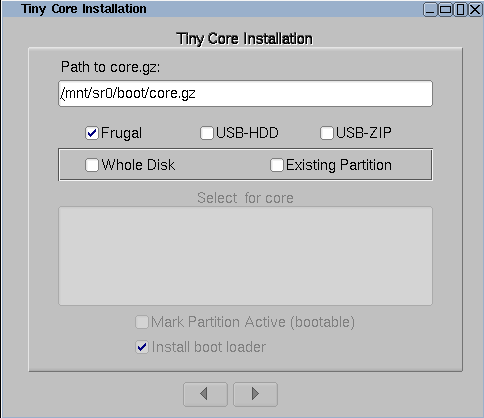
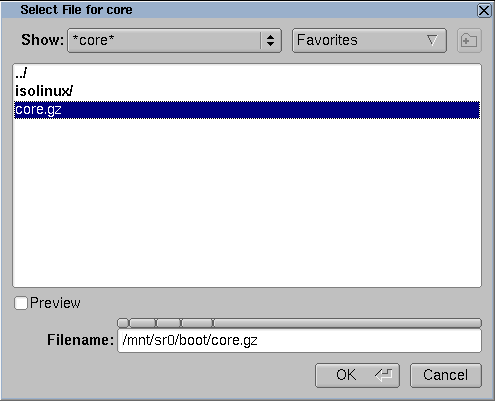
2. Browse to the install files
Browse to /mnt/device/boot and select the core.gz file.
With the source selected, pick the desired install type and target. We’re going to install to an empty hard drive.
If using an existing partition, tick the box to mark it active to have it bootable.

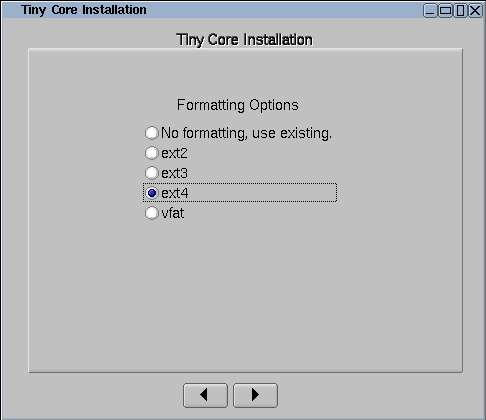
3. Formatting
Format the new partition. It’s recommended to pick one of the ext* options to support linux permissions.
4. Bootcodes
If you want to use additional bootcodes, enter them now. Otherwise leave this blank.
The example bootcodes set a framebuffer resolution and disable wbar icons.
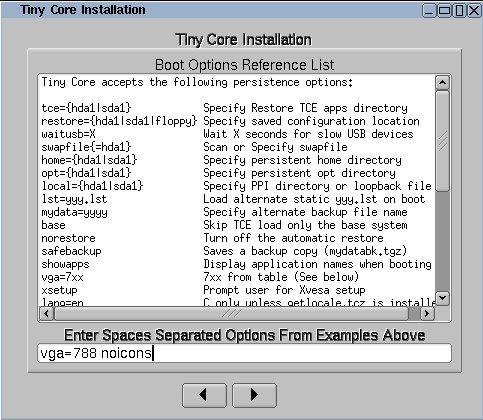
Note that you can edit them any time after the install in the bootloader’s config file, usually extlinux.conf.
5. CorePlus installation options
If you are installing from the CorePlus CD you will see an additional screen asking which extensions from CorePlus you would like to install. Note that you will only see this screen if running the installer from a CorePlus CD.
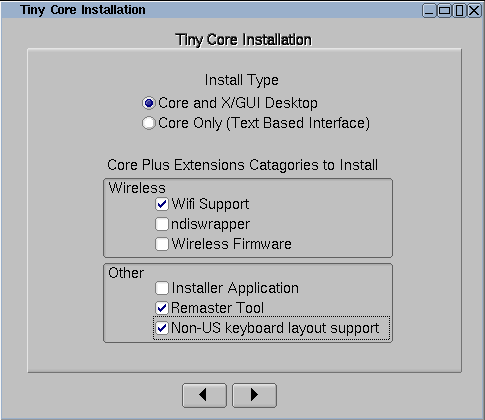
The selected extensions will be installed.
6. Tiny Core installation options
If you are installing from the Tiny Core CD you will see an additional screen asking which directory extensions should be installed from. You should select the cde or tce directory that contains the extensions that you would like installed. For example, if the Tiny Core CD is mounted on /mnt/sr0 you should select /mnt/sr0/cde
Note that you will not see this screen if installing from CorePlus.
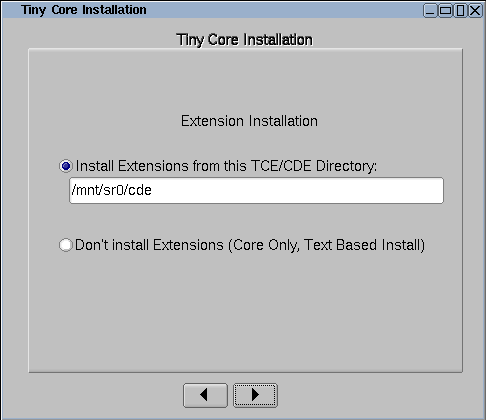
All extensions from selected directory will be installed.
7. Install
If everything’s OK, click on proceed:
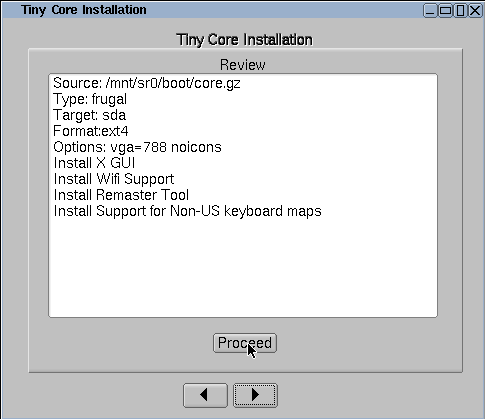
The time required will depend on the size of your hard drive.
8. Testing
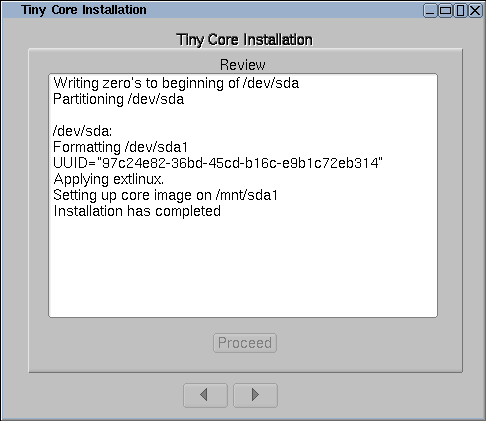
TC is now installed!
Remove the original CD boot media and reboot.
Note: the system may need to be configured to boot hdX first in the BIOS.
Источник
Как настроить tiny core linux
Before making the commitment to perform a frugal install you should consider our Quick and Easy Overview. It covers the basics of running Tiny Core from CDROM and/or USB pendrive. Most will find learning Tiny Core the quick and easy way a better starting point.
But for those who are ready to take the plunge to frugal, this guide shows step by step information on how to partition a blank IDE hard drive using cfdisk, copy over the TC operating system files, and install the GRUB bootloader on that drive.
It assumes that TC was booted from a liveCD and is already running on the target system with Internet access.
Keep in mind that this guide is basic and that the user may choose to adapt, remove and/or add parts as desired.
The result: a standard TC PPR installation.
Note: If you already have a Linux System booting via Grub, then you do not need to make a partition for Tiny Core! Tiny Core can run in a couple of directories in your existing Linux Grub installation. Skip to Step 5. You will only need to do Step 5 and add a Grub menu item (title, kernel, and initrd lines) as shown in Step 6.
1. Obtaining cfdisk and GRUB via Appbrowser
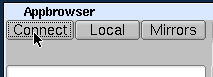
Click on the wbar icon Apps (or access the right-click menu on the desktop and selecting SystemTools/Appbrowser)

Click on Connect
The list on the left side should now be populated. Select cfdisk.tcz from the list.
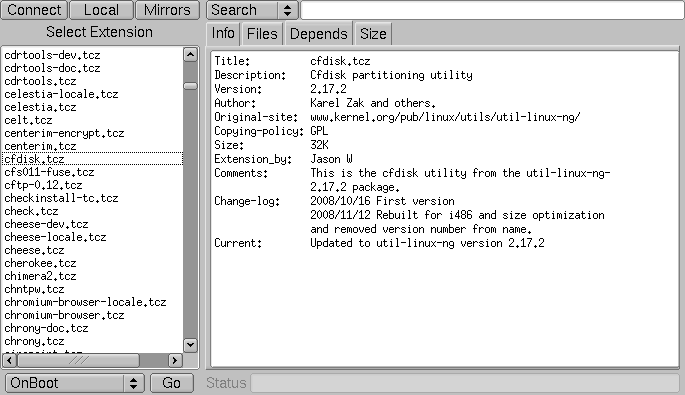
Then click the Go button located in the bottom left corner. It should report that it was installed successfully.

Note: For microcore users, the command-line version of Appbrowser is ab, so you could use ab cfdisk, or to directly download and install, use tce-load -wi cfdisk.tcz
Now repeat this process, by selecting and installing grub-0.97-splash.tcz.
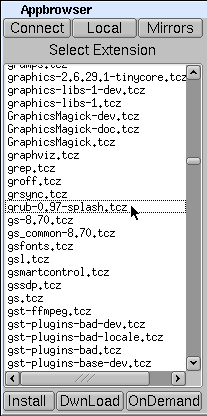
Note: For microcore users, the commnand line version of Appbrowser is ab, so you could use ab grub and select grub-0.97-splash.tcz, or to directly download and install, use tce-load -wi grub-0.97-splash.tcz
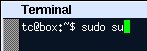
2. Open a root shell
Start a terminal, and type sudo su to make it a root shell:

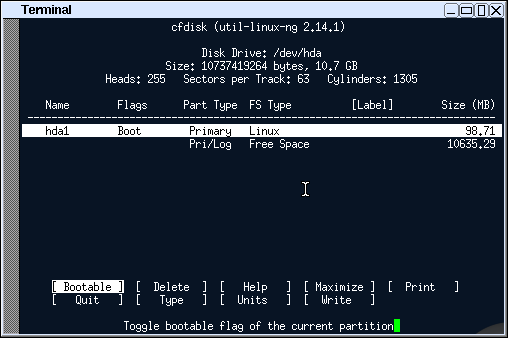
3. Partitioning
Find a disk you want to install on. The following command will list your disks and their current partitions.
Remember which disk will be used for installation. For the purposes of this guide, /dev/hda will be used.
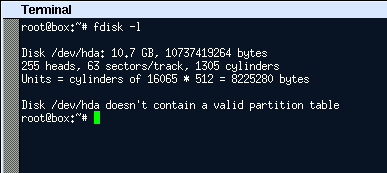
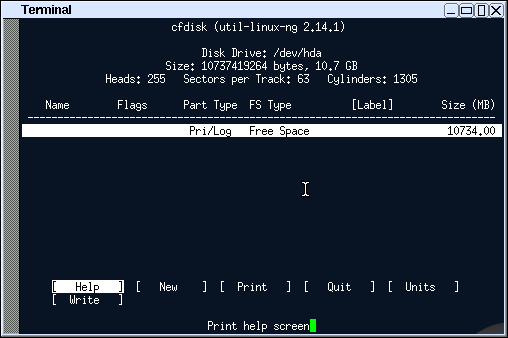
The cfdisk command will be used to partition the hard drives.
Use the left and right arrow keys to navigate the bottom menu, and press Enter to select an option.
Navigate and select [ New ]
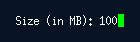
Input the size by entering the numbers you want, or accept the default. Press enter to accept. This demonstration will use 100 MB.
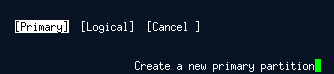
If prompted, choose where to put the new partition.

Set the boot flag on the new partition by selecting [ Bootable ]. Remember this partition as it will be used for installation. This guide will use hda1.
Setup the rest of the disk if preferred, when completed. Adding a swap partition is recommended.

Confirm the write by entering «yes«:


4. Formatting
Format the new partition. This demonstration will use ext3. You may format other partitions here as preferred.
After formatting rebuild the fstab file
Note that if you wish to migrate to ext4, or use grub 2, enable 256-byte inodes by adding -I 256 to the mkfs command above. (capital i)
5. Copy over TC system files and prepare for PPR mode.
Mount the new install partition:
Create directories for TC files and GRUB:
mkdir -p /mnt/hda1/boot/grub
Mount the original boot media. For this guide, TC was booted from an IDE cd-rom drive on the second channel:
Copy over the file:
cp -p /mnt/hdc/boot/* /mnt/hda1/boot/
This will copy over bzImage and tinycore.gz. Ignore any «omitting directory» warnings.
Next setup the tce directory to store application extensions:
mkdir -p /mnt/hda1/tce
Prepare file for backup & restore
6. Installing GRUB
Copy over GRUB files (please note that the grub-0.97-splash.tcz extension will need to be installed as mentioned in step 1):
cp -p /usr/lib/grub/i386-pc/* /mnt/hda1/boot/grub/
The following assumes vi, a console text editor. You can use any other editor instead, for example the «editor» in TC.
Create menu.lst: (note that «lst» contains a lower case ‘L’)
Presss i (enters insert mode)
Enter the following:
default 0
timeout 10
title tinycore
kernel /boot/bzImage quiet
initrd /boot/tinycore.gz
If unsure, copy and paste the above. Note there’s a capital i in bzImage.
Optionally, add other bootcodes now on the kernel line separated by spaces. Note: If you are using a pendrive or other Flash device, be sure to add the boot code of waitusb=5
Press when done. Enter 😡 (saves and quits)
Note that grub uses hd numbers in the form of (hdM,n) and (hdM), instead of hdXy and hdX.
M corresponds to a number from ‘0’, which represents ‘a’ for X.
For every letter after that, add one.
‘b’ is ‘1’, ‘c’ is ‘2’, ‘d’ is ‘3’, etc.
n corresponds to a number from ‘0’, which represents ‘1’ for y.
Subtract 1 from y to get n.
‘1’ becomes ‘0’, ‘2’ becomes ‘1’, ‘3’ becomes ‘2’, etc.
Since this guide is using hda1 for hdXy, this means that (hdM,n) is (hd0,0)
and that the use of hda for hdX means (hdM) is (hd0)
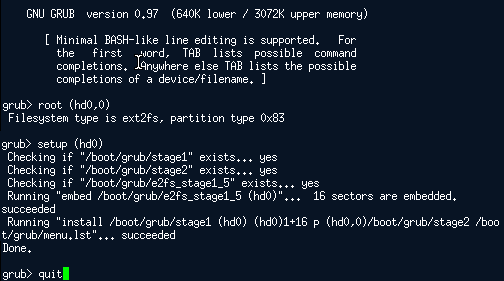
In the grub prompt,
root (hd0,0)
setup (hd0)
quit
Note: you can use tab to auto-complete.
7. Testing
TC and GRUB are now installed!
Remove the original CD boot media:
To test, reboot the system.
Note: the system may need to be configured to boot hdX first in the BIOS.
Источник
Официальные инструкции
Чтобы начать тему, нужно войти или зарегистрироваться
Темы 9
Темы в этом разделе, подробности: ответов, просмотров, последнее сообщение.
1 Загрузочные коды (boot codes)
- 2 ответов
- 15,764 просмотров
- Последнее сообщение 2015-10-29 23:07:35 neuzhtozhusamoe
2 Установка средств разработки и сборка собственных пакетов
- 0 ответов
- 4,182 просмотров
- Последнее сообщение 2015-08-06 12:36:50 dponyatov
3 Запуск WiFi
- 0 ответов
- 3,797 просмотров
- Последнее сообщение 2015-08-06 12:30:54 dponyatov
4 Русификация: установка шрифтов и переключение языка ввода
- 0 ответов
- 6,341 просмотров
- Последнее сообщение 2015-08-06 12:29:03 dponyatov
5 установка core-current
- 0 ответов
- 6,715 просмотров
- Последнее сообщение 2012-08-08 03:18:29 vladimir
6 Установка программ / Использование App Browser
- 0 ответов
- 11,340 просмотров
- Последнее сообщение 2011-10-24 17:58:30 monstr
7 Официальный FAQ
- 1 ответ
- 11,158 просмотров
- Последнее сообщение 2011-10-03 18:57:03 k0l0p0k
8 Пароли в Tiny Core
- 1 ответ
- 16,701 просмотров
- Последнее сообщение 2011-10-03 18:45:42 k0l0p0k
9 Бережная установка Tiny Core Linux
- 0 ответов
- 26,485 просмотров
- Последнее сообщение 2011-09-25 21:25:25 monstr
Темы 9
Чтобы начать тему, нужно войти или зарегистрироваться
Форум работает на PunBB , при поддержке Informer Technologies, Inc
Currently installed 7 official extensions . Copyright © 2003–2009 PunBB.
Источник
Вводный курс
Чтобы отправить ответ, вы должны войти или зарегистрироваться
Сообщений 1
1 Тема от monstr 2011-09-25 21:11:02
- monstr
- Administrator
- Неактивен
- Зарегистрирован: 2011-09-24
- Сообщений: 48
Тема: Вводный курс
Это краткое введение в Tiny Core, уникальный и минималистский дистрибутив операционной системы Linux и инструментов. Опытные пользователи Linux могут пропустить этот раздел, перейдя прямо на страницу «Основные понятия».
Чтобы понять является ли Tiny Core дистрибутивом нужным для вас, этот раздел начинает с азов и рассказывает, чего нет в Tiny Core. Сначала несколько ключевых особенностей, а затем страница со ссылками на дальнейшее чтение, где можно получить Tiny Core, и где найти помощь.
После этого вы можете найти еще больше ответов, просмотрев Wiki или изучение форумы. На многие вопросы уже есть ответы и появление новых вопросов в wiki и на форуме поможет другим пользователям в будущем.
Опять же, приветствие от команды Tiny Core и спасибо за использование Tiny Core.
Что такое Tiny Core?
Во-первых, если вы не знаете, что Linux и дистрибутивы, вы должны прочитать несколько интересных и противоречивых определений Linux. Затем почитайте о разных дистрибутивах. Короче говоря, Tiny Core похож — это специальная версия Linux ядра и других инструментов.
Tiny Core подходит для моих задач?
Если Linux и дистрибутивы на его основе смущают вас, то тогда Tiny Core не может быть вам полезен. Чтобы помочь вам принять решение, вы должны узнать кое-что о Tiny Core.
Tiny Core подходит для моих задач?
Чтобы начать работу, Tiny Core не является:
Дубликатом другой распространенной операционной системы. Tiny Core не имеет красивый экран загрузки, или набор обоев, и Tiny Core, конечно, не имеет собственной рекламной кампании.
Операционной системой «под ключ». Tiny Core может помочь вам сделать то, что вам нужно сделать, но Tiny Core остается крошечным, не включая инструменты, такие как текстовой процессор, браузер (но Tiny Core поможет вам загрузить и установить их очень быстро).
Не для всех. Tiny Core быстрый, мощный и гибкий. Вы можете использовать Tiny Core без особых технических знаний, но как и любой мощный инструмент, Tiny Core становится по-настоящему полезен, если вы знаете, как его использовать. Важные начальные навыки могут включать умение использования командной строки, простых сценариев оболочки и управление файлами и разрешениями в Linux, а также некоторые достаточно типичные навыки.
Если вас это все же не отпугнуло, вы должны знать, что Есть некоторые особенности, которые делают Tiny Core Linux действительно уникальным дистрибутивом.
Чем Tiny Core уникален?
Tiny Core является:
Очень маленьким, 10 мегабайт, размер Tiny Core составляет от 1/400 до 1/100 размера наиболее широко используемых операционных систем в мире (даже по сравнению с большинством дистрибутивов Linux). Это делает Tiny Core достаточно гибкой системой, чтобы хранить и запускать с USB флешки, с CD или даже c встроенных устройств, аппаратного обеспечения.
Linux. Tiny Core использует ядро Linux и набор инструментов командной строки (текстовый интерфейс), включая BusyBox.
Графический интерфейс рабочего стола. Tiny Core имеет гибкий и полностью настраиваемый графический интерфейс рабочего стола пользователя. Большинство устройств типа мышь, клавиатура и экран имеют поддержку, в основном работает «из коробки» благодаря FLWM и рабочему столу FLTK. Вы также можете быстро установить и опробовать множество других надстроек графической облочки и интерфейсов, включая Fluxbox, XFCE, Openbox, IceWM, Joe’s WM, LXDE, и другие.
Минимализм. Tiny Core не «корабль» с большинством количеством программного обеспечения для конечных пользователей. Вместо этого, Tiny Core позволяет быстро и легко сравнить, выбрать, загрузить и установить предпочитаемый вами веб-браузер, текстовый редактор, музыкальный плеер и другое программное обеспечение.
Необычно стабильный. Каждый раз, когда маленькие нагрузки Core, это совершенно новый порку. Это означает, что Tiny Core просто не получить синий экран. Вместо установки программ в пространство файловой системы и риска повреждения системных файлов, Tiny Core использует «расширений» программы, которые повторно подготовлены на каждой перезагрузки . и они готовы быстро.
Необычайно быстро. В отличие от большинства операционных систем, Tiny Core может работать полностью в оперативной памяти. Индивидуально для размера ОЗУ можете использовать Tiny Core, чтобы загрузить и запустить свои программы из оперативной памяти (вы не знали, что ваш компьютер может работать с Open Office и Firefox так быстро). Опытные пользователи могут установить Tiny Core на диск, но Tiny Core могут работать при 48 мегабайт оперативной памяти . или меньше.
Интернет готов. Tiny Core почти всегда находит вашу сетевую карту, сразу же. Вы будете добавлять приложения и инструменты после необычно быстрой загрузки. Вы даже можете вернуться сюда или почитать форумы, если вы обнаружили, что нуждаются в помощи.
Еще меньше. Все тоже самое можно осуществить без графического интерфейса, тогда можно скачать MicroCore, версии Tiny Core без X, которая имеет размер всего 7 МБ.
Открытые исходные коды (Open Source). Tiny Core находится в стадии активного развития сообществом во главе с командой по-настоящему преданных своему делу людей. Здесь можно найти ответы и задавать вопросы на форуме, добавить свой собственный опыт для Wiki, помочь добавить расширение (программу) в репозиторий Tiny Core, и читать достаточно о Tiny Core, чтобы сделать Ваше знакомство проще.
Куда теперь?
Даже если вы хотите как можно скорее загрузить дистрибутив, найдите время, чтобы прочитать наш краткий и легкий обзор. Он охватывает основы работы с Tiny Core с компакт-диска и/или USB-флешки. Большинство найдете обучение Tiny Core быстрой и легкой отправной точкой.
Для дополнительной информации читайте «Основные понятия», где объясняется как Tiny Core загружает данные и программы — это не совсем традиционные способы (в хорошем смысле).
Если Tiny Core все еще звучит хорошо, скачайте Tiny Core. Не забывайте читать «Быстрый и простой обзор» и «основные понятия»!
Источник


