- Installation
- Prerequisites
- Additional resources
- Installing with a package manager
- › Additional helpful information
- Installing manually
- Step 1. Download the latest Gradle distribution
- Step 2. Unpack the distribution
- Step 3. Configure your system environment
- Step 4. Verify your installation
- › Additional helpful information
- Upgrade with the Gradle Wrapper
- › Additional helpful information
- Older Releases
- Command-Line Completion
- Как мне обновить Gradle?
- Как обновить Gradle?
- 10 ответов
- Upgrading your build from Gradle 7.x to the latest
- Upgrading from 7.1 and earlier
- Potential breaking changes
- Security changes to application start scripts and Gradle wrapper scripts
- Updates to bundled Gradle dependencies
- Updates to default tool integration versions
- Deprecations
- Using Java lambdas as task actions
- Relying on equals for up-to-date checks is deprecated
- How to Efficiently Upgrade to Latest Version of Gradle
- Stepwise Gradle Upgrade with Gradle Actions
- Setting up GitHub Action Workflow
- Stepwise Migration
- The Story of One Upgrade
Installation
The current Gradle release is 7.2. You can download binaries and view docs for all Gradle versions from the releases page.
Prerequisites
Gradle runs on all major operating systems and requires only a Java JDK version 8 or higher to be installed. To check, run java -version :
Additional resources
- On-demand and live online training is available for free to Gradle users.
- Self-paced tutorials are a good place to try Gradle with a variety of languages in addition to the docs.
- Gradle has a visual build inspection tool: Build Scan™.
- Finally, the Gradle Newsletter is a great way to keep UP-TO-DATE , with issues crafted monthly.
Installing with a package manager
SDKMAN! is a tool for managing parallel versions of multiple Software Development Kits on most Unix-based systems.
Homebrew is “the missing package manager for macOS”.
Other package managers are available, but the version of Gradle distributed by them is not controlled by Gradle, Inc. Linux package managers may distribute a modified version of Gradle that is incompatible or incomplete when compared to the official version (available from SDKMAN! or below).
› Additional helpful information
Installing manually
Step 1. Download the latest Gradle distribution
The current Gradle release is version 7.2, released on 17 Aug 2021. The distribution zip file comes in two flavors:
If in doubt, choose the binary-only version and browse docs and sources online.
Need to work with an older version? See the releases page.
Step 2. Unpack the distribution
Linux & MacOS users
Unzip the distribution zip file in the directory of your choosing, e.g.:
Microsoft Windows users
Create a new directory C:\Gradle with File Explorer.
Open a second File Explorer window and go to the directory where the Gradle distribution was downloaded. Double-click the ZIP archive to expose the content. Drag the content folder gradle-7.2 to your newly created C:\Gradle folder.
Alternatively you can unpack the Gradle distribution ZIP into C:\Gradle using an archiver tool of your choice.
Step 3. Configure your system environment
Linux & MacOS users
Configure your PATH environment variable to include the bin directory of the unzipped distribution, e.g.:
Microsoft Windows users
In File Explorer right-click on the This PC (or Computer ) icon, then click Properties -> Advanced System Settings -> Environmental Variables .
Under System Variables select Path , then click Edit . Add an entry for C:\Gradle\gradle-7.2\bin . Click OK to save.
Step 4. Verify your installation
Open a console (or a Windows command prompt) and run gradle -v to run gradle and display the version, e.g.:
› Additional helpful information
Upgrade with the Gradle Wrapper
If your existing Gradle-based build uses the Gradle Wrapper, you can easily upgrade by running the wrapper task, specifying the desired Gradle version:
Note that it is not necessary for Gradle to be installed to use the Gradle wrapper. The next invocation of gradlew or gradlew.bat will download and cache the specified version of Gradle.
› Additional helpful information
Older Releases
You can find all releases and their checksums on the releases page.
Command-Line Completion
Command-line completion scripts are available for bash and zsh. This provides completion for Gradle tasks and command-line options.
Источник
Как мне обновить Gradle?
Это показывает, что Gradle актуально:
Как мне перейти на Gradle 4.x? Желательно, с Umake, а не SDKMAN! что, кажется, то, что они предлагают .
(Я не хочу обновлять все пакеты из-за медленного соединения.)
Вы можете использовать ppa для почти всегда последней версии
или SDKMAN для последней версии
- автообновления с системой
- нет загрузки загруженных скриптов в оболочку
Преимущества sdkman: последняя версия поставляется самим Gradle .
Вы также можете указать Gradle обновить себя, используя оболочку Gradle.
Сначала вы создаете оболочку, а затем говорите ей использовать версию Gradle по вашему выбору:
Теперь этот проект будет использовать Gradle 4.9, независимо от того, что установлено. Тем не менее, вы должны помнить, чтобы запустить Gradle через оболочку, то есть запустить ./gradlew вместо обычного gradle .
Оболочка позволяет легко создавать разные проекты, используя разные версии Gradle.
Когда вы отправляете созданную оболочку в систему контроля версий, все, кто проверяет проект, будут использовать одну и ту же версию Gradle. Это может очень помочь с несовместимыми сценариями сборки, когда что-то изменилось между версиями Gradle.
выберите бинарную ссылку согласно
05 декабря 2018 г.
Загрузка: только двоичная или полная
после расширения загрузки просто обновите переменную PATH env var, чтобы получить этот новый двоичный файл
Источник
Как обновить Gradle?
Это показывает, что Gradle обновлен:
$ sudo apt install gradle Reading package lists. Done Building dependency tree Reading state information. Done gradle is already the newest version (2.10-1). 0 upgraded, 0 newly installed, 0 to remove and 629 not upgraded.
Как мне перейти на Gradle 4.x? Предпочтительно, с umake, а не SDKMAN! Кажется, что они предлагают.
(я не хочу обновлять все пакеты из-за медленного соединения.)
10 ответов
Вы можете использовать ppa:
sudo add-apt-repository ppa:cwchien/gradle sudo apt-get update sudo apt upgrade gradle
Вы можете использовать ppa:
sudo add-apt-repository ppa:cwchien/gradle sudo apt-get update sudo apt upgrade gradle
Вы можете использовать ppa :
Вы можете использовать ppa :
Вы можете использовать ppa :
Вы можете использовать ppa :
Вы можете использовать ppa :
Вы можете использовать ppa :
Вы можете использовать ppa :
Вы также можете сказать Gradle обновить себя, используя оболочку Gradle.
Сначала вы создаете оболочку, а затем говорите ей, чтобы использовать выбранную вами версию Gradle:
Теперь этот проект будет использовать Gradle 4.9, независимо от того, что установлено. Однако вам нужно помнить, что нужно запустить Gradle через оболочку, т. Е. Запустить ./gradlew вместо обычного gradle .
Обертка позволяет вам легко выполнять разные проекты, используя разные версии Gradle.
Когда вы создадите созданную оболочку для элемента управления источником, все, кто проверяет проект, будут использовать ту же версию Gradle. Это может многое помочь с несовместимыми скриптами сборки, когда что-то изменилось между версиями Gradle.
Источник
Upgrading your build from Gradle 7.x to the latest
This chapter provides the information you need to migrate your Gradle 7.x builds to the latest Gradle release. For migrating from Gradle 4.x, 5.x, or 6.x, see the older migration guide first.
We recommend the following steps for all users:
Try running gradle help —scan and view the deprecations view of the generated build scan.
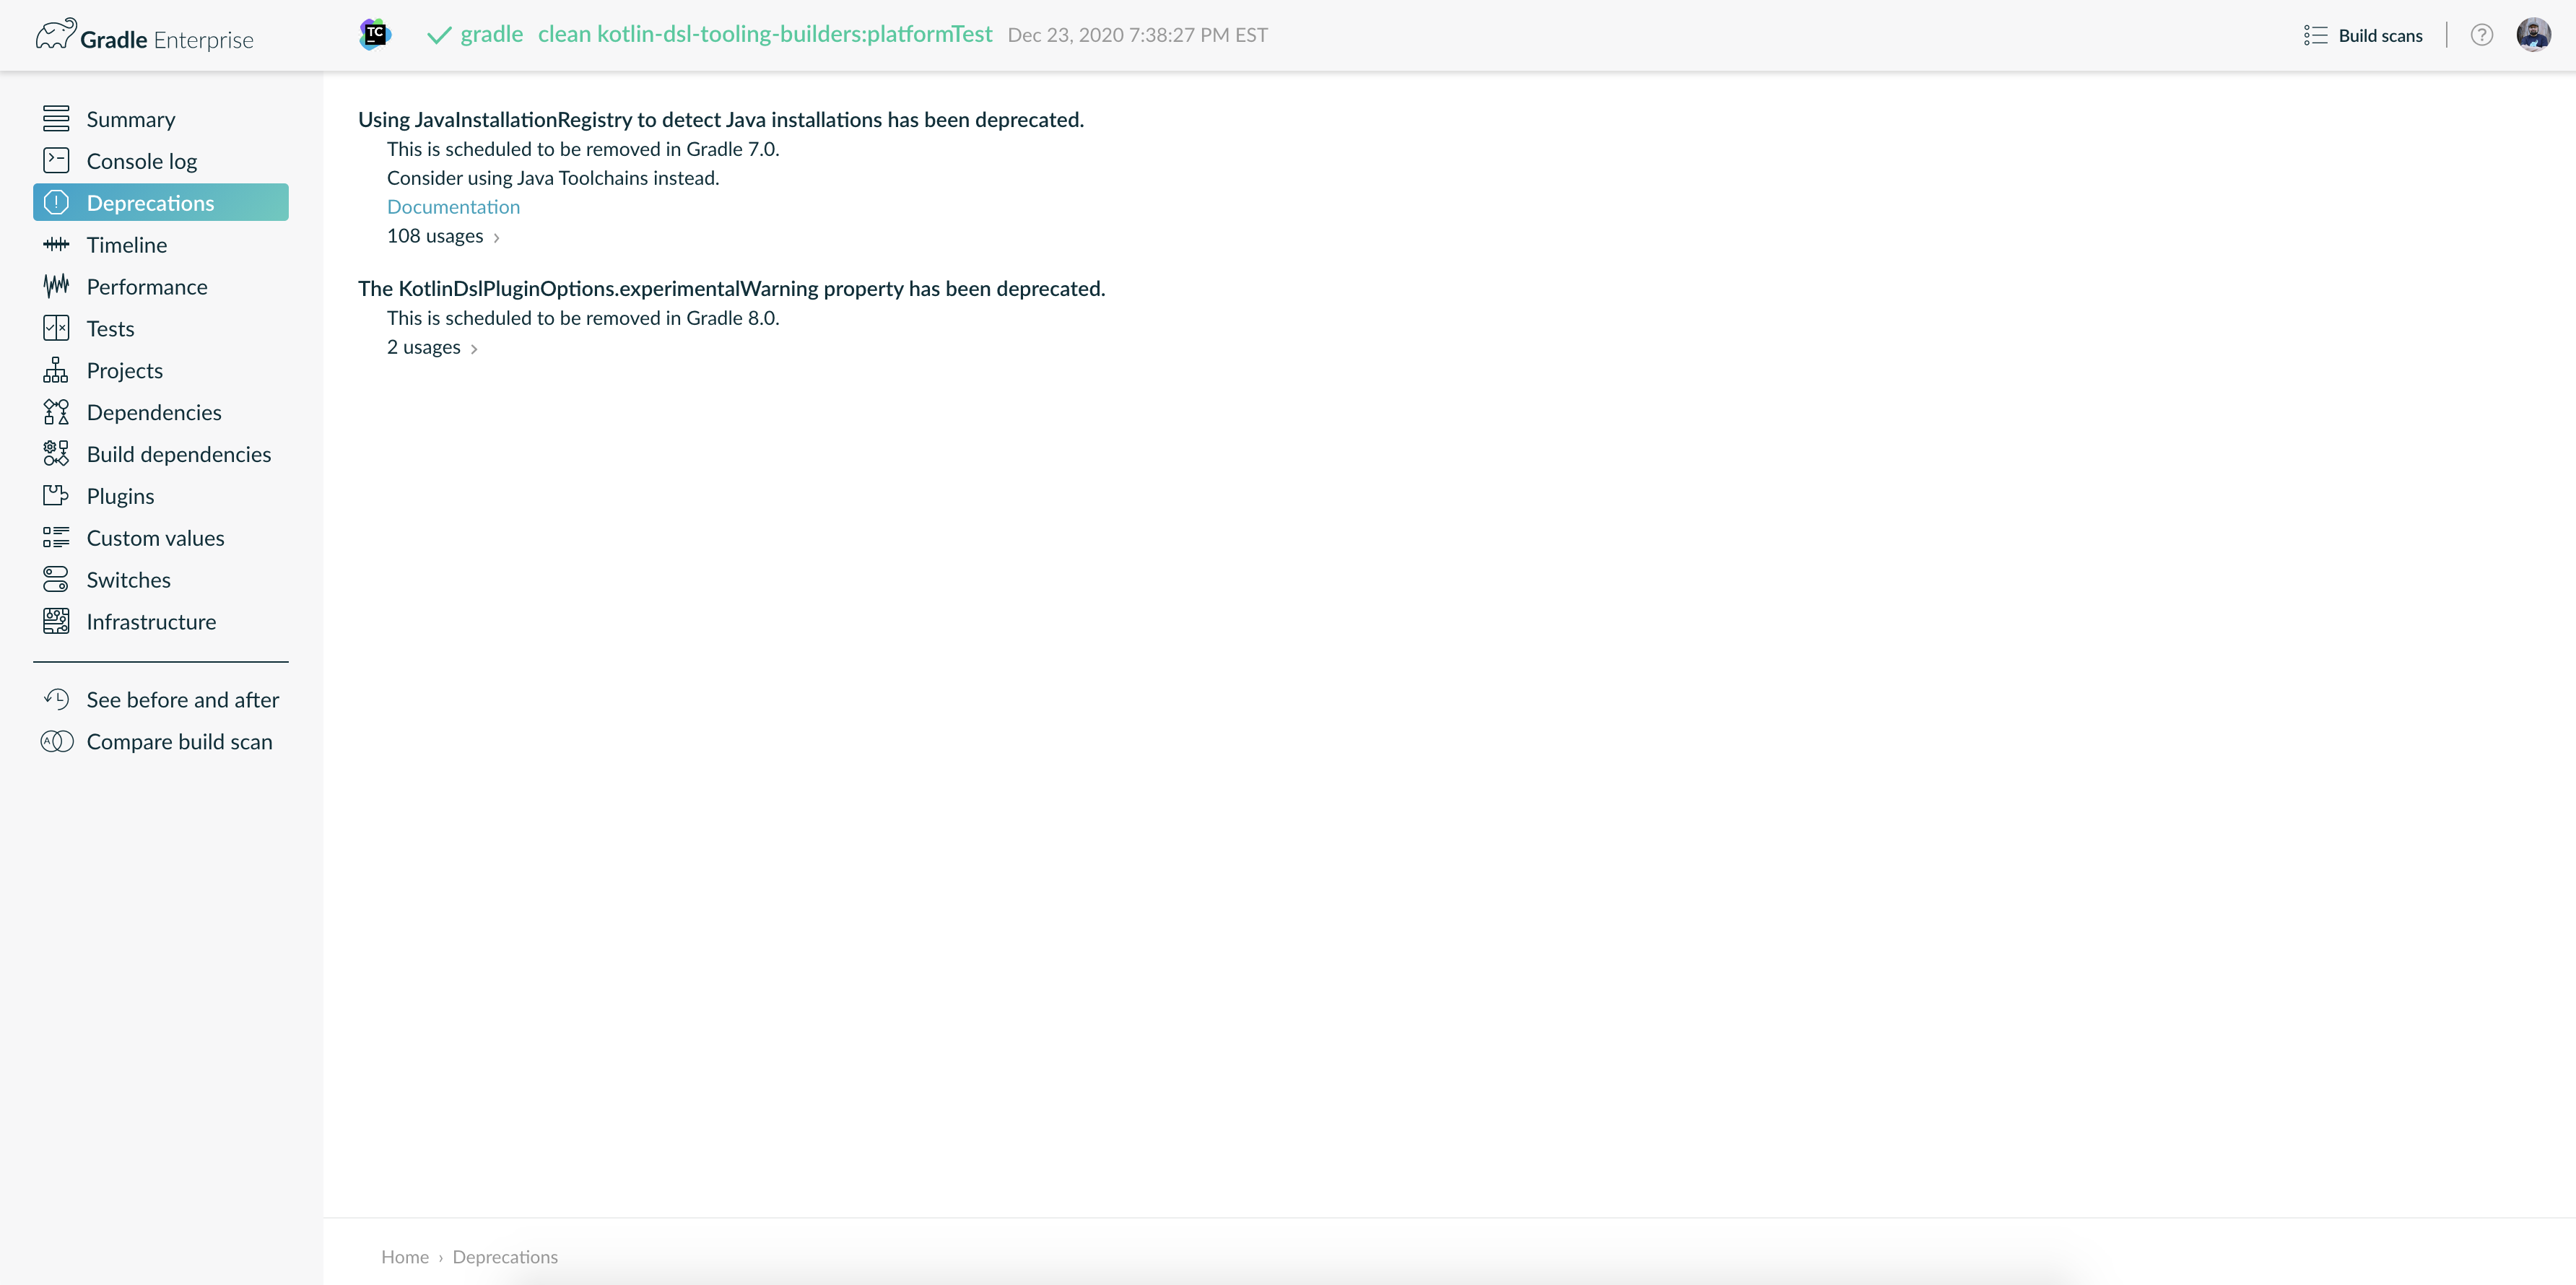
This is so that you can see any deprecation warnings that apply to your build.
Alternatively, you could run gradle help —warning-mode=all to see the deprecations in the console, though it may not report as much detailed information.
Update your plugins.
Some plugins will break with this new version of Gradle, for example because they use internal APIs that have been removed or changed. The previous step will help you identify potential problems by issuing deprecation warnings when a plugin does try to use a deprecated part of the API.
Run gradle wrapper —gradle-version 7.2 to update the project to 7.2.
Try to run the project and debug any errors using the Troubleshooting Guide.
Upgrading from 7.1 and earlier
Potential breaking changes
Security changes to application start scripts and Gradle wrapper scripts
Due to CVE-2021-32751, gradle , gradlew and start scripts generated by Gradle’s application plugin have been updated to avoid situations where these scripts could be used for arbitrary code execution when an attacker is able to change environment variables.
You can use the latest version of Gradle to generate a gradlew script and use it to execute an older version of Gradle.
This should be a transparent for most users; however, there may be changes for Gradle builds that rely on the environment variables JAVA_OPTS or GRADLE_OPTS to pass parameters with complicated quote escaping. Contact us if you suspect something has broken your build and you cannot find a solution.
Updates to bundled Gradle dependencies
Groovy has been updated to Groovy 3.0.8.
Kotlin has been updated to Kotlin 1.5.21.
Updates to default tool integration versions
PMD has been updated to PMD 6.36.0.
Deprecations
Using Java lambdas as task actions
When using a Java lambda to implement a task action, Gradle cannot track the implementation and the task will never be up-to-date of from the build cache. Since it is easy to add such a task action, using task actions implemented by Java lambdas is now deprecated. See Validation problems for more details how to fix the issue.
Relying on equals for up-to-date checks is deprecated
When a task input is annotated with @Input and is not a type Gradle understand directly (like String ), then Gradle uses the serialized form of the input for up-to-date checks and the build cache key. Historically, Gradle also loads the serialized value from the last execution and then uses equals() to compare it to the current value for up-to-date checks. Doing so is error prone, doesn’t work with the build cache and has a performance impact, therefore it has been deprecated. Instead of using at @Input on a type Gradle doesn’t understand directly, use @Nested and annotate the properties of the type accordingly.
Источник
How to Efficiently Upgrade to Latest Version of Gradle

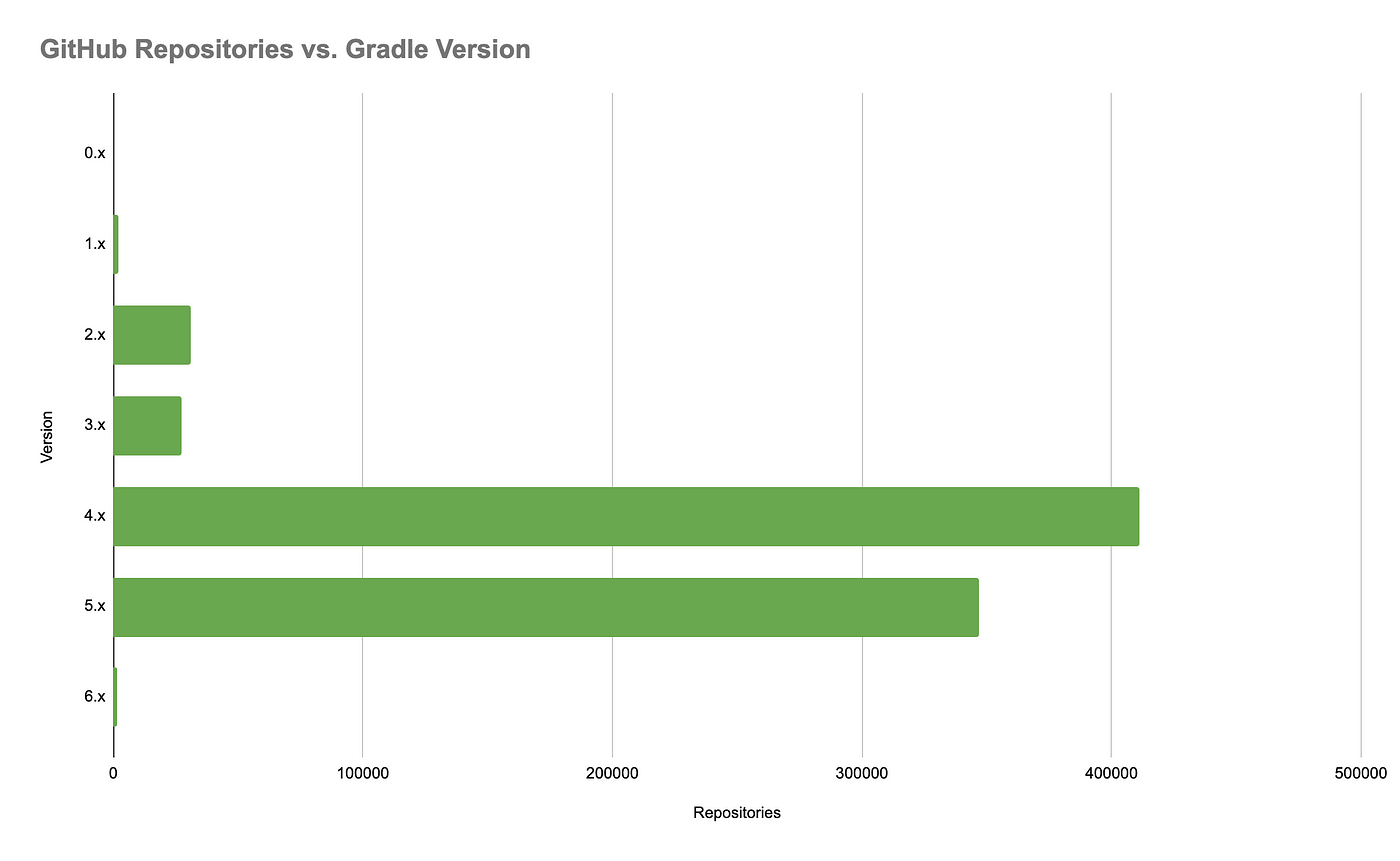
Gradle is a great build tool which allows you to write versatile build code to achieve whatever you want. The biggest drawback for me is the velocity of the Gradle releases and the corresponding breaking changes. You may say that one major release a year is ok but I currently manage tens of small open-sourced projects for me build script is something I should barely be touched except adding dependencies and new subprojects. So the need to upgrade happens only once in a couple of years and obviously not the only one as most of the projects on GitHub are still using Gradle 4.x:
I usually face a storm of issues from the build when I try to get the latest possible Gradle version working. Jumping form a very old version to the newest one is obviously not a good way to go. It’s always better to move stepwise so I took GitHub Actions for a rescue.
Stepwise Gradle Upgrade with Gradle Actions
Following steps could be achieved with any continuous integration tool but GitHub Actions allow to run much more parallel jobs at once than other available CI servers I know (at least for free).
Setting up GitHub Action Workflow
The idea is to run your project against every possible minor version of Gradle between the one currently present in the project ( 4.7 ) and the latest one ( 6.0.1 as a time of writing) to find you the which version still working with the current setup. You may argue that it would be enough to just use the major versions but there might be some consequences (e.g. upgrade of static analysis tools) which may also happen in minor versions.
We start with a workflow file located in .github/workflows/gradle.yml :
The workflow checks out the code then it installs Java and it runs Gradle check task for all versions we are interested in. This may not fully guarantee that the other tasks such as deployment will work but it should detect most of the problems.
When all the jobs are finished in my project I have got the following results:

The results show me that the latest version I can use is 4.10.3 . I suggest you to use SDKMAN to manage the local versions of frameworks so you can upgrade the Gradle wrapper by using the latest passing version and running the wrapper command.
You should also remove the already passing version numbers from the matrix because they are no longer needed:
Then commit the changes in case of that you will need to revert some changes.
Stepwise Migration
Now there’s a time to fix the problem for the first failing version. You may get the good picture of what’s wrong simply by expanding the outputs in the GitHub Actions console. Also, the deprecation notes from the last working version may help. If the logs are not descriptive enough you can always use SDKMAN once again to run the build locally against different version than the wrapper one.
I will summarize some changes that my project required in the next section but each project is quite unique so you will probably face a suite of very different issues depending on which features and plugins you are using.
You repeat the steps unless you reach only the currently latest released version
- fix the build problems for the current version
- push the changes to GitHub
- identity the new latest version which passes
- update the Gradle wrapper to the latest passing version
- remove the already passing version numbers from the workflow file
- push the changes to GitHub
- return to step 1 if required
Once you reach the latest version you can easily remove the matrix and gradle-version from the workflow file:
To be sure that you won’t fall behind the Gradle releases I would suggest you create a separate workflow file gradle-versions-watchdog.yml which will be triggered regularly. scheduled configuration will run once a month which is useful for projects which barely changes but you still want to keep Gradle versions up to date as rc is the latest release candidate version which is currently available.
The Story of One Upgrade
I have created this guide based on my experience of upgrading Gradle for Micronaut Libraries project. The build was pretty simple and consists of
- running a static analysis using CheckStyle and CodeNarc
- running all tests with aggregated JaCoCo coverage
- publishing the coverage to Coveralls.io
- generating the guide from Asiidoctor files
- publishing the guide to GitHub Pages
- publishing the artefacts to Bintray
These are pretty common tasks which you can find in most of the open-source projects. There is even a great bunch of plugins called Kordamp which simplifies most of the tasks mentioned. It also provides test aggregation task which wast the reason I have been doing the migration.
I was expecting a lot of problems with the incompatible plugins but I only had to give up on JaCoCo Full Report Plugin which is no longer supported in Gradle 6. I was willing to sacrifice that one as I want to migrate to Kordamp once the upgrade is finished and it provides the same functionality.
So the first issue was pretty trivial to fix — since 5.x there are no special characters allowed in the project name so I had to fix these.
Источник


