- Можно ли обновить Jenkins от Jenkins самому?
- * Никс / Mac
- Пакет Debian
- Автообновление Windows
- Обновление Дженкинса из файла war
- 10 ответов
- Linux
- Prerequisites
- Debian/Ubuntu
- Long Term Support release
- Weekly release
- Installation of Java
- Fedora
- Long Term Support release
- Weekly release
- Start Jenkins
- Red Hat / CentOS
- Long Term Support release
- Weekly release
- Start Jenkins
- Post-installation setup wizard
- Unlocking Jenkins
- Customizing Jenkins with plugins
- Creating the first administrator user
- mohitgoyal.co
- #Cloud #Devops #Automation #SRE
- Upgrade Jenkins server to a new version
- Identify Current Jenkins Version
- Upgrade Jenkins using yum repository
- Download New Jenkins war File
- Install the new Jenkins war file
Можно ли обновить Jenkins от Jenkins самому?
На Управление Дженкинс у меня есть сообщение, которое:
Новая версия Jenkins (2.47) доступна для скачивания (журнал изменений).
Есть ли способ обновить Jenkins из GUI, как это сделано для плагинов?
Я использую Дженкинс вер. 2.43 в Linux.
Да, это возможно. В Windows это то, что я вижу, когда доступна новая версия: 
Когда вы нажимаете кнопку «Обновить автоматически», Jenkins загружает и устанавливает новый файл войны.
Пожалуйста, проверьте Jenkins Wiki для более подробной информации. Есть некоторые проблемы, если вы установили Jenkins из пакета Debian.
Если вы запустите Jenkins с java -jar jenkins.war , Jenkins сможет обновить себя со страницы Manage Jenkins. Это самый простой способ сделать автоматическое обновление.
* Никс / Mac
Если вы установили с помощью установщика OS X, jenkins запуск процесса не является владельцем .war файла. Чтобы запустить автоматическое обновление, просто исправьте разрешения, чтобы jenkins пользователь мог написать WAR (in /Applications/Jenkins ).
Пакет Debian
Использование кнопки «Обновить» из Jenkins (доступно с версии 1.318) не будет работать, если Jenkins был установлен из пакета Debian (приводит к ошибкам отказа в доступе при попытке загрузить новый файл WAR)!
Автообновление Windows
Если вы установите Jenkins в качестве службы Windows, Jenkins сможет обновить себя со страницы Manage Jenkins .
Источник
Обновление Дженкинса из файла war
У меня есть машина с Ubuntu 12.04 и установили Jenkins ver. 1.424.6 использование apt-get на основе данное руководство, но есть новая версия:
если я нажму «загрузить», я получу Дженкинса.War-файл. но как я могу использовать это для обновления моей текущей установки? или это невозможно до обновления репозиториев apt?
10 ответов
вы можете перезаписать существующий jenkins.war файл с новым, а затем перезапустите Jenkins.
этот файл обычно находится в /usr/share/jenkins .
если это не относится к вашей системе, в Manage Jenkins -> System Information , он отобразит путь к
Если вы установили Jenkins через apt-get, вы также должны обновить Jenkins через apt-get, чтобы избежать будущих проблем. Обновление должно работать через «apt-get update», а затем»apt-get upgrade».
для получения дополнительной информации посетите следующий URL:
безусловно, самый простой способ обновления на linux, работает как шарм каждый раз.
хотя я бы не рассматривал это как правильный ответ на вопрос OP, я бы все равно подчеркнул, что лучший способ развернуть Jenkins (и, скорее всего, большинство, если не все библиотеки/пакеты/программное обеспечение) на Ubuntu-это использовать систему управления aptitude (или apt-get).
поэтому, если бы вы случайно использовали этот подход, вы просто сделали бы apt-get upgrade jenkins
мы запускаем Дженкинса из .файл war со следующей командой.
вы даже можете запустить команду из каталога
шахта установлена под /usr / share/jenkins Я думал, что он был установлен через apt-get, поэтому, возможно, захотите проверить там.
Я использую этот groovy скрипт для загрузки нового файла войны
и еще один скрипт shutsdown tomcat-копирует войну и перезапускает ее
мы размещаем его на windows 2008 и tomcat, я использую SC query, sc config, sc stop, sc start для управления службами windows
Источник
Linux
Jenkins installers are available for several Linux distributions.
Prerequisites
Minimum hardware requirements:
1 GB of drive space (although 10 GB is a recommended minimum if running Jenkins as a Docker container)
Recommended hardware configuration for a small team:
50 GB+ of drive space
Comprehensive hardware recommendations:
For Windows operating system: Windows Support Policy
Debian/Ubuntu
On Debian and Debian-based distributions like Ubuntu you can install Jenkins through apt .
Long Term Support release
A LTS (Long-Term Support) release is chosen every 12 weeks from the stream of regular releases as the stable release for that time period. It can be installed from the debian-stable apt repository.
Weekly release
A new release is produced weekly to deliver bug fixes and features to users and plugin developers. It can be installed from the debian apt repository.
If an error is reported, “jenkins : Depends: daemon but it is not installable”, add the «universe» apt repository of community maintained free and open source software for Ubuntu by executing this command after sudo apt-get update :
This package installation will:
Setup Jenkins as a daemon launched on start. See /etc/init.d/jenkins for more details.
Create a ‘jenkins’ user to run this service.
Direct console log output to the file /var/log/jenkins/jenkins.log . Check this file if you are troubleshooting Jenkins.
Populate /etc/default/jenkins with configuration parameters for the launch, e.g JENKINS_HOME
Set Jenkins to listen on port 8080. Access this port with your browser to start configuration.
If your /etc/init.d/jenkins file fails to start Jenkins, edit the /etc/default/jenkins to replace the line —-HTTP_PORT=8080—- with —-HTTP_PORT=8081—- Here, «8081» was chosen but you can put another port available.
Installation of Java
Jenkins requires Java in order to run, yet certain distributions don’t include this by default and some Java versions are incompatible with Jenkins.
There are multiple Java implementations which you can use. OpenJDK is the most popular one at the moment, we will use it in this guide.
To install the Open Java Development Kit (OpenJDK) run the following:
Update the repositories
search of all available packages:
Pick one option and install it:
the result must be something like:
Why use apt and not apt-get or another command? The apt command has been available since 2014. It has a command structure that is similar to apt-get but was created to be a more pleasant experience for typical users. Simple software management tasks like install, search and remove are easier with apt .
Fedora
You can install Jenkins through dnf . You need to add the Jenkins repository from the Jenkins website to the package manager first.
Long Term Support release
A LTS (Long-Term Support) release is chosen every 12 weeks from the stream of regular releases as the stable release for that time period. It can be installed from the redhat-stable yum repository.
Weekly release
A new release is produced weekly to deliver bug fixes and features to users and plugin developers. It can be installed from the redhat yum repository.
Start Jenkins
Register the Jenkins service with the command:
You can start the Jenkins service with the command:
You can check the status of the Jenkins service using the command:
If everything has been set up correctly, you should see an output like this:
If you have a firewall installed, you must add Jenkins as an exception. You must change YOURPORT in the script below to the port you want to use. Port 8080 is the most common.
Red Hat / CentOS
You can install Jenkins through yum on Red Hat Enterprise Linux, CentOS, and other Red Hat based distributions. You need to choose either the Jenkins Long Term Support release or the Jenkins weekly release.
Long Term Support release
A LTS (Long-Term Support) release is chosen every 12 weeks from the stream of regular releases as the stable release for that time period. It can be installed from the redhat-stable yum repository.
Weekly release
A new release is produced weekly to deliver bug fixes and features to users and plugin developers. It can be installed from the redhat yum repository.
Start Jenkins
You can start the Jenkins service with the command:
You can check the status of the Jenkins service using the command:
If everything has been set up correctly, you should see an output like this:
If you have a firewall installed, you must add Jenkins as an exception. You must change YOURPORT in the script below to the port you want to use. Port 8080 is the most common.
Post-installation setup wizard
After downloading, installing and running Jenkins using one of the procedures above, the post-installation setup wizard begins.
This setup wizard takes you through a few quick «one-off» steps to unlock Jenkins, customize it with plugins and create the first administrator user through which you can continue accessing Jenkins.
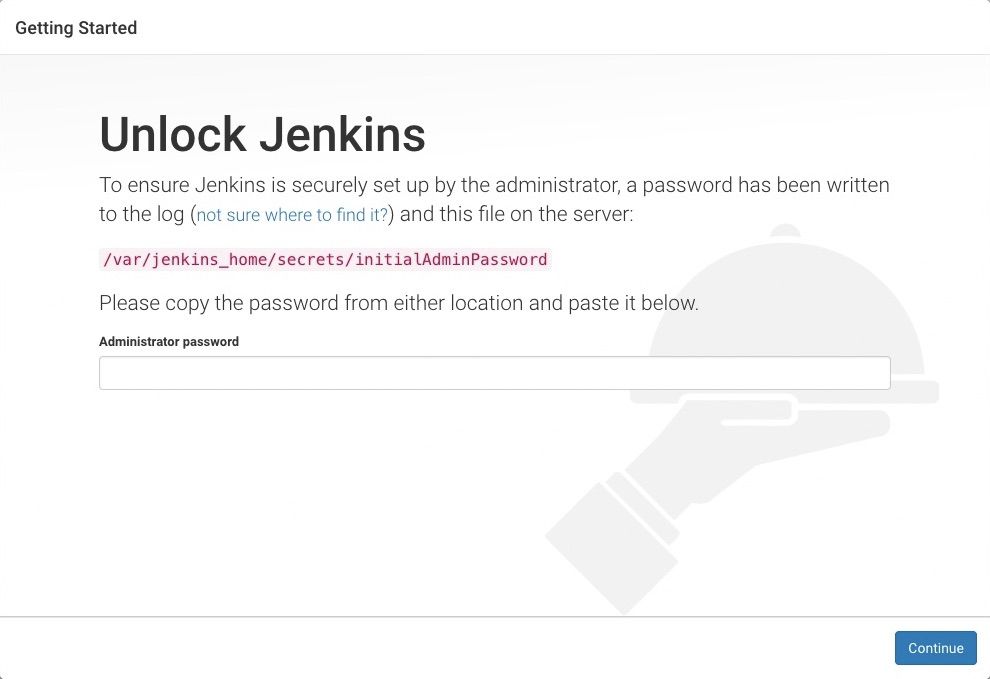
Unlocking Jenkins
When you first access a new Jenkins instance, you are asked to unlock it using an automatically-generated password.
Browse to http://localhost:8080 (or whichever port you configured for Jenkins when installing it) and wait until the Unlock Jenkins page appears.
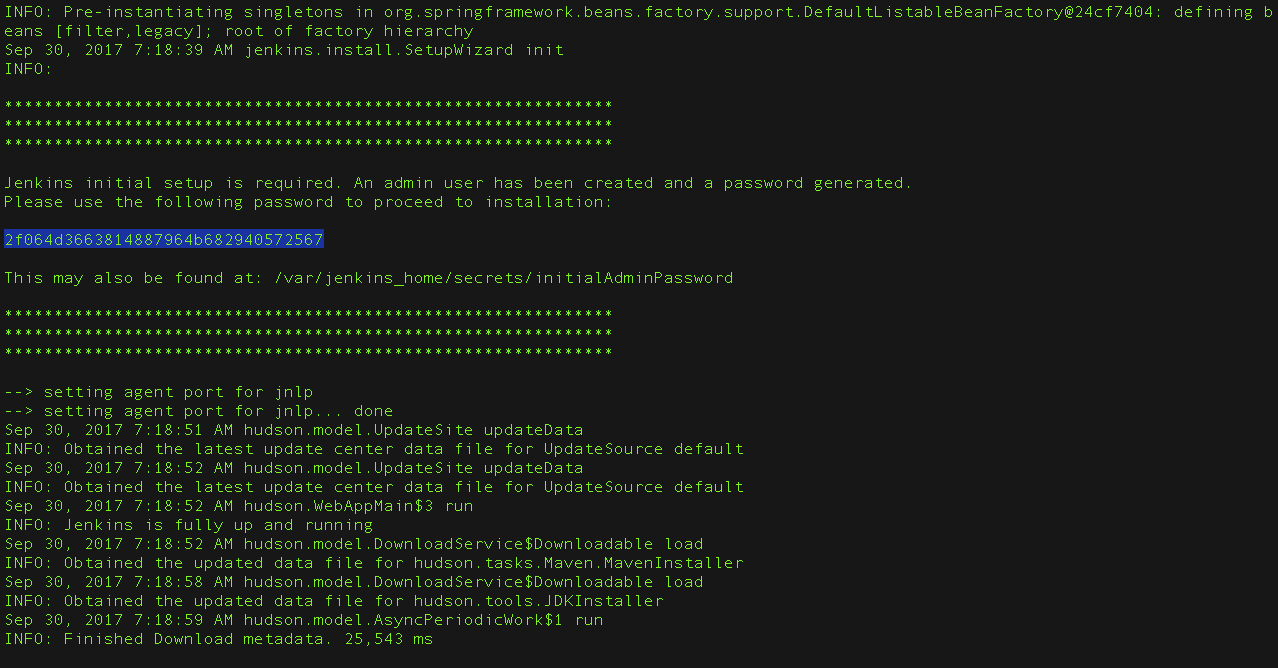
From the Jenkins console log output, copy the automatically-generated alphanumeric password (between the 2 sets of asterisks).
Note:
The command: sudo cat /var/lib/jenkins/secrets/initialAdminPassword will print the password at console.
If you are running Jenkins in Docker using the official jenkins/jenkins image you can use sudo docker exec $
On the Unlock Jenkins page, paste this password into the Administrator password field and click Continue.
Notes:
You can always access the Jenkins console log from the Docker logs (above).
The Jenkins console log indicates the location (in the Jenkins home directory) where this password can also be obtained. This password must be entered in the setup wizard on new Jenkins installations before you can access Jenkins’s main UI. This password also serves as the default admininstrator account’s password (with username «admin») if you happen to skip the subsequent user-creation step in the setup wizard.
Customizing Jenkins with plugins
After unlocking Jenkins, the Customize Jenkins page appears. Here you can install any number of useful plugins as part of your initial setup.
Click one of the two options shown:
Install suggested plugins — to install the recommended set of plugins, which are based on most common use cases.
Select plugins to install — to choose which set of plugins to initially install. When you first access the plugin selection page, the suggested plugins are selected by default.
| If you are not sure what plugins you need, choose Install suggested plugins. You can install (or remove) additional Jenkins plugins at a later point in time via the Manage Jenkins > Manage Plugins page in Jenkins. |
The setup wizard shows the progression of Jenkins being configured and your chosen set of Jenkins plugins being installed. This process may take a few minutes.
Creating the first administrator user
Finally, after customizing Jenkins with plugins, Jenkins asks you to create your first administrator user.
When the Create First Admin User page appears, specify the details for your administrator user in the respective fields and click Save and Finish.
When the Jenkins is ready page appears, click Start using Jenkins.
Notes:
This page may indicate Jenkins is almost ready! instead and if so, click Restart.
If the page does not automatically refresh after a minute, use your web browser to refresh the page manually.
If required, log in to Jenkins with the credentials of the user you just created and you are ready to start using Jenkins!
Источник
mohitgoyal.co
#Cloud #Devops #Automation #SRE
Upgrade Jenkins server to a new version
It is very critical to keep Jenkins up-to-date with the latest version for security purposes. For production environment, you should always use LTS releases which are long term releases and stable in nature. One should always go through the detailed documentation and changelog related to the newer release. Same can also be found online at https://jenkins.io/doc/upgrade-guide/. Needless to say, you should always backup your jenkins environment before upgrading.
In this tutorial, we’ll discover how to upgrade the Jenkins to a newer version. These steps are for the CentOS 7 version but can be easily translated to other linux distros.
Identify Current Jenkins Version
To identify the current version of Jenkins, we can do one of two things. From the Jenkins UI console, if we look at the bottom right corner, we’ll see the current version of the Jenkins that we are running:
Getting existing Jenkins version
» data-medium-file=»https://metavrse.files.wordpress.com/2017/02/getting-existing-jenkins-version.jpg?w=300″ data-large-file=»https://metavrse.files.wordpress.com/2017/02/getting-existing-jenkins-version.jpg?w=506″ src=»https://metavrse.files.wordpress.com/2017/02/getting-existing-jenkins-version.jpg?w=809″ alt=»getting-existing-jenkins-version» srcset=»https://metavrse.files.wordpress.com/2017/02/getting-existing-jenkins-version.jpg 506w, https://metavrse.files.wordpress.com/2017/02/getting-existing-jenkins-version.jpg?w=150 150w, https://metavrse.files.wordpress.com/2017/02/getting-existing-jenkins-version.jpg?w=300 300w» sizes=»(max-width: 506px) 100vw, 506px»/>
Or, login to the Jenkins server, and use the jenkins-cli.jar and execute the following to get the current version from the command line.
When we login to Jenkins UI console, and click on “Manage Jenkins” menu item, if we need an upgrade, it will display the following message at the top saying that a new version of Jenkins is available for download:
Upgrade notification for Jenkins
» data-medium-file=»https://metavrse.files.wordpress.com/2017/02/upgrade-notification.jpg?w=300″ data-large-file=»https://metavrse.files.wordpress.com/2017/02/upgrade-notification.jpg?w=809″ src=»https://metavrse.files.wordpress.com/2017/02/upgrade-notification.jpg?w=809″ alt=»Upgrade notification for Jenkins.JPG» srcset=»https://metavrse.files.wordpress.com/2017/02/upgrade-notification.jpg?w=809 809w, https://metavrse.files.wordpress.com/2017/02/upgrade-notification.jpg?w=150 150w, https://metavrse.files.wordpress.com/2017/02/upgrade-notification.jpg?w=300 300w, https://metavrse.files.wordpress.com/2017/02/upgrade-notification.jpg?w=768 768w, https://metavrse.files.wordpress.com/2017/02/upgrade-notification.jpg 824w» sizes=»(max-width: 809px) 100vw, 809px»/> Upgrade notification for Jenkins
Upgrade Jenkins using yum repository
Note: If one has installed Jenkins as part of yum install, then one should run:
which will upgrade the war file accordingly.
Also, if one has previously installed Jenkins using yum, but yum repository still doesn’t have the latest version of Jenkins, he/she can still go ahead, download the war file and upgrade it manually as explained in this blog post.
Eventually when the repository catches up with the latest version, one can always do sudo yum update jenkins at that time.
Download New Jenkins war File
If we click on the download link from the above message, it will not download the whole Jenkins Installer. Instead, it will download only the jenkins.war file.
We can just copy the link to download from your Jenkins UI console, and go to command prompt, and use wget to download the war file:
Replace your version no of Jenkins in the above command.
Install the new Jenkins war file
On the server, jenkins.war file is located under /usr/lib/jenkins directory. Before wecopy the new version of the jenkins war file, we need to take a backup of the existing version of jenkins war file:
Now, copy the newly downloaded war file to the /usr/lib/jenkins directory.
After this, restart the Jenkins service as shown below:
To make sure service is running, try running sudo systemctl status jenkins after a few minutes and we should see below output:
Well, now we can login into UI console and make sure that everything is working alright.
Источник


