- ChapterВ 4В Upgrading an Oracle Linux System
- 4.1В Conditions for Performing an In-Place Upgrade
- 4.2В Performing an In-Place Upgrade
- Как загрузить последнюю версию Oracle Linux
- Загрузка Oracle Linux
- В чем разница между доступными файлами Oracle ISO:
- Виртуальные и Docker образы Oracle Linux
- How to upgrade from Oracle Linux 6 to Oracle Linux 7
- Issue with tool version
- Как обновить / установить критические обновления безопасности ядра Oracle без перезагрузки
- Что такое Ksplice
- Как зарегистрировать систему для использования Oracle Ksplice в ULN
- Как установить Ksplice Uptrack
ChapterВ 4В Upgrading an Oracle Linux System
Typically, you upgrade an Oracle Linux system by performing a fresh installation. However, starting with Oracle Linux 7, there is support for in-place upgrades. This chapter describes the conditions and method for performing an in-place upgrade.
4.1В Conditions for Performing an In-Place Upgrade
In-place upgrades are supported for systems that run Oracle Linux 6 Update 5 or later only . The following conditions must also be met:
The system to be upgraded must meet the minimum installation requirements for Oracle Linux 7, see Section 1.1, “System Requirements”.
The Oracle Linux 6 system has been completely updated from the ol6_x86_64_latest channel or the ol6_latest repository.
Either the Unbreakable Enterprise Kernel Release 3 (UEK R3) or the Unbreakable Enterprise Kernel Release 4 (UEK R4) release must be installed on the system and it must be the default boot kernel. Upgrading from Unbreakable Enterprise Kernel Release 2 is not supported.
The Oracle Linux 6 system must have been installed with the Minimal set of software.
No Oracle product stack is present on the system.
If the RHCK is installed, it is upgraded as part of the process, but it must not be set as the default boot kernel.
If the system to be upgraded contains valuable data, make a backup or snapshot of the system so that you can recover it to its previous state if the upgrade fails.
Before you upgrade, check the release notes for any known issues with upgrades. See Oracle В® Linux 7 Documentation and Unbreakable Enterprise Kernel Documentation libraries.
To perform an in-place upgrade you must install some additional packages and their dependencies. The system should have access to the Unbreakable Linux Network (ULN), Oracle Linux yum server, or a local yum server.
4.2В Performing an In-Place Upgrade
If the system is registered with ULN, make sure that it is subscribed to the ol6_x86_64_latest and ol6_x86_64_addons channels.
If the system is using the Oracle Linux yum server or a local mirror, make sure that the ol6_latest and ol6_addons repositories are enabled.
Use the yum update command to update the system to the latest Oracle Linux 6 release.
Install the latest versions of the following required packages:
If the system is registered with ULN, delete the system from ULN and disable yum plugins.
You can only delete a system if it is registered to your user name on ULN.
Log in to https://linux.oracle.com with your ULN user name and password.
On the Systems tab, click the link for the system in the list of registered machines.
On the System Details page, click Delete .
When prompted to confirm the deletion, click OK .
On the system, edit the yum configuration file /etc/yum.conf file and disable yum plugins by setting plugins=0 .
Run the preupg command to perform an upgrade assessment:
Examine the upgrade assessment results file /root/preupgrade/result.html .
If the assessment reports any fail , needs_action , or needs_inspection issues, read the remediation instructions for these issues and perform any required actions before proceeding with the upgrade.
You might also need to perform some actions after performing the upgrade.
You can run the preupg command as often as you like to check the system’s readiness for upgrading. A backup of each assessment is stored in the /root/preupgrade-results directory. You might want to back up this directory before performing the upgrade.
The /root/preupgrade directory (and its contents) must be present for the upgrade to proceed.
Run the redhat-upgrade-tool-cli command to perform the upgrade.
For example, to upgrade using an Oracle Linux 7 installation ISO, you might use the following command:
Substitute OL7_ISO with the path to the installation ISO. Alternately, use the —device option to point to a burned media copy of the installation ISO. For example:
Substitute /dev/cdrom with the device where the installation media is accessible.
If you wish to use a network-based resource to perform the upgrade, you can use the —network option in conjunction with the —instrepo to specify the URL where the ISO contents are located. For example:
Substitute OL7_repo_url with the URL where the installation media is accessible. Note that an installation repository must contain a .treeinfo file that provides metadata for the installation. Currently, you cannot use the standard yum repositories exposed on the Oracle Linux yum server directly. If you wish to install from a network resource, you can copy the contents of an installation ISO to a locally hosted web server.
The —cleanup-post option ensures that there are no Oracle Linux 6 packages remaining on the system after the upgrade. If you do not use this option, check the system after the upgrade and manually remove any Oracle Linux 6 packages, for example, by using the yum remove `rpm -qa | grep el6` .
For more information, use the —help option with the redhat-upgrade-tool-cli command.
If you require use of a proxy server to access a network resource where your installation repository is located, set the appropriate command line variables before running the command. For example:
Reboot the system to start the upgrade.
After the reboot, the upgrade tool installs the required packages, reconfigures the system, and then reboots. Depending on the number of packages, this may take some time.
After the upgrade completes, perform any post-upgrade actions identified by the upgrade assessment.
If the system was previously registered with ULN, check that yum plugins are enabled and re-register the system with ULN.
On the system, edit the yum configuration file /etc/yum.conf file and enable yum plugins by setting plugins=1 .
Run the uln_register command.
Alternatively, if you use the GNOME graphical user desktop, select Applications , System Tools , and then ULN Registration .
When prompted, enter your ULN user name, password, and customer support identifier (CSI).
Copyright В© 2014, 2020, Oracle and/or its affiliates. Legal Notices
Источник
Как загрузить последнюю версию Oracle Linux
Операционная система Oracle Linux разработана для открытой облачной инфраструктуры. Он обеспечивает лучшую производительность, масштабируемость, надежность и безопасность для корпоративных рабочих нагрузок SaaS и PaaS, а также для традиционных корпоративных приложений. В отличие от многих других коммерческих дистрибутивов Linux, Oracle Linux легко загрузить и совершенно бесплатно использовать, распространять и обновлять.
Если вы хотите загрузить Oracle Linux, его ISO образ доступен на официальном сайте. Однако некоторых пользователей может раздражать загрузка через Oracle Software Delivery Cloud, требующая процедуры регистрации.
На самом деле компания предлагает два официальных способа загрузки файлов ISO своей операционной системы с открытым исходным кодом: один — это страница «Oracle Linux Installation Media», а другой — «Oracle Software Delivery Cloud». Второй вариант требует процесса регистрации, потому что премиальные продукты Oracle также доступны через этот канал. Но для бесплатной загрузки мы можем воспользоваться ссылкой: «yum.oracle.com».
Загрузка Oracle Linux
- Перейти на страницу https://yum.oracle.com/oracle-linux-downloads.html
- Перейти к ISO-образам
- Перейти Oracle Linux Installation Media for x86_64 and Arm
Загрузите любой из ISO-файлов Oracle Linux (Full — полный, Boot — загрузочный, Boot UEK — загрузочный UEK и Source ISO)
В чем разница между доступными файлами Oracle ISO:
Full ISO: этот файл содержит все инструменты и несколько сред рабочего стола, необходимые для загрузки и установки полноценного Oracle Linux на вашем сервере, рабочем столе или виртуальной машине. Однако недостатком является его размер 8,6 ГБ.
Boot ISO: для тех, кто не хочет лишнего на своей серверной ОС. Образ содержит базовую ОС и некоторые дополнительные функции. Короче говоря, минимальный сервер с графическим интерфейсом или интерфейсом командной строки, но с ядром, совместимым с Red Hat (RHCK), и мастером установки графического интерфейса. (требуется подключение к Интернету)
UEK Boot ISO: все, что мы упомянули выше для Boot ISO, будет таким же и для этого образа, однако вместо использования ядра, совместимого с Red Hat (RHCK), он будет иметь загрузочную систему с нерушимым корпоративным ядром Oracle (UEK). (примечание — требуется подключение к Интернету)
Source ISO: Судя по названию, он содержит исходные коды пакетов, включенных в Full ISO.

Виртуальные и Docker образы Oracle Linux
Помимо обычных загрузочных ISO-образов, пользователь также может использовать образы, доступные для виртуальных машин, таких как Virtualbox, Hyper-V и VMware в формате OVA.
Raspberry pi, Oracle Linux Vagrant Boxes, Docker Image можно скачать прямо со страницы YUM.
Источник
How to upgrade from Oracle Linux 6 to Oracle Linux 7
Published: July 23, 2020 | Modified: September 5, 2020
In this quick walk-through we will upgrade OL 6.8 to OL 7.6
All outputs under this article are from the EC2 server running on AWS. I am using Oracle Linux Yum server public repo hence reference the names from it. If your system is registered to ULN then use respective repos accordingly.
First you need to prepare system for upgrade. Below are pre-requisites :
- Make sure you have a proper backup of your data, disabled monitoring of server, stopped all applications on the server, etc.
- Make sure the system is subscribed to ol6_latest repository
- Update system completely using yum update
- Subscribe system to ol6_addons repo
- Make sure the system meets all OL7 system requirements.
Once you are ready you can go ahead with running pre-upgrade checks to verify if your system is compatible to move on. For that, you need to install the below packages. Those are available from ol6_addons repo.
Once packages are installed you are ready to run a pre-upgrade check. Note: In my case, preupgrade-assistant-el6toel7-data-0 was not available from my repo but it did not hurt my upgrade.
Now run below command to run checks –
Once the tool completes checks, download, and review /root/preupgrade/result.html It will be something like below –
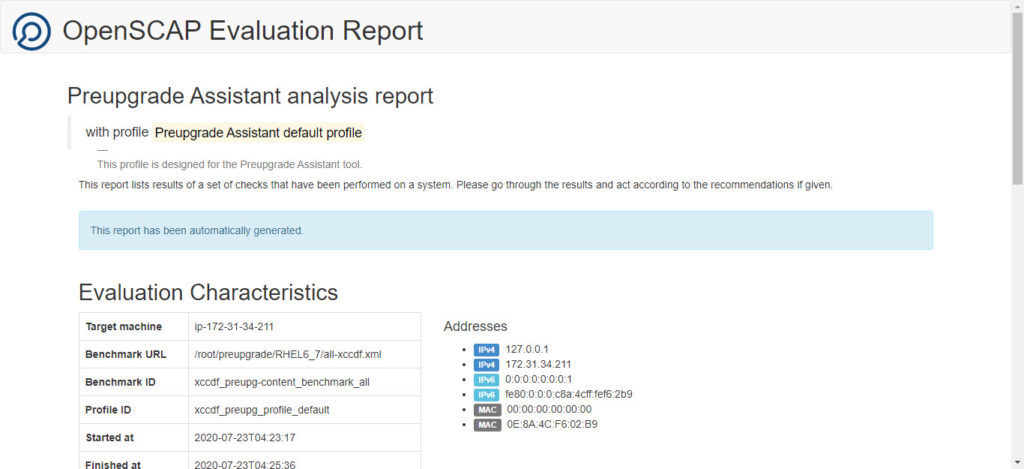 Pre-upgrade report
It will be having all the checks, their results, what is actionable and what actions to be taken.
Spare some time to read the report thoroughly, read the actionable, action on it if it suits your environment/needs, etc. and then move ahead with the upgrade. Since I am running a test instance on AWS, I did not care to consider actionable and I moved ahead with the upgrade.
The upgrade needs an ISO or network path from where it can read OL7 packages for an upgrade. I downloaded OL7 ISO from Oracle using get. To start upgrade with ISO use below command –
Once again it will list out risks of upgrade and ask your confirmation to move ahead. Once you confirm it with Y , the upgrade starts.
Once command completes it will ask you to reboot the server. Reboot will take a while since upgrade process completes during reboot and then login to system to check.
And we are upgraded to Ol7.6! You have to read all the reports and messages before you actually hit confirmation to upgrade. This will make your life easy post upgrade!
Issue with tool version
Redhat upgrade tool always looks for the latest OS that is known to it for an upgrade. So if you are using newer tool version and trying to upgrade OS to old version than the version known to the tool then you will see below error –
I was trying to upgrade to OL 7.4 and tool was looking for 7.5 only. So in such case, you have to downgrade tool version and try.
For OL 7.4 upgrade below version worked for me –
If you use any version below 0.7.50, it will land you up in issue where you see lots of couldn’t add media errors and failed to open file errors in the console –
If you use any version above 0.7.50, you will land in the issue explained above. Decompress kernel modules capability introduced in 0.7.50 makes it best bet in the above-explained scenario.
Few redhat-upgrade-tool versions mapping with their supported upgrades.
Источник
Как обновить / установить критические обновления безопасности ядра Oracle без перезагрузки
В основном обновление ядра Linux потребует перезагрузки системы.
Новое ядро не вступает в силу до перезагрузки системы.
В среднем ядро Linux получает обновления безопасности и исправления ошибок примерно раз в месяц.
Для критической системы мы не можем планировать время простоя один раз в месяц, потому что у нее много зависимостей, и мы не получим одобрение руководства.
Как преодолеть это? Да, у нас есть опция в Oracle Premier Support.
Она называется Ksplice.
Что такое Ksplice
Oracle Ksplice позволяет поддерживать безопасность и доступность ваших систем, позволяя вам обновлять свои системы с помощью последних исправлений безопасности ядра и других критических обновлений.
Он обновляет текущее изображение ядра без необходимости перезагрузки.
Он обновляет текущее ядро в памяти.
Обновление Ksplice вступает в силу сразу же после его применения.
Это не изменение на диске, которое вступает в силу только после последующей перезагрузки.
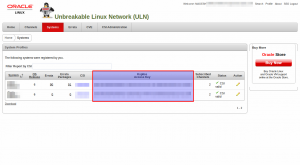
Убедитесь, что ваша система должна быть зарегистрирована в Unbreakable Linux Network (ULN), чтобы использовать Ksplice.
Вы можете использовать Oracle Ksplice, если у вас есть учетная запись поддержки Oracle Linux Premier.
Обратитесь к следующему URL-адресу для регистрации системы с помощью Unbreakable Linux Network (ULN).
После того, как вы прошли регистрацию в Unbreakable Linux Network (ULN), подпишите свои системы на канал Ksplice для Oracle Linux и установите на них программное обеспечение Ksplice Uptrack
Как зарегистрировать систему для использования Oracle Ksplice в ULN
Если у вас уже есть учетная запись в ULN, вы можете зарегистрировать свою систему для использования Ksplice Uptrack.

Нажмите кнопку регистрации Ksplice Uptrack Registration на домашней странице ULN и выберите идентификаторы поддержки клиентов (CSI), которые вы хотите использовать, и нажмите «Register».
На экране отображается подтверждение, что была создана учетная запись Ksplice, и письмо электронной почты, содержащее ключ доступа Ksplice.
То же самое было проверено через портал ULN.
Используйте учетную запись Oracle SSO для входа в веб-интерфейс Ksplice по адресу https://status-ksplice.oracle.com/ и регистрации систем.
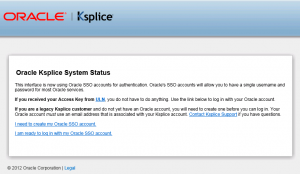
На данный момент система не зарегистрирована. То же самое было проверено на следующем скриншоте.
Как установить Ksplice Uptrack
Просто запустите следующие команды для установки Ksplice Uptrack.
Убедитесь, что вы запускаете следующие команды как root.
Он предлагает скрипт установки, поэтому запустите следующие команды как root и замените YOUR_ACCESS_KEY своим ключом доступа.
Если вы хотите включить автоматическое обновление, установите autoinstall = yes в файле /etc/uptrack/uptrack.conf после установки.
В качестве альтернативы мы можем добавить параметр –autoinstall в команду install-uptrack.
По умолчанию Ksplice Uptrack будет переустанавливать перезагружаемые обновления во время процесса загрузки, чтобы вы оставались в безопасности даже после перезагрузки.
Вы можете настроить это поведение, изменив параметр install_on_reboot в /etc/uptrack/uptrack.conf.
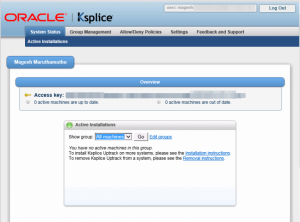
Да, теперь я могу видеть список зарегистрированных систем.
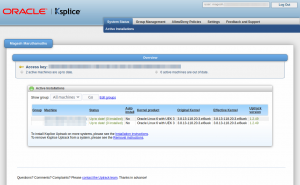
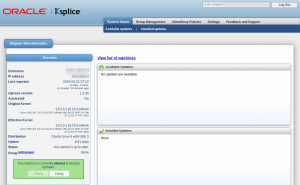
Просмотр доступных обновлений и установленных обновлений.
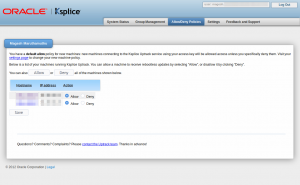
Используйте приведенную ниже страницу, чтобы разрешить или запретить системе использовать ksplice uptrack.
Чтобы перечислить доступные обновления Ksplice, используйте следующие команды uptrack-upgrade.
Чтобы установить все доступные обновления Ksplice:
Просмотр установленных обновлений.
После запуска команды uptrack-upgrade мы можем видеть, как эффективное ядро запускает компьютер.
Ksplice Uptrack не изменяет вывод uname. Запустите uptrack-uname, чтобы увидеть обновленное запущенное ядро на машине.
Источник


