- Что такое защита целостности системы (SIP) и как отключить эту функцию в macOS
- Как отключить SIP на Mac (macOS)
- Как отключить sip mac os big sur opencore
- Зачем отключать SIP
- Инструкция (отключение SIP)
- Дополнительно
- # Post-Install Issues
- # Broken iMessage and Siri
- # No on-board audio
- # BIOS reset or sent into Safemode after reboot/shutdown
- # Synaptics PS2 based trackpad doesn’t work
- # Fix for Dell breakless PS2 keyboard keys
- # macOS GPU acceleration missing on AMD X570
- # DRM Broken
- # «Memory Modules Misconfigured» on MacPro7,1
- # Apps crashing on AMD
- # Sleep crashing on AMD
- # AssetCache Content Caching unavailable in virtual machine
- # Coffee Lake systems failing to wake
- # No temperature/fan sensor output
- # «You can’t change the startup disk to the selected disk» error
- # Selecting Startup Disk doesn’t apply correctly
- # macOS waking up with the wrong time
- # No Volume/Brightness control on external monitors
- # Time inconsistency between macOS and Windows
- # Disabling SIP
- # Writing to the macOS system partition
- # Rolling back APFS Snapshots
- # Apple Watch Unlock issues
- # 4K iGPU output issues over HDMI
Что такое защита целостности системы (SIP) и как отключить эту функцию в macOS

Защита целостности системы или SIP (System Integrity Protection) — это одна из новых технологий, которую Apple внедрила в свою операционную систему для обеспечения безопасности. Впервые эта функция появилась в OS X El Capitan, ее главная задача уберечь пользователя от возможного заражения компьютера вредоносным ПО. По сути, если раньше администратор Mac имел доступ ко всей системе и программам, то сейчас SIP ограничивает его права суперпользователя root, он не может больше изменять системные файлы и папки, а также удалять предустановленные программы в macOS. Для него закрыт доступ к защищенным областям системы:
А это означает, что сторонние приложения не могут вмешиваться в работу системы, доступ имеют только процессы с подписью Apple. Зачем же тогда отключать эту функцию, раз она стоит на страже нашей же безопасности?
Например, Вы хотите понизить версию iTunes после очередного обновления или попросту удалить одну из программ Apple: Safari, iTunes, Photo. но все это предустановленные приложения и удалить их Вы не сможете. Но если отключить SIP, то такая возможность у вас появится.
К большому сожалению, с выходом macOS 11 Big Sur, Apple пересмотрела принципы безопасности своей операционной системы. Теперь пользователи не имеют прав на изменение папки «Система», доступно только чтение, отключение SIP ничего не меняет. Также, она переместила все свои предустановленные приложения в данную папку, кроме браузера Safari.
Как отключить SIP на Mac (macOS)
Отключить функцию из самой системы не получится, это можно сделать лишь из режима восстановления (иначе теряется весь смысл защиты).
- Выключите/включите или перезагрузите Mac
- При загрузке компьютера удерживайте зажатыми клавиши ⌘Cmd + R пока на дисплее не появится логотип Apple
В терминале введите команду csrutil disable и нажмите Enter

Проверить статус состояния защиты можно с помощью команды csrutil status
Иногда отключение SIP может привести к цикличной загрузке Mac в режим Recovery вместо обычного режима. Чтобы устранить эту проблему, при последующей перезагрузке удерживайте на клавиатуре клавишу ⌥Option (Alt) для загрузки в режим выбора дисков. Далее выберите диск с системой и кликните по нем мышкой или нажмите Enter
После загрузки Mac Вы сможете внести нужные для вас изменения, но помните, нужно быть предельно осторожным, чтобы не «наломать дров», так как после отключения защиты целостности системы все вносимые изменения в систему Вы делаете на свой страх и риск.
По внесению всех изменений рекомендуется обратно включить SIP, проделайте те же шаги — снова перезагрузитесь в «Режим восстановления», запустите терминал, только теперь введите команду:
Хотите получать больше полезной информации? Подписывайтесь на наши страницы в соц.сетях: Facebook, Twitter и Вконтакте, а также делитесь этой и другими статьями со своими друзьями
Источник
Как отключить sip mac os big sur opencore
В 2015 году компания Apple внедрила в OS X El Capitan (10.11) новый механизм защиты пользовательских данных от вредоносного ПО, получивший название System Integrity Protection (также известная как SIP или rootless).

Зачем отключать SIP
Например, Вы хотите понизить версию iTunes после очередного обновления или попросту удалить одну из программ Apple: Safari, iTunes, Photo. но все это предустановленные приложения и удалить их вы не сможете. Но если отключить SIP, то такая возможность у вас появится.
Так же, некоторые «пролеченные» приложения требуют отключения SIP для полноценной работы всех функций из-за особенностей реализации активации.
Инструкция (отключение SIP)
Отключить SIP из самой macOS невозможно, иначе теряется весь смысл защиты. Поэтому потребуется загрузиться в режим Восстановления (Recovery mode) и выполнить определенные команды в терминале.
1. Запустите Мак в режиме восстановления macOS.
Intel: Перезагрузите компьютер. Как только экран почернеет, нажмите и удерживайте клавиши Cmd + R до появления на экране логотипа Apple. По завершению загрузки вы попадёте в режим восстановления.
Apple Silicon: Удерживайте кнопку питания выключенного Мак (секунд 10). Затем перейдите в «Options». Возможно, потребуется пароль администратора.

2. Запустите Terminal из меню Utilities:

3. Выполните команду csrutil disable и нажмите Enter.

Добавим, что не каждое пропатченное приложение требует полного отключения SIP.
Команда csrutil enable —without fs отключит его только только для файловой системы, не затрагивая Kernel Extensions и не вмешиваясь в работу NVRAM.
4. Перезагрузите Mac.

Иногда отключение SIP может привести к цикличной загрузке Mac в режим Recovery вместо обычного режима. Чтобы устранить эту проблему, при последующей перезагрузке удерживайте на клавиатуре клавишу ⌥Option (Alt) для загрузки в режим выбора дисков. Далее выберите диск с системой и кликните по нем мышкой или нажмите Enter.
Дополнительно
Совсем не обязательно отключать SIP навсегда. Провернув необходимые махинации (запустив нужное приложение), вы можете перейти в Режим восстановления (повторно) и включить защиту Мак командой csrutil enable
Для проверки статуса SIP используйте команду csrutil status
Терминал отобразит: включена (enabled) или отключена (disabled).
Доступно в обычном режиме, и в режиме восстановления.
Источник
# Post-Install Issues
Issues revolving around macOS once properly installed.
# Broken iMessage and Siri
# No on-board audio
# BIOS reset or sent into Safemode after reboot/shutdown
# Synaptics PS2 based trackpad doesn’t work
(opens new window) . First, you have to open Device Manager, and head to the following:
(opens new window) By default, this uses PCI0.LPCB.PS2K for the pathing. you’ll want to rename accordingly.
Then compile with MaciASL, copy to your OC/ACPI folder, and add it to your config, and you should be good to go.
- Note: Although this will work for most cases, the trackpad may be laggy and you may not be able to use the physical buttons (more details
(opens new window) ). If you can live without the trackpad, this may be better:
Find the ACPI path of your mouse (see above), then grab SSDT-DisableTrackpadProbe.dsl
(opens new window) . By default, this uses PCI0.LPCB.PS2K so you have to change that to your ACPI path if necessary:
# Fix for Dell breakless PS2 keyboard keys
For those with issues surrounding key presses not releasing(ie. pressing infinitely), you’ll want to enable VoodooPS2’s Dell profile.
First of all, you need to find the path to your ACPI keyboard object in the Device Manager:
(opens new window) and change the ACPI path to the one found above as needed:
# macOS GPU acceleration missing on AMD X570
Verify the following:
- GPU is UEFI capable(GTX 7XX/2013+)
- CSM is off in the BIOS
- Forcing PCIe 3.0 link speed
# DRM Broken
# «Memory Modules Misconfigured» on MacPro7,1
Follow guide listed here:
For those who simply want to disable the notification(not the error itself) is more than enough. For these users, we recommend installing RestrictEvents
# Apps crashing on AMD
Easy fix, buy Intel
So with AMD, whenever Apple calls CPU specific functions the app will either not work or outright crash. Here are some apps and their «fixes»:
- Adobe Products don’t always work
- Do note these fixes just disables functionality, they’re not really fixes
- Some fixes can be found here: Adobe Fixes
(opens new window)
- VirtualBox works fine as it doesn’t use AppleHV
- VMware 10 and older can work as well
- Parallels 13.1.0 and older are known to work as well
- Docker toolbox is the only solution as it’s based off of VirtualBox, many features are unavailable with this version
- There’s an Intel specific check in the installer, app itself is likely fine
- Follow directions here after UPDATE 5: Fix web pages
# Sleep crashing on AMD
This is generally seen on AMD who use the chipset’s USB controller, specifically for the Ryzen series and newer. The main way to tell if you’re having issues with this is checking logs after either sleeping or waking:
- In terminal:
- log show —last 1d | grep -i «Wake reason»
Should result in something like this:
You can double check which controller is XHC0 via IOReg and checking the Vendor ID(1022 for AMD chipset). The fix for this sleep issue is either:
- Avoid the chipset USB all together(ideally set _STA = 0x0 to disable the controller outright with an SSDT)
- Correct the USBX power properties to what the controller expects
# AssetCache Content Caching unavailable in virtual machine
arise due to VMM flag being exposed by sysctl.
(opens new window) kernel patch to disguise the flag and allow normal operation.
# Coffee Lake systems failing to wake
In macOS 10.15.4, there were some changes made to AGPM that can cause wake issues on Coffee Lake systems. Specifically displays hooked up to the iGPU would fail to wake. To resolve this:
- Add igfxonln=1 to boot-args
- Make sure you’re using WhateverGreen v1.3.8
# No temperature/fan sensor output
So couple things:
- iStat Menus doesn’t yet support MacPro7,1 readouts
- VirtualSMC’s bundled sensors do not support AMD
For iStat, you’ll have to wait for an update. For AMD users, you can use either:
(opens new window)
- Still in early beta but great work has been done, note it’s been mainly tested on Ryzen
- In terminal:
- FakeSMC3_with_plugins
Note for AMD with FakeSMC:
- FileVault support requires more work with FakeSMC
- Make sure no other SMC kexts are present, specifically those from VirtualSMC
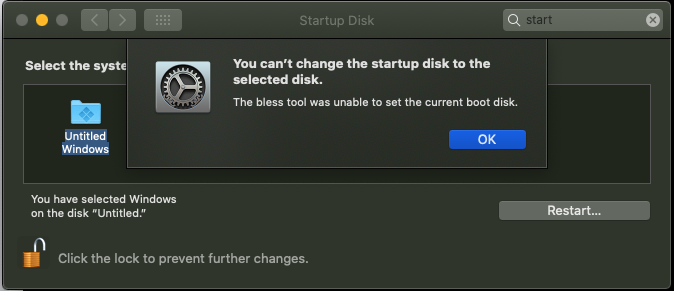
# «You can’t change the startup disk to the selected disk» error
This is commonly caused by irregular partition setup of the Windows drive, specifically that the EFI is not the first partition. To fix this, we need to enable this quirk:
- PlatformInfo -> Generic -> AdviseFeatures -> True

# Selecting Startup Disk doesn’t apply correctly
If you’re having issues with Startup Disk correctly applying your new boot entry, this is most likely caused by a missing DevicePathsSupported in your I/O Registry. To resolve this, ensure you are using PlatformInfo -> Automatic -> True
Example of missing DevicePathsSupported :
# macOS waking up with the wrong time
An odd quirk some people may notice is that from wake, macOS will have the incorrect time for a bit before self-correcting with network time check. The root cause of this issue is most likely due to your RTC not ticking, and can be resolved with a new CMOS battery(note that Z270 and newer are quite picky with voltage so choose carefully).
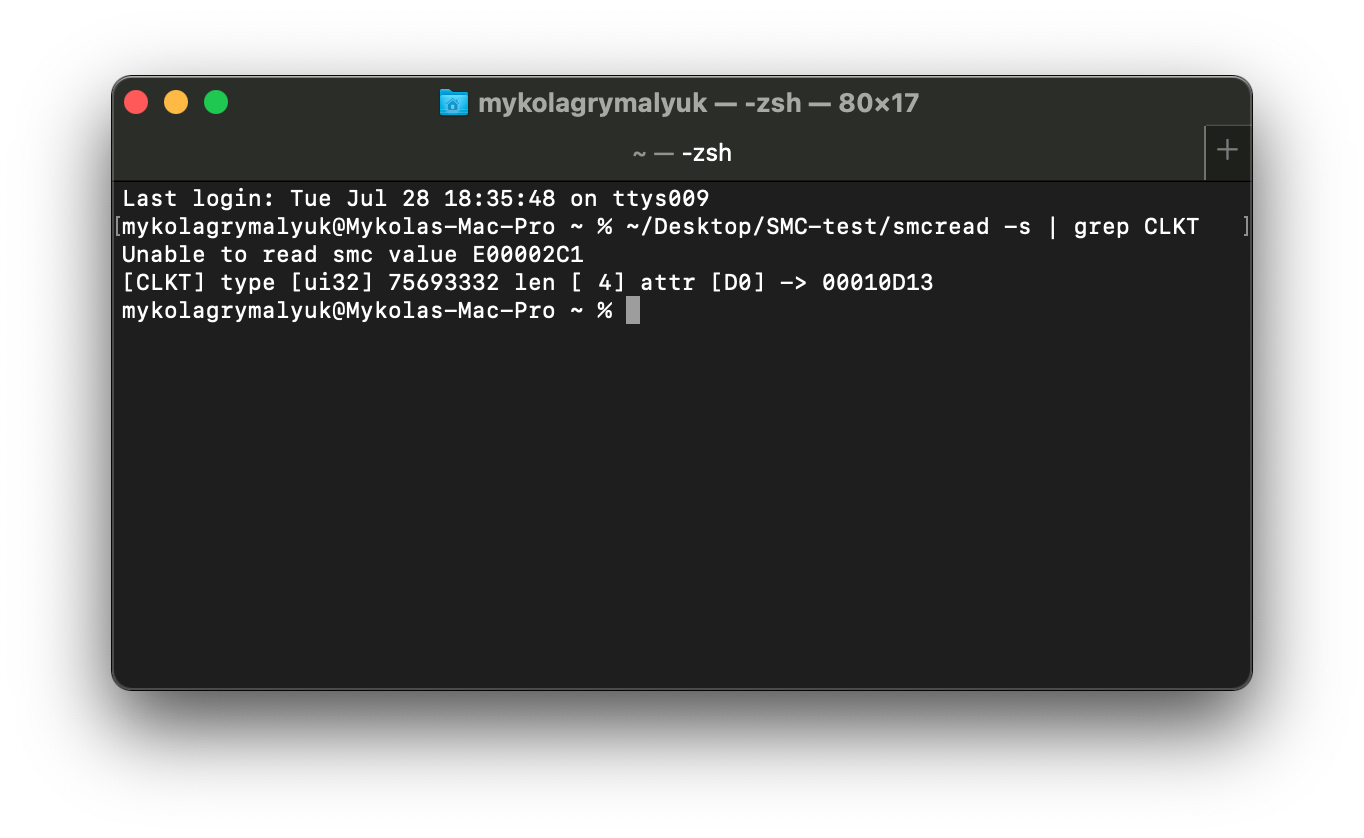
To verify whether your RTC is working correctly:
This should provide you with a hexadecimal value, and once converted it should equal time elapsed from Midnight relative to Cupertino.
So for this example, we’ll grab our value( 00010D13 ) then convert it to decimal and finally divide it by 3600. This should result in the approximate time elapsed(in seconds) since midnight relative to Cupertino
- 00010D13 (Convert to HEX)-> 68883 (Divided by 3600 so we get hours)-> 19.13h(so 19:07:48)
Next you’ll want to put your hack to sleep for a bit and wake it, then check the CLKT value once more to see whether it deviated more or if it has a set difference. If you find it didn’t actually tick much of at all from the elapsed time, you’ll need to look into buying a new battery(with proper voltage)
# No Volume/Brightness control on external monitors
Oddly enough, macOS has locked down digital audio from having control. To bring back some functionality, the app MonitorControl
(opens new window) has done great work on improving support in macOS
# Time inconsistency between macOS and Windows
This is due to macOS using Universal Time while Windows relies on Greenwich time, so you’ll need to force one OS to a different way of measuring time. We highly recommend modifying Windows instead as it’s far less destructive and painful:
# Disabling SIP
SIP or more properly known as System Integrity Protection, is a security technology that attempts to prevent any malicious software and the end user from damaging the OS. First introduced with OS X El Capitan, SIP has grown over time to control more and more things in macOS, including limiting edits to restricted file locations and 3rd party kext loading with kextload (OpenCore is unaffected as kexts are injected at boot). To resolve this, Apple has provided numerous configuration options in the NVRAM variable csr-active-config which can either be set in the macOS recovery environment or with OpenCore’s NVRAM section(The latter will be discussed below).
- WARNING: Disabling SIP can break OS functionality such as software updates in macOS 11, Big Sur and newer. Please be careful to only disable specific SIP values instead of disabling SIP outright to avoid these issues.
- Enabling CSR_ALLOW_UNAUTHENTICATED_ROOT and CSR_ALLOW_APPLE_INTERNAL are common options that can break OS updates for users
You can choose different values to enable or disable certain flags of SIP. Some useful tools to help you with these are CsrDecode
(opens new window) . Common values are as follows (bytes are pre-hex swapped for you, and note that they go under NVRAM -> Add -> 7C436110-AB2A-4BBB-A880-FE41995C9F82 -> csr-active-config):
- 00000000 — SIP completely enabled (0x0).
- 03000000 — Disable kext signing (0x1) and filesystem protections (0x2).
- FF030000 — Disable all flags in macOS High Sierra
(opens new window) (0x7ff) as Apple introduced a value for executable policy.
FF0F0000 — Disable all flags in macOS Big Sur (0xfff) which has another new flag for authenticated rootNote: Disabling SIP with OpenCore is quite a bit different compared to Clover, specifically that NVRAM variables will not be overwritten unless explicitly told so under the Delete section. So if you’ve already set SIP once either via OpenCore or in macOS, you must override the variable:
- NVRAM -> Delete -> 7C436110-AB2A-4BBB-A880-FE41995C9F82 -> csr-active-config
# Writing to the macOS system partition
With macOS Catalina and newer, Apple split the OS and user data into 2 volumes where the system volume is read-only by default. To make these drives writable we’ll need to do a few things:
- Note: Users of SecureBootModel may end up in a RecoveryOS boot loop if the system partition has been modified. To resolve this, Reset NVRAM and set SecureBootModel to Disabled
macOS Catalina
- Disable SIP
- Mount drive as writable (Run sudo mount -uw / in terminal)
macOS Big Sur
- Disable SIP
- Mount drive as writable (See below link for command)
- Note: Due to how OS updates work in macOS Big Sur and newer, changing the system volume can in fact break OS updates. Please edit with caution
Commands based off of Apple’s KDK documents:
# Rolling back APFS Snapshots
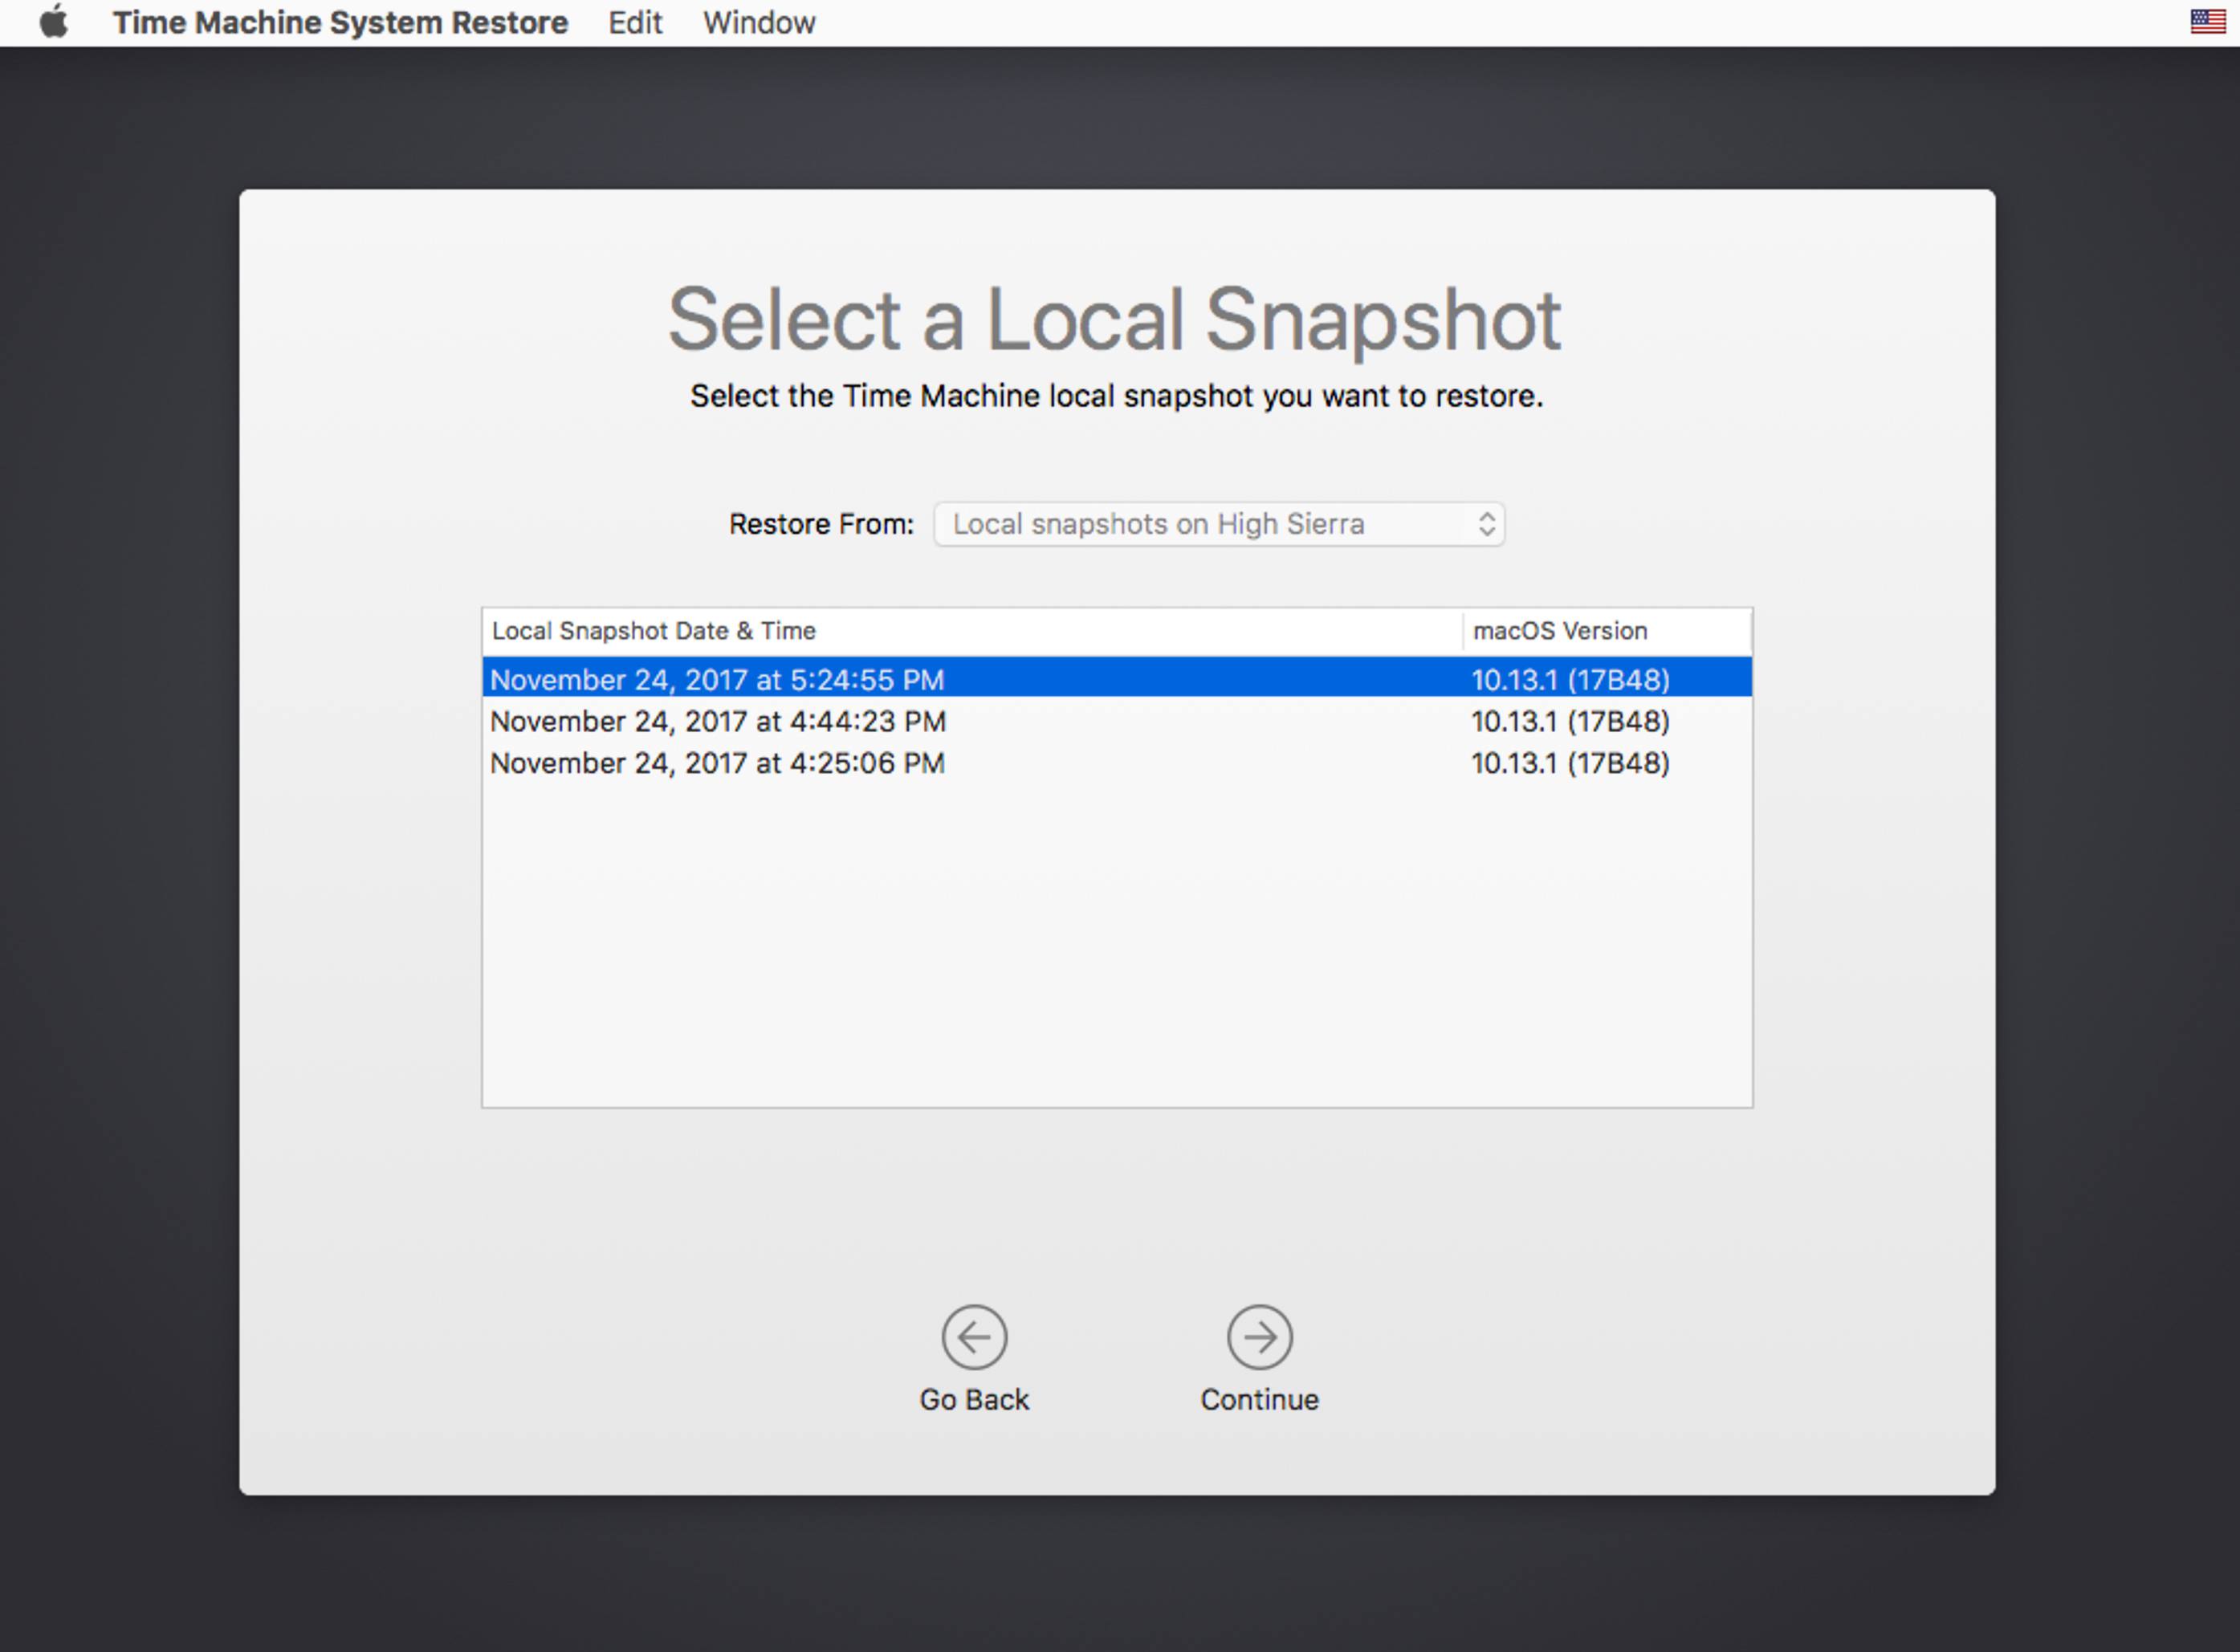
With macOS Big Sur, the system volume is now snapshotted allowing you to roll back in case of issues with system updates breaking due to a broken seal. Thanks to new snapshots being created with every OS update, we’ve got quite a bit to roll back too.
To roll back, you’ll first need to reboot into Recovery partition then select «Restore From Time Machine Backup»:
# Apple Watch Unlock issues
For those with Apple Watch Unlock issues, verify the following:
- You have a supported Apple Wireless card with Bluetooth Low Energy(4.0+)
- Your watch and Mac are signed in with the same account
- iServices working correctly(ie. iMessage)
- There’s an option to Unlock with Apple Watch under Security and Privacy setting in System Preferences
If the above are met, and you still have unlock issues we recommend running through the below guide:
# 4K iGPU output issues over HDMI
For machines with HDMI 2.0 capable ports with resolution issues, verify the following:
- 4k output works correctly in Windows
- Monitor is set explicitly to HDMI 2.0
- If using an HDMI to DisplayPort converter, ensure the monitor is set to DisplayPort 1.2 or higher
- Ensure enough iGPU memory has been allocated
- For Broadwell and newer, 64MB is expected to be allocated
- Machines relying on WhateverGreen’s framebuffer-stolenmem property should know this can cause 4k output issues. Please ensure you can set the iGPU’s memory to 64MB allowing you to remove these properties
- Laptops and many desktop users may need this boot-arg:
- -cdfon
For all other troubleshooting, please reference WhateverGreen’s Intel docs
Источник