- Настройка среды разработки в Windows 10 Set up your development environment on Windows 10
- Пути разработки Development paths
- Средства и платформы Tools and platforms
- Запуск Windows и Linux Run Windows and Linux
- Переход между Mac и Windows Transitioning between Mac and Windows
- Начало работы с Python в Windows для начинающих Get started using Python on Windows for beginners
- Настройка среды разработки Set up your development environment
- Установка Python Install Python
- Установка Visual Studio Code Install Visual Studio Code
- Установка Git (необязательно) Install Git (optional)
- Учебник по некоторым основам работы с Python (на примере Hello World) Hello World tutorial for some Python basics
- Учебник по использованию Python с VS Code (на примере Hello World) Hello World tutorial for using Python with VS Code
- Создание простой игры с помощью Pygame Create a simple game with Pygame
- Материалы для непрерывного обучения Resources for continued learning
- Онлайн-курсы для изучения Python Online courses for learning Python
- Работа с Python в VS Code Working with Python in VS Code
Настройка среды разработки в Windows 10 Set up your development environment on Windows 10
Это руководство поможет приступить к установке и настройке языков и средств, необходимых для разработки в Windows или подсистеме Windows для Linux. This guide will help you get started with installing and setting up the languages and tools you need to develop on Windows or Windows Subsystem for Linux.
Пути разработки Development paths
Начало работы с NodeJS Get started with NodeJS
Установите NodeJS и настройте среду разработки в Windows или подсистеме Windows для Linux. Install NodeJS and get your development environment setup on Windows or Windows Subsystem for Linux.
Начало работы с Python Get started with Python
Установите Python и настройте среду разработки в Windows или подсистеме Windows для Linux. Install Python and get your development environment setup on Windows or Windows Subsystem for Linux.
Начало работы с Android Get started with Android
Установите Android Studio или выберите межплатформенное решение, например Xamarin, React или Cordova, и настройте среду разработки в Windows. Install Android Studio, or choose a cross-platform solution like Xamarin, React, or Cordova, and get your development environment setup on Windows.
Начало работы с классическими приложениями для Windows Get started with Windows Desktop
Приступите к созданию классических приложений для Windows 10 с помощью UWP, Win32, WPF, Windows Forms или обновите и разверните существующие классические приложения с помощью MSIX и XAML Islands. Get started building desktop apps for Windows 10 using UWP, Win32, WPF, Windows Forms, or updating and deploying existing desktop apps with MSIX and XAML Islands.
Начало работы с C и C++ Get started with C++ and C
Приступите к работе с C++ и C и используйте их для сборки при разработке приложений, служб и средств. Get started with C++, C, and assembly to develop apps, services, and tools.
Начало работы с C# Get started with C#
Начните создавать приложения с помощью C# и .NET Core. Get started building apps using C# and .NET Core.
Начало работы с Docker Desktop для Windows Get started with Docker Desktop for Windows
Создавайте удаленные контейнеры разработки с поддержкой Visual Studio, VS Code, .NET, подсистемы Windows для Linux и разных служб Azure. Create remote development containers with support from Visual Studio, VS Code, .NET, Windows Subsystem for Linux, or a variety of Azure services.
Начало работы с PowerShell Get started with PowerShell
Начните использовать кросс-платформенную автоматизацию задач и управление конфигурацией с помощью PowerShell — оболочки командной строки и языка сценариев. Get started with cross-platform task automation and configuration management using PowerShell, a command-line shell and scripting language.
Начало работы с Rust Get started with Rust
Приступите к программированию на Rust, включая настройку Rust для Windows с помощью крейта windows. Get started programming with Rust—including how to set up Rust for Windows by consuming the windows crate.
Средства и платформы Tools and platforms
Подсистема Windows для Linux Windows Subsystem for Linux
Используйте избранный дистрибутив Linux, полностью интегрированный с Windows (больше не требуются два варианта загрузки). Use your favorite Linux distribution fully integrated with Windows (no more need for dual-boot).
Установка WSL Install WSL
Терминал Windows Windows Terminal
Настройте среду терминала для работы с несколькими оболочками командной строки. Customize your terminal environment to work with multiple command line shells.
Установка терминала Install Terminal
Диспетчер пакетов Windows Windows Package Manager
Используйте клиент winget.exe, многофункциональный диспетчер пакетов и командную строку для установки приложений в Windows 10. Use the winget.exe client, a comprehensive package manager, with your command line to install applications on Windows 10.
Установка диспетчера пакетов Windows (общедоступная предварительная версия) Install Windows Package Manager (public preview)
Windows PowerToys Windows PowerToys
Настройте и оптимизируйте работу Windows, чтобы повысить производительность благодаря этому набору программ опытных пользователей. Tune and streamline your Windows experience for greater productivity with this set of power user utilities.
Установка PowerToys (общедоступная предварительная версия) Install PowerToys (public preview)
VS Code VS Code
Упрощенный редактор исходного кода со встроенной поддержкой JavaScript, TypeScript, Node.js, обширной экосистемой расширений (C++, C#, Java, Python, PHP, Go) и средами выполнения (например, .NET и Unity). A lightweight source code editor with built-in support for JavaScript, TypeScript, Node.js, a rich ecosystem of extensions (C++, C#, Java, Python, PHP, Go) and runtimes (such as .NET and Unity).
Установка VS Code Install VS Code
Visual Studio Visual Studio
Интегрированная среда разработки, которую можно использовать для редактирования, отладки, создания кода и публикации приложений, включая компиляторы, функцию завершения кода IntelliSense и многое другое. An integrated development environment that you can use to edit, debug, build code, and publish apps, including compilers, intellisense code completion, and many more features.
Установка Visual Studio Install Visual Studio
Azure Azure
Полная облачная платформа для размещения существующих приложений и оптимизации разработки новых приложений. A complete cloud platform to host your existing apps and streamline new development. Службы Azure интегрируют все, что необходимо для разработки, тестирования, развертывания и управления приложениями. Azure services integrate everything you need to develop, test, deploy, and manage your apps.
Настройка учетной записи Azure Set up an Azure account
.NET .NET
Платформа разработки с открытым исходным кодом со средствами и библиотеками для создания приложений любого типа, включая веб-приложения, мобильные устройства, настольные системы, игры, Интернет вещей, облачные службы и микрослужбы. An open source development platform with tools and libraries for building any type of app, including web, mobile, desktop, gaming, IoT, cloud, and microservices.
Установка .NET Install .NET
Запуск Windows и Linux Run Windows and Linux
Подсистема Windows для Linux (WSL) позволяет разработчикам запускать операционную систему Linux вместе с Windows. Windows Subsystem for Linux (WSL) allows developers to run a Linux operating system right alongside Windows. Обе операционные системы используют один и тот же жесткий диск (и могут обращаться к файлам друг друга), буфер обмена естественным образом поддерживает копирование и вставку между двумя ОС, нет необходимости в двойной загрузке. Both share the same hard drive (and can access each other’s files), the clipboard supports copy-and-paste between the two naturally, there’s no need for dual-booting. WSL позволяет использовать Bash и обеспечивает среду, лучше всего знакомую пользователям Mac. WSL enables you to use BASH and will provide the kind of environment most familiar to Mac users.
Можно также использовать Терминал Windows, чтобы открывать в одном окне с несколькими вкладками или несколькими панелями все любимые программы командной строки, будь то PowerShell, командная строка Windows, Ubuntu, Debian, Azure CLI, Oh-my-Zsh, Git Bash или все перечисленные. You can also use Windows Terminal to open all of your favorite command line tools in the same window with multiple tabs, or in multiple panes, whether that’s PowerShell, Windows Command Prompt, Ubuntu, Debian, Azure CLI, Oh-my-Zsh, Git Bash, or all of the above.
Дополнительные сведения о Терминале Windows см. в документации и видео на канале Channel 9. Learn more in the Windows Terminal docs or via Windows Terminal videos on Channel 9.
Переход между Mac и Windows Transitioning between Mac and Windows
Ознакомьтесь с руководством по переходу между средой разработки Mac и Windows (или подсистемой Windows для Linux). Check out our guide to transitioning between between a Mac and Windows (or Windows Subsystem for Linux) development environment. С его помощью можно понять разницу между: It can help you map the difference between:
Начало работы с Python в Windows для начинающих Get started using Python on Windows for beginners
Это пошаговое руководство для начинающих работу с Python в Windows 10. The following is a step-by-step guide for beginners interested in learning Python using Windows 10.
Настройка среды разработки Set up your development environment
Для начинающих, которые не знакомы с Python, рекомендуется установить Python из Microsoft Store. For beginners who are new to Python, we recommend you install Python from the Microsoft Store. При установке из Microsoft Store используется базовый интерпретатор Python3, но в дополнение к автоматическому обновлению также настраиваются параметры пути для текущего пользователя (без необходимости доступа администратора). Installing via the Microsoft Store uses the basic Python3 interpreter, but handles set up of your PATH settings for the current user (avoiding the need for admin access), in addition to providing automatic updates. Это особенно полезно, если вы работаете из среды образовательного учреждения или являетесь частью организации, которая ограничивает разрешения или административный доступ на компьютере. This is especially helpful if you are in an educational environment or a part of an organization that restricts permissions or administrative access on your machine.
Если вы используете Python в Windows для разработки веб-приложений, мы рекомендуем настроить среду разработки другим образом. If you are using Python on Windows for web development, we recommend a different set up for your development environment. Вместо установки непосредственно в Windows рекомендуется установить и использовать Python через подсистему Windows для Linux. Rather than installing directly on Windows, we recommend installing and using Python via the Windows Subsystem for Linux. Справочные сведения см. в следующих статьях: Начало работы с Python для разработки веб-приложений в Windows. For help, see: Get started using Python for web development on Windows. Если вы заинтересованы в автоматизации общих задач в операционной системе, ознакомьтесь с нашим руководством: Начало работы с Python в Windows для создания сценариев и автоматизации If you’re interested in automating common tasks on your operating system, see our guide: Get started using Python on Windows for scripting and automation. В некоторых сложных сценариях (например, при необходимости модификации или доступа к установленным файлам Python, создания копий двоичных файлов или непосредственного использования библиотек DLL Python) может потребоваться загрузить определенный выпуск Python непосредственно с сайта python.org или установить альтернативное средство, например Anaconda, Jython, PyPy, WinPython, IronPython и т. д. Мы рекомендуем это только в том случае, если вы более продвинутый программист на Python и у вас есть конкретная причина выбрать альтернативную реализацию. For some advanced scenarios (like needing to access/modify Python’s installed files, make copies of binaries, or use Python DLLs directly), you may want to consider downloading a specific Python release directly from python.org or consider installing an alternative, such as Anaconda, Jython, PyPy, WinPython, IronPython, etc. We only recommend this if you are a more advanced Python programmer with a specific reason for choosing an alternative implementation.
Установка Python Install Python
Чтобы установить Python с помощью Microsoft Store, сделайте следующее: To install Python using the Microsoft Store:
Перейдите в меню Пуск (значок Windows в нижнем левом углу), введите «Microsoft Store» и щелкните ссылку, чтобы открыть магазин. Go to your Start menu (lower left Windows icon), type «Microsoft Store», select the link to open the store.
Когда магазин откроется, выберите Поиск в верхнем правом меню и введите «Python». Once the store is open, select Search from the upper-right menu and enter «Python». Выберите «Python 3.9» из результатов в разделе приложений. Open «Python 3.9» from the results under Apps. Щелкните Получить. Select Get.
После того как Python завершит процесс загрузки и установки, откройте Windows PowerShell, используя меню Пуск (значок Windows в нижнем левом углу). Once Python has completed the downloading and installation process, open Windows PowerShell using the Start menu (lower left Windows icon). После открытия PowerShell введите Python —version , чтобы убедиться, что Python 3 установлен на компьютере. Once PowerShell is open, enter Python —version to confirm that Python3 has installed on your machine.
Установка Python из Microsoft Store содержит стандартный диспетчер пакетов pip. The Microsoft Store installation of Python includes pip, the standard package manager. Pip позволяет устанавливать дополнительные пакеты, которые не входят в стандартную библиотеку Python, и управлять ими. Pip allows you to install and manage additional packages that are not part of the Python standard library. Чтобы убедиться, что у вас есть pip, который можно использовать для установки пакетов и управления ими, введите pip —version . To confirm that you also have pip available to install and manage packages, enter pip —version .
Установка Visual Studio Code Install Visual Studio Code
При использовании VS Code в качестве текстового редактора или интегрированной среды разработки (IDE) вам доступны IntelliSense (помощь в завершении кода), анализ кода (помогает избежать ошибок в коде), поддержка отладки (помогает находить ошибки в коде после запуска), фрагменты кода (шаблоны для небольших повторно используемых блоков кода) и модульное тестирование (тестирование интерфейса кода с различными типами входных данных). By using VS Code as your text editor / integrated development environment (IDE), you can take advantage of IntelliSense (a code completion aid), Linting (helps avoid making errors in your code), Debug support (helps you find errors in your code after you run it), Code snippets (templates for small reusable code blocks), and Unit testing (testing your code’s interface with different types of input).
VS Code также содержит встроенный терминал, который позволяет открывать командную строку Python с помощью командной строки Windows, PowerShell или любой другой, создавая простой рабочий процесс между редактором кода и командной строкой. VS Code also contains a built-in terminal that enables you to open a Python command line with Windows Command prompt, PowerShell, or whatever you prefer, establishing a seamless workflow between your code editor and command line.
Чтобы установить VS Code, скачайте VS Code для Windows: https://code.visualstudio.com. To install VS Code, download VS Code for Windows: https://code.visualstudio.com.
Установив VS Code, необходимо также установить расширение Python. Once VS Code has been installed, you must also install the Python extension. Для установки расширения Python можно выбрать ссылку на VS Code в Marketplace или открыть VS Code и выполнить поиск по фразе Python в меню расширений (Ctrl+Shift+X). To install the Python extension, you can select the VS Code Marketplace link or open VS Code and search for Python in the extensions menu (Ctrl+Shift+X).
Python — интерпретируемый язык, и для выполнения кода Python необходимо указать VS Code, какой интерпретатор нужно использовать. Python is an interpreted language, and in order to run Python code, you must tell VS Code which interpreter to use. Мы советуем использовать Python 3.7, если только у вас нет конкретной причины для выбора другой программы. We recommend sticking with Python 3.7 unless you have a specific reason for choosing something different. После установки расширения Python выберите интерпретатор Python 3, открыв палитру команд (CTRL+SHIFT+P), и начните вводить команду Python: Select Interpreter (Python: выбор интерпретатора) для поиска, а затем выберите появившуюся команду. Once you’ve installed the Python extension, select a Python 3 interpreter by opening the Command Palette (Ctrl+Shift+P), start typing the command Python: Select Interpreter to search, then select the command. Вы также можете использовать параметр Select Python Environment (Выбрать среду Python) в нижней строке состояния, если она доступна (возможно, уже отображается выбранный интерпретатор). You can also use the Select Python Environment option on the bottom Status Bar if available (it may already show a selected interpreter). Команда предоставляет список доступных интерпретаторов, которые VS Code может найти автоматически, включая виртуальные среды. The command presents a list of available interpreters that VS Code can find automatically, including virtual environments. Если нужный интерпретатор не отображается, перейдите к статье о настройке сред Python. If you don’t see the desired interpreter, see Configuring Python environments.
Чтобы открыть терминал в VS Code, выберите Просмотр > Терминал или используйте клавиши CTRL+` (символ обратного апострофа). To open the terminal in VS Code, select View > Terminal, or alternatively use the shortcut Ctrl+` (using the backtick character). Терминалом по умолчанию является PowerShell. The default terminal is PowerShell.
В окне терминала VS Code откройте Python, просто введя команду: python Inside your VS Code terminal, open Python by simply entering the command: python
Попробуйте использовать интерпретатор Python, введя: print(«Hello World») . Try the Python interpreter out by entering: print(«Hello World») . Python вернет фразу «Hello World». Python will return your statement «Hello World».

Установка Git (необязательно) Install Git (optional)
Если вы планируете совместно работать над кодом Python с другими пользователями или размещать проект на сайте с открытым исходным кодом (например, GitHub), примите во внимание, что VS Code поддерживает управление версиями с помощью Git. If you plan to collaborate with others on your Python code, or host your project on an open-source site (like GitHub), VS Code supports version control with Git. Вкладка системы управления версиями в VS Code отслеживает все изменения и содержит общие команды Git (добавление, фиксация, принудительная отправка, извлечение) прямо в пользовательском интерфейсе. The Source Control tab in VS Code tracks all of your changes and has common Git commands (add, commit, push, pull) built right into the UI. Сначала необходимо установить Git для включения панели управления версиями. You first need to install Git to power the Source Control panel.
Скачайте и установите Git для Windows с веб-сайта git-scm. Download and install Git for Windows from the git-scm website.
В комплект входит мастер установки, который задает вам ряд вопросов о параметрах установки Git. An Install Wizard is included that will ask you a series of questions about settings for your Git installation. Рекомендуется использовать все параметры по умолчанию, если у вас нет конкретной причины изменить какой-либо из них. We recommend using all of the default settings, unless you have a specific reason for changing something.
Если вы никогда не использовали Git, обратитесь к руководствам по GitHub. Они помогут вам приступить к работе. If you’ve never worked with Git before, GitHub Guides can help you get started.
Учебник по некоторым основам работы с Python (на примере Hello World) Hello World tutorial for some Python basics
Python, согласно его создателю Гвидо ван Россуму, — это «язык программирования высокого уровня, и его основная философия проектирования — это удобочитаемость кода и синтаксис, позволяющий программистам выразить концепции в нескольких строках кода». Python, according to its creator Guido van Rossum, is a “high-level programming language, and its core design philosophy is all about code readability and a syntax which allows programmers to express concepts in a few lines of code.”
Python — интерпретируемый язык. Python is an interpreted language. В отличие от скомпилированных языков, в которых написанный код необходимо перевести в машинный код для выполнения процессором компьютера, код Python передается непосредственно интерпретатору и запускается напрямую. In contrast to compiled languages, in which the code you write needs to be translated into machine code in order to be run by your computer’s processor, Python code is passed straight to an interpreter and run directly. Просто введите код и запустите его. You just type in your code and run it. Попробуем сделать это! Let’s try it!
Откройте командную строку PowerShell и введите python , чтобы запустить интерпретатор Python 3. With your PowerShell command line open, enter python to run the Python 3 interpreter. (В некоторых инструкциях указано использовать команду py или python3 , которые также подойдут.) (Some instructions prefer to use the command py or python3 , these should also work). Если вы делаете все правильно, появится командная строка с тремя символами «больше, чем» (>>>). You will know that you’re successful because a >>> prompt with three greater-than symbols will display.
Существует несколько встроенных методов, позволяющих вносить изменения в строки в Python. There are several built-in methods that allow you to make modifications to strings in Python. Создайте переменную с помощью команды variable = ‘Hello World!’ . Create a variable, with: variable = ‘Hello World!’ . Нажмите клавишу ВВОД для создания новой строки. Press Enter for a new line.
Выведите переменную с помощью команды print(variable) . Print your variable with: print(variable) . Отобразится текст «Hello World!». This will display the text «Hello World!».
Выясните, сколько символов используется для переменной строки, с помощью команды len(variable) . Find out the length, how many characters are used, of your string variable with: len(variable) . Будет показано, что используется 12 символов. This will display that there are 12 characters used. (Обратите внимание, что пробел учитывается как символ в общей длине.) (Note that the blank space it counted as a character in the total length.)
Преобразуйте строковую переменную в буквы верхнего регистра: variable.upper() . Convert your string variable to upper-case letters: variable.upper() . Теперь преобразуйте строковую переменную в буквы нижнего регистра: variable.lower() . Now convert your string variable to lower-case letters: variable.lower() .
Подсчитайте, сколько раз буква «l» используется в строковой переменной: variable.count(«l») . Count how many times the letter «l» is used in your string variable: variable.count(«l») .
Найдите определенный символ в вашей строковой переменной. Давайте найдем восклицательный знак с помощью команды variable.find(«!») . Search for a specific character in your string variable, let’s find the exclamation point, with: variable.find(«!») . Будет показано, что восклицательный знак находится в позиции 11 строки. This will display that the exclamation point is found in the 11th position character of the string.
Замените восклицательный знак на вопросительный знак: variable.replace(«!», «?») . Replace the exclamation point with a question mark: variable.replace(«!», «?») .
Чтобы выйти из Python, введите exit() , quit() или нажмите клавиши CTRL+Z. To exit Python, you can enter exit() , quit() , or select Ctrl-Z.

Надеемся, вам понравилось использовать некоторые из встроенных в Python методов модификации строк. Hope you had fun using some of Python’s built-in string modification methods. Теперь попробуйте создать файл программы Python и запустить его с помощью VS Code. Now try creating a Python program file and running it with VS Code.
Учебник по использованию Python с VS Code (на примере Hello World) Hello World tutorial for using Python with VS Code
Команда VS Code составила отличный учебник по началу работы с Python с пошаговым руководством по созданию программы Hello World с помощью Python, запуску программного файла, настройке и запуску отладчика, а также установке пакетов, таких как matplotlib и numpy, для создания графического изображения в виртуальной среде. The VS Code team has put together a great Getting Started with Python tutorial walking through how to create a Hello World program with Python, run the program file, configure and run the debugger, and install packages like matplotlib and numpy to create a graphical plot inside a virtual environment.
Откройте PowerShell и создайте пустую папку с именем hello, перейдите в эту папку и откройте ее в VS Code: Open PowerShell and create an empty folder called «hello», navigate into this folder, and open it in VS Code:
После открытия среды VS Code, где показана новая папка hello в левом окне обозревателя, откройте окно командной строки в нижней панели VS Code, нажав CTRL+` (символ обратного апострофа) или выбрав Просмотр > Терминал. Once VS Code opens, displaying your new hello folder in the left-side Explorer window, open a command line window in the bottom panel of VS Code by pressing Ctrl+` (using the backtick character) or selecting View > Terminal. После запуска VS Code в папке эта папка станет вашей рабочей областью. By starting VS Code in a folder, that folder becomes your «workspace». VS Code хранит параметры, относящиеся к этой рабочей области, в файле .vscode/settings.json. Они отделены от параметров пользователя, которые хранятся глобально. VS Code stores settings that are specific to that workspace in .vscode/settings.json, which are separate from user settings that are stored globally.
Продолжайте работу с учебником в документации для VS Code: Сведения о создании файла исходного кода для Hello World на Python. Continue the tutorial in the VS Code docs: Create a Python Hello World source code file.
Создание простой игры с помощью Pygame Create a simple game with Pygame
Pygame — это популярный пакет Python для создания игр, который позволяет учащимся изучать программирование увлекательным способом. Pygame is a popular Python package for writing games — encouraging students to learn programming while creating something fun. Pygame отображает графические изображения в новом окне, поэтому метод «только командной строки» WSL не подойдет. Pygame displays graphics in a new window, and so it will not work under the command-line-only approach of WSL. Но если вы установили Python с помощью Microsoft Store, как описано в этом учебнике, все получится. However, if you installed Python via the Microsoft Store as detailed in this tutorial, it will work fine.
После установки Python установите Pygame из командной строки (или терминала в VS Code), введя python -m pip install -U pygame —user . Once you have Python installed, install pygame from the command line (or the terminal from within VS Code) by typing python -m pip install -U pygame —user .
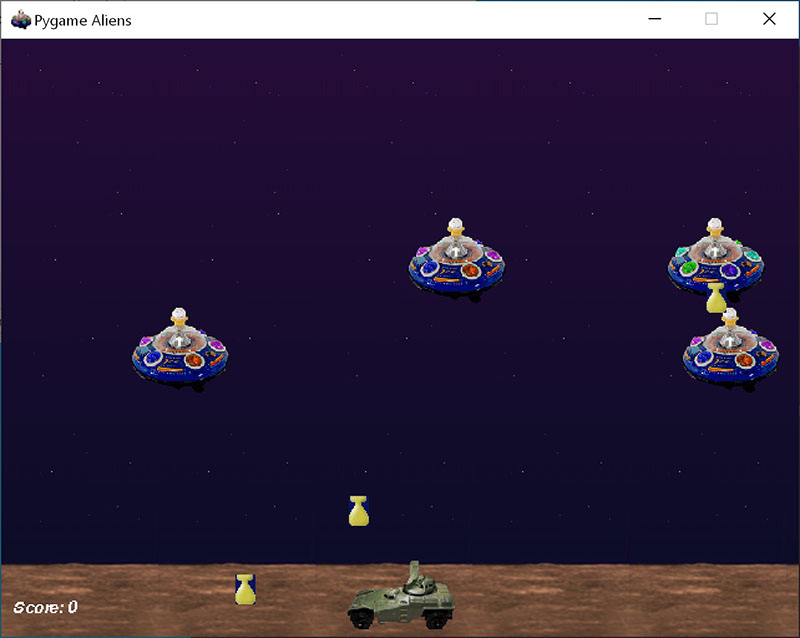
Протестируйте установку, запустив пример игры: python -m pygame.examples.aliens Test the installation by running a sample game : python -m pygame.examples.aliens
Если все в порядке, откроется окно игры. All being well, the game will open a window. По завершении игры закройте окно. Close the window when you are done playing.
Вот как начать написание кода собственной игры: Here’s how to start writing your own game.
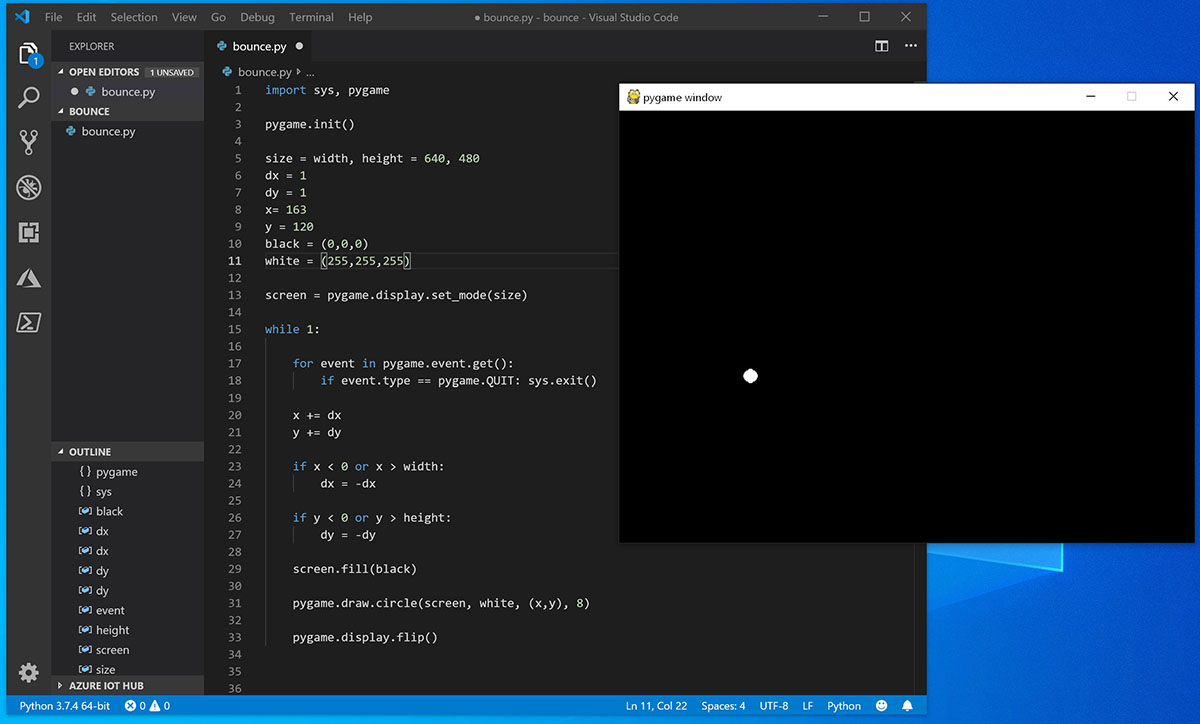
Откройте PowerShell (или командную строку Windows) и создайте пустую папку с именем bounce. Open PowerShell (or Windows Command Prompt) and create an empty folder called «bounce». Перейдите к этой папке и создайте файл с именем bounce.py. Navigate to this folder and create a file named «bounce.py». Откройте папку в VS Code: Open the folder in VS Code:
С помощью VS Code введите следующий код Python (или скопируйте и вставьте его): Using VS Code, enter the following Python code (or copy and paste it):
Сохраните его как: bounce.py . Save it as: bounce.py .
Запустите его в терминале PowerShell, введя: python bounce.py . From the PowerShell terminal, run it by entering: python bounce.py .
Попробуйте изменить некоторые из чисел, чтобы увидеть, как они влияют на прыгающий шарик. Try adjusting some of the numbers to see what effect they have on your bouncing ball.
Дополнительные сведения о создании игр с помощью Pygame см. на сайте pygame.org. Read more about writing games with pygame at pygame.org.
Материалы для непрерывного обучения Resources for continued learning
Мы рекомендуем использовать следующие ресурсы, чтобы продолжить изучение разработки на Python в Windows. We recommend the following resources to support you in continuing to learn about Python development on Windows.
Онлайн-курсы для изучения Python Online courses for learning Python
Введение в Python на Microsoft Learn. Попробуйте интерактивную платформу Microsoft Learn и получите навыки выполнения этого модуля, охватывающего основы написания базового кода Python, объявления переменных и работы с входными и выходными данными консоли. Introduction to Python on Microsoft Learn: Try the interactive Microsoft Learn platform and earn experience points for completing this module covering the basics on how to write basic Python code, declare variables, and work with console input and output. Интерактивная среда песочницы предоставляет эту отличную возможность начать пользователям, у которых еще не настроена среда разработки Python. The interactive sandbox environment makes this a great place to start for folks who don’t have their Python development environment set up yet.
Python на Pluralsight: 8 курсов, 29 часов. Схема обучения Python на Pluralsight предлагает онлайн-курсы, охватывающие различные темы, связанные с Python, включая средство для измерения навыков и поиска пробелов в знаниях. Python on Pluralsight: 8 Courses, 29 Hours: The Python learning path on Pluralsight offers online courses covering a variety of topics related to Python, including a tool to measure your skill and find your gaps.
Учебники на сайте LearnPython.org. Приступите к изучению Python без необходимости дополнительной установки или настройки с помощью этих бесплатных интерактивных учебников по Python от DataCamp. LearnPython.org Tutorials: Get started on learning Python without needing to install or set anything up with these free interactive Python tutorials from the folks at DataCamp.
Учебники на сайте Python.org. Предоставляют читателям неформальное описание основных понятий и функций языка и системы Python. The Python.org Tutorials: Introduces the reader informally to the basic concepts and features of the Python language and system.
Изучение Python на сайте Lynda.com. Основные сведения о Python. Learning Python on Lynda.com: A basic introduction to Python.
Работа с Python в VS Code Working with Python in VS Code
Редактирование Python в VS Code. Узнайте больше о том, как воспользоваться преимуществами автозаполнения VS Code и поддержкой IntelliSense для Python, включая их настройку или отключение. Editing Python in VS Code: Learn more about how to take advantage of VS Code’s autocomplete and IntelliSense support for Python, including how to customize their behavior. or just turn them off.
Анализ кода Python. Анализ кода — это процесс запуска программы, которая будет анализировать код на наличие возможных ошибок. Linting Python: Linting is the process of running a program that will analyse code for potential errors. Узнайте о различных формах поддержки анализа кода VS Code для Python и о том, как выполнить его настройку. Learn about the different forms of linting support VS Code provides for Python and how to set it up.
Отладка Python. Отладка — это процесс обнаружения и удаления ошибок из компьютерной программы. Debugging Python: Debugging is the process of identifying and removing errors from a computer program. В статье по этой ссылке описывается инициализация и настройка отладки для Python с помощью VS Code, установка и проверка точек останова, присоединение локального скрипта, выполнение отладки для различных типов приложений или на удаленном компьютере, а также некоторые основные способы устранения неполадок. This article covers how to initialize and configure debugging for Python with VS Code, how to set and validate breakpoints, attach a local script, perform debugging for different app types or on a remote computer, and some basic troubleshooting.
Модульное тестирование Python. В статье по этой ссылке содержатся некоторые основные сведения о модульном тестировании, включении платформы тестирования, создании и выполнении тестов, отладке тестов и параметрах конфигурации теста, а также приведено пошаговое руководство с примером. Unit testing Python: Covers some background explaining what unit testing means, an example walkthrough, enabling a test framework, creating and running your tests, debugging tests, and test configuration settings.


