- Как проверить pgp signature linux
- Прозрачно подписанные(Clearsigned) документы
- Отделённая подпись
- How to Verify PGP Signature of Downloaded Software on Linux
- Example: Verify PGP Signature of VeraCrypt
- Importing Public Key from a Trusted Source
- How Do I Verify a PGP Signature?
- How PGP Works
- PGP Signatures
- How Do I Verify a PGP Signature?
- Verifying SHA256SUMS.gpg
- Searching gpg Keys:
- Conclusion
- About the author
- David Adams
- Простой способ проверки подписи PGP в программном обеспечении биткоина
- 1. Импортируйте открытый ключ, используемый в качестве подписи на загрузочной странице Electrum
- 2. Проверка подлинности открытого ключа
- 3. Используйте GPG для проверки загруженных файлов
Как проверить pgp signature linux
Цифровая подпись удостоверяет создателя и дату создания документа. Если документ будет каким-либо образом изменен, то проверка цифровой подписи будет неудачной. Цифровая подпись может использоваться в тех же целях, что и обычная подпись. Исходные тексты GnuPG, например, подписаны, и Вы можете убедиться, что они дошли до Вас неизменёнными.
Создание и проверка подписей отличается от зашифрования/расшифрования. При подписи документа используется закрытый ключ подписывающего, а проверяется подпись с использованием его открытого ключа. Например, Alice использует свой секретный ключ, чтобы подписать свою новую статью в журнал. Редактор, получив письмо, использует открытый ключ Alice, чтобы проверить, что письмо действительно от Alice и не было изменено за время пересылки.
Для подписи документов используется команда —sign .
Если не указать подписываемый документ, то данные считываются со стандартного ввода. Перед подписью документ сжимается. Подписанный документ выводится в двоичном формате.
Имея подписанный документ, Вы можете либо только проверить подпись, либо проверить подпись и восстановить исходный документ. Для проверки подписи используется команда —verify . Для проверки подписи и извлечения документа используется команда —decrypt .
Прозрачно подписанные(Clearsigned) документы
Обычно цифровые подписи применяются при подписи сообщений usenet и e-mail. При этом нежелательно сжимать подписываемые документы. Команда —clearsign добавляет к документу цифровую подпись в формате ASCII, не изменяя при этом сам документ.
Отделённая подпись
Применение подписанных документов ограниченно. Получатель должен восстанавливать документ из подписанной версии, и даже в случае прозрачной подписи, подписанный документ должен быть отредактирован для получения оригинала. Поэтому имеется третий метод подписи документов, который создает отделённую подпись (detached signature). Отделённая подпись создается при использовании команды —detach-sign .
Для проверки подписи необходимы и подпись, и сам документ. Для проверки используется команда —verify .
Источник
How to Verify PGP Signature of Downloaded Software on Linux
PGP (Pretty Good Privacy) is a public key cryptography software that can be used to encrypt and sign data communication. In this tutorial, we will look at how to verify the PGP signature of software downloaded from the Internet on Linux.
Linux users can securely install software from their distribution’s repositories. But there are times when you need to download and install software from a website. How can you be sure that the software you downloaded wasn’t tampered with?
Some software authors sign their software using a PGP program such as GPG (GNU Privacy Guard), which is a free software implementation of the OpenPGP standard. In that case, you can verify the integrity of software using GPG.
The process is relatively simple:
- You download the public key of the software author.
- Check the public key’s fingerprint to ensure that it’s the correct key.
- Import the correct public key to your GPG public keyring.
- Download the PGP signature file of the software.
- Use public key to verify PGP signature. If the signature is correct, then the software wasn’t tampered with.
We will use VeraCrypt as an example to show you how to verify PGP signature of downloaded software.
Example: Verify PGP Signature of VeraCrypt
Although VeraCrypt is open source software, it isn’t included in Ubuntu repository. We can download VeraCrypt Linux installer from official website. I use Ubuntu 20.04 desktop, so I download the .deb file for Ubuntu 20.04.
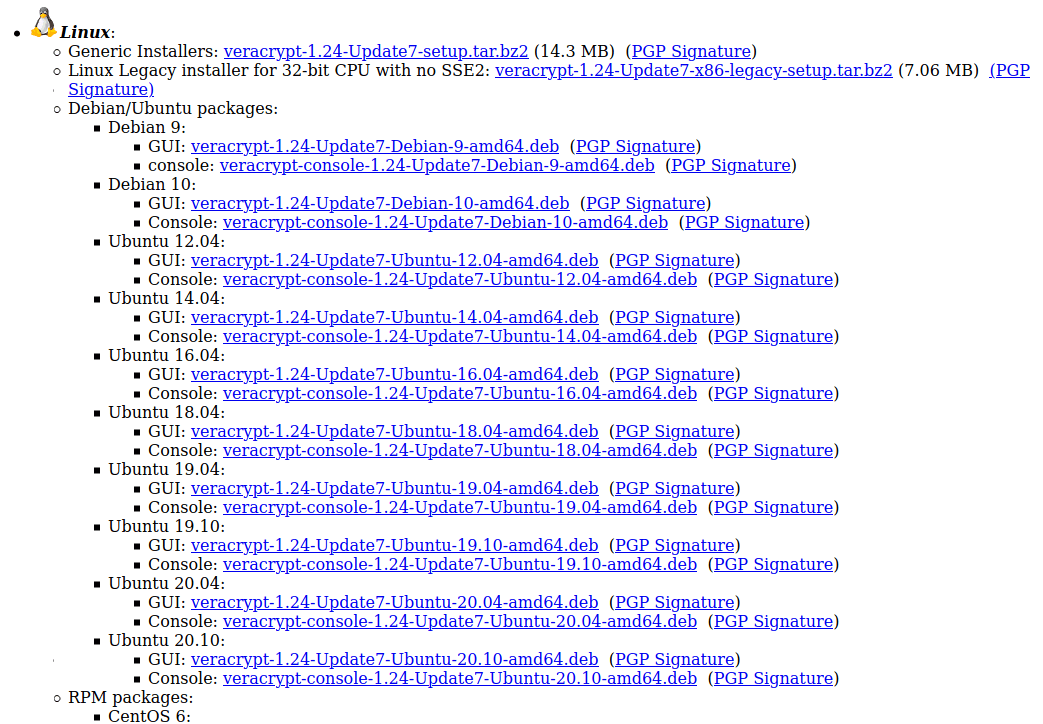
On the VeraCrypt download page, you can also find the PGP public key and PGP signature download link. Click the links to download these two files. You can run the following command to download PGP public key of VeraCrypt.
Before you do anything with the public key, you must always check the key’s fingerprint to see if it’s the correct key. Display the fingerprint of the key using the command below.
The second line of the output is the key’s fingerprint.
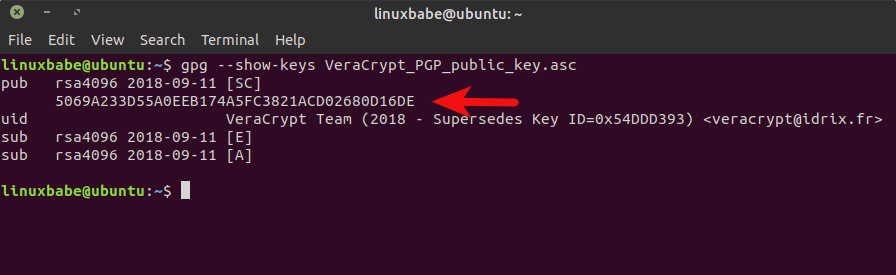
If you are using a very old version of GPG ( gpg —version ) like 1.4.20, then use the following command to display the fingerprint.
Compare it with the fingerprint published on VeraCrypt website.
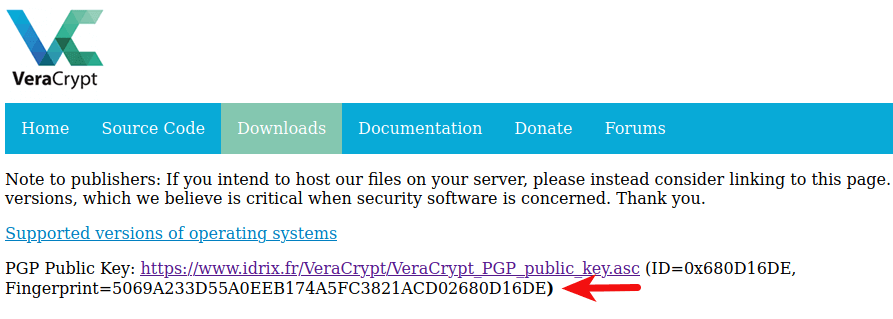
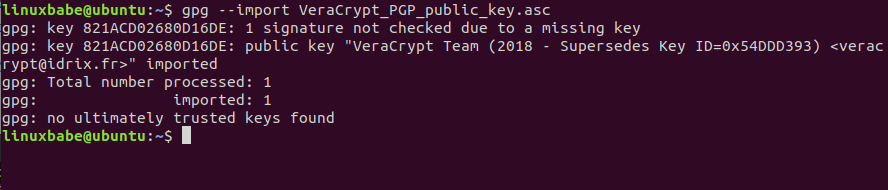
As you can see, the two fingerprints are identical, which means the public key is correct. So you can import the public key to your GPG public keyring with:
Now verify the signature of the software installer file using the command below. You need to specify the signature file ( .sig ) and the software installer file. This is a detached signature, meaning that the signature and software are in separate files.
The output should say “Good Signature”.
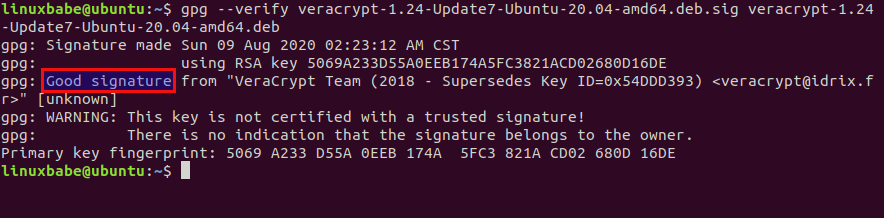
The signature is a hash value, encrypted with the software author’s private key. GPG uses the public key to decrypt hash value, then calculate the hash value of VeraCrypt installer and compare the two. If these two hash values match, then the signature is good and the software wasn’t tampered with.
If GPG tells you it’s a bad signature, then the software installer was tampered with or corrupted.
Importing Public Key from a Trusted Source
Note that if the software author tells you his/her public key ID on the website, then you can import the public key with the following command, so you don’t have to manually download the PGP public key and import it to your keyring.
Then display the fingerprint with:
And compare the fingerprint from output with the one published on website. This is more secure because the public key is imported from a public key server, which by default is set to hkp://keys.gnupg.net in
/.gnupg/gpg.conf file. There’re hundreds of public keyservers around the world. Ubuntu has their own key server. MIT also has one.
If you see the following error,
then you can try a different key server, like this:
I hope this tutorial helped you verify PGP signature of software downloads. As always, if you found this post useful, then subscribe to our free newsletter or follow us on Twitter or like our Facebook page.
Источник
How Do I Verify a PGP Signature?
PGP is not only used to secure information from cyber threats but also to check file integrity.
This tutorial explains easily how PGP works and how to verify PGP signatures.
How PGP Works
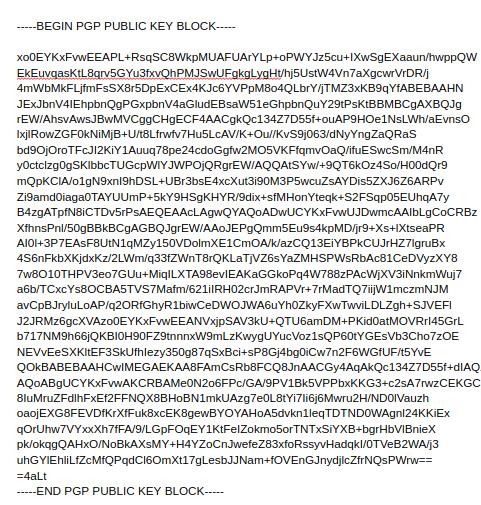
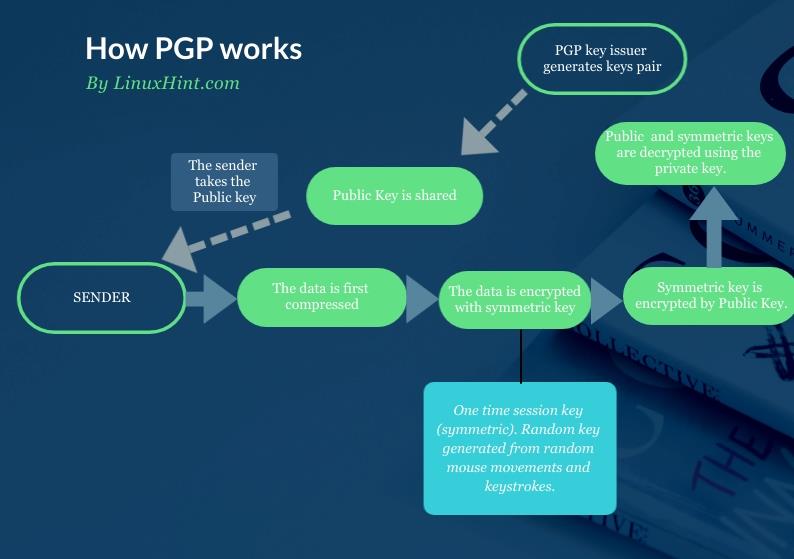
The image below depicts a PGP public key. This PGP public key can be decrypted only with a specific private PGP key. The issuer of the public key below also issued a private PGP key since they are generated in the same process. He only shares the public key.
If you take his public key to encrypt a message to him, he will be able to decrypt the message using his private key. Only his private key can decrypt the message you encrypted using his public key.
The information is encrypted using the public key, and decrypted using the private key. This is called asymmetric encryption.
So even if an attacker manages to intercept the message without the private key, he is unable to see the message content.
The advantage of asymmetric encryption is the simplicity to exchange keys. But its disadvantage is it can’t encrypt large amounts of data, and that’s why PGP implements both of them.
Symmetric encryption is applied when the public key is used to encrypt the protected data. With the public key, the sender does two things: first generates the symmetric encryption to protect the data, and then it applies asymmetric encryption, which does not encrypt the data itself, but the symmetric key, which protects the data.
To be more technical, before the symmetric key is applied, the data is also compressed before being encrypted with the symmetric key and public key. The following chart flow shows the whole process:
PGP Signatures
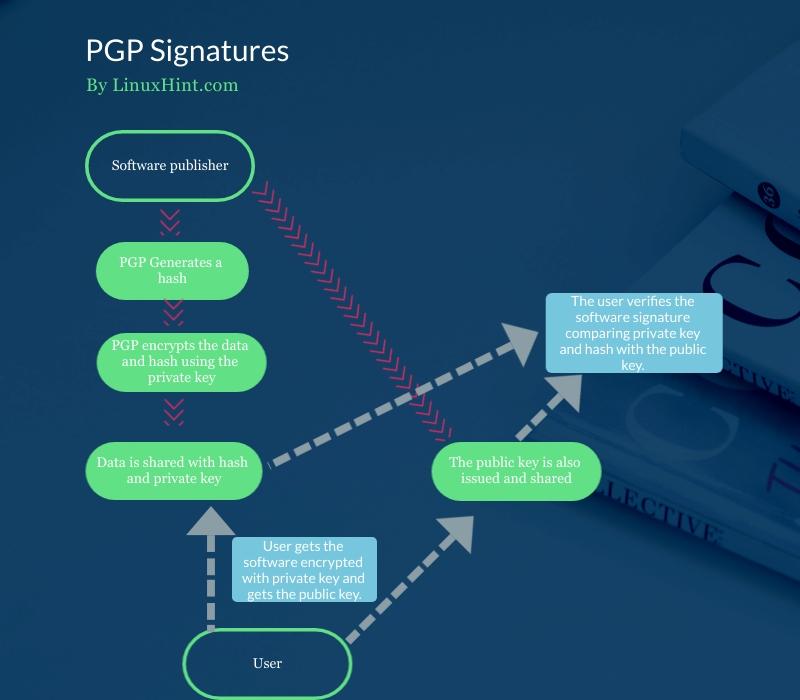
PGP is also used to check packages’ integrity. This is achieved through digital signature, which can be done with PGP.
First, PGP generates a hash that is encrypted with the private key. Both private key and hash can be decrypted using the public key.
PGP creates a digital signature, for example, for an ISO image using DSA or RSA algorithms. In this case, the private key is attached to the software or ISO Image, contrary to the operation described previously. The public key is also shared.
Users use the public key to verify the signature attached to the released software.
The following chart flow shows how the private key and hash is attached to the software and how the user takes the software with the attached hash and private key together with the public key to verify the signature:
How Do I Verify a PGP Signature?
The first example shows how to verify the Linux kernel signature. To try it, access https://kernel.org and download a kernel version and its PGP file. For this example, I will download files linux-5.12.7.tar.xz and linux-5.12.7.tar.sign.

The first example shows how to verify the signature with a single command. According to the man page, this option combination is going to be deprecated in future versions. However, it is still widely used, and while the specific combination will be deprecated, the options will remain.
The first option –keyserver-options allows defining options for the keyserver where public keys are stored. Basically, this allows the implementation of public keys fetching options.
The –keyserver-options is combined with the –auto-key-retrieve option to automatically retrieve public keys from a keyserver when verifying signatures.
To find the public keys, this command will read the signature looking for a defined preferred keyserver or signer’s ID through a lookup process using Web Key Directory.
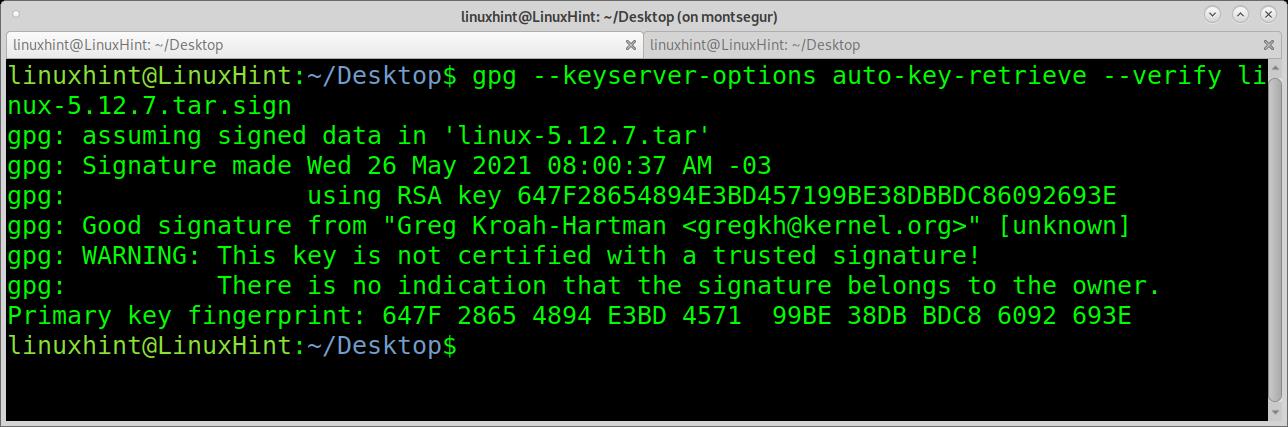
As you can see, the signature is good, but there is a warning message saying gpg can’t confirm the signature belongs to the owner. Anyone can issue a public signature as Greg Krohan-Hartman. You know the signature is legitimate because you trust the server you have downloaded it from. In this case, it is specified in the .sign downloaded from kernel.org.
This warning is always present, and you can avoid it by adding signatures to a signature trusted list using the option –edit-key trust. The truth is no user does it, and the Gpg community requested the warning removal.
Verifying SHA256SUMS.gpg
In the following example, I will verify the integrity of an old Kali Linux image I found in my box. For this purpose, I downloaded the SHA256SUMS.gpg and SHA256SUMS files belonging to the same iso image.
Once you download an iso image, the SHA256SUMS.gpg, and SHA256SUMS, you need to get the public keys. In the following example, I fetch the keys using wget and gpg –import (Kali verification instructions link to this key server).
Then I verify the file integrity by calling gpg with the –verify argument:
wget -q -O — https: // archive.kali.org / archive-key.asc | gpg —import
gpg —verify SHA256SUMS.gpg SHA256SUMS
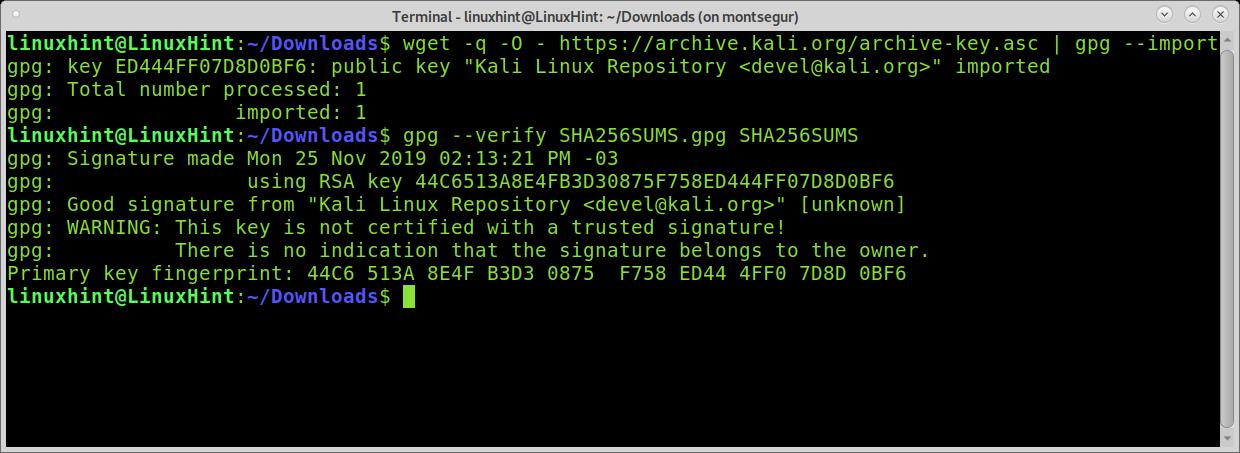
As you can see, the signature is good, and the verification was successful.
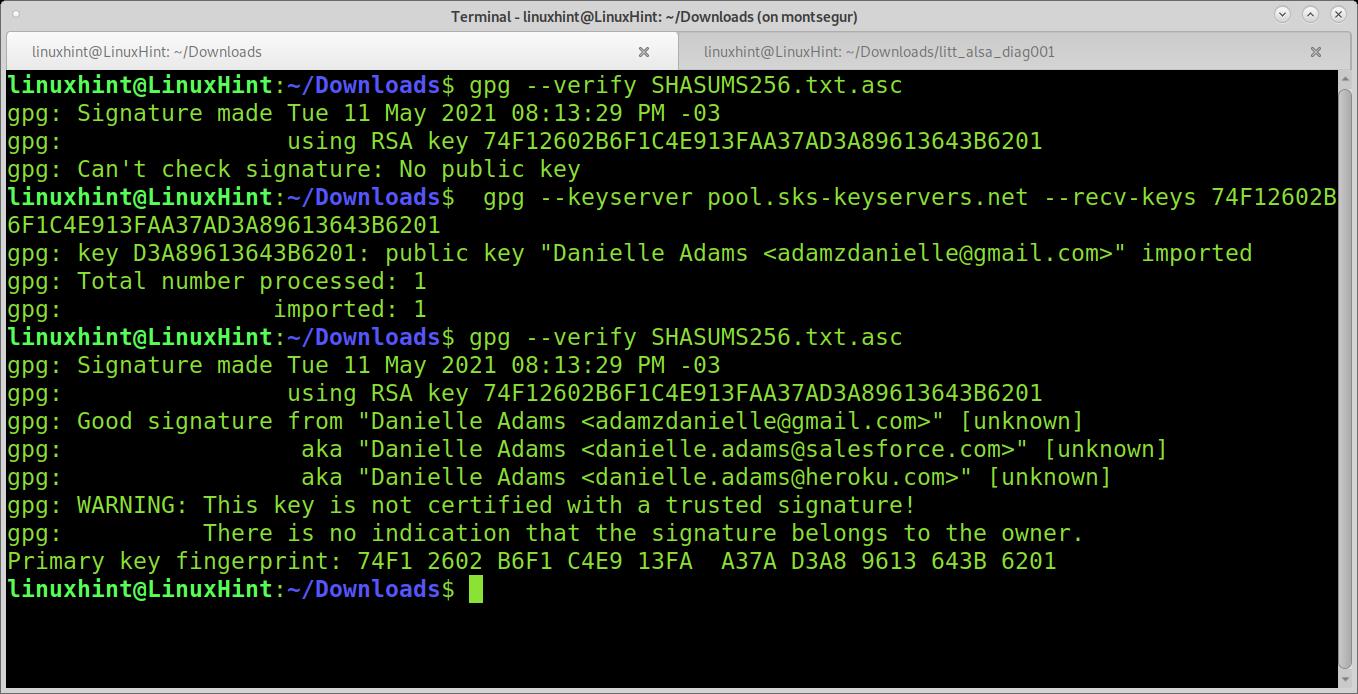
The following example shows how to verify a NodeJS download. The first command returns an error because there is no public key. The error indicates I need to search for the key 74F12602B6F1C4E913FAA37AD3A89613643B6201. Usually, you can also find the key ID in the instructions.
By using the option –keyserver, I can specify the server to search for the key. By using the option –recv-keys, I retrieve keys. Then the verification works:
I copy the key I need to fetch, and then I run:
gpg —keyserver pool.sks-keyservers.net —recv-keys
gpg —verify SHASUMS256.txt.asc
Searching gpg Keys:
If auto retrieving keys doesn’t work and you can’t find the verification-specific instructions, you can search the key in a keyserver using the option –search-key.

As you can see, the key was found. You can also retrieve it by pressing the number of the key you want to retrieve.
Conclusion
Verifying downloads’ integrity may prevent serious problems or explain them, for example, when downloaded software doesn’t work correctly. The process with gpg is pretty easy, as shown above, as long as the user gets all the necessary files.
Understanding asymmetric encryption or public and private keys-based encryption is a basic need to interact safely on the internet, for example, using digital signatures.
I hope this tutorial on PGP signatures was helpful. Keep following Linux Hint for more Linux tips and tutorials.
About the author
David Adams
David Adams is a System Admin and writer that is focused on open source technologies, security software, and computer systems.
Источник
Простой способ проверки подписи PGP в программном обеспечении биткоина
Если вы новичок в проектах с открытым кодом (биткоин — один из них), то вы, вероятно, не слышали о GPG (PGP — это оригинальное проприетарное программное обеспечение, GPG — это реализация PGP с открытым кодом). GPG — это ПО, используемое для создания цифровых подписей openPGP, которые разработчики биткоина используют при публикации программного обеспечения. GPG соответствует духу биткоина, поскольку не требуют посредничества третьих сторон. Однако Windows и macOS не поддерживают проверку подписей PGP; вы должны загрузить программное обеспечение GPG и выполнить проверку самостоятельно.
Ниже приведено руководство по проверке подписей PGP на примере популярного биткоин-кошелька Electrum. Руководство показывает, как убедиться в том, что загруженный вами файл был действительно опубликован разработчиком Electrum Томасом Вётлином. Для этого требуется:
- Подлинный отпечаток ключа PGP, который мы можем увидеть на презентации разработчика биткоина и участника Web of Trust Грегори Максвелла;
- Веб-сайт для анализа взаимосвязанных подписей PGP (https://pgp.cs.uu.nl);
- Программное обеспечение GPG, которое проверяет корректность подписей.
Процесс состоит из трёх этапов:
- Импорта открытого ключа, который используется в качестве подписи на загрузочной странице Electrum;
- Проверки подлинности открытого ключа;
- Проверки загруженного файла с использованием GPG.
1. Импортируйте открытый ключ, используемый в качестве подписи на загрузочной странице Electrum
Нужно импортировать ключ PGP на загрузочной странице electrum.org в GnuPG (GPGTools для macOS; пользователи Windows используют gpg4win). Получить информацию об этом ключе можно запустив в командной строке gpg —fingerprint 0x7F9470E6 (для Windows) или терминале (для macOS). В результате мы увидим отпечаток ключа — 6694 D8DE 7BE8 EE56 31BE D950 2BD5 824B 7F94 70E6, шестнадцатеричное число из 40 символов.
Теперь нужно определить отношение этого ключа к ключу доверенного человека. В данном случае мы будем определять это отношение к ключу Грегори Максвелла.
2. Проверка подлинности открытого ключа
Мы знаем ключ Грегори Максвелла — DE47 BC9E 6D2D A6B0 2DC6 10B1 AC85 9362 B041 3BFA, потому что он был включен в видеопрезентацию, которая, как мы предполагаем, не подделана. Я доверяю ему потому, что его ключ относится только к ключам доверенных людей (см. Web of Trust).
Мы вводим оба отпечатка пальца на веб-сайте PGP pathfinder & key statistics, чтобы узнать, являются ли они участниками Web of Trust. В результате мы должны получить этот список.
Мы видим, что между двумя ключами PGP существует как минимум восемь путей доверия. Путь доверия — это цепочка подписей, где A подтверждает, что личность B является доверенной, B подтверждает, что C является доверенной, C подтверждает D и так далее. Согласно этим результатам, существует 8 таких путей между ключом PGP Грегори Максвелла и ключом Томаса Вётлин, который в свою очередь связан с сайтом electrum.org. Поэтому я делаю вывод, что ключ PGP, загруженный с веб-сайта https://www.electrum.org/, контролируется настоящим Томасом Вётлином.
Важное примечание: в идеале вы должны вручную импортировать ключи в ПО GPG. Если вы укажете своему ПО доверять ключу Максвелла, тогда ваше программное обеспечение предоставит ту же информацию, что была указана выше. Веб-сайт https://pgp.cs.uu.nl просто выполняет эту работу для вас. Если вы хотите хранить много биткоинов на кошельке, вам не следует использовать только https://pgp.cs.uu.nl.
Таким образом, мы проверили подлинность ключа PGP Томаса Вётлина.
3. Используйте GPG для проверки загруженных файлов
Теперь, когда мы определили, что ключ PGP с отпечатком 6694 D8DE 7BE8 EE56 31BE D950 2BD5 824B 7F94 70E6 является ключом Томаса Вётлина, мы можем проверить, что файлы, доступные для загрузки по адресу https://electrum.org/#download, были подписаны Томасом.
Загрузите инсталлятор и связанный файл подписи .asc в ту же папку. Для Windows выберите файл electrum-3.3.4-setup.exe и electrum-3.3.4-setup.exe.asc. Для macOS выберите electrum-3.3.4.dmg и electrum-3.3.4.dmg.asc.
Используйте GPG для проверки файла .asc. Для этого в gpg4win (для пользователей Windows) нужно щелкнуть правой кнопкой мыши на файле .asc и выбрать дополнительные параметры GpgEX > Verify. В GPGTools (пользователи macOS) нужно щелкнуть правой кнопкой мыши файл .asc и выбрать Services > OpenPGP: Verify Signature of File.
В Windows программа Kleopatra должна открыть диалоговое окно, в котором говорится:
Signature created on 2019-03-06 23:36:08 With certificate: 6694 D8DE 7BE8 EE56 31BE D950 2BD5 824B 7F94 70E6 The used key is not certified by you or any trusted person.
Kleopatra обнаружила, что файл был подписан ключом PGP с отпечатком 6694 D8DE 7BE8 EE56 31BE D950 2BD5 824B 7F94 70E6, тем же отпечатком, который, как мы знаем, принадлежит настоящему Томасу Вётлину. Такой отпечаток чрезвычайно сложно подделать.
В macOS должно появиться окно, в котором сказано:
electrum-3.3.4.dmg Signed by: Thomas Voegtlin (https://electrum.org) (7F9470E6) — undefined trust
Примечание: если у вас есть проблемы с проверкой подписи, потому что ваше ПО GPG говорит, что подпись была сгенерирована с использованием отпечатка, который отличается от того, который вы ожидали увидеть, тогда возможно, что для подписи использовался подключ. Ключ PGP может иметь «подключ», предназначенный для подписи файлов вместо первичного ключа. Ищите отпечатки подраздела в деталях ключа, который вы импортировали (в Kleopatra (Windows) или GPG Keychain (macOS)). Отпечаток первичного ключа и подключа представляют собой шестнадцатеричные числа из 40 символов.
Мы убедились, что файлы, загруженные с https://electrum.org, подписаны Томасом Вётлином, разработчиком Electrum, исходя из следующих предположений:
- Отпечаток ключа Грегори Максвелла в этом видео правильный.
- Веб-сайт https://pgp.cs.uu.nl предоставил правильную информацию о путях доверия.
- Программа GPG корректно проверила подпись.
В идеальном мире мы бы присутствовали на «вечеринке по верификации ключей» с разработчиками биткоина (Грегори Максвеллом, Люка Дашжраом, Томасом Вётлином, Владимиром ван дер Лааном, Питером Тоддом и так далее). Тогда мы бы были полностью уверенны в подлинности загружаемого программного обеспечения биткоина. Но на практике это пока самый простой метод проверки, поскольку он требует лишь предположения о том, что отпечаток ключа PGP в видео Грегори Максвелла является реальным ключом реального Грегори Максвелла.
Этот метод также применяется для проверки подписей в других кошельках, в том числе Bitcoin Core.
Источник


