- Сжатие и распаковка файловых архивов с помощью Терминала на Mac
- Создание сжатого tar-архива
- Распаковка архива tar
- Секреты Терминала. Часть 20: Упаковка и распаковка архивов различных форматов
- GNU Zip
- Как создать архив .TAR.GZ (GZip) на macOS без установленного приложения
- Как распаковать tar gz mac os
- Part 1. How to Unzip a Gz or Tar.gz File on Mac via Command Line
- Part 2 : How to Extract .gz/tar.gz File on Mac via TunesBro CleanGeeker
- How to unzip GZ files on Mac
- Why Use GZ Archives?
- How to open GZ files on Mac
- How to unzip GZ files with Terminal
- How to extract .gz archives with third-party apps
- How to extract a specific file from a tar archive?
Сжатие и распаковка файловых архивов с помощью Терминала на Mac
При передаче папок и нескольких файлов между компьютерами может быть полезно сжать их в один архив. Это экономит место, позволяет передавать всего один объект вместо множества объектов и упрощает возобновление передачи, если задача будет по какой-либо причине приостановлена.
В Терминале можно использовать команду GNU tar для сжатия и распаковки файловых архивов. Стандартным расширением файла для сжатого архива tar является .tgz, но иногда имена файлов имеют расширение .tar.gz. Если архив не сжат, его имя оканчивается просто на .tar.
Совет. Создавать и распаковывать архивы легче в Finder (команду tar в Терминале рекомендуется использовать только в том случае, если нужно создать именно архив tar). См. Сжатие и распаковка файлов и папок.
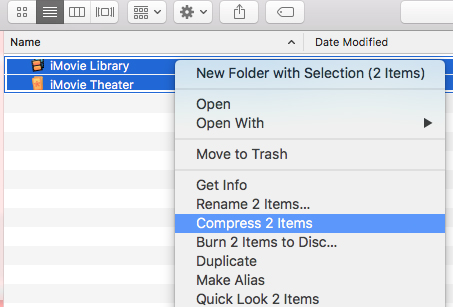
Создание сжатого tar-архива
В приложении «Терминал»  на Mac введите команду tar и нажмите клавишу Return.
Для простого сжатия папки с именем, например LotsOfFiles, можно ввести:
Флаг z указывает на то, что архив сжимается и объединяется в один файл. Этот параметр обычно используется, но он не обязателен.
Если папка имеет большой размер, можно добавить флаг v и следить за процессом сжатия:
Распаковка архива tar
Чтобы распаковать tar-архив на Mac, выполните одно из следующих действий.
В приложении «Терминал» на Mac введите команду tar с флагом x , затем нажмите клавишу Return. Для просмотра сообщений о ходе сжатия также используйте флаг v . Например:
В Finder  на Mac дважды нажмите файл tar.
Источник
Секреты Терминала. Часть 20: Упаковка и распаковка архивов различных форматов
Вот мы и дошли уже до 20-той темы фирменного цикла «Секреты Терминала«. Этот материал мы хотели бы посвятить созданию архивов популярных и не очень форматов, а также извлечению из них файлов. Давайте сразу к делу.
Терминал по умолчанию поддерживает следующие популярные форматы: zip, gzip, bzip и tar.
Если не вдаваться в тонкости, то можно моментально выдать читателям две команды: compress и uncompress. Первая упаковывает, а вторая распаковывает файлы, вот только на выходе мы получает стандартный Unix-овский формат сжатия Lempel Ziv и суффикс Z там, где привыкли видеть более обыденные расширения. Поэтому разумнее использовать описанные выше архиваторы (файл «index.txt» был выбран в качестве примера и может быть заменён на что угодно).
Zip — пожалуй, самый распространённый формат, поэтому рассмотрим его первым. Zip, кстати, единственный, кто не удаляет оригинальные файлы/архивы и работает с несколькими файлами.
Для упаковки одного файла:
zip index.zip index.txt
Для упаковки нескольких файлов:
zip index.zip index1.txt index2.txt index3.txt
GNU Zip
Упаковка GNU Zip (оригинальный файл удаляется, создаётся архив с суффикcом .gz):
Распаковка (здесь удаляется уже распакованный архив):
Упаковка BZip аналогична (оригинальный файл удаляется, создаётся архив с суффикcом .bz2):
Распаковка BZip (здесь удаляется уже распакованный архив):
Остался tar. Tar предназначен для архивации не только файлов, но и целых директорий, чтобы потом, например, сохранить их в качестве бэкапа или отправить по почте. Этот метод благополучно работает с GNU Zip, BZip и Zip. Родное расширение .TAR обычно не используется и в ход идёт тройка тех самых архиваторов. Команда для упаковки (GNU Zip):
tar -czvf Hello.tar.gz /Users/Wandarnem/Desktop/ololo
После нажатия «Enter» папка, находящаяся по адресу «/Users/Wandarnem/Desktop/ololo» сожмётся в архив «Hello.tar.gz». «-czvf» — дежурная комбинация, служащая для вывода дополнительных атрибутов команды. Она будет меняться в зависимости от типа выбранного архиватора:
- GNU Zip — «-czvf«
- BZip — «-cjvf«
- Zip — «-cZvf«
Само собой, суффикс «.gz» сменится на «.bz2» и «.Z» соответственно.
Для распаковки воспользуйтесь соответствующими командами (для GNU Zip, BZip и Zip соответственно):
tar -xfvf Hello.tar.bz2
tar -xZvf Hello.tar.Z
А ещё возьмите на заметку полезнейшую фишку tar’а по упаковке файлов определённого формата в конкретной директории. Например, если вам нужно сжать только изображения расширения .JPG, введите следующее:
Источник
Как создать архив .TAR.GZ (GZip) на macOS без установленного приложения
Вы, наверное, знаете, что Mac OS X / MacOS o .zip Архив может создать очень простой, выбрав папки и файлы для архивации, щелкните правой кнопкой мыши и в «контекстном меню» выберите параметр: «Компресс № Files».
Архивный файл будет создан в текущей папке с именем: «Archive.zip».
.TAR.GZ — это гораздо более продвинутая форма архивирования, которая используется, особенно когда нам нужно создавать архивы, содержащие много файлов и папок.
.tar.gz (GZIP) поставляется с алгоритм архивирования разработанный для систем UNIX / Linux. алгоритм DEFLATEИспользуется для включения архив GZIP Обеспечивает лучшее сжатие файлы с минимальный или не существует. В архивах .ZIP часто бывает, что заархивированные файлы имеют вид «коррумпированнымиИ непригодный для использования.
пользователи MacOS очень проста в архив файлов из одного или нескольких папок с помощью командной строки в терминале.
Командная строка для архивирования .tar.gz из Terminal такая же, как и в Linux:
tar -cvzf nume_arhiva.tar.gz folderdearhivat
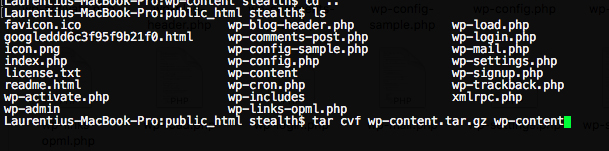
В сценарии, показанном на скриншоте выше, будет создан архив «wp-content.tar.gz» папки «wp-content» в WordPress.
Если вы хотите архивировать все фотографии в папке, вы можете использовать командную строку:
tar -cvzf nume_arhiva.tar.gz /calea/folder/poze/*.jpg
Используя «*» перед расширением «.jpg», вы будете архивировать только файлы, которые используют это расширение.
Извлечение архива .tar.gz осуществляется с помощью командной строки:
tar -xvf nume_arhiva.tar.gz
Команду архивирования можно комбинировать с расширенными параметрами. Используйте «-R«Чтобы заархивировать, например, все изображения в нескольких папках, игнорируя другие файлы, которые можно там найти.
Источник
Как распаковать tar gz mac os
Compressing multiple files into a single one has been a major task we do with computers. For Windows users, we are familiar with ZIP or RAR. However, for Mac computer gz or tar.gz file is more popular based on the nature macOS was built on with Unix. a .gz file is the outcome of a compressed file made by Gzip utility, which only compresses one file. Instead, tar.gz file is a compressed file made up by serveral single files. That’s the difference between .gz and tar.gz file.
By definition, therefore, you should be able to uncompress or unzip the file, and the command to be used for this purpose is «gunzip». On a Mac computer, you can use Terminal to run the gunzip command, but there are a few things to remember. You can also use a software utility for this purpose. Both methods are described in detail in the following sections.
Part 1. How to Unzip a Gz or Tar.gz File on Mac via Command Line
Terminal is Apple’s equivalent of the Windows shell, which is also known as Command Prompt. Using Terminal, you can easily uncompress a gz file. Once it has been unzipped, the file name will be retained and the .gz extension will be removed. The contents of the file will be extracted to the same directory where the .gz file is. Let’s see how to do this on a Mac:
Step 1. Open an instance of Terminal on your Mac by going to Applications >> Utilities and clicking on Terminal.
Step 2. In the Terminal window, use the ‘cd’ command to take you to the specific folder where your gz file is present. For example, if your file is in
/xyz/Documents, then type this command followed by Enter: cd
Step 3. Now run the following command in the command line of Terminal: gunzip filename.gz
You must be in the same directory as the .gz file, or this command will not work.
The above command will decompress the file and extract the contents into a folder with the same name as the .gz file. However, if there’s a file with the same filename already in that folder, you’ll get an overwrite prompt. For example, if you have a file called ‘Conversation1.doc’ in the folder and your .gz file is called ‘Conversation1.doc.gz’, then you will be prompted to accept or reject an overwrite of the existing file when you run the gunzip command. To automatically overwrite the original, you can force the decompression by using the ‘-f’ switch, in which case your command will need to be as follows. However, you will lose the original file if you do this: gunzip -f filename.doc.gz
There are clearly several issues that you have to watch for. First, you need to make sure that the Terminal shell is running in the same directory as your .gz file. Second, you need to make sure that any file with a similar filename is either renamed or moved to another directory if you want to keep it. Third, if the file is a .tar.gz, then in addition to decompressing the file, you will need a separate archive extractor utility to extract the contents of the .tar file that you get after running the gunzip command. Fourth, if you want to retain a copy of the .gz file, then you need to use a different switch, which is ‘-k’.
If you are not tech-savvy or have doubts about being able to do such intensive command line work, then you can consider a special software utility for Mac that can do the job for you
Part 2 : How to Extract .gz/tar.gz File on Mac via TunesBro CleanGeeker
This software (TunesBro CleanGeeker) will help you avoid any command line work, and you can easily extract a gz file on your Mac with just a couple of clicks. The CleanGeeker software is essentially a Mac optimization utility that can help manage your Mac’s memory resources by cleaning junk, duplicate and other unnecessary files. But it also has some very useful modules such as the Unarchiver (used here to extract gz files), Uninstaller for apps, Eraser for complete data deletion and many more.
Источник
How to unzip GZ files on Mac
Superpowers for your Mac
Most of us are familiar with ZIP files, and those who’ve used Windows would recognize RAR files as well. Both of those are popular archiving formats, frequently used to compress files and folders, and easily send them out without compromising their integrity.
Naturally, .zip and .rar are not the only archives available. If you use Mac or Linux, eventually you’ll encounter .z or .gz files as well.
What is a GZ file? The GZ (or GZIP) archive format was created by Jean-loup Gailly and Mark Adler, two software developers, back in 1992 who used the GNU Gzip compression algorithm to improve on the default compression process in UNIX. That’s why you most often see .gz files in macOS and Linux systems.
A unique feature of .gz files is that they can only contain one item each (unlike .zip or .rar). To combine multiple files under .gz format, you need to first use an archive utility like TAR, which would create a special .tar.gz or .tgz file format.
Zip and unzip with BetterZip
Get a world-class app for managing all types of archive formats on Mac. Free to try with Setapp membership.
Let’s see why you might want to use .gz files, how to open gz files on Mac, and how to extract .gz archives as well as create your own.
Why Use GZ Archives?
GZ or GZIP is still a widely used compression algorithm because it helps reduce the size of a file considerably while protecting its integrity. Importantly, GZIP compression doesn’t strip out the original file name, ownership, or timestamp. The latter is especially handy when working with files that can easily get truncated in transfer.
Today, you also often see .gz files being used in web development to compress web elements and make webpages load faster.
So how do you create and extract .gz archives on your Mac? You have a few options to do that.
How to open GZ files on Mac
While Windows users have to install additional apps and extensions to open GZ files, Mac users can do so by default.
Archive Utility, for example, which is Mac’s default archiving app (with no user interface) can easily extract .gz archives at any time. To do so, just double-click on the .gz file or right-click, go to Open With, and select Archive Utility.
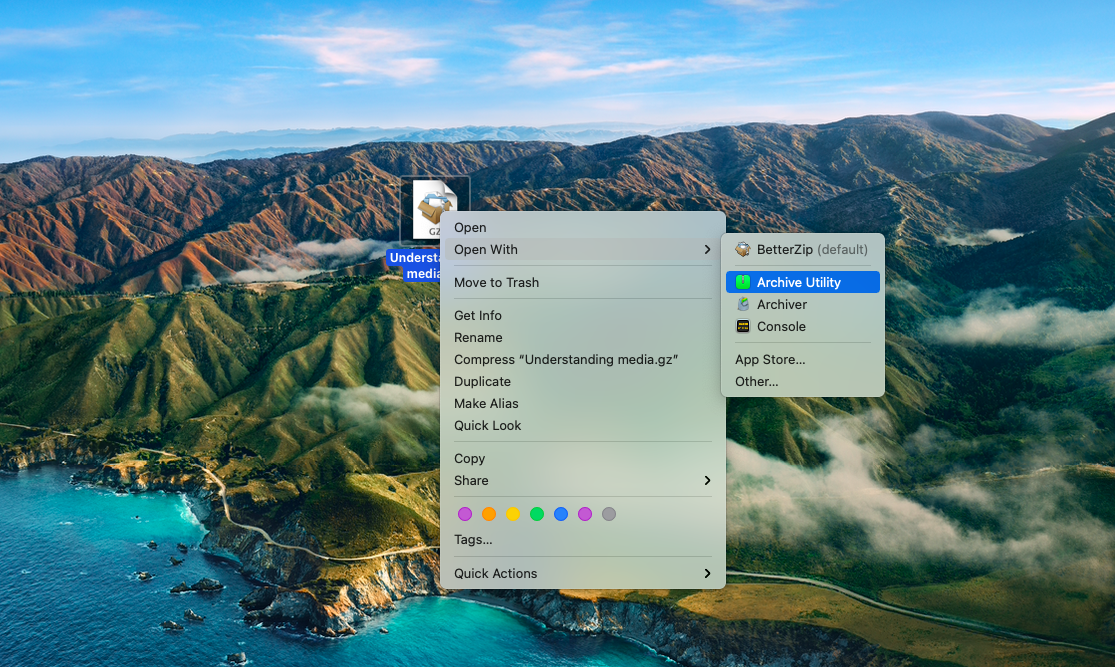
Unfortunately, while Archive Utility can unzip GZ files, it can’t zip them back into archives. For that, you need to either use Terminal or third-party software.
How to unzip GZ files with Terminal
Since .gz file format was originally created to make archiving better on UNIX systems, it can also be controlled by Mac’s command line — Terminal.
Terminal is very powerful, letting you do any action on your Mac without the graphical user interface. But it’s also quite unforgiving, since it’s very easy to do something very wrong. That’s why most people try to avoid it.
To safely extract .gz files, you can use Terminal’s gzip or gunzip commands. But, first, make sure that your terminal state is in the same folder and the files about to be zipped. You can use the ls -la command to print the files in the current folder and then navigate inside folders with the cd command or step back with the cd — command.
Alternatively, you can just also drag and drop your file onto the Terminal’s window.
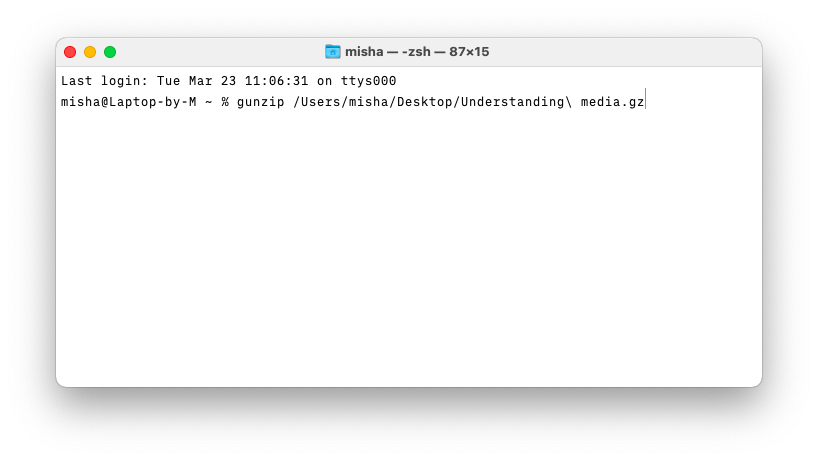
To unzip GZ files, use: gzip -d file.gz (where file.gz is the path to your file). For simpler syntax, you can also use gunzip to replace gzip -d, so type: gunzip file.gz
These commands will also remove the original file. To unzip GZ and keep the original file, use: gzip -dk file.gz
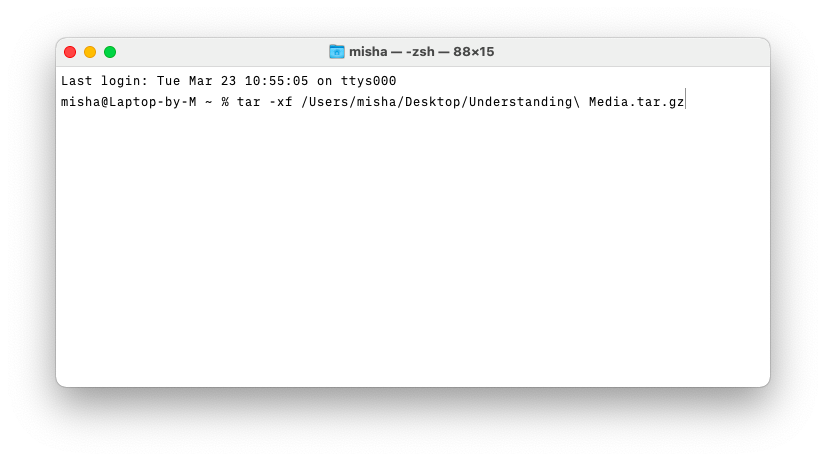
If you’re actually trying to extract a folder archive like .tar.gz, the Terminal command is a bit different: tar -xf file.tar.gz
All of the commands above will extract files in the same directory as the original archive. You can also now see why most people avoid using Terminal, it works like magic but, at the same time, it’s hard to understand how. Luckily, there are a few more powerful and user-friendly options you can turn to.
How to extract .gz archives with third-party apps
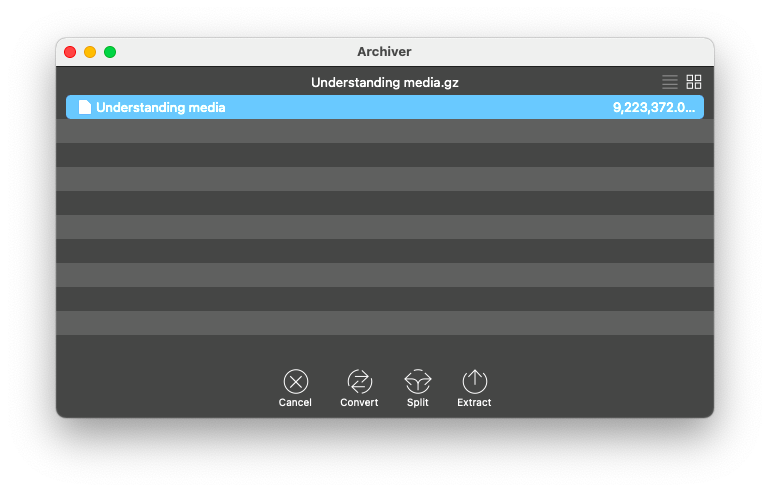
If you’re looking for fast and easy options to unzip GZ files, you should start with Archiver.
Archiver is a lightweight archiving utility that is blazing fast and supports all the archiving formats you’ll ever meet in your life. Its interface is so intuitive that you barely have to do anything, just follow a few prompts to either create or unpack an archive at any time.
Moreover, you can extract files out of the same archived folder selectively and preview them with Quick Look. You can also set passwords, combine a few archives together, or split large archives into equal parts.
To unzip GZ file with Archiver:
- Launch Archiver
- Drag and drop your archive onto the app
- Use Space to preview your file in Quick Look
- Click Extract
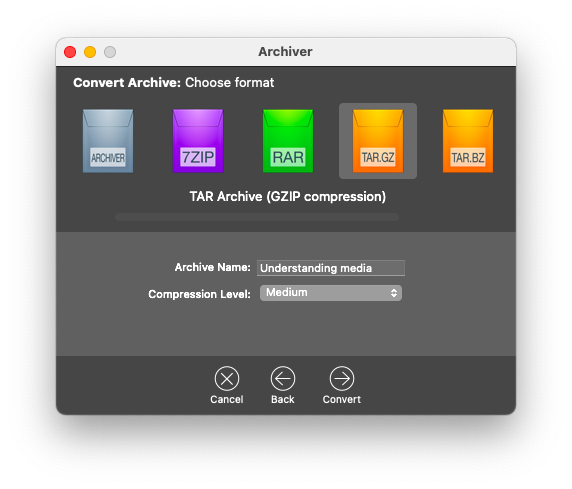
Similarly, to create an archive like .tar.gz, you can use the Convert feature in Archiver and choose TAR.GZ among the options. Then click Convert.
How to extract a specific file from a tar archive?
BetterZip is another powerful archive manager. It lets you browse and manage archives without even unarchiving them in the first place! So you can preview, rename, edit, and delete files right within the app.
In addition, BetterZip is a breeze to zip and extract more than 30 archive formats, install passwords, and even automate any archiving functionality with AppleScript.
To extract a specific file from a gzip-compressed archive with BetterZip:
- Launch BetterZip
- Drag and drop your file onto the app
- Preview with Space to launch Quick Look, if needed
- Click Extract in the top menu

As you can see, there’s no shortage of ways to create and open GZ files. For the most basic functionality, the default Archive Utility will suffice. For the most advanced users, learning a few Terminal commands could be helpful. But most people should probably try Archiver as the easiest way to unarchive files or BetterZip as the most flexible archiving solution on the market.
Best of all, Archiver and BetterZip are both available to you absolutely free for seven days through the trial of Setapp, a platform with more than 210 best-in-class Mac apps that cover any app category possible, from managing your daily tasks (2Do) to creating text templates for repeating messages (Rocket Typist). Try every Setapp app at no cost today and download dozens of wonderful apps to skyrocket your productivity.
Источник


