- Установка Anaconda в Ubuntu 16.04
- Требования
- Установка Anaconda
- Настройка виртуальной среды Anaconda
- Обновление Anaconda
- Удаление Anaconda
- Заключение
- Guide for Installing and Uninstalling Anaconda in Linux
- What is Anaconda?
- Install Anaconda in Linux
- Step 1: Download the correct version of Anaconda
- Step 2: Installing Anaconda through the command line installer
- Make Anaconda available for other users
- Uninstall Anaconda from Linux
Установка Anaconda в Ubuntu 16.04
Anaconda – это открытый пакетный менеджер и дистрибутив языков программирования Python и R. Он широко используется для обработки объемных данных, научных вычислений и прогностического анализа. В основно пакет предназначен для исследователей, разработчиков, бизнес-аналитиков, а также тех, кто работает в DevOps.
Anaconda предлагает набор пакетов с открытым исходным кодом, который на данный момент включает в себя более 720 экземпляров. Существует бесплатная и платная версия Anaconda.
Дистрибутив Anaconda поставляется с утилитой командной строки conda.
Данное руководство поможет установить Anaconda для Python 3 на сервере Ubuntu 16.04.
Требования
- Сервер Ubuntu 16.04
- Доступ к sudo
Все необходимые инструкции можно найти здесь.
Установка Anaconda
Чтобы установить Anaconda, загрузите установочный bash-сценарий программы, проверьте его на подлинность и целостность, а затем запустите.
Найдите на сайте проекта последнюю версию Anaconda для Python 3 и скопируйте ссылку на неё. На момент написания статьи такой версией является 4.2.0.
Перейдите в каталог /tmp, предназначенный для хранения временных файлов:
С помощью curl загрузите пакет:
curl -O https://repo.continuum.io/archive/Anaconda3-4.2.0-Linux-x86_64.sh
Теперь нужно проверить целостность пакета с помощью криптографического хэша и контрольной суммы SHA-256. Используйте команду sha256sum и укажите имя файла сценария:
Команда вернёт примерно следующее:
Сравните полученный вывод с хэшем загруженного пакета, который можно найти здесь. Эти значения должны совпадать. Если это так, значит, пакет не был повреждён во время загрузки, теперь его можно запустить. Чтобы запустить сценарий, введите:
bash Anaconda3-4.2.0-Linux-x86_64.sh
Welcome to Anaconda3 4.2.0 (by Continuum Analytics, Inc.)
In order to continue the installation process, please review the license
agreement.
Please, press ENTER to continue
Нажмите Enter, чтобы продолжить. Затем нажмите Enter, чтобы ознакомиться с лицензией. Программа предложит принять условия лицензии:
Do you approve the license terms? [yes|no]
Для этого введите yes.
После этого будет предложено выбрать место установки. Чтобы принять маршрут по умолчанию, нажмите Enter.
Anaconda3 will now be installed into this location:
/home/8host/anaconda3
— Press ENTER to confirm the location
— Press CTRL-C to abort the installation
— Or specify a different location below
[/home/8host/anaconda3] >>>
Установка займёт некоторое время. После её окончания вы увидите:
.
installation finished.
Do you wish the installer to prepend the Anaconda3 install location
to PATH in your /home/8host/.bashrc ? [yes|no] [no] >>>
Введите yes, чтобы получить доступ к команде conda. На экране появится вывод:
Prepending PATH=/home/8host/anaconda3/bin to PATH in /home/8host/.bashrc
A backup will be made to: /home/8host/.bashrc-anaconda3.bak
.
Чтобы активировать установку, введите команду:
Чтобы убедиться, что установка прошла успешно, попробуйте запустить команду conda, например:
Эта команда выведет на экран список доступных пакетов Anaconda:
# packages in environment at /home/8host/anaconda3:
#
_license 1.1 py35_1
_nb_ext_conf 0.3.0 py35_0
alabaster 0.7.9 py35_0
.
Настройка виртуальной среды Anaconda
Виртуальная среда Anaconda позволяет изолировать проекты Python друг от друга и использовать в них индивидуальный набор пакетов и версию Python. В каждой среде Anaconda вы можете указать требуемую версию Python и хранить все файлы проекта.
Для начала нужно узнать доступные версии Python:
conda search «^python$»
Команда выведет список версий Python, которые вы можете использовать, включая Python 3 и Python 2. В этом руководстве используем Python 3 и соответствующие версии пакетов.
Создайте среду с использованием последней версии Python 3. Для этого нужно присвоить значение 3 аргументу python. Имя виртуальной среды должно быть описательным (к примеру, вы можете указать название проекта или его версию); в руководстве среда условно называется my_env.
conda create —name my_env python=3
Команда выведет список пакетов, которые нужно загрузить и установить. Чтобы продолжить, введите y.
Утилита conda извлечёт все требуемые пакеты и создаст среду.
Чтобы активировать новую среду, введите:
source activate my_env
После этого командная строка изменится:
Убедитесь, что в среде используется необходимая вам версия Python:
$ python —version
Python 3.6.0 :: Continuum Analytics, Inc.
Чтобы отключить среду Anaconda, введите:
Примечание: source можно заменить символом точки.
Чтобы более точно указать версию Python, передайте её аргументу python, например:
conda create -n my_env35 python=3.5
Вы также можете обновить версию Python внутри одной ветки (например, Python 3.5.1 to Python 3.5.2) в соответствующей среде с помощью следующей команды:
conda update python
Также в аргументе python вы можете указать конкретную версию Python, например python=3.3.2.
Чтобы просмотреть все доступные среды, введите:
conda info —envs
# conda environments:
#
my_env /home/8host/anaconda3/envs/my_env
my_env35 /home/8host/anaconda3/envs/my_env35
root * /home/8host/anaconda3
Текущая активная среда отмечена звёздочкой.
Каждая среда, созданная с помощью conda create, по умолчанию содержит следующие пакеты:
Вы можете добавить в неё другие пакеты. К примеру, чтобы добавить numpy, нужно ввести команду:
conda install —name my_env35 numpy
Если вы ещё во время создания среды знаете, что вам понадобится какой-либо нестандартный пакет, вы можете указать его в команде conda create. Например, чтобы добавить в среду numpy:
conda create —name my_env python=3 numpy
Ненужную среду можно удалить с помощью следующей команды:
conda remove —name my_env35 —all
Чтобы убедиться, что среда была удалена, запросите список доступных сред (conda info –envs).
Обновление Anaconda
Anaconda нуждается в регулярном обновлении.
Для начала нужно обновить утилиту conda:
conda update conda
Введите y, чтобы продолжить.
Затем можно обновить дистрибутив Anaconda:
conda update anaconda
Введите y, чтобы продолжить.
Удаление Anaconda
Чтобы удалить Anaconda, нужно установить модуль anaconda-clean, который удалит конфигурационные файлы программы.
conda install anaconda-clean
Введите y, чтобы продолжить.
Затем вы можете запустить его с помощью следующей команды:
Примечание: Программа будет запрашивать у вас разрешение на удаление каждого файла. Если вы хотите удалить все файлы, добавьте в команду флаг –yes.
Также команда создаст папку для резервных копий .anaconda_backup в домашнем каталоге:
Backup directory: /home/8host/.anaconda_backup/2017-01-25T191831
Затем вы можете удалить каталог Anaconda:
После этого осталось только удалить переменную PATH из файла .bashrc, добавленную во время установки программы.
Найдите соответствующую строку (для поиска можно использовать комбинацию CTRL + W), удалите или закомментируйте её:
# added by Anaconda3 4.2.0 installer
export PATH=»/home/8host/anaconda3/bin:$PATH»
Затем нажмите CTRL + X и y, чтобы закрыть и сохранить файл.
Заключение
Теперь вы умеете устанавливать Anaconda, работать с утилитой conda, создавать виртуальные среды, обновлять и удалять программу Anaconda.
Anaconda поможет вам управлять и анализировать большие объемы данных и научных вычислений.
Источник
Guide for Installing and Uninstalling Anaconda in Linux
What is Anaconda?
Anaconda is a Data Science platform. It aims to simplify development, packaging and deploying packages in certain programming languages. It currently supports Python (2 & 3 both) and R.
Anaconda comes with its own package manager called conda. It’s an alternative to pip, python-native package manager. conda also has a virtual environment (provided by virtualenv in normal python installations).
It includes several packages preinstalled. So all of these in one install is a pretty good deal for developers and sys-admins. Its community is also widespread, which has forums and a lot of documentation for learning and troubleshooting.
Anaconda has two versions:
- Anaconda Enterprise for Business uses. It has great scalability features.
- Anaconda Distribution for individual users, students, data scientists, and professionals. It’s open source.
Note that this article explains the installing and uninstalling of Anaconda Distribution rather than Anaconda Enterprise. Refer to the docs for the Enterprise edition.
Install Anaconda in Linux
Installing Anaconda is a straight forward task just like running those programs in Windows. You get an installer script and then run it.
Let’s see the steps in a little more detail.
Step 1: Download the correct version of Anaconda
Head over to Anaconda official website and download the installer after selecting your OS correctly. Be sure to check which version of Python to be installed and which CPU architecture you have. They are mandatory for the correct working of the program.
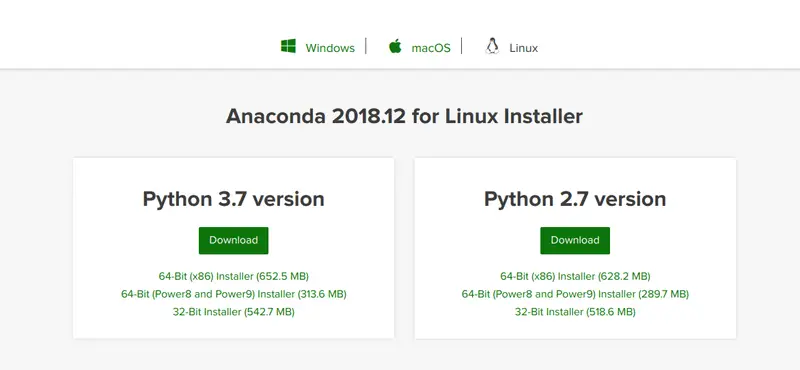 Select your Anaconda version carefully
Optional Step: After downloading, check the hash sum of the downloaded file using md5sum or sha256sum. Verify the hashes with the ones mentioned on this page.
One thing you might notice is that anaconda installer is entirely different from how you normally install a program in Linux. There is no need to extract a tar xz file because it’s just a .sh script file. You can see that from the following screenshots.
 Directory listing showing anaconda installer which is just .sh script file
Installing anaconda is very straight forward. Everything will be done for you.
For example, .bashrc will be edited to extend the PATH environment variable. As of this writing, anaconda installer updates only
/.bashrc of the current user. So if you want to allow other users to access this program, you need to edit /etc/profile.
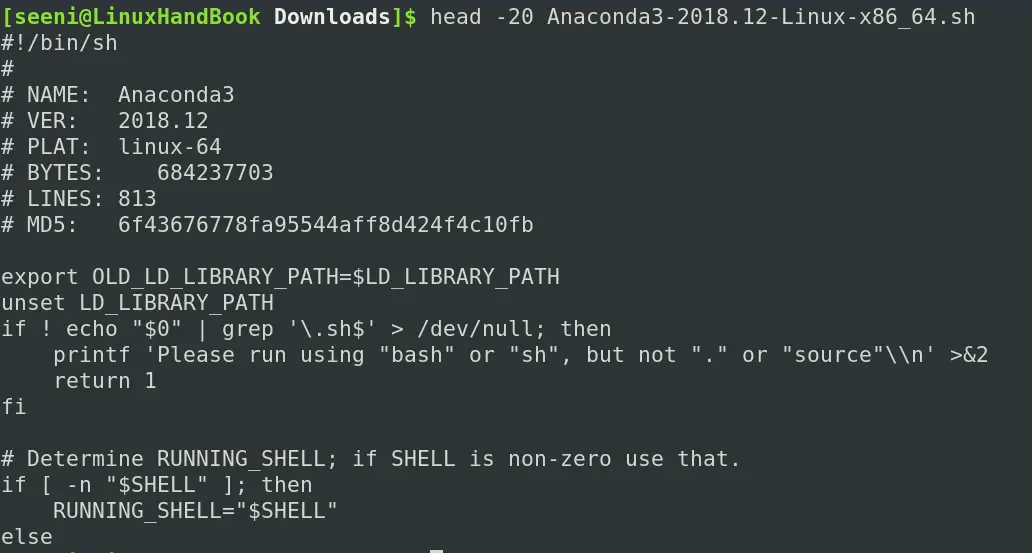 First 20 lines of the anaconda installer
You need not to extract any file or move the installer to places like /usr/local. You just need to run the installer. Installer will itself copy the files to the required location(You can change those too).
Step 2: Installing Anaconda through the command line installer
Run the installer. You can do that by going into the directory where you downloaded Anaconda or by providing the absolute path.
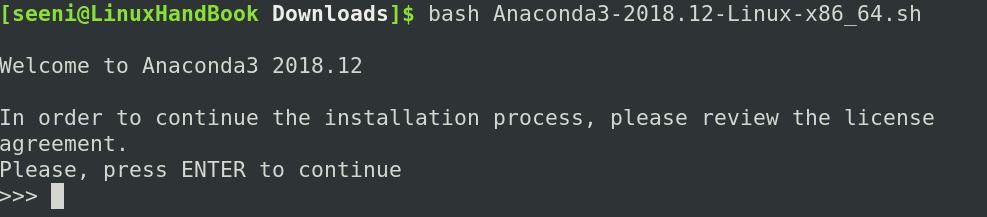 Run Anaconda bash script to start installation
The installer will prompt the following questions regarding installation.
License Agreement – Read through the agreement and proceed if you agree (of course, you do have to agree).
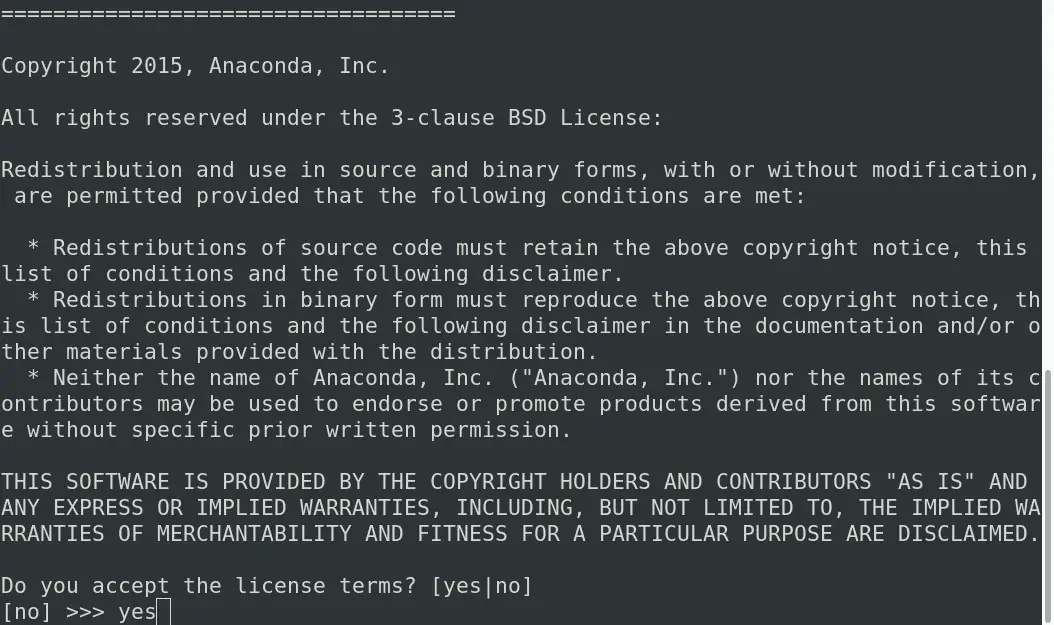 Agree to the license
Install Location – This is the place where anaconda files (i.e., executables) will be installed.
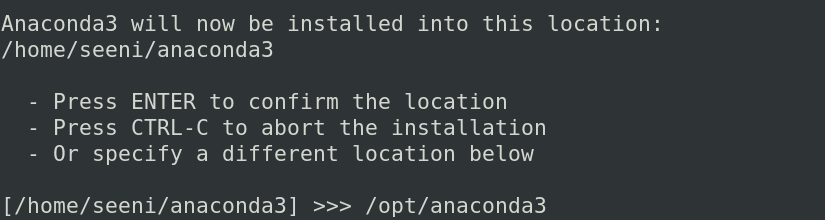 Provide a install location or go with the default
Specify places like /opt/anaconda3 or /usr/local/anaconda3 if you want to make the program available to all users.
You can also specify /home/ /anaconda3 or any other path if you just need to install for the current user.
If you want to share the access to anaconda, make sure that those people also have access to that directory or themselves are sudo users.
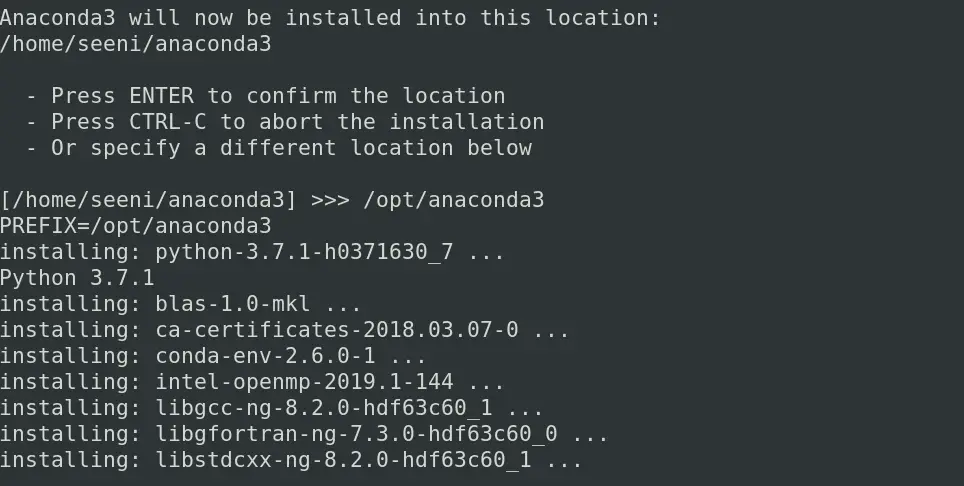 Anaconda is installed in your chosen location
/.bashrc – This is the part where your executables are linked to environment variable PATH. Note that this will initialize
/.bashrc only for the current user. So if you don’t all users to have access, you need to edit /etc/profile. You can find out about how to do that later in this article.
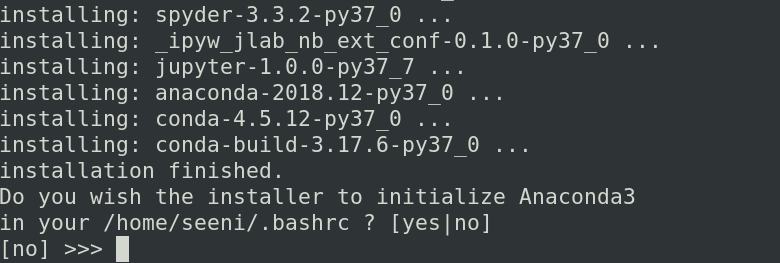 Initialize bashrc for Anaconda
VS code install – It will prompt whether to install VS Code editor or not. Type yes/no based on your preference. Since that is not our focus in this article, I recommend typing “no” and continue with the installation later.
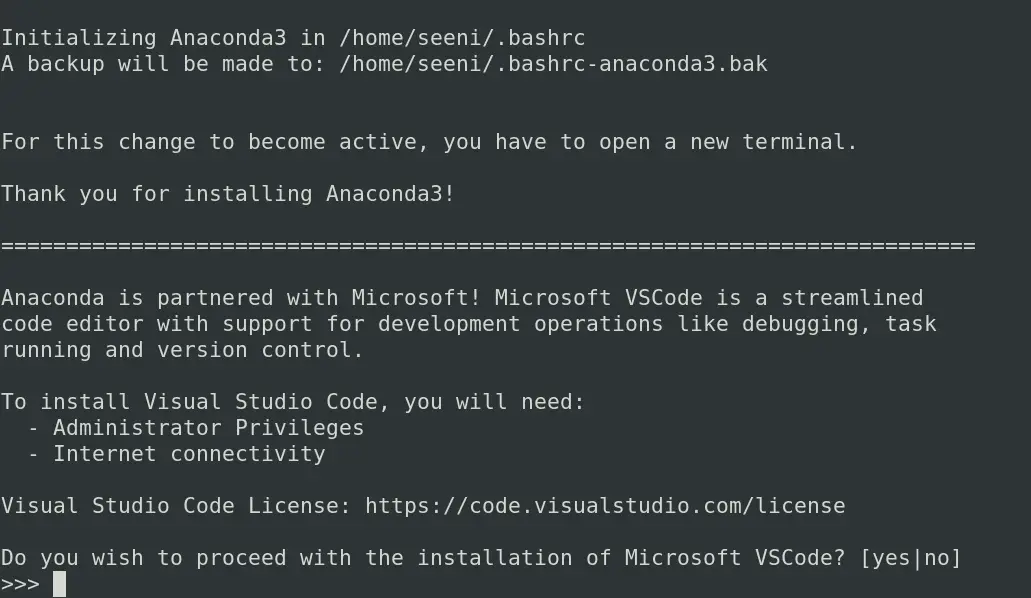 You can install VS Code with Anaconda
Installation is now complete. You will now have conda and anaconda-navigator executables.
Let us check whether they are working. Type conda —version to see the version as follows.
 conda version
Type anaconda-navigator and you’ll see the following window.
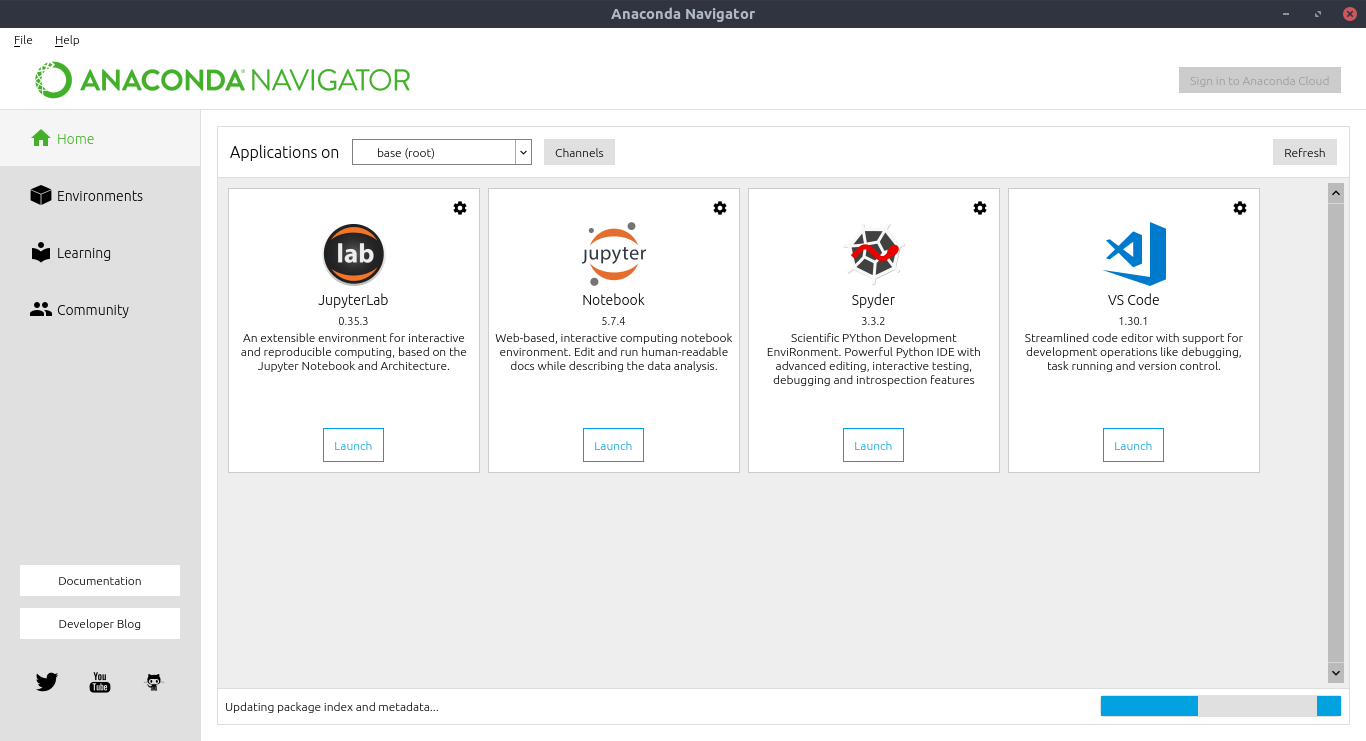 anaconda navigator
The anaconda-navigator is more than an IDE, you use code editor, Jupyter notebooks, terminals and what not. It will increase your productivity manyfold.
Make Anaconda available for other users
As of now, only current user has his/her’s
/.bashrc file edited to link PATH to anaconda executables.
If you want all users to access anaconda, open /etc/profile and add the following line.
If you have installed anaconda other than the above two locations, just the replace /opt/ with the “install-location” where you have installed anaconda.
If you want only certain users to have access, just edit their
/.bashrc file in their home directory by adding the above export PATH line.
After the install is complete, to make changes live immediately run source
/.bashrc. If you have edited /etc/profile then run source /etc/profile &&
Uninstall Anaconda from Linux
You can uninstall Anaconda in two easy steps.
Step 1: Remove the anaconda directory using rm -rf anaconda-install-location. You may refer to this article to know how to remove files and directories in Linux.
For example, if you installed it in the default location, you can use rm -rf
Step 2: Comment or remove the following line from the /etc/profile and
Now the uninstall is complete. Projects created with conda will not be removed unless you have saved them inside anaconda-install-location like /opt/anaconda3/myproject or /home/seeni/anaconda3/myproject.
That’s it
I hope you found this article useful. If you have suggestions or comments, feel free to drop them below. And don’t forget to share it on social media.
Источник


