- Cisco Anyconnect Manual uninstall Mac OS
- Q: How do I uninstall Cisco Anyconnect VPN Client on Mac OS X?
- Answer
- If the application is still installed do this:
- Here’s the procedure for manually uninstalling the AnyConnect client from a Mac OS X system.
- If you still having trouble and/or the new Cisco Anyconnect installation complains that you have a version installed, follow these steps:
- Установка и удаление Cisco VPN Client 3.5 и более поздних версий для Mac OS 10.1
- Параметры загрузки
- Содержание
- Введение
- Предварительные условия
- Требования
- Используемые компоненты
- Условные обозначения
- Установка VPN-клиента
- Расположение профилей пользователей
- Удаление VPN-клиента
- Как удалить cisco anyconnect с mac os big sur
- AnyConnect macOS 11 Big Sur Advisory
- Available Languages
- Download Options
- 1. Introduction
- 2. About the AnyConnect System Extension
- 3. Approving the AnyConnect System Extension
- 3.1 Extension Approval by End User
- 3.2 Extension Approval using MDM
- How to uninstall Cisco Anyconnect modules
- Leave a Reply Cancel reply
Cisco Anyconnect Manual uninstall Mac OS
| This article refers to the Cisco AnyConnect VPN. If you’re looking for information on the Prisma Access VPN Beta that uses the GobalConnect app, see: Prisma Access VPN Landing Page. |
If you’re not sure which service you’re using, see: How do I know if I’m using the Cisco AnyConnect VPN or the Prisma Access VPN?
Q: How do I uninstall Cisco Anyconnect VPN Client on Mac OS X?
Answer
If the application is still installed do this:
- From the Finder go to the Applications folder.
- Look for the Cisco folder and open it
- Then double click on Uninstall Anyconnect to start the uninstall process
- Follow instructions to uninstall VPN program
Here’s the procedure for manually uninstalling the AnyConnect client from a Mac OS X system.
As root, run the following shell script from the Terminal:
You will be prompted for your password. Once you enter it, just follow the steps
If you still having trouble and/or the new Cisco Anyconnect installation complains that you have a version installed, follow these steps:
Enter these commands to clean out the old Cisco VPN kernel extension and reboot the system.
If you installed the Cisco VPN for Mac version 4.1.08005 package, enter these commands to delete the misplaced files. The deletion of these files will not affect your system, since applications do not use these misplaced files in their current location.
Enter these commands if you no longer need the old Cisco VPN Client or Shimo.
Источник
Установка и удаление Cisco VPN Client 3.5 и более поздних версий для Mac OS 10.1
Параметры загрузки
Содержание
Введение
В этом документе приведены пошаговые инструкции по установке и удалению клиента Cisco VPN Client версии 3.5 для компьютера Mac с операционной системой Mac OS 10.1.
Загрузить текущую версию VPN-клиента для операционной системы Mac OS можно в Центре программного обеспечения (только для зарегистрированных пользователей).
Предварительные условия
Требования
Действия, описанные в этом документе, выполняются на жестком диске под управлением операционной системы Mac OS 10.1.
Используемые компоненты
Сведения в этом документе основаны на версиях оборудования и программного обеспечения, указанных ниже.
Cisco VPN Client 3.5
Операционная система MAC OS 10.1
Примечание. Для применения этой конфигурации в системе Mac OS X 10.2 необходимо использовать клиент Cisco VPN Client версии 3.6 или выше. Кроме того, следует учесть, что клиент Cisco VPN Client версии 3.6 для Mac при использовании в операционной системе Mac OS X 10.2 не работает на интерфейсе en1 (плата Apple AirPort WiFi). Дополнительные сведения и временное решение представлены в описании идентификатора ошибки CSCdy4112 (только для зарегистрированных пользователей).
Условные обозначения
Подробные сведения об условных обозначениях см. в документе Условное обозначение технических терминов Cisco.
Установка VPN-клиента
Установка VPN-клиента требует изменения реестра Mac OS 10.1 и должна выполняться в режиме администратора (root).
Для установки VPN-клиента следуйте приведенным ниже указаниям.
Для активации пользователя-администратора и настройки пароля выполните следующие шаги:
Включите режим администратора.
Войдите в систему как обычный пользователь.
Дважды щелкните значок жесткого диска (Hard Drive).
Выберите Applications > Utilities > Netinfo Manager (Приложения > Служебные > Диспетчер сведений о сети).

В диспетчере выберите Domain > Security > Authenticate (Домен > Безопасность > Аутентификация).

Будет запрошен пароль администратора (admin). Администратор – это пользователь, создавший учетную запись администратора.
В диспетчере выберите Domain > Security > Enable Root User (Домен > Безопасность > Разрешить пользователя-администратора).

После разрешения администратора войдите в качестве пользователя-администратора.
Определите местонахождение файла TAR VPN-клиента, загруженного с web-сайта компании Cisco, и дважды щелкните по образу TAR, чтобы его распаковать.
Файлы будут помещены в папку vpnclient на вашем рабочем столе. Эта папка содержит необходимые файлы для установки и удаления VPN-клиента.
В окне терминала перейдите в папку vpnclient, указав после каталога символ «/», например cd \desktop/vpnclient, и нажмите Enter. Затем для установки VPN-клиента в выбранной папке наберите ./vpn_install.


Выберите Applications > Security > Netinfo Manager (Приложения > Безопасность > Диспетчер сведений о сети), затем войдите в раздел Domain > Security > Disable Root User (Домен > Безопасность > Отключить пользователя-администратора) для отключения администратора.

Для отмены аутентификации администратора выберите Domain (Домен) > Security (Безопасность) > Deauthenticate (Отменить аутентификацию).

Выйдите из диспетчера Netinfo Manager.
Перезапустите компьютер Mac и войдите в качестве обычного пользователя. При этом будет запущена служба VPN, установленная вместе с VPN-клиентом.
Расположение профилей пользователей
Можно изменить файл sample.pcf и сохранить его как новый файл в том же месте.
Удаление VPN-клиента
Для удаления VPN-клиента необходимо очистить записи реестра в системе Mac. Также потребуются полномочия администратора. При удалении VPN-клиента выводятся следующие сообщения:
Включите режим администратора. (Процедура совпадает с описанной в шаге 1 раздела Установка VPN-клиента.)
Выполните удаление VPN-клиента.
Отключите режим администратора и отмените для него аутентификацию. (Процедура совпадает с описанной в шагах 4 и 5 раздела Установка VPN-клиента.)
Источник
Как удалить cisco anyconnect с mac os big sur
» means nesting-related): — Failed at: @displayUserCertifications user_id [in template «custom.author-acclaim-certifications» at line 4, column 9] ——>
- Mark as New
- Bookmark
- Subscribe
- Mute
- Subscribe to RSS Feed
- Permalink
- Email to a Friend
- Report Inappropriate Content
- Fully uninstall Cisco Anyconnect Mobility Client 4.6 from my Macbook according to this manual because of leaving company. Delete all certificates.
- Install Cisco Anyconnect again at new company. Install new certificates.
- Expected for asking new host and credentials / certificates. No, this app asking for previous (seems to be wiped out before) data (host / login / password) as it is cached / stored somewhere else. So, previous cleaning evidently not completed.
How to fix this?
» means nesting-related): — Failed at: @displayUserCertifications user_id [in template «custom.author-acclaim-certifications» at line 4, column 9] ——>
- Mark as New
- Bookmark
- Subscribe
- Mute
- Subscribe to RSS Feed
- Permalink
- Email to a Friend
- Report Inappropriate Content
hope this helps you
will ask for your password, then follow process.
No, didn’t help.
Uninstaller cleared just portion of files / settings.
So, I found:
Host name saved in non-cleared
/.anyconnnect
/.anyconnect file.
Источник
AnyConnect macOS 11 Big Sur Advisory
Available Languages
Download Options
AnyConnect Changes Related to macOS 11 (Big Sur)
Table of Contents
Table of Figures
1. Introduction
AnyConnect 4.9.04xxx leverages the System Extension framework available in macOS 11 (Big Sur). This differs from past AnyConnect versions, which rely on the now-deprecated Kernel Extension framework. This is the minimum version required to run AnyConnect on macOS 11.
This advisory describes changes introduced in the new AnyConnect version and the steps administrators can take to confirm AnyConnect is operating correctly on macOS 11. There are important changes in approving the AnyConnect system extension, as detailed in the next section.
The advisory also details the steps for failing over to the AnyConnect kernel extension, as last-resort workaround in case a critical system extension (or related OS framework) issue is encountered. The AnyConnect kernel extension is installed on macOS 11 solely for this purpose, it is no longer used by default.
2. About the AnyConnect System Extension
AnyConnect uses a network system extension on macOS 11, bundled into an application named Cisco AnyConnect Socket Filter. (This app controls the extension activation and deactivation and is installed under /Applications/Cisco.)
The AnyConnect extension has the following three components:
These components are visible in the macOS System Preferences – Network UI window:

Figure 1 — DNS proxy component
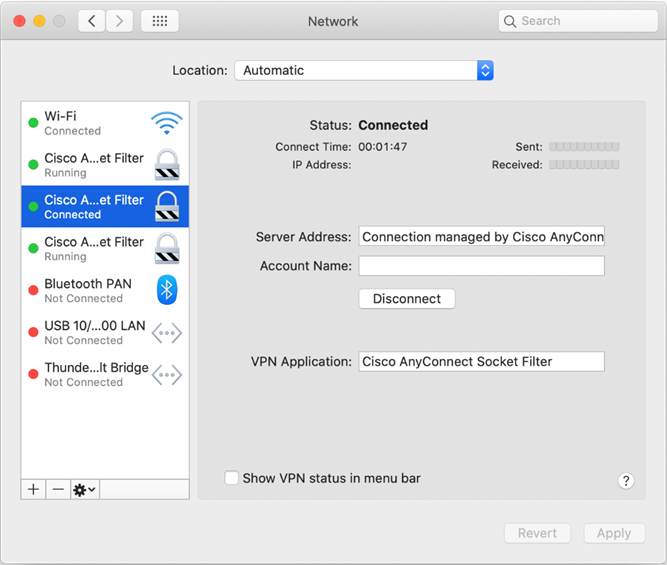
Figure 2 — App/Transparent proxy component
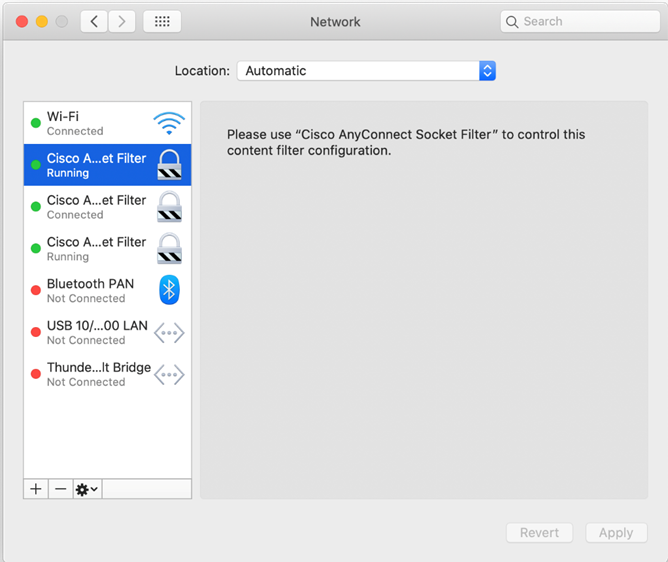
Figure 3 — Content filter component
AnyConnect requires its system extension and all its components to be active in order to operate properly, which implies that the mentioned components are all present and show up as green/running in the left pane of the macOS Network UI, as per above screenshots.
3. Approving the AnyConnect System Extension
macOS 11 requires end user or MDM approval before system extensions are allowed to run.
Two approvals are required for the AnyConnect system extension:
— Approve the system extension loading/activation.
— Approve the extension’s content filter component activation.
3.1 Extension Approval by End User
The AnyConnect system extension and its content filter component can be approved by end user, by following either the OS prompting, or the more explicit AnyConnect Notification app’s instructions.

Figure 4 — Extension blocked — OS prompt
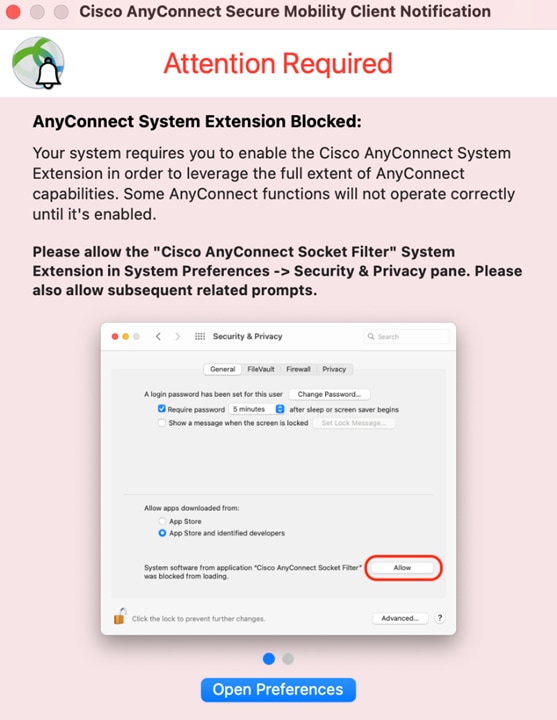
Figure 5 — Extension blocked — AnyConnect prompt
After opening the Security & Privacy Preferences window, click the bottom-left lock and provide the requested credentials, as prompted, to unlock it and allow changes.
The window’s appearance depends on whether the AnyConnect extension is the only one requiring approval. If that’s the case, simply click the Allow button.

Figure 6 — AnyConnect extension approval
Otherwise click the Details… button, then select the ”Cisco AnyConnect Socket Filter” check box and click OK.

Figure 7 — AnyConnect extension approval (multiple unapproved extensions)
Shortly after approving the AnyConnect extension, the user is shown another popup, this time for approving the extension’s content filter component.

Figure 8 — AnyConnect extension’s content filter approval
After the extension’s content filter approval is complete, the extension and its components should be active, as confirmed by the AnyConnect Notification app:

Figure 9 — AnyConnect extension approval confirmation
3.2 Extension Approval using MDM
The AnyConnect system extension can also be approved without end user interaction, using a management profile’s SystemExtensions payload with the following settings:
Источник
How to uninstall Cisco Anyconnect modules
A while ago I installed Cisco AnyConnect on my Mac, in order to VPN into work. Recently I noticed that a process acwebsecagent was logging multiple failures every minute to my system log; with a bit of investigation, it appears that the AnyConnect installer defaults also installs Cisco Web Security unless one chooses to uncheck it.
As far as I can tell Web Security appears not to be related to AnyConnect’s VPN functionality; it is a separately licensed Cisco service, and if it isn’t configured it appears to have a performance impact on one’s Mac.
If it is installed, you can remove it with:
sudo /opt/cisco/anyconnect/bin/websecurity_uninstall.sh
Uninstall other Cisco Anyconnect modules:
sudo /opt/cisco/anyconnect/bin/dart_uninstall.sh
sudo /opt/cisco/anyconnect/bin/nvm_uninstall.sh
sudo /opt/cisco/anyconnect/bin/umbrella_uninstall.sh
sudo /opt/cisco/anyconnect/bin/amp_uninstall.sh
Thank you for this post 🙂
Without this I wouldve reinstalled it manually, this works much faster
Thank you soooooo much for this post. I would not be able to remove it without your instruction and help. I am no programmer or have any knowledge about mac.
I have one more module that would like to get rid of which is ‘system scan’. would you be able to help how to remove it?
Leave a Reply Cancel reply
This site uses Akismet to reduce spam. Learn how your comment data is processed.
Источник


