Deleting Backups
Backup files created with Veeam Agent are removed automatically according to the retention policy settings. You can also remove backups from the target location and/or Veeam Agent configuration database manually if necessary.
Removing Backup from Configuration
To remove a backup from the Veeam Agent configuration database, use the following command:
veeamconfig backup delete —id
where is an ID of the backup that you want to delete.
The way Veeam Agent removes a backup from configuration depends on the backup location:
- If the backup resides in a local directory or network shared folder, Veeam Agent removes records about the deleted backup from the Veeam Agent database. Backup files themselves (VBK, VIB, VBM) remain in the backup repository.
You can import information about the removed backup later to Veeam Agent and perform restore operations with the imported backup. To import information about the removed backup, use the veeamconfig repository rescan —all command.
- If the backup resides in a Veeam Backup & Replication repository, Veeam Agent removes records about the deleted backup from the Veeam Agent database and Veeam Backup & Replication database. Backup files themselves (VBK, VIB, VBM) remain in the backup repository.
If you want to import information about the removed backup later to Veeam Agent and perform restore operations with this backup, you must contact backup administrator working with Veeam Backup & Replication . The administrator must rescan the backup repository that contained the backup in the Veeam Backup & Replication console. For details, see the Rescanning Backup Repositories section in the Veeam Backup & Replication User Guide.
After rescan, the backup will be displayed in the list of backups on the Veeam Agent machine connected to the Veeam backup server.
Deleting Backup Files
To delete backup files from the target location and Veeam Agent database, use the following command:
veeamconfig backup delete —id —purge
where is an ID of the backup that you want to delete.
Veeam Agent for Linux will remove records about the deleted backup from the Veeam Agent database and, additionally, delete backup files themselves from the destination storage.
Источник
Removing Veeam Agent Backups
You can remove Veeam Agent backups from Veeam Backup & Replication or permanently delete Veeam Agent backups from the Veeam backup repository.
Removing from Configuration
When you remove a Veeam Agent backup from configuration, Veeam Backup & Replication deletes all records about the backup from its database and console. The actual backup files remain on the backup repository. You can import the backup to the Veeam Backup & Replication at any time later and restore data from it. To learn more, see Importing Veeam Agent for Linux Backups .
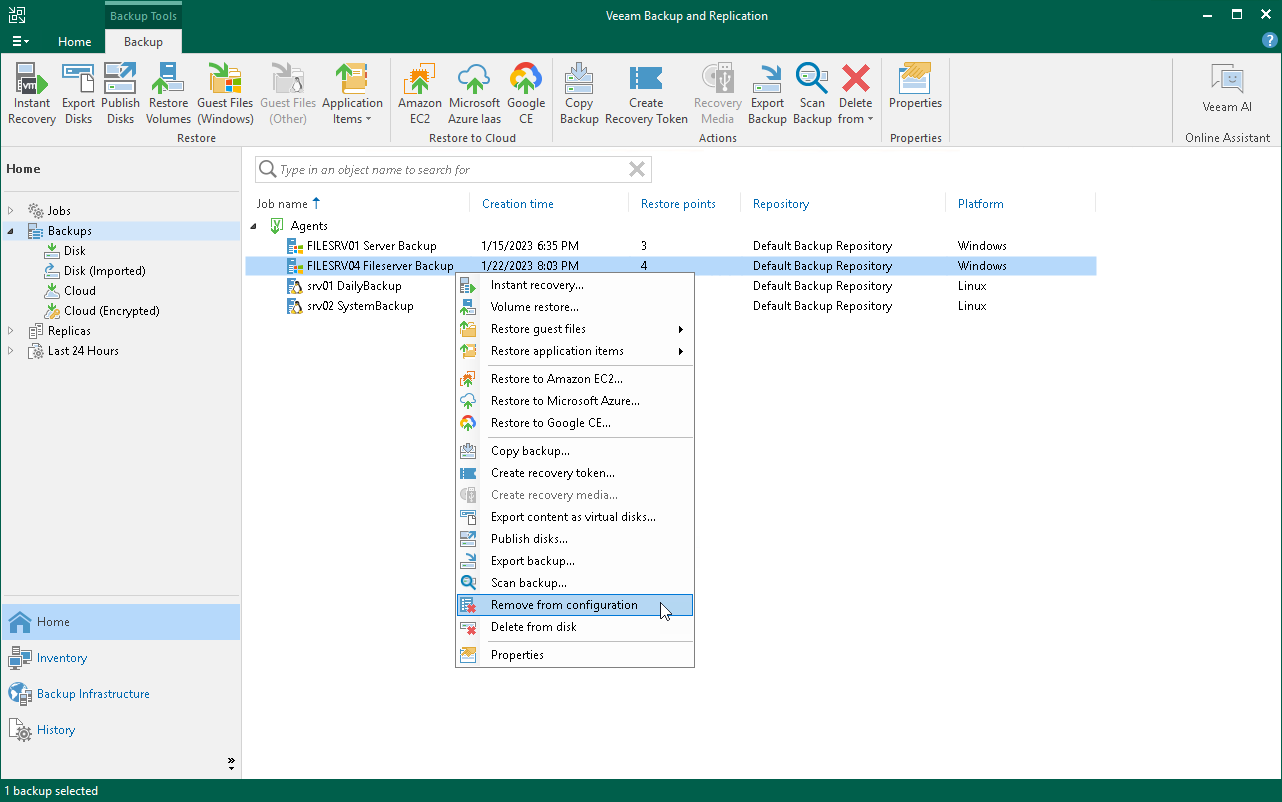
To remove a Veeam Agent backup from configuration:
- In Veeam Backup & Replication , open the Home view.
- In the inventory pane, click Disk under the Backups node.
- In the working area, expand the Agents node, select the necessary backup and click Remove from > Configuration on the toolbar or right-click the backup and select Remove from configuration .
Removing from Veeam Backup Repository
When you remove a Veeam Agent backup from the Veeam backup repository, Veeam Backup & Replication deletes all records about the backup from its database and console. The actual backup files are removed from the backup repository, too.
To remove a Veeam Agent backup from the backup repository:
- In Veeam Backup & Replication , open the Home view.
- In the inventory pane, click Disk under the Backups node.
- In the working area, expand the Agents node, select the necessary backup and click Remove from > Disk on the toolbar or right-click the backup and select Delete from disk .
Источник
Overview
Veeam Agent for Linux is a data protection and disaster recovery solution for physical endpoints and virtual machines running Linux-based operating systems.
Veeam Agent can be used by IT administrators who run Linux infrastructure to protect different types of computers and devices: servers, desktops and laptops. The solution runs inside the guest OS and does not need access to virtualization infrastructure components. Thus, Veeam Agent can be used to protect Linux server instances deployed in the public cloud, for example, in Microsoft Azure environment.
NOTE
Veeam Agent can operate in either standalone or managed mode. Depending on the mode, Veeam Agent provides different features and limitations. To learn more, see Standalone and Managed Operation Modes .
Veeam Agent offers a variety of features to protect your data. You can create an entire system image backup, back up specific machine volumes or individual directories and files. Backups can be stored on a local hard drive, on an external hard drive, in a network shared folder or on a Veeam backup repository.
In case of a disaster, you can perform the following restore operations:
- Start the OS from the Veeam Recovery Media and use standard Linux command line tools to diagnose and fix problems.
- Perform bare metal restore.
- Restore necessary data from backups to its original location or a new location.
Veeam Agent integrates with Veeam Backup & Replication . Backup administrators who work with Veeam Backup & Replication can perform advanced tasks with Veeam Agent backups: restore files and disks from backups, manage backup jobs configured in Veeam Agent or backups created with these jobs.
Источник
Installing Veeam Agent for Linux
NOTE
To make UEFI systems with Secure Boot work with the pre-built veeamsnap kernel module, you need to enroll the Veeam public key to the MOK list using the mokutil utility. The key is available in the veeamsnap-ueficert-5.0.1.4493-1.noarch package residing on the Veeam repository. To enroll the key:
- Request the enrollment of the public key with the following command: mokutil —import veeamsnap-ueficert.crt .
- Reboot the Veeam Agent computer and complete the enrollment in the UEFI console.
To install Veeam Agent for Linux :
- Download the Veeam software repository installation package ( veeam-release ) from the this Veeam webpage , and save the downloaded package on the computer where you plan to install the product.
TIP
If the computer where you want to install Veeam Agent for Linux is not connected to the internet, you can download and install Veeam Agent for Linux packages manually. To learn more, see Installing Veeam Agent for Linux in Offline Mode .
- Navigate to the directory where you have saved the veeam-release package and install the package with the following commands:
For CentOS / RHEL / Oracle Linux / Fedora
rpm -ivh ./veeam-release* && yum check-update
For openSUSE / SLES
zypper in ./veeam-release* && zypper refresh
For Debian / Ubuntu
dpkg -i ./veeam-release* && apt-get update
For CentOS / RHEL / Fedora
yum install veeam
NOTE
[For CentOS / RHEL] If the dkms package is already installed in the OS, you can install Veeam Agent with one of the following commands:
With this command, the veeamsnap kernel module will be installed from the source RPM package using dkms .
- yum install kmod-veeamsnap veeam
With this command, the non-DKMS version of the veeamsnap kernel module will be installed from the pre-built kmod-veeamsnap binary package.
For Oracle Linux
yum install veeamsnap
yum install veeam
For openSUSE Tumbleweed
zypper in veeam
For openSUSE Leap 15.3
zypper in veeamsnap-kmp-default
zypper in veeam
For SLES with Default kernel
zypper in veeamsnap-kmp-default
zypper in veeam
For SLES with Trace kernel
zypper in veeamsnap-kmp-trace
zypper in veeam
For SLES with Xen kernel
zypper in veeamsnap-kmp-xen
zypper in veeam
For SLES with PAE kernel
zypper in veeamsnap-kmp-pae
zypper in veeam
For SLES with Preempt kernel
zypper in veeamsnap-kmp-preempt
zypper in veeam
For Debian / Ubuntu
apt-get install veeam
The following dependency packages may require special handling in case you see installation errors:
- The dkms package is not present in default repositories for some Linux distributions. You should obtain it from third-party repositories:
- EPEL repository (for CentOS / RHEL / Oracle Linux / Fedora)
- Packman repository (for openSUSE). To learn more , see Installing dkms in openSUSE .
For SLES, the dkms package is not available in the Packman repository. You must use the package intended for openSUSE. To learn more, see this Veeam KB article .
- Extended kernels, such as kernel-pae , kernel-uek and other, require appropriate kernel-devel packages to be installed, for example, kernel-pae-devel , kernel-uek-devel , and so on.
Version of the kernel-devel package must match your current kernel version. To check your current kernel version, run the uname -r command.
[For RHEL and derivatives] If the yum package manager installs packages that do not match your current kernel version, you should either update your system or fetch older versions of the required packages from the CentOS Vault repository .
In openSUSE systems, while installing the dkms package, you may see an error similar to the following:
Problem: nothing provides kernel-devel needed by dkms-2.2.0.3-14.1.noarch
Solution 1: do not install dkms-2.2.0.3-14.1.noarch
Solution 2: break dkms-2.2.0.3-14.1.noarch by ignoring some of its dependencies
To install the dkms package, do the following:
- Make sure that you have an appropriate kernel-devel package installed and its version matches your kernel version. For example:
> rpm -qa | grep kernel-default
kernel-default-devel-3.0.101-91.1
kernel-default-3.0.101-91.1
Источник
Бета-версия Veeam Agent для Linux, часть 4: Работа из командной строки
Часть 1 — Установка
Часть 2 — Переходим к бэкапу
Часть 3 — Восстановление
Часть 4 — Работа из командной строки
В предыдущих статьях из этой серии рассказывалось о бета-версии программы Veeam Agent для Linux, которую можно установить уже сейчас, и о том, как начать работу с ней. Мы рассмотрели удобные способы создания резервных копий и восстановления файлов и томов с помощью графического интерфейса (GUI). Однако настоящая программа под Linux обязательно должна поддерживать работу из командной строки.
Сегодняшняя статья посвящена работе с Veeam Agent для Linux из консоли!
Введение
После установки Veeam Agent для Linux на машине запускается и настраивается соответствующая служба. Если вы используете дистрибутив Linux с менеджером Systemd (например, CentOS 7), проверить службу и ее состояние можно с помощью следующей команды:
systemctl status veeamservice

На экране появляется информация, подтверждающая, что служба активна и запущена. Все команды Veeam Agent для Linux, которые мы будем набирать в командной строке, будут выполняться не сами по себе, а этой службой. Это означает, в частности, что процесс создания резервной копии будет завершен, даже если после его запуска пользователь выйдет из системы.
Бэкап
Прежде чем выполнить бэкап, нужно создать хотя бы один репозиторий.
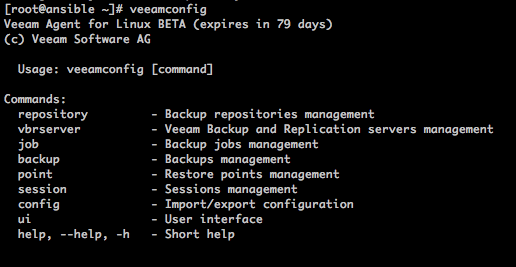
А что делать, если забыл нужную команду? Поможет встроенная справка утилиты командной строки veeamconfig, которая вызывается командой veeamconfig help (или —help, или -h). Можно также выполнить команду без параметров, чтобы увидеть все доступные подкоманды:
Нужную подкоманду можно выбрать и по-другому: набрать главную команду и нажать клавишу «Tab». Если в системе поддерживается функциональность bash completion, на экране появятся доступные подкоманды:

В нашем случае мы увидим подкоманду repository. Если теперь выполнить команду veeamconfig repository без дополнительных параметров, то на экране отобразится справка по использованию этой подкоманды.

Благодаря этой функции мы быстро получаем перечень доступных параметров и можем создать репозиторий с помощью следующей команды:
veeamconfig repository create —name STORE —location /mnt/store/
Команда возвращает результат «Repository was created successfully» (Репозиторий успешно создан), и созданный репозиторий появляется в списке доступных репозиториев:

Обратите внимание: создать удаленный репозиторий, например, на общем NFS-диске, можно только из графического интерфейса. Из командной строки можно создать только локальный репозиторий.
Теперь можно создать задание бэкапа. Команда будет выглядеть следующим образом:
veeamconfig job create —name Backup_root —repoName Repository_1 —maxPoints 7 —objects root
Veeam Agent для Linux должен создать новое задание бэкапа с названием «Backup_root» в репозитории «Repository_1» (удаленный обший NFS-диск). Резервная копия должна содержать семь точек восстановления, область бэкапа — «root». «Root» — это название логического тома LVM /dev/centos/root, смонтированного в корневом каталоге /.
Veeam Agent для Linux возвращает результат «Job was created successfully» (Задание успешно создано). Теперь его можно запустить с помощью следующей команды:
veeamconfig job start —name Backup_root
Veeam Agent для Linux возвращает состояние операции:
Backup job is started.
Задание выполняется в автоматическом режиме, но можно посмотреть его состояние:

Как видно на рисунке, последний сеанс имеет состояние «Running» (Запущено), бэкап выполняется. При необходимости можно выполнить команду veeamconfig session ui, чтобы посмотреть ход выполнения задания в GUI, но эта статья целиком посвящена работе из командной строки, поэтому мы будем обновлять список сеансов, пока состояние последнего бэкапа не сменится на «Success» (Успешно). Также можно выполнить команду:
watch veeamconfig session info —id 64bbf9db-c83c-4ca4-b60a-e93301db8de3
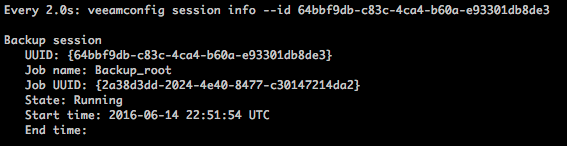
Бэкап успешно выполнен.
Восстановление
Из командной строки с помощью нескольких простых команд можно выполнить и восстановление файлов.
Сначала просматриваем список доступных резервных копий:
veeamconfig backup list
Job name Backup UUID Repository Created at
Нужную резервную копию можно сразу монтировать с помощью следующей команды:
veeamconfig backup mount —id eaf8c7fa-3048-4b41-a917-9418f876662b —mountdir /mnt/backup/
Программа возвращает результат операции:
Backup is mounted.
Обратите внимание, что, в отличие от упрощенного варианта работы через GUI, здесь можно указать точку монтирования, в которую будет смонтирован файл резервной копии.
Дополнительные возможности
Командная строка предоставляет полный набор возможностей не только для бэкапа и восстановления данных, но и для решения других задач.
Например, из командной строки можно управлять настройками программы. Выполнив команду:
veeamconfig config export —file config.txt
мы получим следующий результат::
Configuration file has been exported successfully.
Конфигурация Veeam Agent для Linux была экспортирована в текстовый файл, который можно отредактировать. Veeam Agent для Linux использует локальную базу данных для хранения настроек, а также истории сеансов, заданий бэкапа, информации о репозиториях и практически всей прочей информации, которую можно встретить при работе с программой. Единственный инструмент работы с базой даных и хранящимися в ней настройками — командная строка Veeam. Однако пользователям может потребоваться изменить эту информацию с помощью других инструментов, например, решений для автоматизации. Для этого и нужна подкоманда config.
Команда «export» сохраняет конфигурацию в текстовом файле в формате XML:
Источник


