- Как установить htop linux
- Как установить htop:
- Описание столбцов:
- Управление:
- How to install htop on Ubuntu Linux using apt
- Procedure to install htop on Ubuntu Linux
- Ubuntu Linux Linux install htop
- Get information about htop package
- Install htop using apt or apt-get
- How to install the latest version of htop using snap
- How to use htop command
- htop command keyboard shortcut keys
- How to get help about htop
- Conclusion
- linux-notes.org
- Установка HTOP в RHEL, CentOS и Fedora Linux
- Сравнение между Htop и top
- Установка HTOP на RHEL / CentOS 5.x/6.x/7.x, Fedora 12/13/14/15/16/17/18/19/20
- Как использовать Htop команду
- Измените выход интервала обновления
- Функциональные клавиши Htop
- Добавить комментарий Отменить ответ
- How to install htop on Arch Linux
- How to install htop on Arch Linux using pacman
- Arch Linux install htop
- Find information about htop package
- Installing htop on Arch Linux
- How to use htop command
- One can use a monochrome color scheme, run:
- Want to see the tree view by default when running htop? Try:
- Arch Linux htop keyboard shortcut keys
- Other keyboard shortcuts
- How to get help about htop
- Conclusion
Как установить htop linux
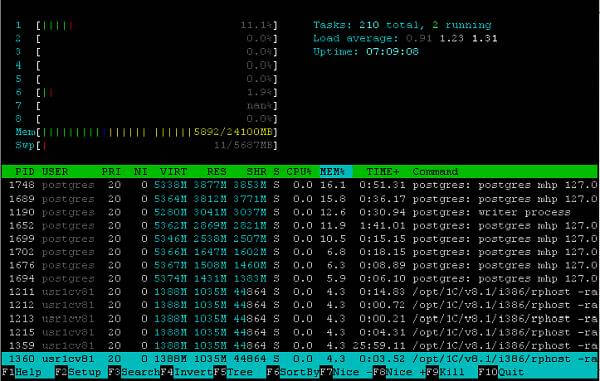
htop — продвинутый монитор процессов, написанный для Linux. Он был задуман заменить стандартную программу top. Htop показывает динамический список системных процессов, список обычно выравнивается по использованию ЦПУ. В отличие от top, htop показывает все процессы в системе. Также показывает время непрерывной работы, использование процессоров и памяти. Htop часто применяется в тех случаях, когда информации даваемой утилитой top недостаточно, например при поиске утечек памяти в процессах. Htop написан на языке Си и использует для отображения библиотеку Ncurses.
Как установить Htop в Debian, Ubuntu
Как установить htop:
sudo apt-get install htop
Запускаем:
sudo htop
Описание столбцов:
PID — идентификатор процесса.
USER — владелец процесса.
PRI — текуший приоритет (влияет на процессорное время, отводимое процессу, значение по умолчанию — 20; чем меньше приоритет, тем больше времени отводится процессу, следовательно он выполняется быстрее).
NI — величина изменения приоритета относительно значения PRI (клавиши F7, F8).
VIRT — общий объем виртуальной памяти, используемой процессом. Включает в себя: область кода (CODE), данные (DATA), разделяемые библиотеки (SHARED) и страницы, перемещенные в swap-область памяти. Если приложение потребовало от ядра выделить ему 100Мб памяти, а использует всего 5 Мб, данный столбец всё равно будет показывать цифру 100.
(CODE — объем памяти, содержащий исполняемый код процесса.
DATA — объем памяти, занятой данными, используемыми процессом в ходе выполнения.
SWAP — объем памяти, используемой процессом, но перемещенной в swap-область.)
RES — количество резидентной (не перемещаемой в swap) памяти в килобайтах. Если приложение потребовало от ядра выделить ему 100Мб памяти, а использует всего 5 Мб, то данный столбец покажет 5. Но здесь есть два ньюанса:
а) RES не показывает сколько данных было перемещено в swap,
б) часть RES-памяти может быть разделяемой.
SHR — количество разделяемой (shared) памяти программы в килобайтах, т.е. памяти, которая может быть использована другими приложениями.
S — состояние процесса:
S — так называемое состояние сна;
R — состояние выполнения;
D — состояние ожидания.
CPU% — использование процессора в процентном отношении.
MEM% — использование процессом памяти в процентном отношении.
TIME+ — время работы процесса.
Command — указывает на команду, которой был запущен процесс.
Через настройки (F2) можно добавить еще некоторые полезные параметры:
IO RATE — Операции ввода\вывода. Чтение + запись. Если нужно отдельно на чтение и на запись, то можно добавить:
IO READ RATE и IO WRITE RATE.
Также на экран выводятся следующие параметры:
Load average — отражает число блокирующих процессов в очереди на исполнение в определенный временной интервал, а именно 1 минута, 5 минут и 15 минут, соответственно. Блокирующий процесс — это процесс, который ожидает ресурсов для продолжения работы.
Uptime — время работы системы.
Управление:
F1 — справка;
F2 — настройки;
F3 — поиск процесса;
F4 — сортировка списка процессов (от большего к меньшему или от меньшего к большему);
F5 — устанавливает древовидное отображение (корни — родительские процессы, а листья — дочерние) и наоборот;
F6 — открывает панель с выбором параметра сортировки процессов;
F7 — увеличить приоритет выполнения текущего процесса;
F8 — уменьшить приоритет выполнения текущего процесса;
F9 — убить процесс;
F10 — выйти из программы.
Источник
How to install htop on Ubuntu Linux using apt
Procedure to install htop on Ubuntu Linux
- Open the terminal application for the local system. For remote system use the ssh command
- Update your Ubuntu system, run: sudo apt update && sudo apt upgrade
- Install htop on Ubuntu using apt: apt install htop
- To install the latest version of htop on Ubuntu Linux: snap install htop
- Launch htop, type: htop
Let us see all steps and command in details.
Ubuntu Linux Linux install htop
First, update the system using apt command or apt-get command:
sudo apt update
sudo apt upgrade
Let us search for htop package, run:
apt-cache search htop
Sample outputs:
Get information about htop package
Run the following command:
apt show htop
Install htop using apt or apt-get
Now you know package name. It is time to install the same:
sudo apt install htop
OR
sudo apt-get install htop
- No ads and tracking
- In-depth guides for developers and sysadmins at Opensourceflare✨
- Join my Patreon to support independent content creators and start reading latest guides:
- How to set up Redis sentinel cluster on Ubuntu or Debian Linux
- How To Set Up SSH Keys With YubiKey as two-factor authentication (U2F/FIDO2)
- How to set up Mariadb Galera cluster on Ubuntu or Debian Linux
- A podman tutorial for beginners – part I (run Linux containers without Docker and in daemonless mode)
- How to protect Linux against rogue USB devices using USBGuard
Join Patreon ➔
How to install the latest version of htop using snap
Search for htop using the snap command:
snap search htop
Sample outputs:
Next, install it using the snap, run:
sudo snap install htop
Sample outputs:
How to use htop command
htop command keyboard shortcut keys
Now that you install htop on Ubuntu. It is time to learn keyboard shortcuts. The following commands are supported while in htop session:
| Command | Description |
|---|---|
| Up arrow key | Select (highlight) the previous process in the process list. Scroll the list if necessary. |
| Down arrow key | Select (highlight) the next process in the process list. Scroll the list if necessary. |
| Left arrow key | Scroll the process list left. |
| Right arrow key | Scroll the process list right. |
| PgUp, PgDn | Scroll the process list up or down one window. |
| Home | Scroll to the top of the process list and select the first process. |
| End | Scroll to the bottom of the process list and select the last process. |
| s | Trace process system calls: if strace(1) is installed, pressing this key will attach it to the currently selected process, presenting a live update of system calls issued by the process. |
| l | Display open files for a process: if lsof(1) is installed, pressing this key will display the list of file descriptors opened by the process. |
| u | Show only processes owned by a specified user. |
| M | Sort by memory usage (top compatibility key). |
| P | Sort by processor usage (top compatibility key). |
| T | Sort by time (top compatibility key). |
| F | “Follow” process: if the sort order causes the currently selected process to move in the list, make the selection bar follow it. This is useful for monitoring a process: this way, you can keep a process always visible on screen. When a movement key is used, “follow” loses effect. |
| K | Hide kernel threads: prevent the threads belonging the kernel to be displayed in the process list. (This is a toggle key.) |
| H | Hide user threads: on systems that represent them differently than ordinary processes (such as recent NPTL-based systems), this can hide threads from userspace processes in the process list. (This is a toggle key.) |
| p | Show full paths to running programs, where applicable. (This is a toggle key.) |
| Ctrl-L | Rfresh the screen. |
| F1 | See this help menu. |
| h | Same as above. |
| ? | Again, same as above. |
| F10 | Quit htop |
| q | Exit htop (same as above) |
How to get help about htop
Simply type:
htop —help
man htop
Conclusion
This page showed you how to install and use htop on Ubuntu Linux 16.04/18.04 LTS. For more information see htop home page online here.
🐧 Get the latest tutorials on Linux, Open Source & DevOps via
Источник
linux-notes.org
Установка HTOP в RHEL, CentOS и Fedora Linux
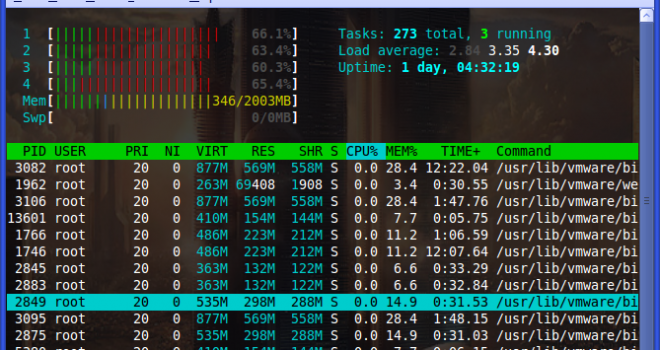
Htop является интерактивным режимом реального времени и системой-мониторинга «процесс-зритель» который написанный для Linux. Он предназначен для замены программы top в Unix. Она показывает часто обновленный список процессов, запущенных на компьютере, как правило. В отличие от top, HTOP предоставляет полный список процессов, запущенных. Htop использует цвет и дает визуальную информацию о процессоре, своп и состояние памяти.
Сравнение между Htop и top
— В «Htop» вы можете прокручивать список по вертикали и горизонтали, чтобы увидеть все процессы и все командные строки.
— В «top» возможна задержка для каждого неназначенной нажатой клавиши (особенно раздражает, когда несколько ключей управляющие последовательности вызывают аварии).
— ‘HTOP’ стартует быстрее (‘top’, кажется, собирать данные в течение некоторого времени перед отображением).
— В «Htop» вам не нужно набирать номер процесса, чтобы убить процесс, в ‘top’ вы должны знать его.
— В «Htop» вам не нужно набирать номер процесса или значение приоритета для изменить приоритет процесса, в «top» вы делаете это.
— ‘HTOP «поддерживает работу мыши.
— ‘top’ старше, следовательно, больше привыкли к нему.
Установка HTOP на RHEL / CentOS 5.x/6.x/7.x, Fedora 12/13/14/15/16/17/18/19/20
На RHEL, CentOS, инструмент HTOP не доступен в репозитории yum по умолчанию. Таким образом, мы подключим репозиторий RPMForge.
Узнать какая разрядность ОС можно выполнив команду:
После включения хранилище RPMForge установить HTOP можно выполнив yum команду:
Установка Htop из исходного кода
Если вы предпочитаете устанавливать Htop от соусе, загрузить исходный код и скомпилировать его:
Как использовать Htop команду
После установки, просто введите HTOP в терминале, чтобы запустить его, и обратите внимание на большой текстовый режим график в верхней части дисплея:

Нажмите «F2», чтобы увидеть меню настройки HTOP :
Если вы хотите увидеть список процессов в виде древо процессов то используйте «F5» или «Т»
Измените выход интервала обновления
Чтобы изменить интервал обновления выхода Htop, используйте D-опции командной строки. «htop -d x». Где х упоминается в thenths секунд.
Функциональные клавиши Htop
На этом подошла тема «Установка HTOP в RHEL, CentOS и Fedora Linux» к завершению.
Добавить комментарий Отменить ответ
Этот сайт использует Akismet для борьбы со спамом. Узнайте, как обрабатываются ваши данные комментариев.
Источник
How to install htop on Arch Linux
How to install htop on Arch Linux using pacman
The procedure for installing htop Arch Linux is as follows:
- Open the terminal window/application.
- For remote Arch Linux server login using ssh command.
- Execute pacman -Ss htop command to search for htop on Arch Linux
- Run sudo pacman -S htop to install htop in Arch Linux
Let us see all commands and examples in details.
Please note that vivek@desktop:$ is my shell prompt. You need to type all commands after that prompt.
Arch Linux install htop
It is important that you know how to search for any packages. Therefore type the following command to search for htop package using pacman command:
vivek@desktop:$ sudo pacman -Ss htop
Sample outputs:
- No ads and tracking
- In-depth guides for developers and sysadmins at Opensourceflare✨
- Join my Patreon to support independent content creators and start reading latest guides:
- How to set up Redis sentinel cluster on Ubuntu or Debian Linux
- How To Set Up SSH Keys With YubiKey as two-factor authentication (U2F/FIDO2)
- How to set up Mariadb Galera cluster on Ubuntu or Debian Linux
- A podman tutorial for beginners – part I (run Linux containers without Docker and in daemonless mode)
- How to protect Linux against rogue USB devices using USBGuard
Join Patreon ➔
Find information about htop package
Run the following command:
vivek@desktop:$ sudo pacman -Si htop
Installing htop on Arch Linux
First, make sure you system is up to date:
vivek@desktop:$ sudo pacman -Syu
Finally, run the following to install htop on Arch Linux:
vivek@desktop:$ sudo pacman -S htop
Installing htop on Arch Linux box
How to use htop command
The syntax is:
htop
htop [options] htop [options] arg1 arg2 argN
One can use a monochrome color scheme, run:
vivek@desktop:$ htop -C
vivek@desktop:$ htop —no-color
Want to see the tree view by default when running htop? Try:
vivek@desktop:$ htop -t
vivek@desktop:$ htop —tree
Let us see only processes of a given user named tina:
vivek@desktop:$ htop -u tina
vivek@desktop:$ htop —user=tina
vivek@desktop:$ htop —user=mysql
Limit and show process for only the given PIDs:
vivek@desktop:$ htop -p PID
vivek@desktop:$ htop -p PID1,PID2
vivek@desktop:$ htop —pid=PID,[,PID,PID. ] vivek@desktop:$ htop -p 3754
vivek@desktop:$ htop -p 6876,8618
Arch Linux htop keyboard shortcut keys
The following commands are supported while in htop:
| Command | Description |
|---|---|
| Up arrow key | Select (highlight) the previous process in the process list. Scroll the list if necessary. |
| Down arrow key | Select (highlight) the next process in the process list. Scroll the list if necessary. |
| Left arrow key | Scroll the process list left. |
| Right arrow key | Scroll the process list right. |
| PgUp, PgDn | Scroll the process list up or down one window. |
| Home | Scroll to the top of the process list and select the first process. |
| End | Scroll to the bottom of the process list and select the last process. |
| s | Trace process system calls: if strace(1) is installed, pressing this key will attach it to the currently selected process, presenting a live update of system calls issued by the process. |
| l | Display open files for a process: if lsof(1) is installed, pressing this key will display the list of file descriptors opened by the process. |
Other keyboard shortcuts
| u | Show only processes owned by a specified user. |
| M | Sort by memory usage (top compatibility key). |
| P | Sort by processor usage (top compatibility key). |
| T | Sort by time (top compatibility key). |
| F | “Follow” process: if the sort order causes the currently selected process to move in the list, make the selection bar follow it. This is useful for monitoring a process: this way, you can keep a process always visible on screen. When a movement key is used, “follow” loses effect. |
| K | Hide kernel threads: prevent the threads belonging the kernel to be displayed in the process list. (This is a toggle key.) |
| H | Hide user threads: on systems that represent them differently than ordinary processes (such as recent NPTL-based systems), this can hide threads from userspace processes in the process list. (This is a toggle key.) |
| p | Show full paths to running programs, where applicable. (This is a toggle key.) |
| Ctrl-L | Rfresh the screen. |
| F1 | See this help menu. |
How to get help about htop
Simply pass the —help option. For example:
vivek@desktop:$ htop —help
vivek@desktop:$ man htop
Conclusion
This page showed you how to install and use htop on Arch Linux Unix server. It has many more option. Hence, see the htop home page online or read man page by typing the following man command:
$ man htop
🐧 Get the latest tutorials on Linux, Open Source & DevOps via
Источник


