- Install IntelliJ IDEA
- System requirements
- Install using the Toolbox App
- Install the Toolbox App
- Install the Toolbox App
- Install the Toolbox App
- Standalone installation
- Silent installation on Windows
- Silent configuration file
- Install as a snap package on Linux
- Intellij Idea — Установка и настройка
- Установка на Windows
- Системные Требования
- Загрузка и установка
- Установка в Linux
- Системные Требования
- Загрузка и установка
- Настроить IntelliJ
- Как установить intellij idea windows
Install IntelliJ IDEA
IntelliJ IDEA is a cross-platform IDE that provides consistent experience on the Windows, macOS, and Linux operating systems.
IntelliJ IDEA is available in the following editions:
Community Edition is free and open-source, licensed under Apache 2.0. It provides all the basic features for JVM and Android development.
IntelliJ IDEA Ultimate is commercial, distributed with a 30-day trial period. It provides additional tools and features for web and enterprise development.
For more information, see the comparison matrix.
System requirements
| Requirement | Minimum | Recommended |
|---|---|---|
| RAM | 2 GB of free RAM | 8 GB of total system RAM |
| CPU | Any modern CPU | Multi-core CPU. IntelliJ IDEA supports multithreading for different operations and processes making it faster the more CPU cores it can use. |
| Disk space | 2.5 GB and another 1 GB for caches | SSD drive with at least 5 GB of free space |
| Monitor resolution | 1024×768 | 1920×1080 |
| Operating system | Latest 64-bit version of Windows, macOS, or Linux (for example, Debian, Ubuntu, or RHEL) |
You do not need to install Java to run IntelliJ IDEA because JetBrains Runtime is bundled with the IDE (based on JRE 11). However, to develop Java applications, a standalone JDK is required.
Install using the Toolbox App
The JetBrains Toolbox App is the recommended tool to install JetBrains products. Use it to install and manage different products or several versions of the same product, including Early Access Program (EAP) releases, update and roll back when necessary, and easily remove any tool. The Toolbox App maintains a list of all your projects to quickly open any project in the right IDE and version.
Install the Toolbox App
Download the installer .exe from the Toolbox App web page.
Run the installer and follow the wizard steps.
After you run the Toolbox App, click its icon in the notification area and select which product and version you want to install.

Log in to your JetBrains Account from the Toolbox App and it will automatically activate the available licenses for any IDE that you install.
Install the Toolbox App
Download the disk image .dmg from the Toolbox App web page.
There are separate disk images for Intel and Apple Silicon processors.
Mount the image and drag the JetBrains Toolbox app to the Applications folder.
After you run the Toolbox App, click its icon in the main menu and select which product and version you want to install.

Log in to your JetBrains Account from the Toolbox App and it will automatically activate the available licenses for any IDE that you install.
Install the Toolbox App
Download the tarball .tar.gz from the Toolbox App web page.
Extract the tarball to a directory that supports file execution.
For example, if the downloaded version is 1.17.7391, you can extract it to the recommended /opt directory using the following command:
Execute the jetbrains-toolbox binary from the extracted directory to run the Toolbox App and select which product and version you want to install. After you run the Toolbox App for the first time, it will automatically add the Toolbox App icon to the main menu.

Log in to your JetBrains Account from the Toolbox App and it will automatically activate the available licenses for any IDE that you install.
You can use this shell script that automatically downloads the tarball with the latest version of the Toolbox App, extracts it to the recommended /opt directory, and creates a symbolic link in the /usr/local/bin directory.
Standalone installation
Install IntelliJ IDEA manually to manage the location of every instance and all the configuration files. For example, if you have a policy that requires specific install locations.
Run the installer and follow the wizard steps.
On the Installation Options step, you can configure the following:
Create a desktop shortcut for the launcher relevant to your operating system.
Add the directory with IntelliJ IDEA command-line launchers to the PATH environment variable to be able to run them from any working directory in the Command Prompt.
Add an item Open Folder as Project to the system context menu (when you right-click a folder).
Associate specific file extensions with IntelliJ IDEA to open them with a double-click.
Install the 32-bit version of JetBrains Runtime if you are running a 32-bit Windows version.

To run IntelliJ IDEA, find it in the Windows Start menu or use the desktop shortcut. You can also run the launcher batch script or executable in the installation directory under bin .
Extract the archive to the desired folder.
To run IntelliJ IDEA, use the launcher batch script or executable in the extracted directory under bin .
There are separate disk images for Intel and Apple Silicon processors.
Mount the image and drag the IntelliJ IDEA app to the Applications folder.
Run the IntelliJ IDEA app from the Applications directory, Launchpad, or Spotlight.
Extract the tarball to a directory that supports file execution.
For example, to extract it to the recommended /opt directory, run the following command:
Do not extract the tarball over an existing installation to avoid conflicts. Always extract it to a clean directory.
Execute the idea.sh script from the extracted directory to run IntelliJ IDEA.
To create a desktop entry, do one of the following:
On the Welcome screen, click Configure | Create Desktop Entry
From the main menu, click Tools | Create Desktop Entry
When you run IntelliJ IDEA for the first time, some steps are required to complete the installation, customize your instance, and start working with the IDE.
For information about the location of the default IDE directories with user-specific files, see Default IDE directories.
Silent installation on Windows
Silent installation is performed without any user interface. It can be used by network administrators to install IntelliJ IDEA on a number of machines and avoid interrupting other users.
To perform silent install, run the installer with the following switches:
/S : Enable silent install
/CONFIG : Specify the path to the silent configuration file
/D : Specify the path to the installation directory
This parameter must be the last in the command line and it should not contain any quotes even if the path contains blank spaces.
To check for issues during the installation process, add the /LOG switch with the log file path and name between the /S and /D parameters. The installer will generate the specified log file. For example:
Silent configuration file
You can download the default silent configuration file for IntelliJ IDEA at https://download.jetbrains.com/idea/silent.config
The silent configuration file defines the options for installing IntelliJ IDEA. With the default options, silent installation is performed only for the current user: mode=user . If you want to install IntelliJ IDEA for all users, change the value of the installation mode option to mode=admin and run the installer as an administrator.
The default silent configuration file is unique for each JetBrains product. You can modify it to enable or disable various installation options as necessary.
It is possible to perform silent installation without the configuration file. In this case, omit the /CONFIG switch and run the installer as an administrator. Without the silent configuration file, the installer will ignore all additional options: it will not create desktop shortcuts, add associations, or update the PATH variable. However, it will still create a shortcut in the Start menu under JetBrains .
Install as a snap package on Linux
You can install IntelliJ IDEA as a self-contained snap package. Since snaps update automatically, your IntelliJ IDEA installation will always be up to date.
To use snaps, install and run the snapd service as described in the installation guide.
On Ubuntu 16.04 LTS and later, this service is pre-installed.
IntelliJ IDEA is distributed via two channels:
The stable channel includes only stable versions. To install the latest stable release of IntelliJ IDEA, run the following command:
The —classic option is required because the IntelliJ IDEA snap requires full access to the system, like a traditionally packaged application.
The edge channel includes EAP builds. To install the latest EAP build of IntelliJ IDEA, run the following command:
When the snap is installed, you can launch it by running the intellij-idea-community , intellij-idea-ultimate , or intellij-idea-educational command.
To list all installed snaps, you can run sudo snap list . For information about other snap commands, see the Snapcraft documentation.
Intellij Idea — Установка и настройка
В этой главе мы поймем, как установить и настроить IntelliJ IDEA. Первый шаг процесса начинается с выбора издания. Согласно вашим требованиям, вы можете скачать сообщество или окончательную версию. Как следует из названия, общественная версия абсолютно бесплатна, и мы можем использовать ее также для коммерческой разработки. Тем не менее, окончательная версия является платной версией, и мы можем свободно оценить ее в течение 30 дней.
Установка на Windows
IntelliJ совместим практически со всеми версиями Windows до 2003 года. Полный список будет: Windows 10/8/7 / Vista / 2003 / XP. Перед установкой IntelliJ в Windows рекомендуется закрыть все остальные приложения.
Системные Требования
Для бесперебойной работы рекомендуется минимум 2 ГБ ОЗУ.
Для лучшей визуализации рекомендуется разрешение экрана 1024×768.
Минимум 300 МБ дискового пространства для установки и дополнительные 1 ГБ для кэша.
Для бесперебойной работы рекомендуется минимум 2 ГБ ОЗУ.
Для лучшей визуализации рекомендуется разрешение экрана 1024×768.
Минимум 300 МБ дискового пространства для установки и дополнительные 1 ГБ для кэша.
Загрузка и установка
Загрузка — Вы можете скачать установщик Windows с их официального сайта.
Установка. Давайте начнем с установки, а затем с настройками. Установка IntelliJ аналогична другим программным пакетам. Просто дважды щелкните по установщику и следуйте инструкциям на экране для завершения процесса установки.
Загрузка — Вы можете скачать установщик Windows с их официального сайта.
Установка. Давайте начнем с установки, а затем с настройками. Установка IntelliJ аналогична другим программным пакетам. Просто дважды щелкните по установщику и следуйте инструкциям на экране для завершения процесса установки.
Установка в Linux
Для установки IntelliJ на платформах Linux вы должны заметить, что 32-битный JDK не входит в комплект, поэтому рекомендуется 64-битная система.
Системные Требования
Среда рабочего стола GNOME, KDE или XFCE
Для беспроблемного использования рекомендуется минимум 2 ГБ ОЗУ
300 МБ дискового пространства для установки и добавления 1 ГБ для кэшей
Для лучшей визуализации рекомендуется разрешение экрана 1024×768
Среда рабочего стола GNOME, KDE или XFCE
Для беспроблемного использования рекомендуется минимум 2 ГБ ОЗУ
300 МБ дискового пространства для установки и добавления 1 ГБ для кэшей
Для лучшей визуализации рекомендуется разрешение экрана 1024×768
Загрузка и установка
Загрузка — Вы можете скачать IntelliJ для Linux с их официального сайта.
Установка — Мы скачали пакет tar.gz. Обратите внимание, что в нашем случае имя пакета было ideaIC-2017.2.5.tar.gz. Это может измениться с выпуском / версией. Пожалуйста, используйте соответствующее название пакета.
Загрузка — Вы можете скачать IntelliJ для Linux с их официального сайта.
Установка — Мы скачали пакет tar.gz. Обратите внимание, что в нашем случае имя пакета было ideaIC-2017.2.5.tar.gz. Это может измениться с выпуском / версией. Пожалуйста, используйте соответствующее название пакета.
Настроить IntelliJ
Шаги настройки одинаковы на обеих платформах. Чтобы начать настройку, запустите приложение IntelliJ. При желании вы можете импортировать существующую конфигурацию из этого мастера. Нажмите на следующую кнопку, чтобы продолжить.
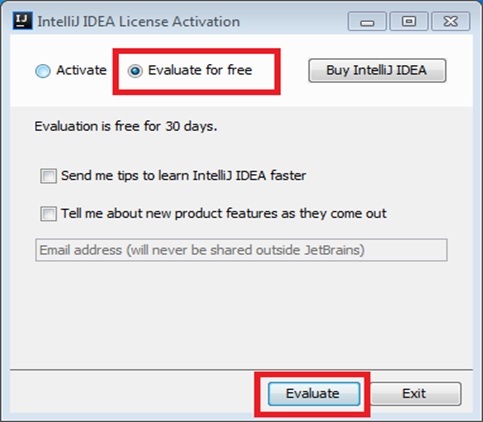
Шаг 1 — Если вы используете окончательную версию, появится окно активации лицензии. Выберите параметр «Оценить бесплатно» и нажмите кнопку «Оценить», как показано на следующем рисунке.
Шаг 2. Примите лицензионное соглашение для продолжения и следуйте инструкциям на экране, чтобы запустить IntelliJ. Вы увидите экран приветствия IntelliJ.
Шаг 3. Теперь пришло время сконфигурировать Java Development Kit (в дальнейшем мы будем называть его JDK) с IntelliJ. Если JDK еще не установлен, следуйте инструкциям, приведенным здесь .
На экране приветствия нажмите «настроить»
Выберите «Проект по умолчанию» из выпадающего списка
Выберите опцию «структура проекта»
Выберите опцию «SDK» в меню «Настройки платформы».
Нажмите на значок «плюс» и выберите опцию «JDK».
Выберите домашний каталог JDK и следуйте инструкциям на экране.
Как установить intellij idea windows
Установка IntelliJ IDEA в Windows
В статье рассказывается, как установить IntelliJ IDEA.
Вначале необходимо установить JDK. Всё просто, но если есть вопросы, то подробно можно узнать в статье: Установка JDK в Windows.
Скачивание IntelliJ IDEA
Скачиваем там последнюю версию IntelliJ IDEA:

Выбираем именно Community версию:

Установка IntelliJ IDEA
Установка простая. Запускаем скаченный EXE файл:


Если у вас 32-битная операционная система, то и выбираем 32-битные компоненты:


Программа установилась. Запускаем её, не забыв перезагрузить компьютер.
Первоначальная настройка IntelliJ IDEA
При первом запуске спросит про импорт настроек с прежних установок данной программы. Если таковых не было, то говорите, что не хотите:

Выбираем тему редактора. Мне нравится светлая тема. А также плагины выбираем по умолчанию:

Создание нового приложения

Если вы у себя видите на месте SDK фразу No SDK в отличии от скриншота внизу, то нужно вначале будет выбрать SDK, которым будем компилировать приложения, через кнопку New. :

У меня JDK находится в папке C:\Program Files\Java\jdk-12.0.1 . Выбираем это месторасположение (у вас может быть другое), если JDK не определяется автоматически.
Говорим, что хотим создать приложение уже с готовым шаблоном (будет присутствовать метод Main ):

Выбираем название проекта, папку для размещения проекта (по своему усмотрению):

Возможно, что вас спросят создать новую папку под проект. Соглашайтесь:

Всё. Создался проект консольного приложения Java. Если наверху справа появится желтая надпись Attach annotations , как на скриншоте внизу, то щелкните по ней:

В методе main пропишем простейшую команду:


В консоли отобразился результат выполнения программы:

Настройки, описанные в данном разделе, опциональны, и можно их вообще не трогать.
Переходим в настройки приложения:

В разделе General я ставлю возможность увеличения шрифта колесиком мыши при нажатом Ctrl , а также устанавливаю правило, что при сохранении файла все лишние пробелы справа у всех строк будут удаляться:

В статье Сложение двух чисел в IntelliJ IDEA на Java (консольное приложение) вы можете посмотреть пример того, как сложить два числа.


